Kulinary Adventures of Kath

Food Photography, Recipes & Baking
  • home
  • About
  • Work with Kath
  • Shop
  • Blog
    • The Blog
    • Recipe Archive
  • Newsletter
  • Contact
  • home
  • About
  • Work with Kath
  • Shop
    • The Blog
    • Recipe Archive
  • Newsletter
  • Contact
Raspberry Pistachio Rose Cake (23 of 25).jpg

The Blog

Recipes and Food Photography by Kath Vincent.

  • The Blog
  • Recipe Archive
  • All
  • Biscuits/Cookies
  • Breads Etc.
  • Breakfast
  • Cakes & Slices
  • Confectionary
  • Drinks
  • Events
  • Food Photography Tips
  • From The Mailing List
  • Heirloom Recipes
  • Holidays
  • Ice Cream
  • Jams Preserves & Spreads
  • Muffins
  • Off the Shelf
  • Other Desserts
  • Savoury Dishes/Meals
  • Scones
  • Tarts & Pastry
  • Travel
Quince Almond Cookies

Dried Quince & Almond Butter Biscuits

Kath May 16, 2019

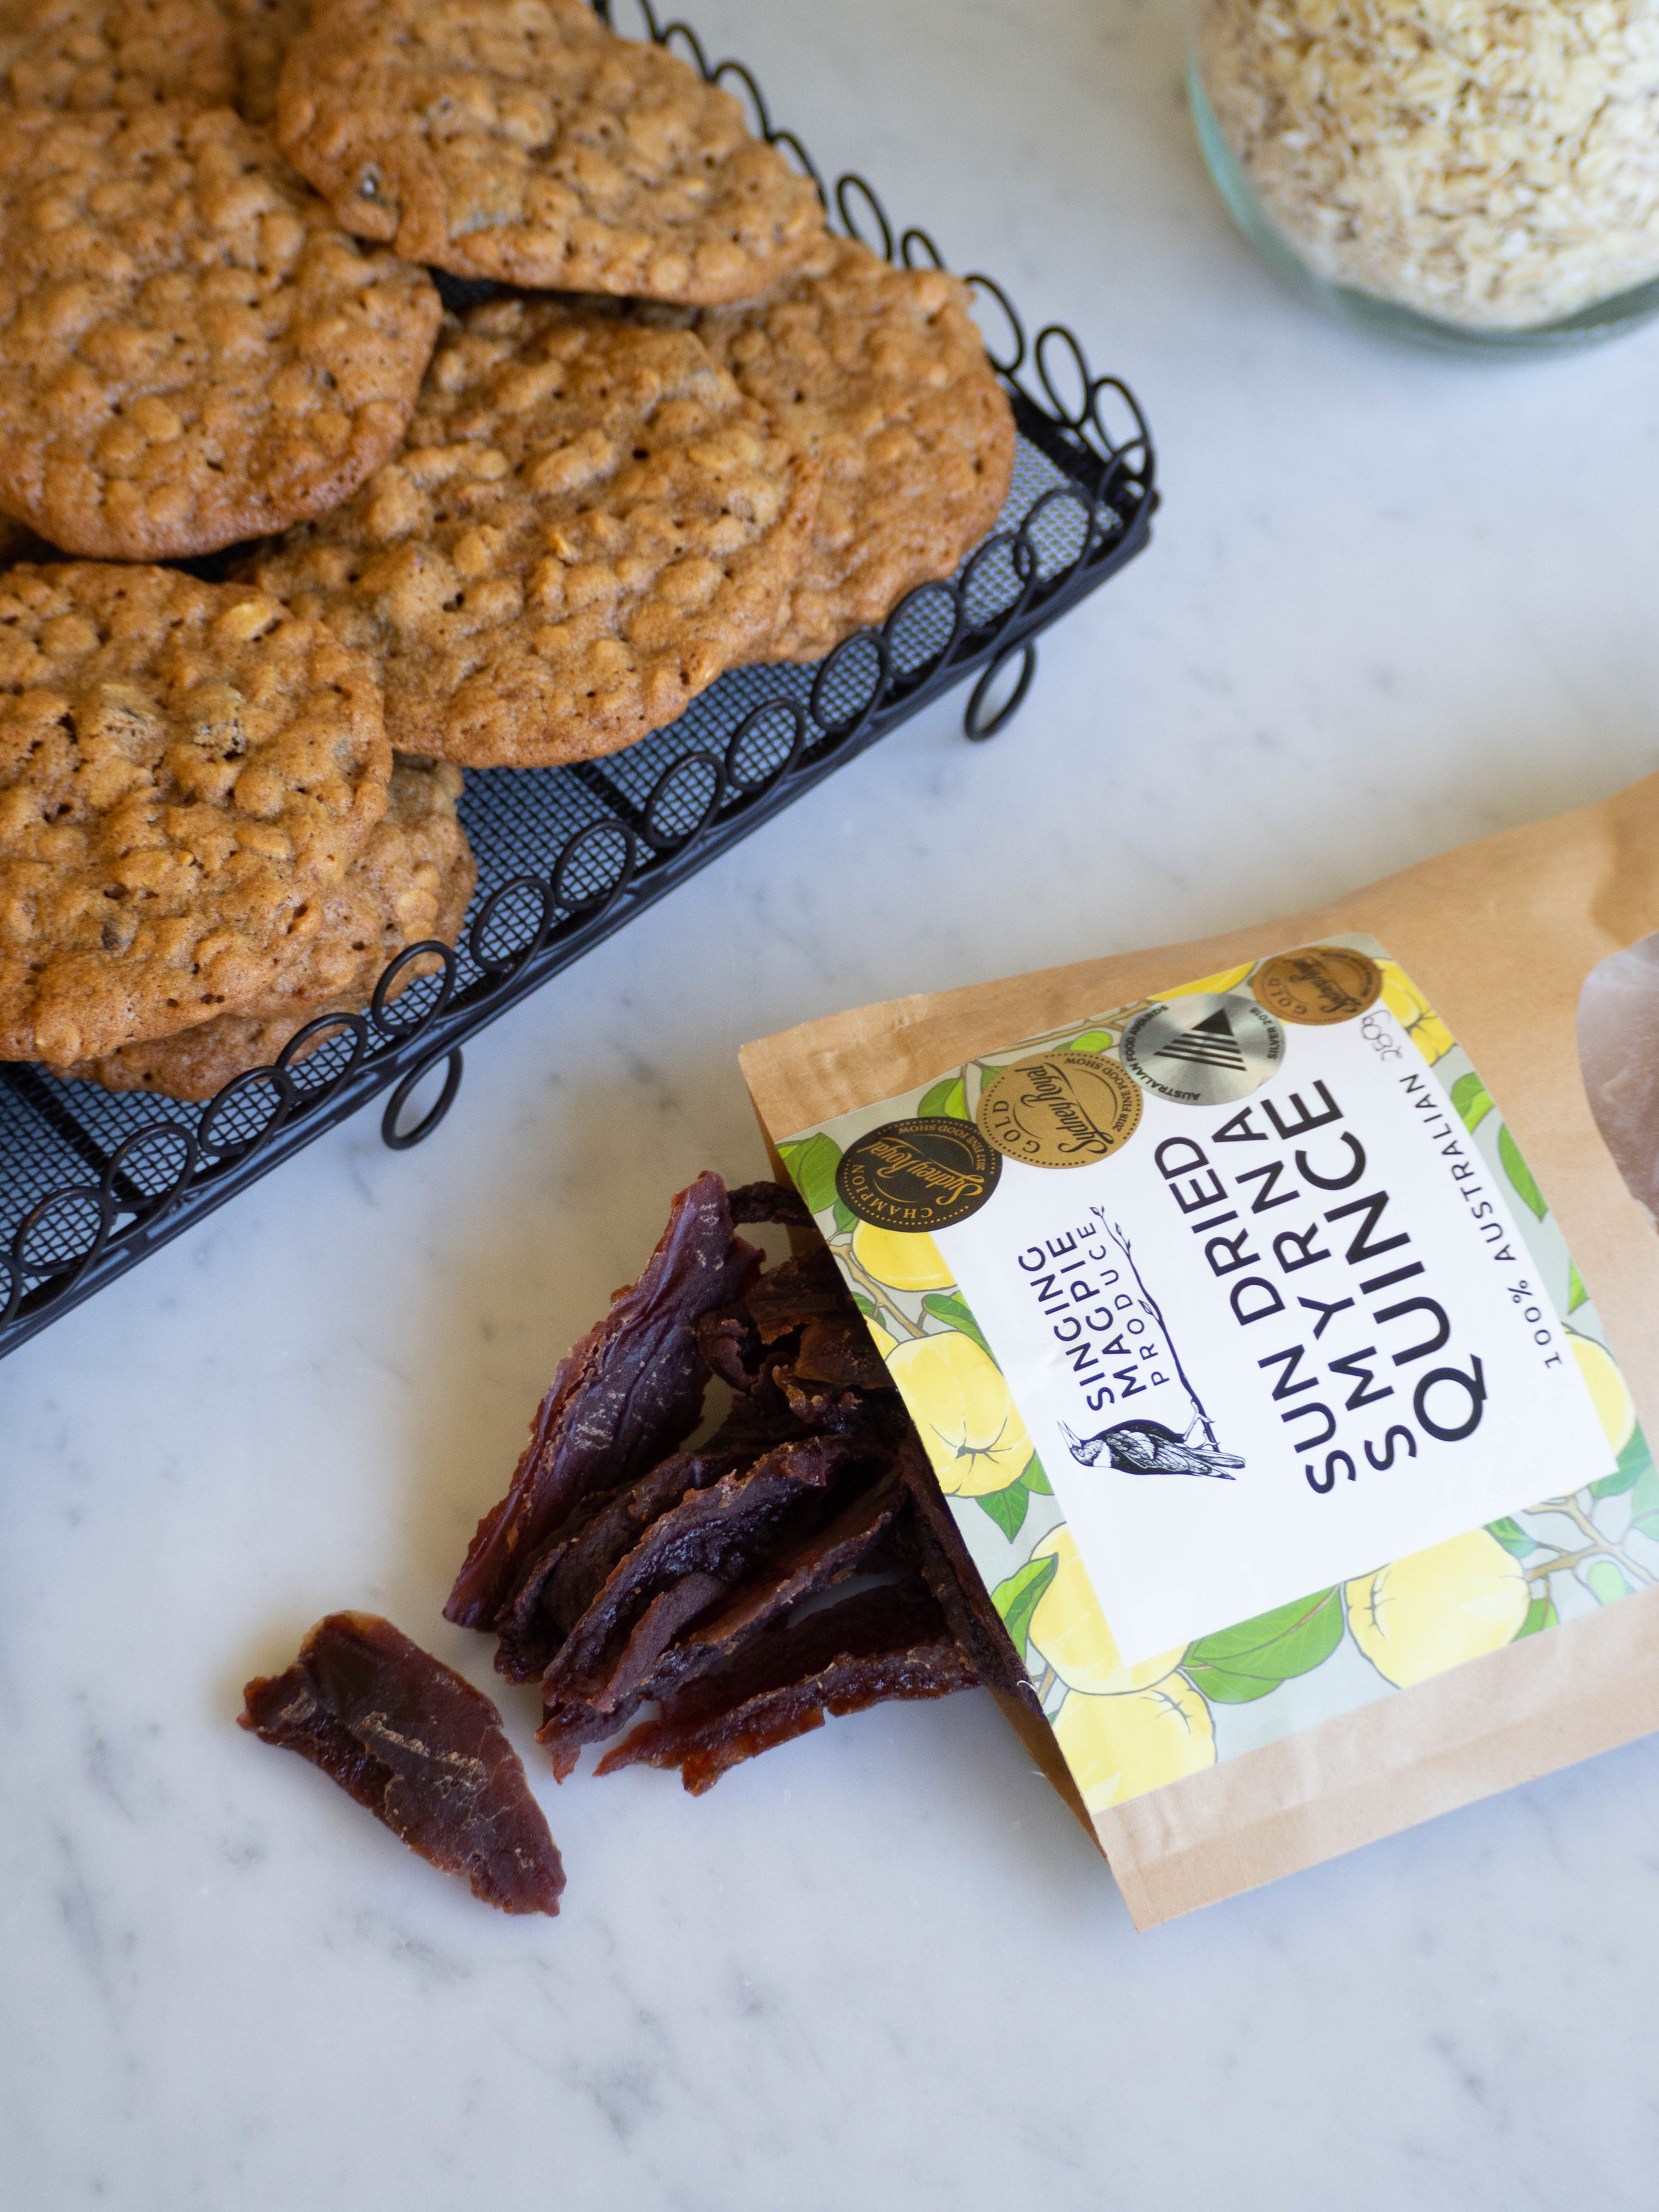
These biscuits showcase a couple of things I really love at the moment - almond butter and dried quince. I am actually having a thing will all nut butters at the moment, especially pistachio, but finding a recipe that used it in a biscuit was super exciting. My moment with dried quince has been quite long standing, after meeting Sue of Singing Magpie Produce last year. When I saw this particular recipe I knew I needed to try it with Singing Magpie Produce’s Dried Quince. 

The recipe originally comes from Georgina Hayden’s first book ‘Stirring Slowly.’ I have followed Georgina on Instagram for a while, but up until recently didn’t have any of her books. To be honest I haven’t really come across them in bookshops here in Sydney. But after seeing a bit of the behind the scenes of Georgina making her second book ‘Taverna’ on Instagram, I knew I needed to get her books, ASAP. I pre-ordered ‘Taverna’ online, and in the meantime bought ‘Stirring Slowly’ online too.

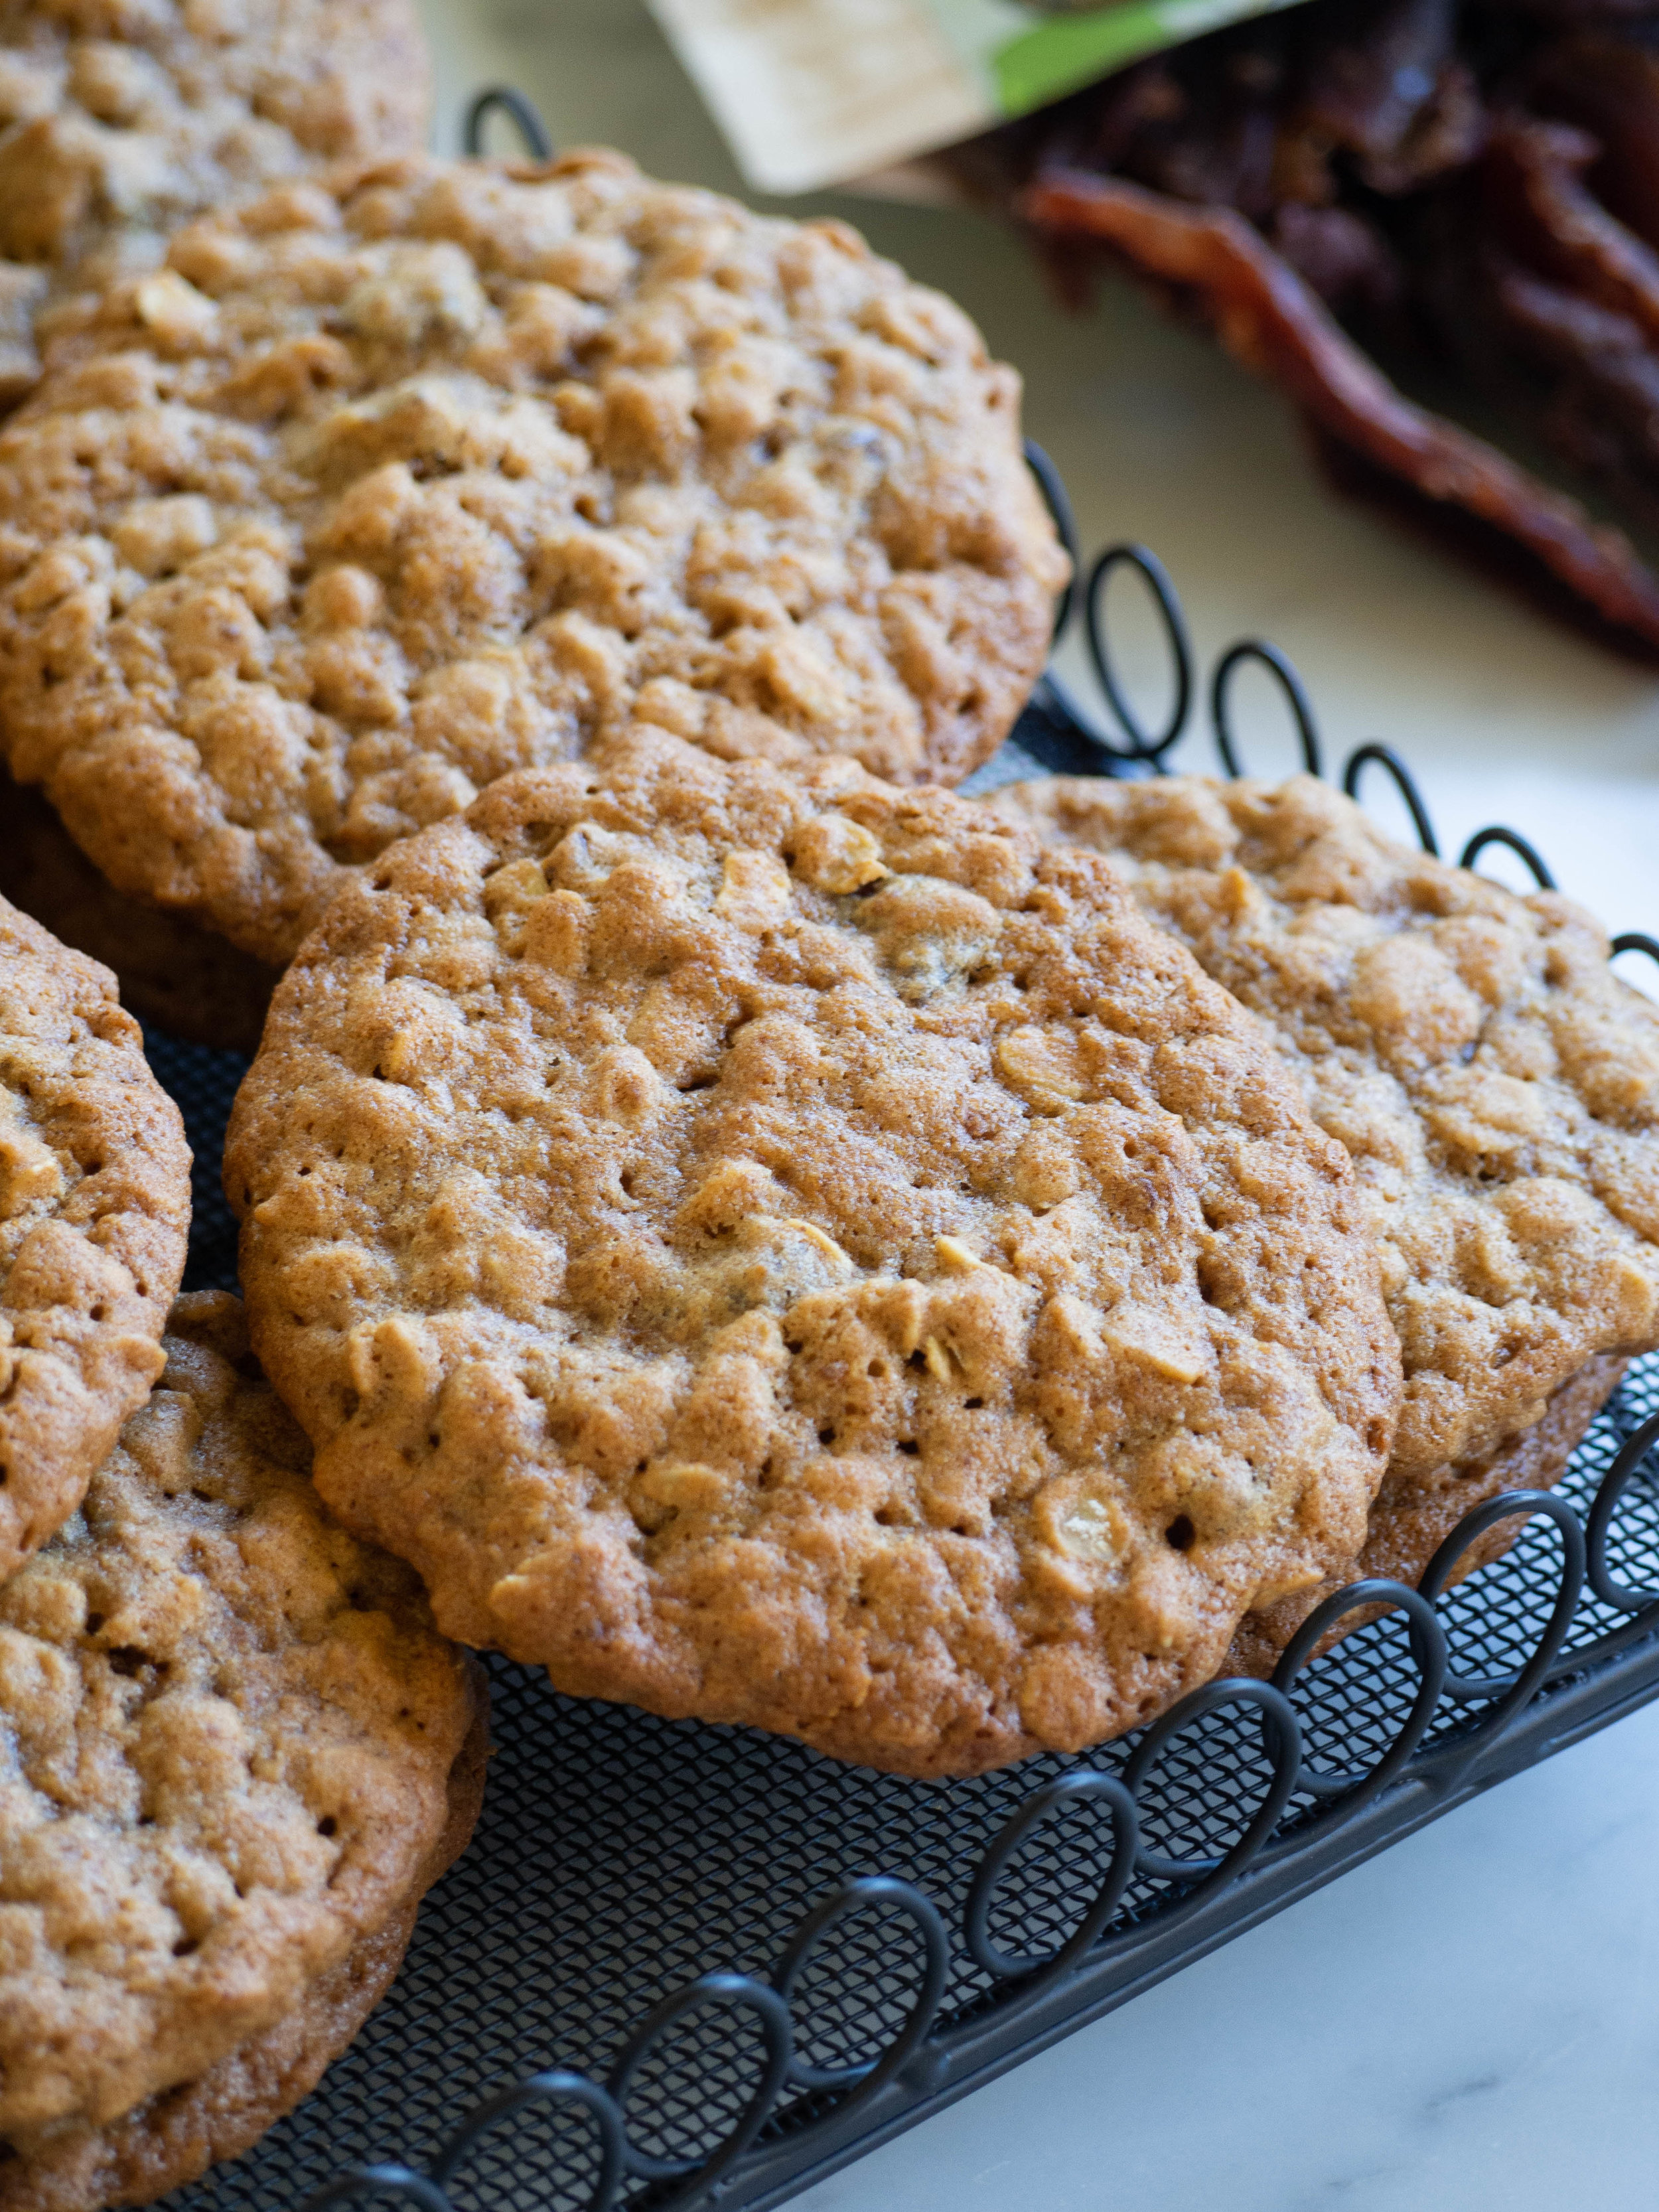
Both books are utterly delightful and jam packed filled with recipes I want to make. The recipe for Almond, Oat and Raisin Cookies jumped out at me instantly when I first looked at ‘Stirring Slowly’, which is the recipe these biscuits are based on. The recipe reminded me of the Oatmeal Biscuits my Grandma used to make, but with the addition on almond butter and raisins. 

Always being on the lookout for a new way to use dried quince, I decided to make these with my dried quince from Singing Magpie Produce, rather than raisins. I really like the addition of the dried quince, you could even add more if it to the biscuits when baking for a bigger quince hit. Many other dried fruits would work if you don’t have any dried quince, and other nut butters would work well too. Though if you can get some dried quince, I highly recommend it. It’s so good I often find myself eating it straight from the packet before I have a chance to make anything with it, it’s that good.

Quince and Almond Biscuits
Dried Quince from Singing Magpie Produce

Dried Quince & Almond Butter Cookies

Ingredients: 

175g rolled oats (not instant)

150g plain flour 

1 tsp ground cinnamon 

1 tsp baking powder

125g softened unsalted butter or margarine

75g almond butter 

1tsp vanilla bean paste

125g Panela sugar

200g brown sugar

2 eggs (large)

100g roughly chopped dried quince (I buy mine from Singing Magpie Produce) 

Method: 

Preheat oven to 180 degrees Celsius and line two large baking trays with baking paper. 

In a medium bowl mix the oats, flour, cinnamon and baking powder together and set aside.

In the bowl of a stand mixer beat the butter, almond butter and vanilla bean paste together until smooth. Add the sugars and mix until pale and creamy. Beat in the eggs one at a time, and mix until combined. 

Fold in the flour, either with a wooden spoon or mix briefly on the lowest speed of your stand mixer. Add the chopped dried quince and gently mix to evenly distribute. 

Spoon heaped teasponfuls of the mixture on to the prepared trays, leaving gaps between each as they will spread a fair bit during baking. 

Bake for 10-12 minutes, or until the biscuits are turning golden but are still soft in the middle. Biscuits can be left on the baking trays to cool.

Quince and Almond Cookies

Reference: ‘Stirring Slowly’ by Georgina Hayden (Square Peg, 2016) p.196. 

Quince and Almond Biscuits
In Biscuits/Cookies Tags Quince, Almond, Almond Butter, Dried Quince, Singing Magpie Produce
Comment

How to Make a Blood Orange Cake (Dairy Free)

Kath September 27, 2015

Believe it or not, until recently I had never tried blood oranges before. I now know what I have been missing, and will be eagerly anticipating buying them when they are next in season. 

The first lot I bought were from the Pyrmont Growers Markets. The flesh was a deep purple and they were clearly at their prime. I have since bought more and each time I buy them their colour is lighter and lighter, more a pink-ish hue than the deep purple of the first ones. Their flavour is still great, and I have frozen a fair bit of the juice. I saw a recipe for a blood orange, peach and mango granita in Katie Quinn Davies first book, and will be making it as soon as Australian peaches are in season! 

The idea for this cake came to me after the first thing I baked with the first lot of blood oranges I bought didn’t work out so well. I found the recipe online and it combined the flavours of blood orange and coconut, and they just went together so well. Unfortunately the addition of blood orange juice in the recipe, just made the cakes very wet, soggy and unstable and they just fell apart. 

I then thought about trying another cake with these same flavours, and remembered a lime and coconut cake I made a little while ago (recipe here) that I thought I could adapt to suit the blood oranges. Luckily, this time it worked! While only using the zest in the cake reduces the punchy blood orange flavour a little, the blood orange icing mostly makes up for that (and the cake doesn’t fall apart!). 

I used some coconut blossom sugar in the recipe, just to try it and add to the coconut flavour of the cake, but it can be substituted for caster sugar. Also, if blood oranges aren’t available regular oranges could be used. 

This cake could also easily be made gluten free - try substituting the self raising flour for gluten free flour and baking powder. The quantity of flour in the cake is quite small, so as long as you don’t knock the air out of the egg whites when folding them into the batter, you should still get the same result.

I used a lot of spring blooms when I styled the photos for this cake, and I really like the look they gave. The weekend I made this cake, I went looking around the garden for some flowers to use, and when I saw the weeping cherries we have, I just h…

I used a lot of spring blooms when I styled the photos for this cake, and I really like the look they gave. The weekend I made this cake, I went looking around the garden for some flowers to use, and when I saw the weeping cherries we have, I just had to use them. They had burst into bloom since I had last noticed them and were buzzing with lots of bees.

Blood Orange Cake (Dairy Free)

Ingredients: 

200g almond meal

135g caster sugar

30g coconut blossom sugar

40g self raising flour 

6 large eggs, separated 

45g desiccated coconut 

zest of one small/medium blood orange 


Ingredients for the Icing: 

2 cups icing sugar 

juice from 1/2 to one blood orange 

50g coconut chips 


Method: 

Pre heat oven to 180 degrees Celsius and grease and line the base of a 23cm spring form cake tin. 

Beat the egg yolks and sugars in a bowl for about 3 minutes, or until they are pale and fluffy. Fold in the zest, coconut, flour and almond meal. 

In a separate bowl, whip the egg whites until stiff peaks form. Using a large metal spoon, gently fold the egg whites into the almond mixture, a third at a time. 

Pour the batter into the prepared tin and bake for 40 minutes, or until lightly golden and cooked through. 

Allow the cake to cool in the tin for 5 minutes, then transfer to a wire rack to cool completely. 

While the cake is cooling, toast the coconut chips in the oven for 2-3 minutes. Keep an eye on them as they will toast very quickly. 

To make the icing, sift the icing sugar into a bowl. Juice the blood orange, and pass the juice through a sieve to remove the pulp. Gradually add the juice (not necessarily all of it), until you have a smooth icing. Spread over the cooled cake and use the toasted coconut to decorate. 

Reference: ‘Bills Open Kitchen’ by Bill Granger (Murdoch Books, 2003), p.91.

In Cakes & Slices Tags Blood Orange, Cake, Coconut, Almond, Spring, Flowers, Cherry Blossoms, Dairy Free
Comment

Raspberry, Almond & Vanilla Layer Cake (Gluten Free)

Kath September 16, 2015

There is a bit of a story behind this cake. I have been wanting to make something like this for a while, pretty much since I first tried the ‘Old Fashioned Vanilla Cake’ from Flour & Stone. While the ingredients are simple, the end result is definitely the best cake you can buy in Sydney. My version, while highly inspired by the cake at Flour & Stone, ends up being a bit different, but equally as delicious. 

It also ends up being gluten free as I opted to use a almond based cake for this recipe. I didn’t choose the almond cake deliberately for its gluten free qualities, I just wanted something that in some way resembled the cake at Flour & Stone, which is denser than a traditional sponge cake, yet still very light and fluffy.

Goodies from Flour & Stone, including the 'Old Fashioned Vanilla Cake'.

Goodies from Flour & Stone, including the 'Old Fashioned Vanilla Cake'.

The 'Old Fashioned Vanilla Cake'.

The 'Old Fashioned Vanilla Cake'.

My cake, inspired by the 'Old Fashioned Vanilla Cake' from Flour & Stone.

My cake, inspired by the 'Old Fashioned Vanilla Cake' from Flour & Stone.

The cake recipe has been adapted from ‘Gran’s almond cake’ in Sophie Hansen’s book ‘Local is Lovely’. This book never ceases to provide culinary inspiration and great recipes.

The filling for this cake, while still being influenced by the ‘Old Fashioned Vanilla Cake’ which has a mascarpone element to its filling, is also inspired by my desire to use some of Pepe Saya’s great products. I visited the Pyrmont Grower’s Market earlier this month and came home with Pepe Saya’s mascarpone and buttermilk. I bought the mascarpone knowing I wanted to try make this cake, and I felt that such good quality products could only be used in something as special as a cake. The buttermilk was used to make a double batch of these muffins, which we are still eating as they freeze so well, and a double batch of these pancakes. The pancakes worked so well with the Pepe Saya buttermilk, I’m not sure I want to make them again unless I have it! 

The recipe for the filling ended up being an amalgamation of this recipe from Delia Online and this recipe from Fool Proof Living. The second recipe has some good tips about whipping mascarpone, as apparently if the mascarpone and cream you are whipping are different temperatures the mascarpone will split. Most places I looked advised using both products at room temperature, however I used both chilled from the fridge and it worked well. 

As a little side note, I did add some toasted coconut chips to the layers of the cake, mostly because I had some leftover from breakfast that morning. I didn't add it to the recipe as I didn't think it significantly added anything to the cake as a whole, however they are visible in some of the photos of the cake.

Raspberry, Almond & Vanilla Layer Cake (Gluten Free)

Ingredients: 

290g almond meal 

315g golden caster sugar

6 eggs, separated

2 tsp vanilla bean paste

1 tsp baking powder


Ingredients for the Mascarpone & Raspberry Cream 

200g mascarpone 

150ml thickened cream

1 tsp vanilla extract

35g icing (confectioners) sugar, plus extra for dusting

250g fresh raspberries


Method: 

Preheat oven to 200 degrees Celsius, and grease and line the base of two 18 cm round loose bottomed cake tins (spring form cake tins will work well too). 

In the bowl of an electric mixer, beat the egg yolks and sugar until they are pale and creamy. Add the vanilla bean paste and beat to combine. 

Sift in the almond meal and baking powder, and gently mix to combine. 

In a separate bowl, whisk the egg whites until stiff peaks form. 

Using a large metal spoon, gently fold the egg whites into the almond meal mixture, a quarter at a time. 

Divide the mixture evenly between the two prepared cake tins. Turn the oven temperature down to 180 degrees Celsius. Bake the cakes for 30 minutes, or until golden and a skewer inserted into the middle of each cake comes out clean. 

Once cooked, cool the cakes in their tins for 5 minutes, then turn out onto a wire rack to cool completely (leaving the baking paper lining on the cakes as they may stick to the racks). 

Once the cakes have cooled completely, make the mascarpone and raspberry cream. 

Place the mascarpone in a medium bowl and whip until it has thickened and soft peaks form. Gradually add the cream, extract and sifted icing sugar a third at a time, and continue to whip until all ingredients have combined and the cream has thickened and stiff peaks form.

Leave a quarter of the raspberries aside for decoration, and squash the remainder with a fork. Gently fold the squashed raspberries into the mascarpone cream. 

Remove the baking paper from the cakes and cut each of the cakes in half (horizontally). Place the base of one cake on a serving plate or cake stand and cover with a third of the mascarpone cream. Top with the top half of the cake, then another third of the cream, then top with the base of the second cake, the remaining cream and finish with the remaining cake half. 

Decorate with the remaining raspberries and dust with icing sugar. 


This cake is best served on the day it is assembled, but will keep in the fridge for a few days. 

Reference: ‘Local is Lovely’ by Sophie Hansen (Hachette Australia, 2014), p.233.

In Cakes & Slices Tags Raspberry, Almond, Vanilla, Layer Cake, Cake, Flour & Stone, Local is Lovely, Spring, Flowers, Pepe Saya, Gluten Free
8 Comments

recipes

  • Biscuits/Cookies 39
  • Breads Etc. 9
  • Breakfast 7
  • Cakes & Slices 67
  • Confectionary 5
  • Drinks 6
  • Events 14
  • Food Photography Tips 3
  • From The Mailing List 24
  • Heirloom Recipes 12
  • Holidays 44
  • Ice Cream 9
  • Jams Preserves & Spreads 9
  • Muffins 4
  • Off the Shelf 47
  • Other Desserts 25
  • Savoury Dishes/Meals 15
  • Scones 4
  • Tarts & Pastry 9
  • Travel 13

Sign up to Friday Food Chat with Kath, a weekly newsletter for more food, baking, cookbook chat and more!

Sign Up Here!
instagram-unauth pinterest facebook url

Website Accessibility: To enable text to speech function on the blog, click the sound button to the right of each blog post.

All images & content are the property of Kathryn Vincent, unless stated otherwise. Please do not use without permission.

Kulinary Adventures of Kath

Food Photography, Recipes & Baking

instagram-unauth pinterest facebook url