Kulinary Adventures of Kath

Food Photography, Recipes & Baking
  • home
  • About
  • Work with Kath
  • Shop
  • Blog
    • The Blog
    • Recipe Archive
  • Newsletter
  • Contact
  • home
  • About
  • Work with Kath
  • Shop
    • The Blog
    • Recipe Archive
  • Newsletter
  • Contact
Raspberry Pistachio Rose Cake (23 of 25).jpg

The Blog

Recipes and Food Photography by Kath Vincent.

  • The Blog
  • Recipe Archive
  • All
  • Biscuits/Cookies
  • Breads Etc.
  • Breakfast
  • Cakes & Slices
  • Confectionary
  • Drinks
  • Events
  • Food Photography Tips
  • From The Mailing List
  • Heirloom Recipes
  • Holidays
  • Ice Cream
  • Jams Preserves & Spreads
  • Muffins
  • Off the Shelf
  • Other Desserts
  • Savoury Dishes/Meals
  • Scones
  • Tarts & Pastry
  • Travel
Berry Almond Slice with Homemade Triple Berry Jam

Berry Almond Slice with Homemade Triple Berry Jam

Berry Almond Slice + How to Make Homemade Triple Berry Jam

Kath June 6, 2016

This is the first time I have used homemade jam in this slice, and I am pleased to say it is well worth the effort. I have made this slice numerous times in the past, usually using a raspberry jam, mostly one by Bonne Maman. It was always nice, and always something that I was asked to make often. 

Once I decided I was going to make my own jam however, I knew I needed to try some with this slice recipe. I was quite amazed at how much better the flavours were and I don’t think I will be going to back to using bought jam anytime soon. 

If you are worried about making jam, I urge you to give this a go. Its not difficult you just need to be organised and have everything prepared and ready. Make sure you read through the recipe before you begin, and work out how you want to co-ordinate sterilising the jam jars and getting the jam started. I have also added a few extra jam making tips at the end of the recipe which should help. Fresh or frozen berries can be used for the jam, and you can alter the quantities or types of berries used. Just make sure the total quantity adds up to 1 kg. 

I used fresh berries that I had frozen myself for this recipe. When I see berries in season and at a good price, I always buy them and freeze them immediately. I use tupperware containers to store them in the freezer, and try to keep the most recent purchases at the bottom to ensure I use them after the ones I bought less recently. It is often a good idea to label and date these things, I just often forget or can’t be bothered. I bake with berries so often that they don’t tend to stay in the freezer very long. I find they cook much better than the bought frozen berries, as they hold their shape and don’t bleed so much (which is good when making cakes and muffins etc). 

I am very much looking forward to making this jam again. I found it so satisfying that my homemade jam tasted better than the bought stuff, and it was really nice to give as gifts as well. The slice recipe would lend itself to be paired with lots of different types of jams - I’m thinking cherry, or quince for next time. 

Homemade Triple Berry Jam

Homemade Triple Berry Jam

Berry Almond Slice with Homemade Triple Berry Jam
Almond Topping

Almond Topping

Berry Almond Slice with Homemade Triple Berry Jam

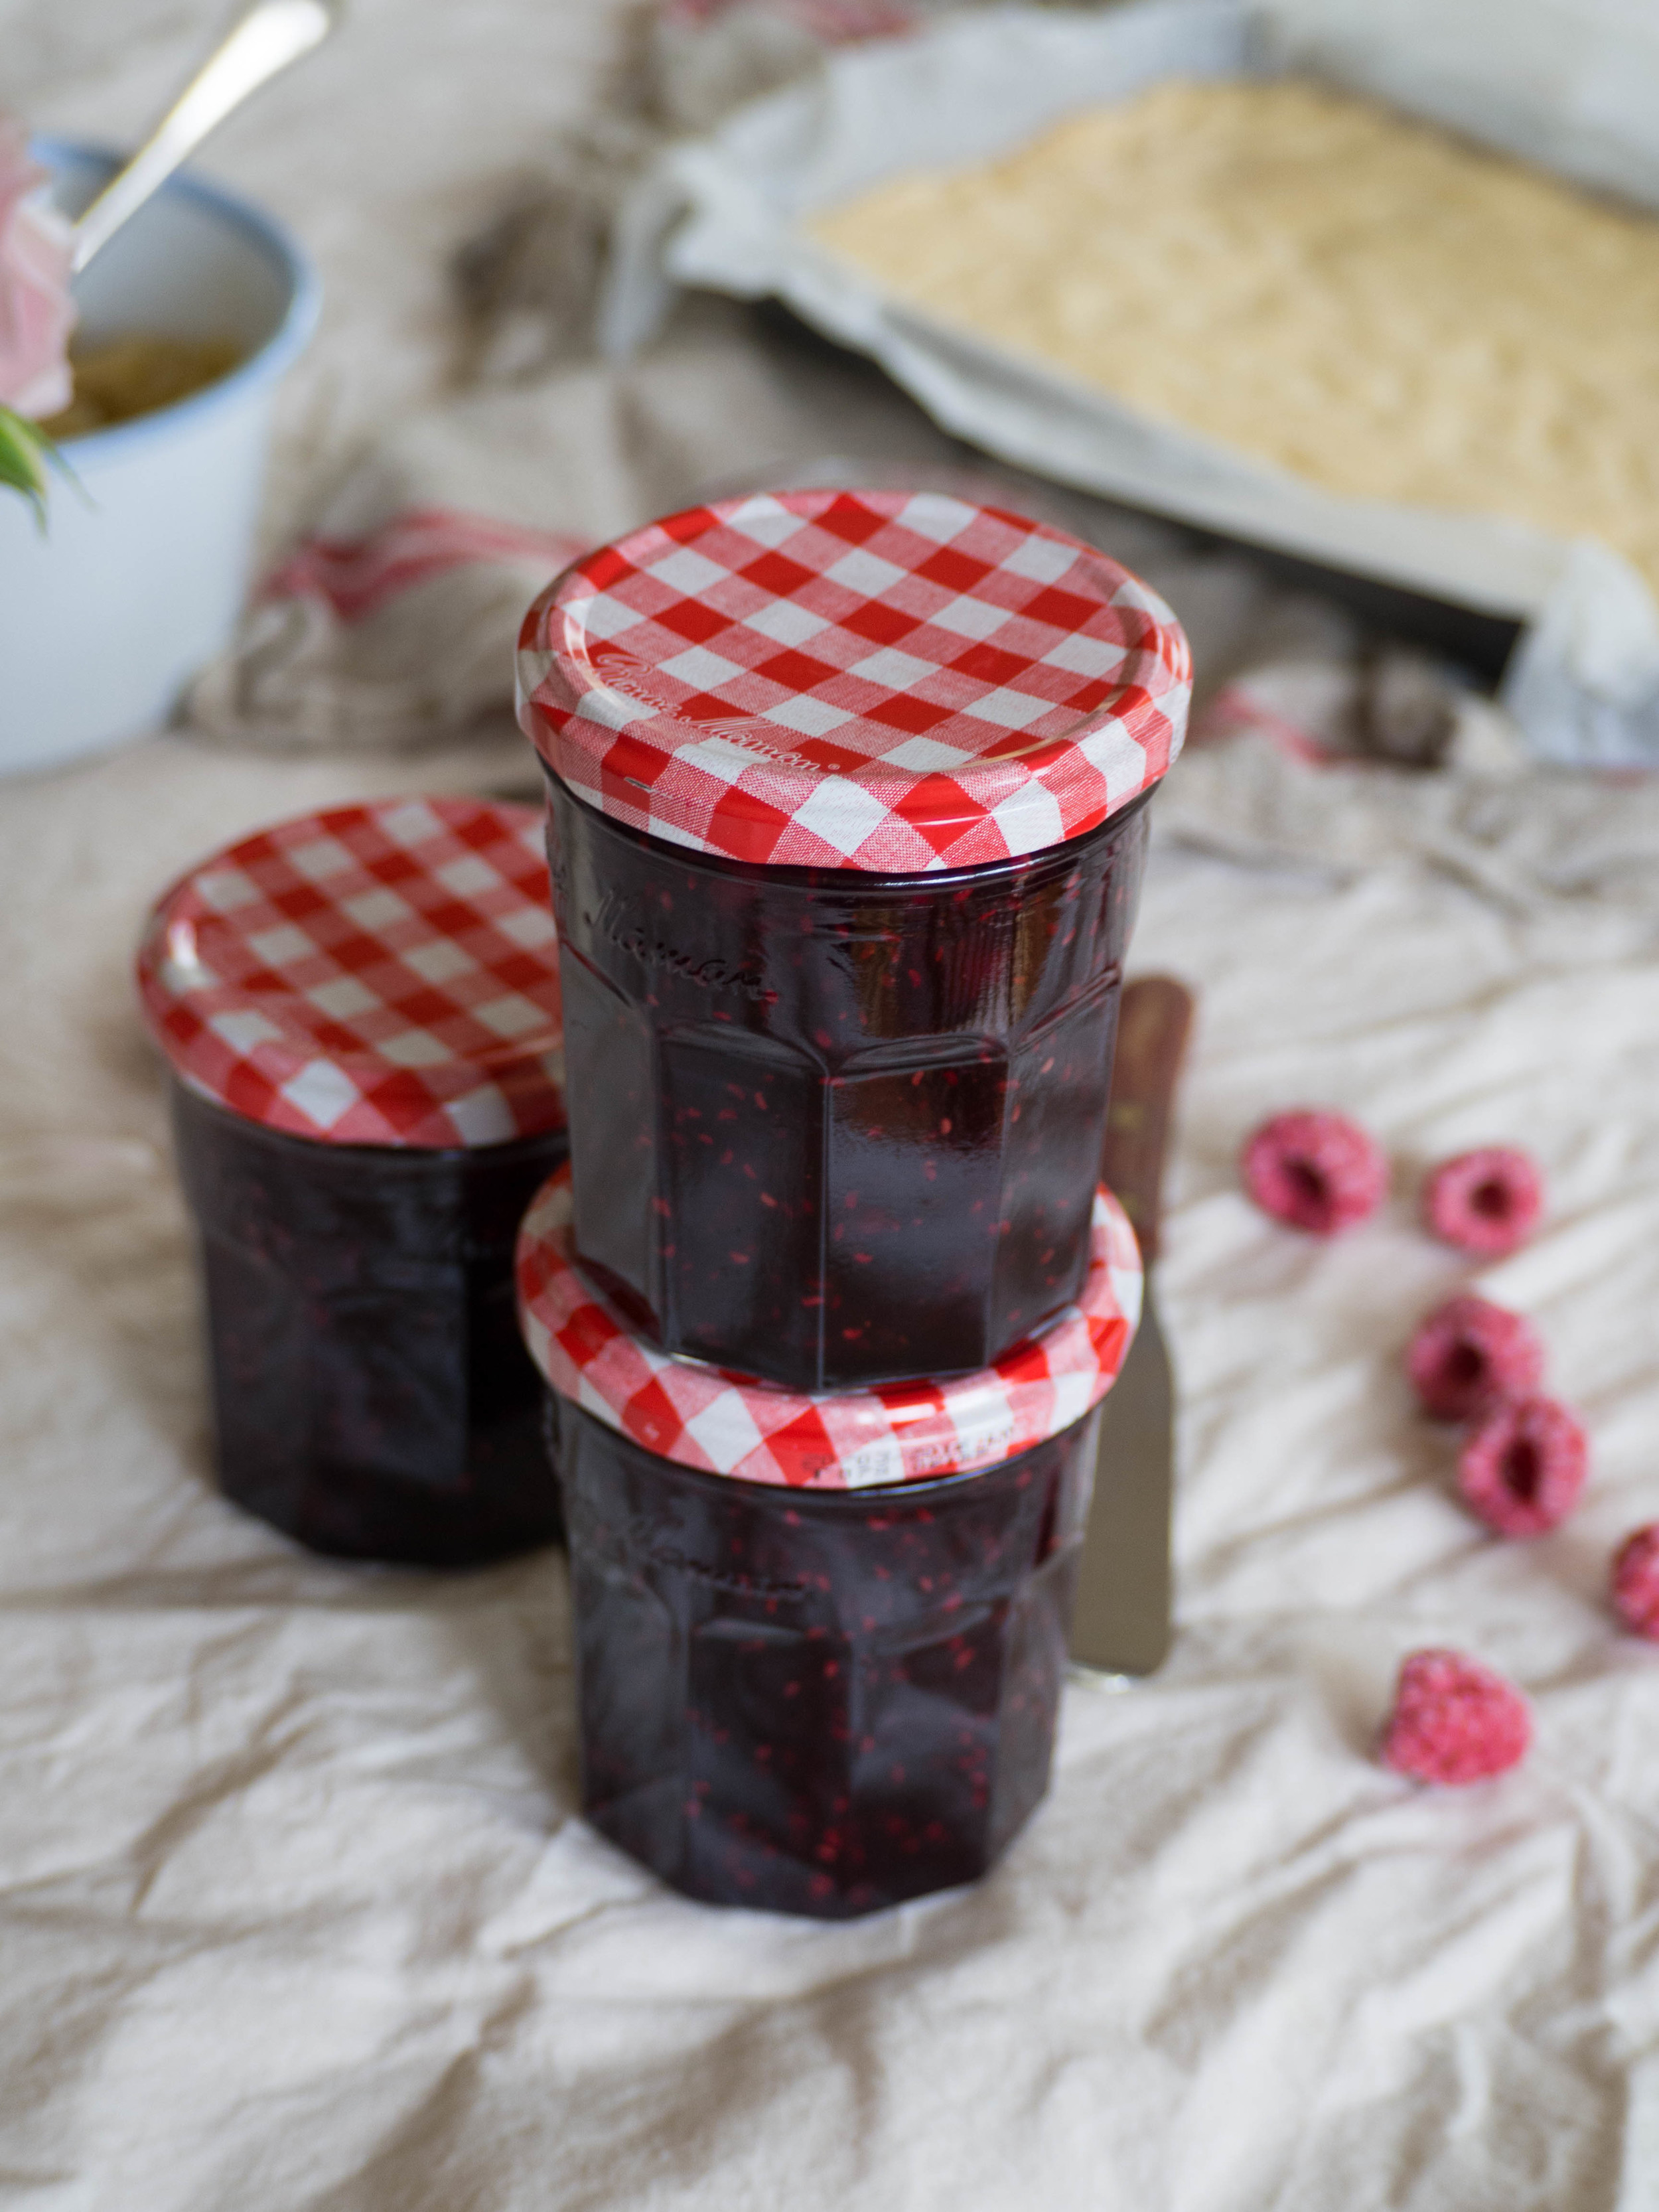
Homemade Triple Berry Jam

 If making the homemade jam for the almond slice, make the jam at least one day ahead. 

Ingredients: 

700 g raspberries

175 g blueberries

125 g blackberries

80 ml lemon juice, plus extra 

880 g white sugar 


Method: 

Begin by placing two or three small plates in the freezer. You will need these later to test if the jam is jelling and ready to bottle. 

Then, sterilise at least four 370g capacity jars (I used old Bonne Maman jam jars). There are a few different methods to sterilise jars for preserving, however I prefer to pre-heat the oven to 100-120 degrees Celsius, wash the jars and lids in hot soapy water, then place the jars upside down on an oven shelf. Allow the lids to air dry. Leave the jars in the oven for at least 20 minutes. 

Whilst the jam jars are being sterilised, start making the jam. Using a large heavy based saucepan (preferably enamel, stainless steel or aluminium), mix all the ingredients together and place on the stove over high heat without boiling, until the sugar dissolves, then bring to the boil. Reduce the heat and allow the jam mixture to simmer uncovered for 20 minutes without stirring. The jam mixture should have reduced by the 20 minute mark and will also appear to have thickened. If necessary stir the jam a little ensure it is cooking evenly. 

After 20 minutes test the jam to see if it has reached jelling point. To test the jelling point of the jam, use one of the chilled plates and drop a small amount of the jam onto it. Leave for a couple of minutes, then push your finger through the jam. If a skin has formed over the jam and you can now see it wrinkling, the jam is ready. If it is not ready, leave to cook for a few more minutes and/or add some extra lemon juice. Then use the remaining chilled plates to test if the jam has jelled.

Once the jam has reached jelling point, remove the sterilised jars from the oven and place onto a wooden board. Using a wide mouthed funnel or jam funnel, pour the hot jam into the hot sterilised jars. Fill right to the top and seal immediately. Leave to cool, and store in a cool dark place. This jam should last about 1 year stored correctly and unopened. Once opened keep in the fridge. 

Berry Almond Slice with Homemade Triple Berry Jam

Jam Tips

  • I often sterilise one extra jar just in case I need it, even if its a slightly smaller jar, just in case the recipe makes more jam than I expect.

  • Make sure the jars are filled right to the top with jam. If you do not they may not store as well and could develop mould. If you find you cannot fill a jar to the top, make sure you use that one first.

  • If mould does develop on the surface of the jam during storage, discard that whole jar. It will not be safe to eat any of the jam from that jar, even if the mould is removed from the surface.

  • In very humid conditions jam can be stored in the fridge even before opening.

  • If the jam will not reach jelling point, bring back to the boil and try again. You can also add more lemon juice (which acts as a natural jelling agent), or pectin/jam setter. Jams using apples generally set well as they naturally contain a lot of pectin.

  • Ensure all the utensils you are using, particularly the funnel, are well washed. Any contamination of the jam once it is cooling down could compromise its shelf life.

Berry Almond Slice with Homemade Triple Berry Jam

Berry Almond Slice

Ingredients for the Topping: 

60 g unsalted butter, softened

55 g caster sugar

1 tsp vanilla extract/paste

200 g flaked almonds

2 tbsp milk 


Ingredients for the Base: 

150 g unsalted butter, softened

110 g caster sugar 

1 tsp vanilla extract/paste

225 g plain flour

40 g cornflour

180-200g homemade triple berry jam  


Method: 

Preheat oven to 180 degrees Celsius, and line a 24 x 20 cm baking/lamington tin with baking paper. 

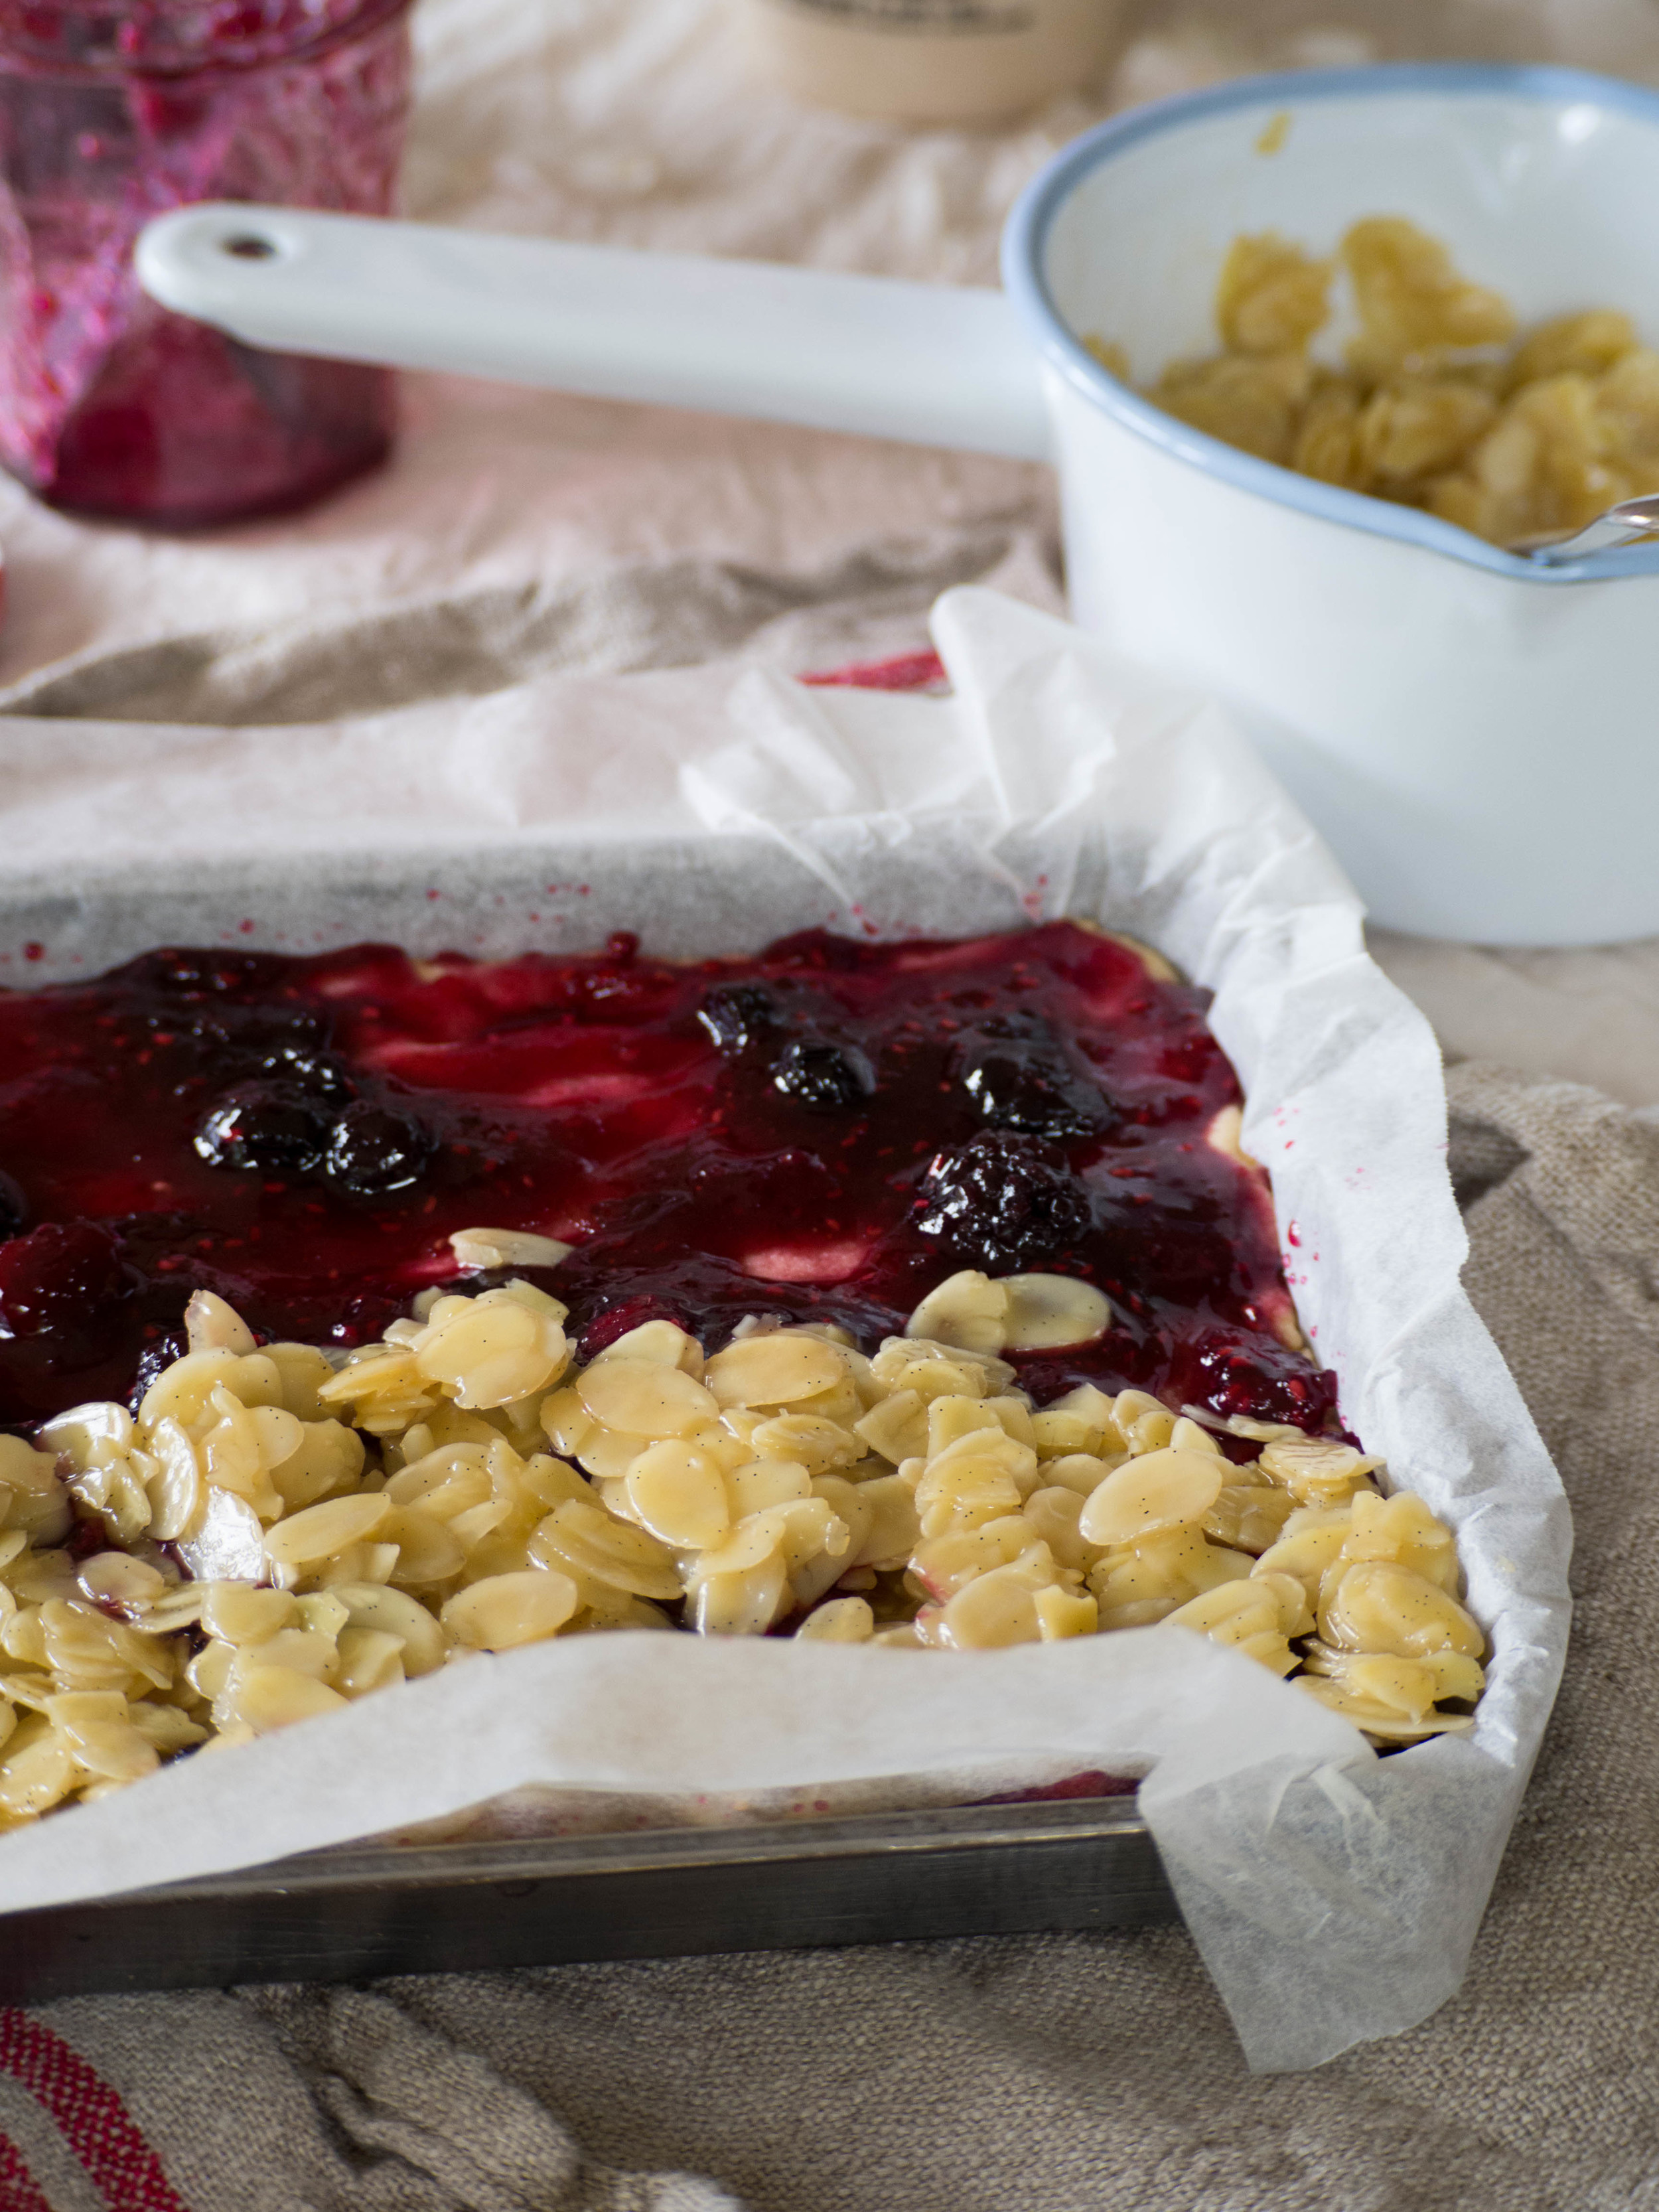
Make the almond topping first by combining all the ingredients in a small/medium saucepan. Place over low heat and stir until the butter has melted. Set aside to cool. 

To make the base of the slice, beat the butter, sugar and vanilla in the bowl of an electric mixer with the paddle attachment, until the mixture is pale and creamy. With the mixer on low speed, sift in the flour and cornflour in two or three batches. Mix until the ingredients are just combined. 

Press the dough mixture into the base of the lined tin, and bake for 12-15 minutes, or until it is light golden in colour. Then remove from the oven and leave to cool for at least 10 minutes. 

Spread the jam over the base, then top with the almond mixture. Cook for a further 25-30 minutes, or until the almond topping has turned golden brown. You may need to turn the slice half way through the cooking time to bake the top evenly. 

Allow to cool in the tin, and cut into slices once cooled. 

Berry Almond Slice with Homemade Triple Berry Jam

References: ‘Made from Scratch’ by the Australian Women’s Weekly (Bauer Media Books, 2015) pp 48-49, 57 & 270; ‘Holiday’ by Bill Granger (Murdoch Books, 2007) p.22. 

Berry Almond Slice with Homemade Triple Berry Jam
In Cakes & Slices, Jams Preserves & Spreads Tags Berry Jam, Berry Almond Slice, Homemade Jam, Bill Granger, Australian Women's Weekly, Almonds, Slices
2 Comments

A Pink Tinged Birthday Cake

Kath January 15, 2015

This cake was made early last month for my birthday. Yes, I made my own birthday cake! I had seen this recipe in the Australian Women’s Weekly book ‘Indulgent Cakes’ a few months earlier, and never had a reason to make such a big cake. So when it came to deciding what to make for my birthday, I knew it was the perfect opportunity to make it. 

This cake combines two things that I really love - raspberry and rosewater. You may have noticed I use these two ingredients a lot, particularly together. I actually have to try and not use them so much now, so my blog isn’t just a how-to on using raspberries and rosewater! 

The icing of this cake is marshmallowy, and the cake itself is pink. Also two things I love. Marshmallows and anything pink. This cake was definitely the right choice for my birthday! 

I made the cakes the day before and stored them between baking paper in air-tight containers overnight. The icing needs to be made then used straight away. It is also best to assemble and ice the cake just before you want to serve it, as the icing is at its best straight away. 

This cake can (and should) be stored in fridge, and will last a couple of days (the icing will start to dissolve away however). 


Ingredients for the Cake: 

250 g unsalted butter, softened

6 egg whites

2 tsp vanilla extract

2 cups caster sugar 

2 1/2 cups plain flour

1 cup buttermilk

2 tsp bicarb soda

2 tsp white vinegar

3 tsp pink food colouring


Ingredients for the Filling: 

185 g raspberries 

1 tbsp rosewater

300 ml thickened cream

1/4 cup icing sugar 


Ingredients for the Icing: 

3/4 cup caster sugar 

1 tbsp glucose syrup 

2 tbsp water 

3 tsp rosewater 

3 egg whites 

fresh raspberries, for decoration


Method: 

Pre-heat oven to 180 degrees Celsius and line two 20cm round baking tins three times. 

In the bowl of an electric mixer, beat the butter until smooth. Then add the buttermilk, egg whites, sugar, flour and vanilla extract. 

In a separate bowl combine the white vinegar and bicarb soda. This mixture should become foamy. Add the pink colouring to the vinegar mixture. Then add the vinegar mixture to the main cake mix. Beat on a low speed until everything has combined, then beat for a couple of minutes on medium speed until the mixture turns a paler colour. 

Divide the cake mix evenly between the two prepared tins, and bake for 45 minutes. Test cakes with a skewer to ensure they are cooked through. Allow the cakes to stand in their tins for a few minutes, then turn them onto baking paper lined cooling racks (top side of cake facing down). 

Once the cakes are cool, carefully cut them in half. Place one of the layers on a serving plate, cake stand or board. Set aside.

To make the filling, lightly squash the raspberries in a small bowl with the rosewater. In a separate bowl beat the cream and icing sugar until the cream forms stiff peaks. Fold the raspberries into the cream. Spread one-third of the cream onto the base layer of the cake, and top with the next layer. Repeat with the remaining layers, finishing with a final layer of cake. 

To make the icing, place the egg whites in the bowl of an electric mixture. Then place 2/3 cup of the sugar, water, glucose and rosewater in a saucepan and stir over medium heat until the sugar has dissolved. Bring mixture to the boil, and allow to boil for 3 minutes, or until a small amount can be rolled into a soft ball once dropped in cold water. If you have a sugar thermometer, the syrup should be 115 degrees Celsius at this stage. Once the syrup is boiling, start beating the egg whites until soft peaks form. Then beat in the remaining sugar. 

Remove the syrup from the heat and allow the bubbles to settle. With the mixer running, add the syrup to the egg whites in a thin stream. Beat on high speed for about five minutes, by which time the icing should have thickened and cooled.

Use icing immediately, trying to ice the top and sides of the cake evenly. Decorate with fresh raspberries. 


Recipe originally from, The Australian Women’s Weekly ‘Indulgent Cakes’  (2014, Bauer Media Books), pp.140-145.

All baking, styling & photography for this post by Kathryn Vincent of Kulinary Adventures of Kath. 

In Cakes & Slices Tags cake, birthdays, Australian Women's Weekly, Raspberry, Rosewater, Afternoon Tea, Baking
Comment
IMG_5647.jpg

Tomato & Bacon Soup

Kath October 11, 2014

This is the first savoury recipe I have posted so far. By now, some of you may be questioning whether I eat or cook anything savoury at all! Do not despair, here is proof that, at least sometimes, I cook something that is actually viable to eat as a proper meal! However, to ‘make up’ for this savoury post (and after not having posted any recipes in a couple of weeks), I will also be posting a sweet recipe this evening. Just to keep things in balance, because in my mind no meal is complete without a little sugar afterwards!


This is my go-to Winter soup. It is very easy to make and only gets a bit messy when you use the blender to whiz it up! Though if you don’t have a blender or food processor, a stick blender or something similar would do. The tomato flavour is rich and goes well with parmesan and crusty bread. The bacon element adds bulk and substance to the soup, which is great if you want it to be more than just an entree. This recipe makes about 2.5 litres of soup, but can be easily halved to make less. 


Ingredients: 

2 tbsp olive oil 

2 large onions, chopped

6 cloves garlic, crushed

6 bacon rashers, chopped

x2 800g tins diced tomatoes

2 tbsp tomato paste

2 chicken stock cubes, crumbled/crushed

2 cups water


Method:

Heat the oil in a large saucepan. Add the onions, garlic and bacon and stir over a medium heat for about 3 minutes or until the bacon is cooked and the onions are softened. Add the tomatoes, tomato paste, stock cubes and water. 


Bring to the boil then reduce the heat and simmer for 5 minutes (uncovered). Allow the soup to cool down, then process in a food processor. This may have to be done in batches depending on the size of your processor. Then transfer back to the saucepan and heat to serve. 


Original Recipe from The Australian Women’s Weekly Starters and Soups, p.115 (1989).


Originally Posted May 19, 2014.

In Savoury Dishes/Meals Tags Soup, Tomato, Bacon, Australian Women's Weekly
2 Comments
P4140584.jpg

Vanilla Cupcakes with Passionfruit Icing

Kath October 11, 2014

These cupcakes are ridiculously easy to make and are a crowd pleaser every time. They are probably one of my favourite things to make and to eat! The cake itself is a recipe I grew up with. My Mum would use this trusty Women’s Weekly recipe to make our birthday cakes and cupcakes. My brother and I would always fight over who got to lick the beaters when Mum made these cupcakes! Mum would ice these cupcakes with a coloured icing made with a little margarine, milk and icing sugar, I of course always wanted pink! 


The original recipe uses butter, however Mum has always used margarine. Margarine gives the cakes a nice light texture. She also says using a low fat milk is great for creating a nice light cake. I find this recipe makes between 12 and 15 cakes. I think it depends on the size of the eggs used, or how much batter I fill the cupcake cases with. Either way, I always line a 12 hole cupcake tray with cases, and have another tray ready in case I need it. 


Ingredients:

125g margarine

1tsp vanilla essence

3/4 cup caster sugar

2 eggs

1 1/2 cups self raising flour 

1/2 cup milk 


Ingredients for the Icing:

2 cups icing (confectioners) sugar (approx.)

pulp of 3-4 passionfruit (approx.) 


Method: 

Pre-heat oven to 160 degrees Celsius and place cupcake cases into a cupcake tray. 


Cream the margarine, vanilla essence and sugar in a bowl with an electric mixer. The mixture should become light and fluffy. Beat in the eggs one at a time, then sift half the flour into the mixture and add half the milk. Mix until combined, then add the remaining flour (sifted) and milk. 


Divide mixture between the cupcake cases. Fill them about 1/2 to 3/4 full. They will rise, and if you fill them too much they will spill over the sides. 


Bake for 15 minutes, or until the cakes are slightly golden in colour and spring back when touched. Cool on wire racks.


Once the cakes have cooled, sift the icing sugar into a microwave safe bowl, and gradually add the pulp of two passionfruit. Mix to form a thick paste. If the mixture is too wet, sift in some more icing sugar. If it is too dry add more passionfruit pulp. Place the bowl into the microwave and heat the icing in 10 second intervals until a smoother consistency is achieved. The icing should spread nicely, but not be so runny that it will run down the sides of the cupcakes. 


Using a knife or small spatula, ice the top of the cupcakes with the passionfruit icing. Allow the icing to set before storing in an airtight container. 


The original recipe for the cupcakes can be found in ‘The Australian Women’s Weekly Cakes and Slices Cookbook’ p. 89.


Originally Posted April 27, 2014.


In Cakes & Slices Tags Passionfruit, Cupcakes, Vanilla, Margarine, Australian Women's Weekly
Comment

recipes

  • Biscuits/Cookies 39
  • Breads Etc. 9
  • Breakfast 7
  • Cakes & Slices 67
  • Confectionary 5
  • Drinks 6
  • Events 14
  • Food Photography Tips 3
  • From The Mailing List 24
  • Heirloom Recipes 12
  • Holidays 44
  • Ice Cream 9
  • Jams Preserves & Spreads 9
  • Muffins 4
  • Off the Shelf 47
  • Other Desserts 25
  • Savoury Dishes/Meals 15
  • Scones 4
  • Tarts & Pastry 9
  • Travel 13

Sign up to Friday Food Chat with Kath, a weekly newsletter for more food, baking, cookbook chat and more!

Sign Up Here!
instagram-unauth pinterest facebook url

Website Accessibility: To enable text to speech function on the blog, click the sound button to the right of each blog post.

All images & content are the property of Kathryn Vincent, unless stated otherwise. Please do not use without permission.

Kulinary Adventures of Kath

Food Photography, Recipes & Baking

instagram-unauth pinterest facebook url