Kulinary Adventures of Kath

Food Photography, Recipes & Baking
  • home
  • About
  • Work with Kath
  • Shop
  • Blog
    • The Blog
    • Recipe Archive
  • Newsletter
  • Contact
  • home
  • About
  • Work with Kath
  • Shop
    • The Blog
    • Recipe Archive
  • Newsletter
  • Contact
Raspberry Pistachio Rose Cake (23 of 25).jpg

The Blog

Recipes and Food Photography by Kath Vincent.

  • The Blog
  • Recipe Archive
  • All
  • Biscuits/Cookies
  • Breads Etc.
  • Breakfast
  • Cakes & Slices
  • Confectionary
  • Drinks
  • Events
  • Food Photography Tips
  • From The Mailing List
  • Heirloom Recipes
  • Holidays
  • Ice Cream
  • Jams Preserves & Spreads
  • Muffins
  • Off the Shelf
  • Other Desserts
  • Savoury Dishes/Meals
  • Scones
  • Tarts & Pastry
  • Travel

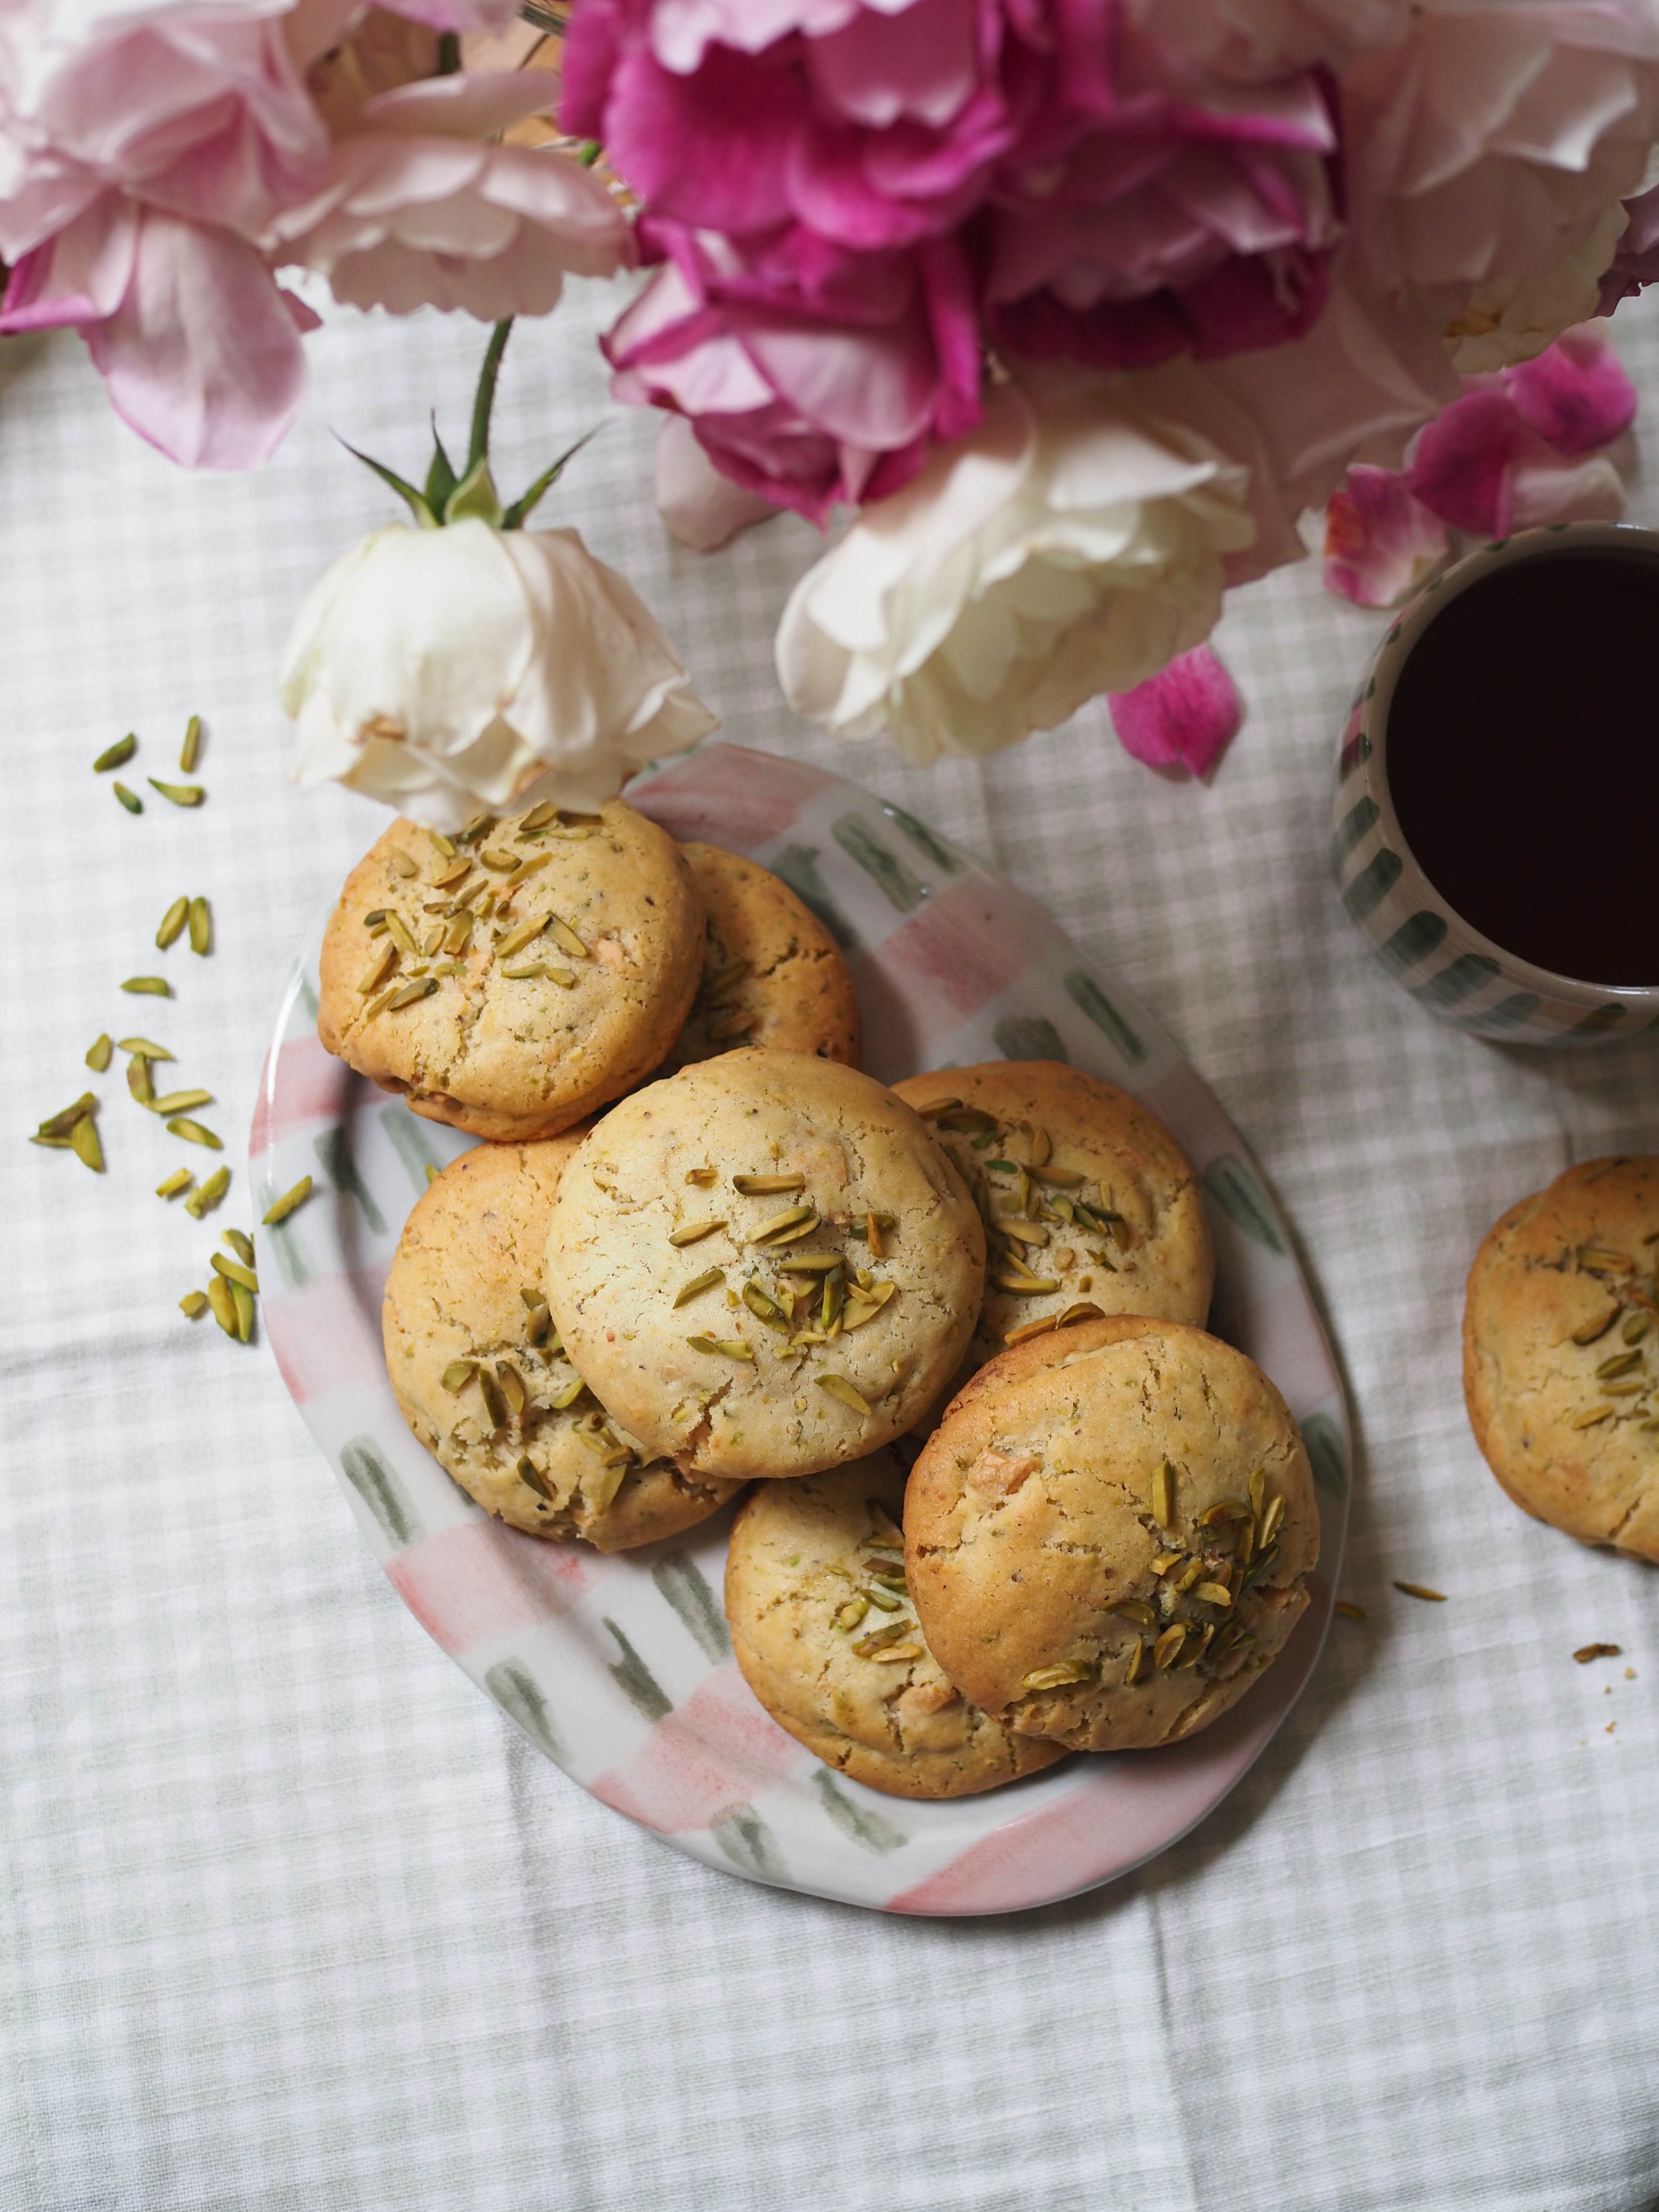
Pistachio Filled Caramelised White Chocolate Cookies

Kath November 7, 2024

The internet seems to be having a big pistachio moment right now. I have been having a pistachio ‘moment’ for many years now, I am happy to see everyone else is catching on to how delicious everything pistachio is.

There are a few recipes floating around that use a pistachio cream (crema di pistacchio) as a filling for cookies, plus a few bakeries selling cookies like this too. I am all for pistahcio cream anything, however, when it comes to using it in baking at home I really consider how I am going to use it.

Crema di pistacchio is an expensive ingredient, and sometimes not easy to buy. I have had multiple times I’ve found a brand of pistachio cream I like, only for the shop I bought it from to never sell it again. I’ve got the impression that these shop’s suppliers find it hard to import these products from Italy for whatever reason. But it’s really annoying to find something, enjoy it, then never be able to buy it again.

And that’s not to mention the price per jar, which is usually around $20AUD for a 180g or so jar. If I’m using a whole jar in one recipe, that’s an expensive bake.

There are Australian based brands that are making/selling pistachio creams/spreads that you could use. One of the brands I found was genuinely disgusting in flavour, and the other has quite a low percentage of pistachios in the spread. While the second brand I thought flavour wise was pretty good considering the low percentage of pistachios and the price, baking with it is still a rather expensive exercise. I also didn’t love how many ‘extra’ ingredients were contained in some of these spreads, compared to the imported Italian varieties.

Considering all that, I decided if I were going to make some cookies/biscuits stuffed with a pistachio spread, I was going to make the spread myself. A homemade pistachio spread or butter will have a better flavour than many of the bought pistachio creams, plus it won’t be quite as expensive!

I have been making pistachio butter/spread like the one in the recipe below for years (if you have my ebook Cosy Winter Bakes you might recognise the pistachio butter recipe!). The addition of white chocolate gives the pistachio spread a sweetness and creamy texture that is similar to the bought varieties.

When using homemade pistachio spread/butter as a filling in cookies, you won’t get that oozing of the pistachio spread out of the cookie (when the cookie is broken in half) like you would when buying a cookie like this or making one using crema di pistacchio. However, I think its a small price to pay for a delicious cookie, that doesn’t have to use up your very expensive jar of pistachio cream, and is decidedly less messy to eat as well!

Homemade Pistachio Butter/Spread

Pistachio Filled Caramelised White Chocolate Cookies/Biscuits

Ingredients:

170g raw pistachios

160g caramelised white choc (e.g. Caramilk, or any white choc)

120g unsalted butter, melted

180g caster sugar 

1 tsp vanilla extract

1 tbsp milk

1 egg, beaten

290g self raising flour

1/4 tsp baking powder

2 tbsp slivered pistachios (or roughly chopped whole pistachios)


Method:

Preheat oven to 160 degrees Celsius and line a tray with baking paper. Place the pistachios on the tray, and roast in the oven for 5-7 minutes or until they are lightly golden and fragrant. Allow to cool. You won’t need your oven again for a while so you can turn it off for now.

Make the pistachio butter by blitzing the toasted pistachios in a food processor until they form fine crumbs. Measure out 50g of the pistachio crumbs and set aside, this will be used in the biscuit dough later. 

Melt 60g of the caramelised white chocolate, then add to the blitzed pistachios. Keep blitzing until the pistachios form a paste (this will take around 10 minutes, depending on your food processor). Scrape down the sides of the food processor bowl now and then to ensure everything is processing evenly. Once done the pistachio butter will be smooth and creamy, and the texture will seem light and soft. Place the pistachio butter in a bowl or container and leave in the fridge until it has chilled and firmed up (at least 1 hour, but you can do this step in advance and leave overnight).

To make the biscuit dough, place the melted butter, sugar, vanilla, milk and egg in a large mixing bowl, and whisk until combined.

In another bowl, whisk together the flour, the 50g pistachio crumbs you set aside earlier, and the baking powder. 

Roughly chop the remaining caramelised white chocolate (100g), until you have small chunks. 

Add the flour mixture to the butter mixture, and mix with a wooden spoon until almost combined. Add the chopped chocolate and mix until everything is combined.  

Cover the bowl and place in the fridge to chill for at least 30 minutes. 

Once the dough has chilled, divide it into 12 equal portions. 

Take one of the portions and remove about 1/3 of the dough. Press the remaining larger portion of dough into a flatter disc, allowing the sides to curl up like a birds nest. Place a heaped teaspoon of the chilled pistachio butter inside the dough. Bring the sides of the dough up around the butter, then place the remaining 1/3 of dough over the top of the pistachio butter filled biscuit and smooth out so there are no gaps. Gently roll the filled biscuit between your hands so it is a nice round shape. 

Continue with each of the portions of dough so you have 12 pistachio butter filled individual dough balls. You should use most if not all of the pistachio butter across the 12 biscuits. 

Place the dough balls on a lined tray or in a container (or similar), cover, and place in the fridge for 3 hours (or overnight). 

When ready to bake the biscuits, preheat oven to 180 degrees Celsius. Ensure you have two large baking trays lined and ready. 

Spread the dough biscuit balls out over the prepared trays leaving enough room around the biscuits as they will spread. Sprinkle with the slivered pistachios, pushing them into the dough a bit.

Bake for about 15 minutes, or until they are gently golden in colour. Rotate the trays in the oven at least once during the cooking time so the biscuits cook more evenly. If you can’t bake the biscuits all at once leave the dough balls in the fridge until you have oven space.

Allow to cool on the trays for 10 minutes before eating. 

Makes 12 large biscuits.

These cookies are a more cake-y style cookie, so they are the absolute best the day they are baked. You can store them in an airtight container or jar, however they will have a slightly softer texture than when they were first baked. You can refresh them a bit by putting them in the oven for 5-8 minutes at 160 degrees Celsius.

Pistachio Spread Cookies
In Biscuits/Cookies Tags Pistachio Butter, Pistachio, Pistachio Cookies, Crema di Pistacchio, Pistachio Cream, Pistachio Spread, Caramelised White Chocolate
Comment
Caramilk Cookies

Caramilk Cookies

Caramilk Cookies

Kath September 2, 2020

My blog feels very cookie heavy right now, but honestly that’s a pretty fair indication of what I have been baking in the last few months. Apart from revisiting old favourites from my recipe eBooks and testing recipes for my new eBook (and a little bit of recipe development for clients too), versions of this particular recipe have been what I am making when I just want something nice to eat - that doesn’t take much time to make. 

Like the Chai Cookies in the post before this one, these cookies are based on the recipe for Gingernut Cookies from my Grandma. It is a simple cookie recipe, that lends itself to multitudes of adaptations. You can change up some of the ingredients (just keep the quantities the same). A different oil or melted butter can be used instead of canola oil, treacle instead of golden syrup, white sugar instead of caster for a crunchier cookie (just don’t use brown sugar, when I made them like this the oiliness of the oil in the cookie was very noticeable and not as satisfying to eat). And of course a mixture of plain flour and baking powder can be used to make your own self raising flour (see here for a good explanation on how to make it).

Caramilk (a caramelised white chocolate) is my chocolate of choice for these, but you can use whatever you prefer (up to 200g).  And if you would like the recipe to be dairy free, make them using an oil (not butter) and pair with a dairy free or super dark chocolate. Or use something else completely instead of chocolate like some chopped dried fruit or nuts. 

I know a lot of people are using the time we have this year to embark on more involved baking projects, but I am finding that recipes like this one, that are endlessly adaptable and very quick and effortless to make, provide just the kind of instant gratification I am looking for - a little bit of time in the kitchen, and something very tasty to eat not long after. 

Caramilk Cookie Recipe

Caramilk Cookies

Ingredients:

120ml canola oil

225g caster sugar 

2 tbsp golden syrup

1 tsp vanilla extract

1 egg, beaten

290g self raising flour

180g block Cadbury Caramilk, roughly chopped

Method:

Preheat oven to 170 degrees Celsius and line three large baking trays with baking paper.

In a large bowl whisk together the oil, sugar, golden syrup, vanilla and egg.

Then add the flour and the chopped Caramilk and mix to combine with a wooden spoon.

Roll heaped teaspoonfuls of the dough into balls and place on the trays. The cookies will spread as they bake so leave enough room in between. 

Bake for 12-15 minutes or until golden brown. Rotate the trays in the oven about halfway through to ensure the cookies cook evenly.  

Allow to cool on their trays, then store in an airtight container (they will last 5-7 days). 

Makes about 30 cookies.

Caramilk Cookie Recipe
In Biscuits/Cookies Tags Caramilk, Caramelised White Chocolate, Cookies, Dairy Free, Biscuits/Cookies, Easy Baking, Mixer Free Recipes
2 Comments
Easy Homemade Lamington

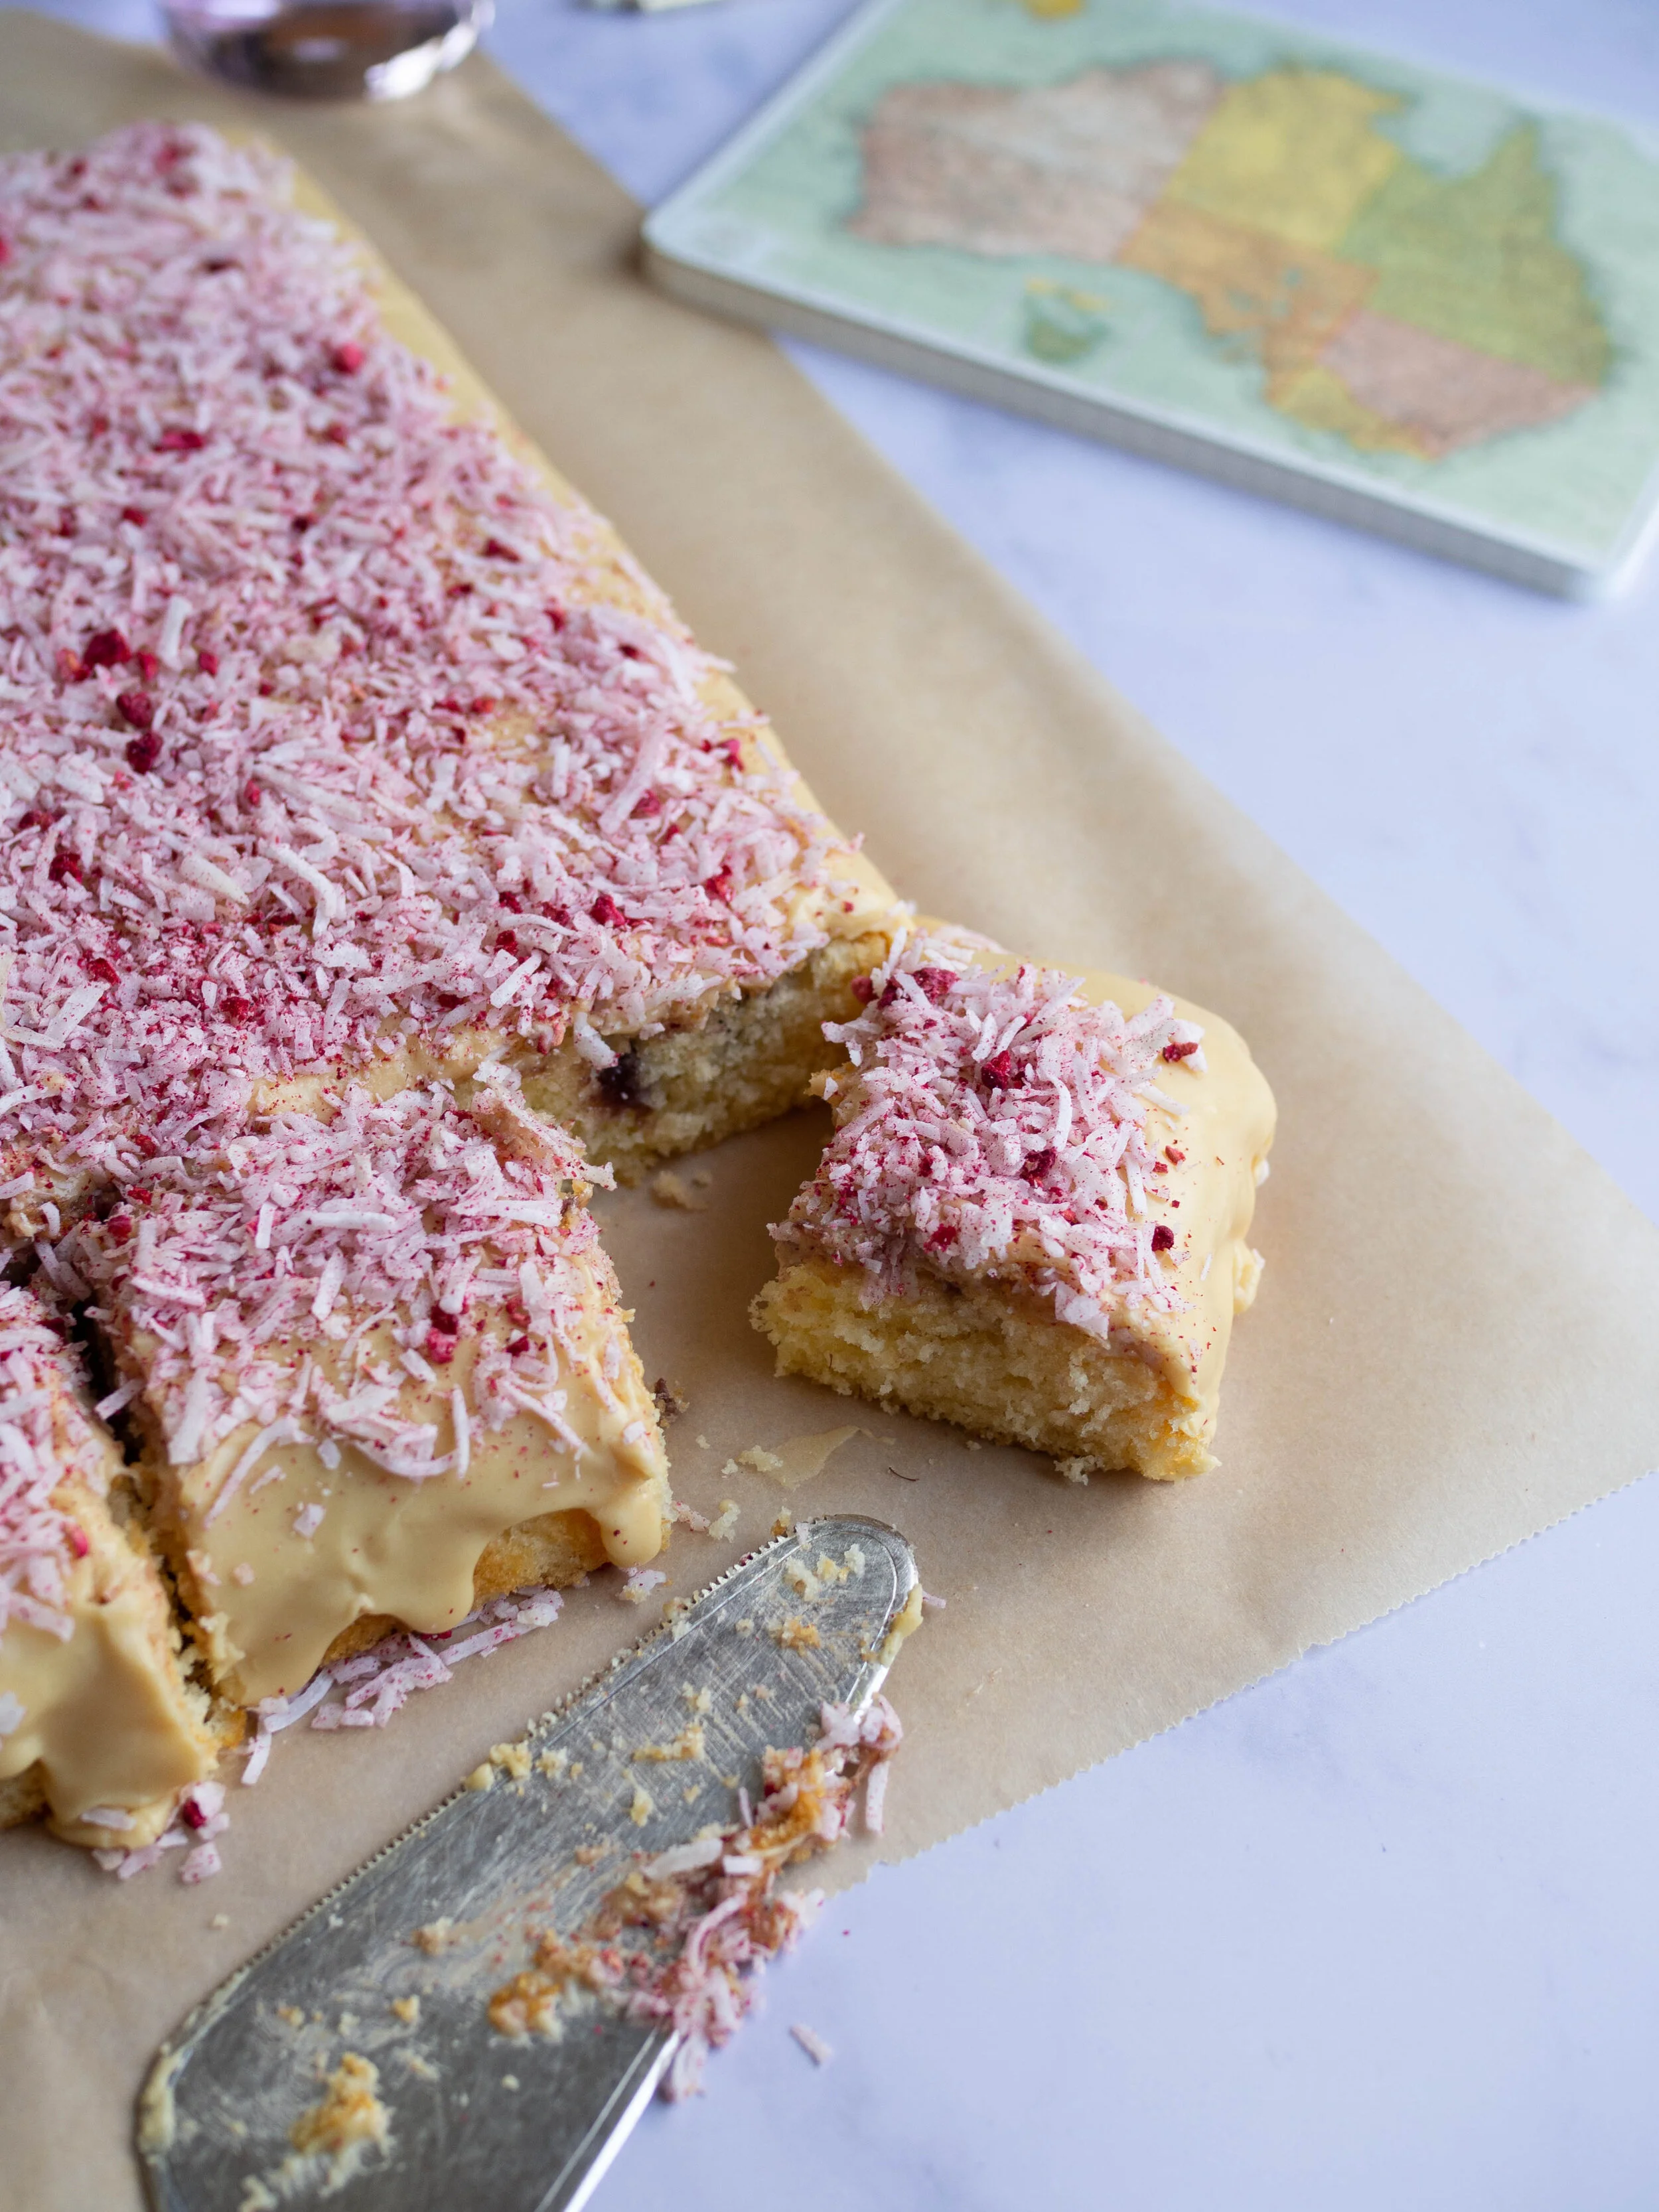
Caramelised White Chocolate Lamington Slice

Kath January 21, 2020

I love lamingtons so much. They were probably my favourite treat as a kid, and probably the only thing that contained chocolate that I genuinely really loved. 

I loved when I found a lamington at a bakery that had lovely soft icing, not the kind that set really firmly. I remember taking a Chinese exchange student who stayed with us a week or two to the local French bakery and insisted that she try one - she was only in Australia for a couple of weeks after all, and tasting a lamington is a must do when someone visits! And oddly the French bakery made very good lamingtons!

I also remember getting those small lamingtons from a packet in the supermarket in my lunch box sometimes at school. I’d probably hate them if I tried one now, but back then they felt like I had hit the lunchbox jackpot.

Quite a few years ago I realised chocolate was no friend to me, and decided I must stop eating it (in any form) to avoid the side effects I was experiencing. And one of the most difficult things to give up was lamingtons. I made them at home a couple of times (recipe here), and they are well worth the effort, but sadly not if you actually can’t eat them. 

I’ve been thinking about a white chocolate version for a while, and finally I have given it a go. I have made the whole lamington making process much more simple by making a slice rather than individual lamingtons. I have also incorporated one of my favourite things, caramelised white chocolate. Please use good quality white chocolate (Lindt couverture or similar with a cocoa butter content of around 30%) for this. 

I am really happy with how this lamington slice has turned out, and to have a new version of a lamington I can enjoy!

Let me know in the comments if you give this recipe a go!

NB. Do not try using any white ‘baking’ chocolate you can find in the baking isle at the supermarket. As these chocolates are not pure white chocolate, the caramelisation process will not work.

White Chocolate Lamington Slice
Caramelised White Chocolate Lamington

Caramelised White Chocolate Lamington Slice

Ingredients:

125g unsalted butter (softened) or margarine

165g caster sugar

1 tsp vanilla extract

2 eggs 

250g self-raising flour

105ml milk

80g mixed berry or raspberry jam

Ingredients for the Icing: 

100g good quality white chocolate (see note above recipe)

280g icing sugar

7g unsalted butter, softened

65ml milk 

40g shredded coconut

freeze dried raspberry, about 1 tsp if powdered or 4 raspberries if whole

Method: 

Pre-heat oven to 160 degrees Celsius, and line a lamington tin (rectangle tin with dimensions approx. 30 x 20cm) with baking paper.

In the bowl of an electric mixer, beat the butter, sugar and vanilla until light and fluffy. 

Beat in the eggs one at a time, then add half the flour and half the milk and mix. Add the remaining flour and milk and mix on medium speed until combined.

Pour the mixture into the prepared tray and smooth the top. Place teaspoons of jam over the mixture, and using a knife to swirl the jam into the batter.

Bake for 20 minutes or until the cake is light golden in colour and springs back to the touch. 

Allow to cool in the tin for a few minutes before transferring to a cooling rack. 

Allow to cool completely before making the icing. 

To make the icing, preheat oven to 120 degrees Celsius/110 degrees Celsius fan. 

Line a small baking tray completely with foil, and place the chocolate in a single layer in the centre of the tray. 

Place in the oven for 5 minutes, then stir. Repeat every 5 minutes for about 25 minutes or until the chocolate has smoothly melted as is a lovely golden colour. 

The chocolate will seem grainy for the first 10-15 minutes, don’t worry just keep stirring every five minutes and the chocolate will become a smooth consistency again.

In the last five or so minutes you can decide how caramelised you want your chocolate - leave in the oven for an extra five minutes after stirring for a slightly deeper golden colour, and caramelised flavour. 

Once you have caramelised your chocolate place in a medium bowl, and whisk together with the icing sugar, butter and milk until it reaches a smooth consistency. Cover the cake with the icing, allowing it to fall over the sides. 

In a small bowl mix the coconut with the freeze dried raspberry (crush up any whole raspberries between your fingers before mixing), then cover the cake with the coconut. 

Cake can be stored in an airtight container for a few days.

Easy Homemade Lamington
Caramelised White Chocolate Lamingtons
In Cakes & Slices Tags Lamingtons, Caramelised White Chocolate, Lamington Slice, cake
Comment
White Chocolate Easter Torte (Passover Friendly)

White Chocolate Easter Torte (Passover Friendly)

White Chocolate Easter Torte (Passover Friendly)

Kath April 14, 2019

Since Easter and Passover again fall at the same time this year, I thought I would make a dessert that observed both holidays. My immediate thought was a variation of a Lithuanian Nut Torte I had made a couple of years ago. The recipe uses nuts, grated chocolate and whipped egg whites to make a light cake. 

The time I first made this cake, I made it with dark or milk chocolate, however always thought I should try a white chocolate version of it. Now two years later I am finally doing it! 

The idea to make this cake again reappeared in my mind late one night when I was trying to fall asleep. That day a friend and I had visited Bakedown Cakery in St Leonards, as I was really keen to get some of the new Easter range. We both bought some chocolate, and as we walked home got caught in the worst downpour! We were absolutely saturated once we got back, but our Bakedown goodies had been well protected and survived the journey. 

I had bought some of the Golden Almond Eggs (caramelised white chocolate filled with almond praline - as delicious as it sounds), and some of the Hot Cross Bunnies chocolate bark (white and caramelised white chocolate with Easter spices with cute bunny illustrations printed on top). These chocolates, particularly the bark got me thinking about how it could be used to decorate a cake. 

The Nut Torte I had made so long before popped into my head as the perfect Easter dessert, which could also double as dessert for Passover. I decided I needed to visit Bakedown again to get more of the Hot Cross Bunnies bark, and a couple of blocks of Toasty (Bakedown’s caramelised white chocolate) to use for the torte. Jen at Bakedown also had Toasty Easter Bunnies ready when I went in the second time, and my gosh I was excited! Caramelised white chocolate is one of the best things I have ever tasted, and as someone who can’t eat ‘normal’ chocolate it was so nice to have an Easter treat I could actually enjoy! 

For this Easter Torte, I used Bakedown’s Toasty to grate into the torte, and the Hot Cross Bunnies bark to decorate the outside. I also used a combination of Toasty and regular white chocolate to melt down and decorate the top and use to stick the bark to the sides of the torte. You can of course use any type of chocolate you wish to make this torte, and decorate with your favourite Easter eggs, or just leave the decoration at the chocolate drizzle if you are making this cake for Passover (some toasted nuts scattered over the top would also be lovely). 

White Chocolate Bark from Bakedown Cakery, illustrations by Dawn Tan.

White Chocolate Bark from Bakedown Cakery, illustrations by Dawn Tan.

Hot Cross Bunnies white and caramelised white chocolate by Bakedown Cakery

Hot Cross Bunnies white and caramelised white chocolate by Bakedown Cakery

Caramelised White Chocolate Torte

White Chocolate Easter Torte (Passover Friendly)

Ingredients: 

100g macadamias or almonds, ground

3 tbsp fine matzo meal (or fine dry breadcrumbs if not making for Passover)

100g good quality white chocolate (the kind you would buy to eat) 

3 eggs (large), separated

125g golden caster sugar

1 tbsp lemon juice 

To Decorate: 

50-100g white chocolate 

Easter eggs/chocolate to decorate or some extra toasted nuts (macadamias or almonds) 

Method: 

Pre heat oven to 170 degrees Celsius and line a round 20cm loose bottomed or springform tin with baking paper. 

Grate the chocolate into a medium bowl, then add the ground nuts and matzo meal. Mix to combine then set aside. 

Place the egg whites in the bowl of a stand mixer, fitted with the whisk attachment. Whisk the egg whites until stiff peaks form, then gradually add the sugar. Continue to whisk until the sugar has just incorporated. Briefly whisk in the egg yolks, then fold in the chocolate nut mixture. 

Tip into the prepared tin, and gently smooth the top. 

Bake for 35-45 minutes or until the torte is golden in colour and a skewer inserted into the centre comes out clean. The torte will rise up then sink down a bit as it cooks. 

Leave to cool on a wire rack, removing from the tin once cooled. 

To decorate, melt the chocolate either in the microwave or over a double boiler. If sticking chocolate bark or similar around the edges of your torte use 100g of chocolate, drizzle some over the top, then spread the remaining chocolate around the sides of the cake then sick on the bark. If not, use 50g chocolate to drizzle over the top. Decorate with Easter eggs or toasted nuts. 

Easter Eggs
White Chocolate Passover Torte

Reference: ‘100 Best Jewish Recipes’ by Evelyn Rose with Judi Rose (Pavilion, 2016), p.149. 

Caramelised White Chocolate Torte
Easter Eggs
In Cakes & Slices, Holidays Tags White Chocolate, Caramelised White Chocolate, Bakedown Cakery, Passover, Easter
Comment

recipes

  • Biscuits/Cookies 39
  • Breads Etc. 9
  • Breakfast 7
  • Cakes & Slices 67
  • Confectionary 5
  • Drinks 6
  • Events 14
  • Food Photography Tips 3
  • From The Mailing List 24
  • Heirloom Recipes 12
  • Holidays 44
  • Ice Cream 9
  • Jams Preserves & Spreads 9
  • Muffins 4
  • Off the Shelf 47
  • Other Desserts 25
  • Savoury Dishes/Meals 15
  • Scones 4
  • Tarts & Pastry 9
  • Travel 13

Sign up to Friday Food Chat with Kath, a weekly newsletter for more food, baking, cookbook chat and more!

Sign Up Here!
instagram-unauth pinterest facebook url

Website Accessibility: To enable text to speech function on the blog, click the sound button to the right of each blog post.

All images & content are the property of Kathryn Vincent, unless stated otherwise. Please do not use without permission.

Kulinary Adventures of Kath

Food Photography, Recipes & Baking

instagram-unauth pinterest facebook url