Kulinary Adventures of Kath

Food Photography, Recipes & Baking
  • home
  • About
  • Work with Kath
  • Shop
  • Blog
    • The Blog
    • Recipe Archive
  • Newsletter
  • Contact
  • home
  • About
  • Work with Kath
  • Shop
    • The Blog
    • Recipe Archive
  • Newsletter
  • Contact
Raspberry Pistachio Rose Cake (23 of 25).jpg

The Blog

Recipes and Food Photography by Kath Vincent.

  • The Blog
  • Recipe Archive
  • All
  • Biscuits/Cookies
  • Breads Etc.
  • Breakfast
  • Cakes & Slices
  • Confectionary
  • Drinks
  • Events
  • Food Photography Tips
  • From The Mailing List
  • Heirloom Recipes
  • Holidays
  • Ice Cream
  • Jams Preserves & Spreads
  • Muffins
  • Off the Shelf
  • Other Desserts
  • Savoury Dishes/Meals
  • Scones
  • Tarts & Pastry
  • Travel

An Aussie Pav for Christmas

Kath December 20, 2021

I have posted a handful of Pavlova recipes on my blog over the years. I love a Pavlova, it was my favourite dessert that my Grandma would make and it has been quite a permanent feature in my life.

Christmas in Australia is an excellent time for a Pavlova (or ‘Pav’ as we Aussies like to shorten it to!). The pavlova itself can be made in advance, and it is a nice light dessert after a filling Christmas lunch or dinner.

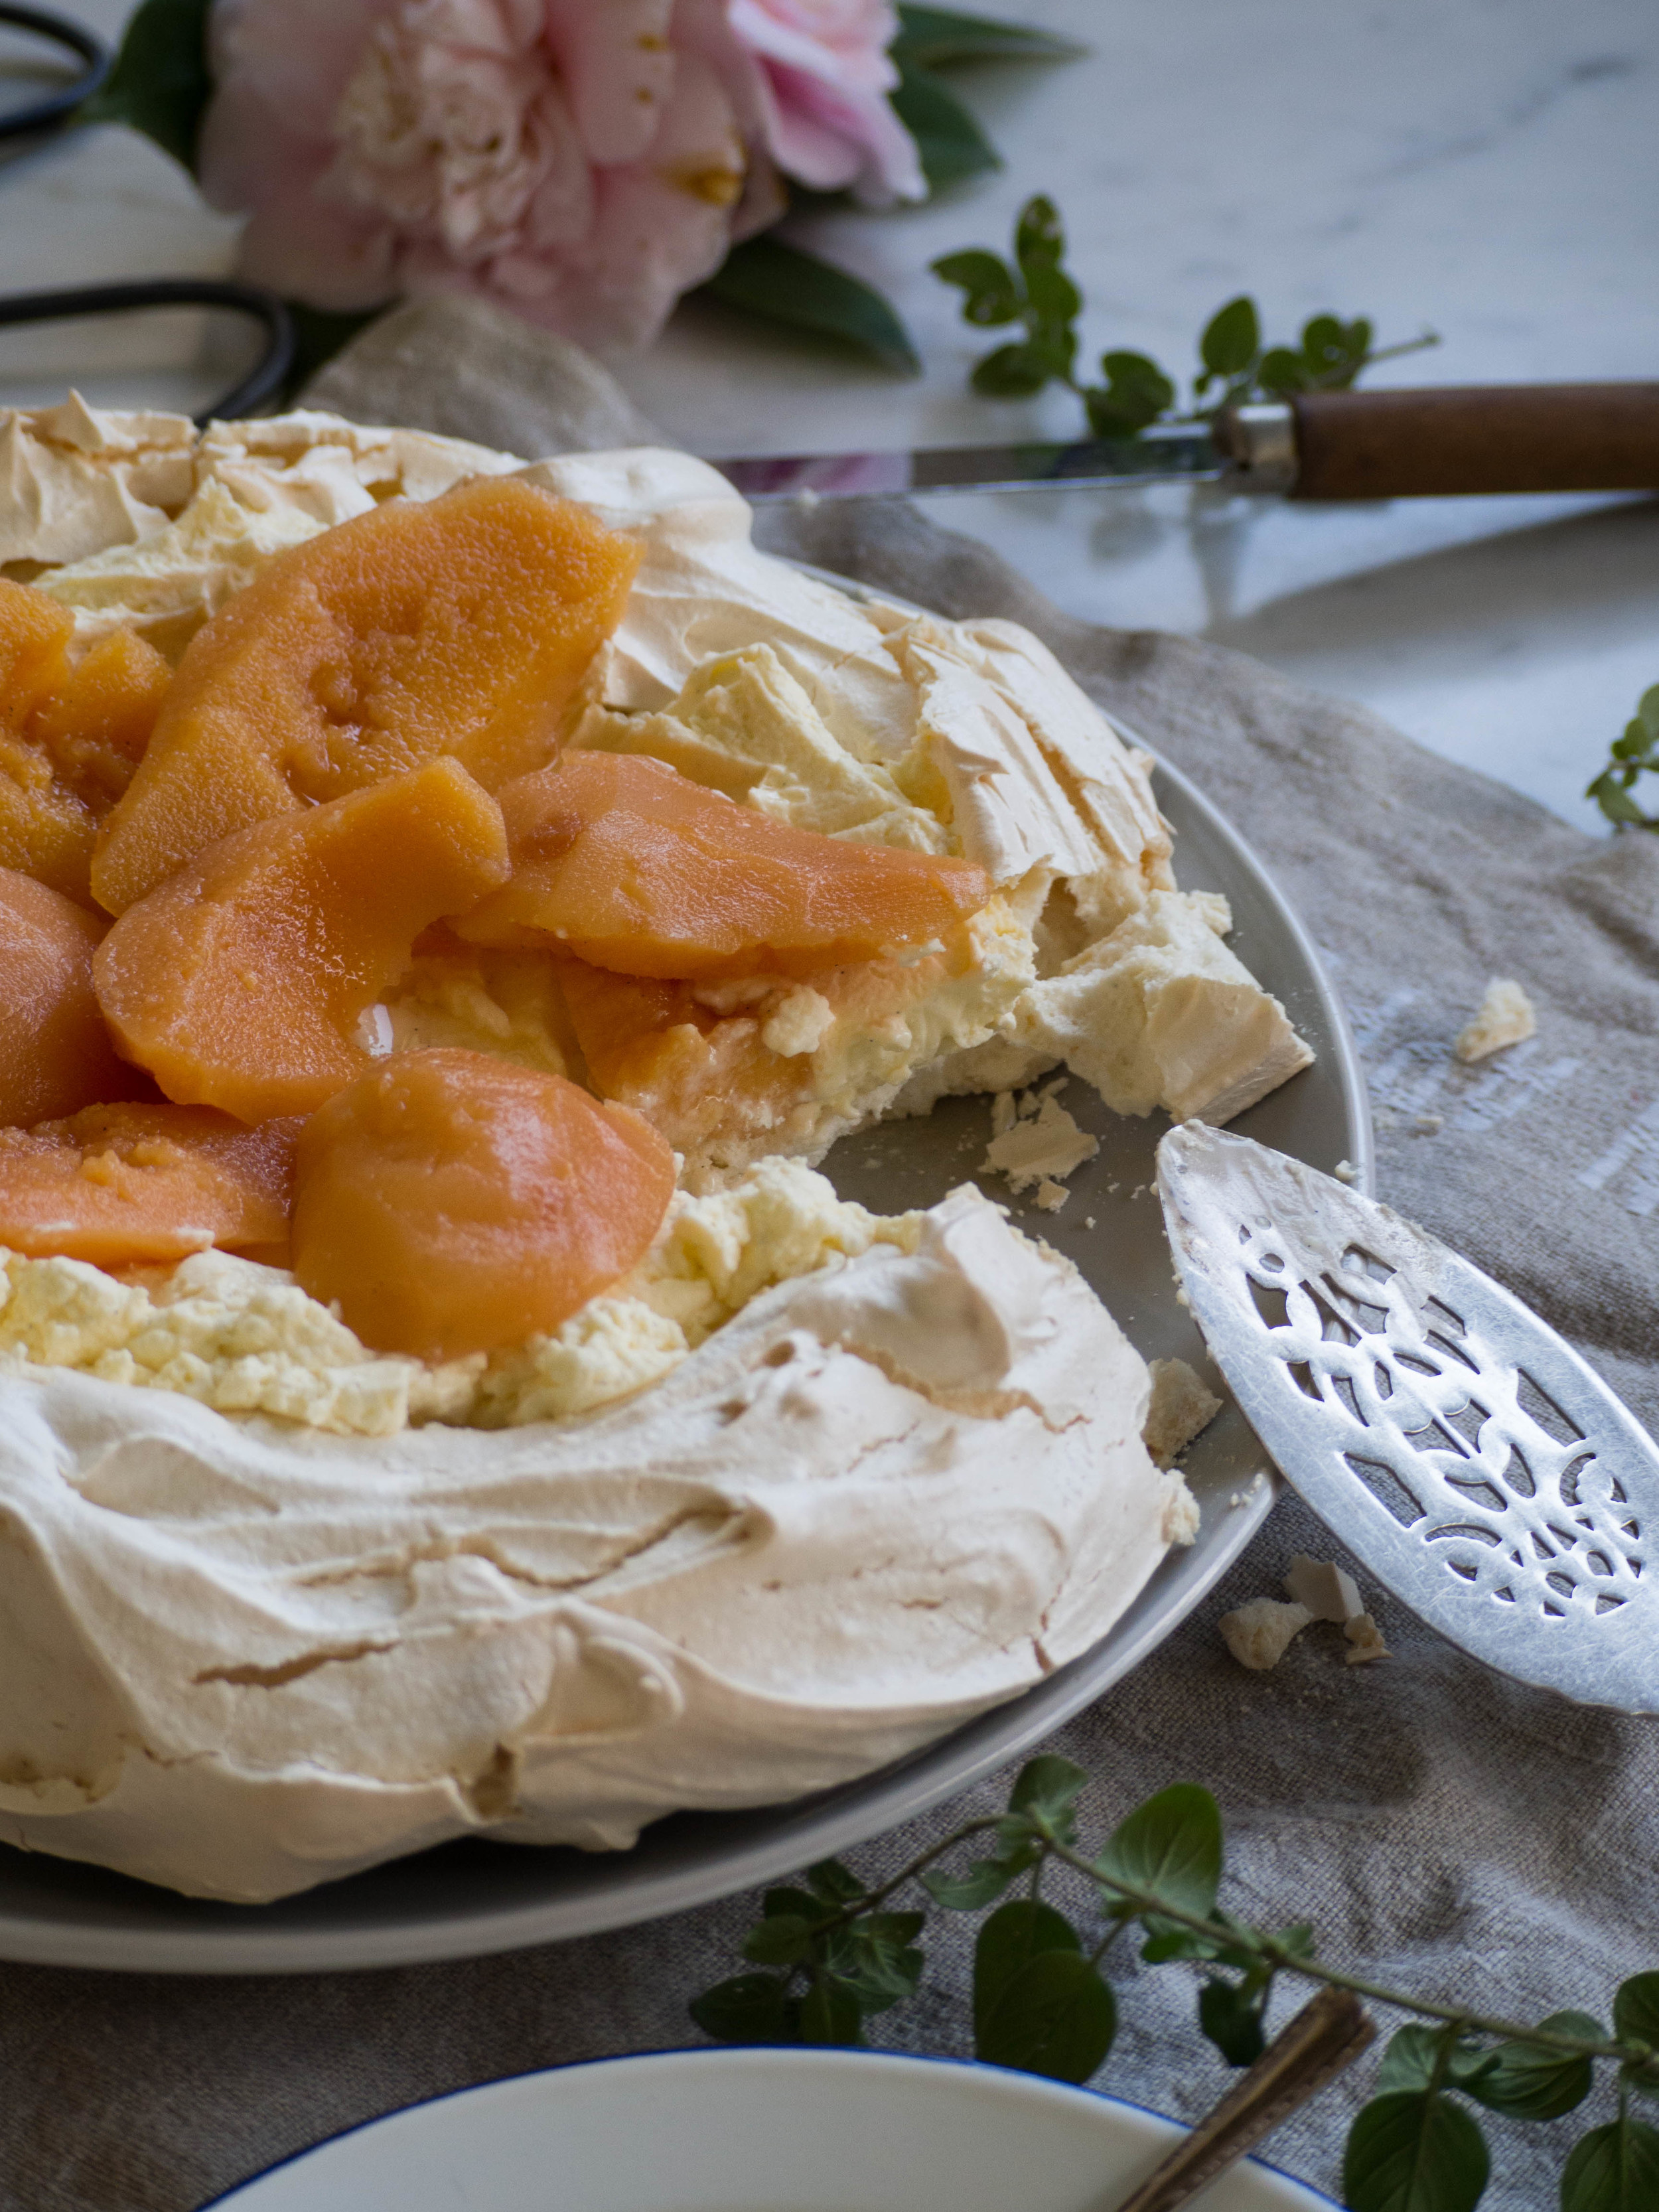
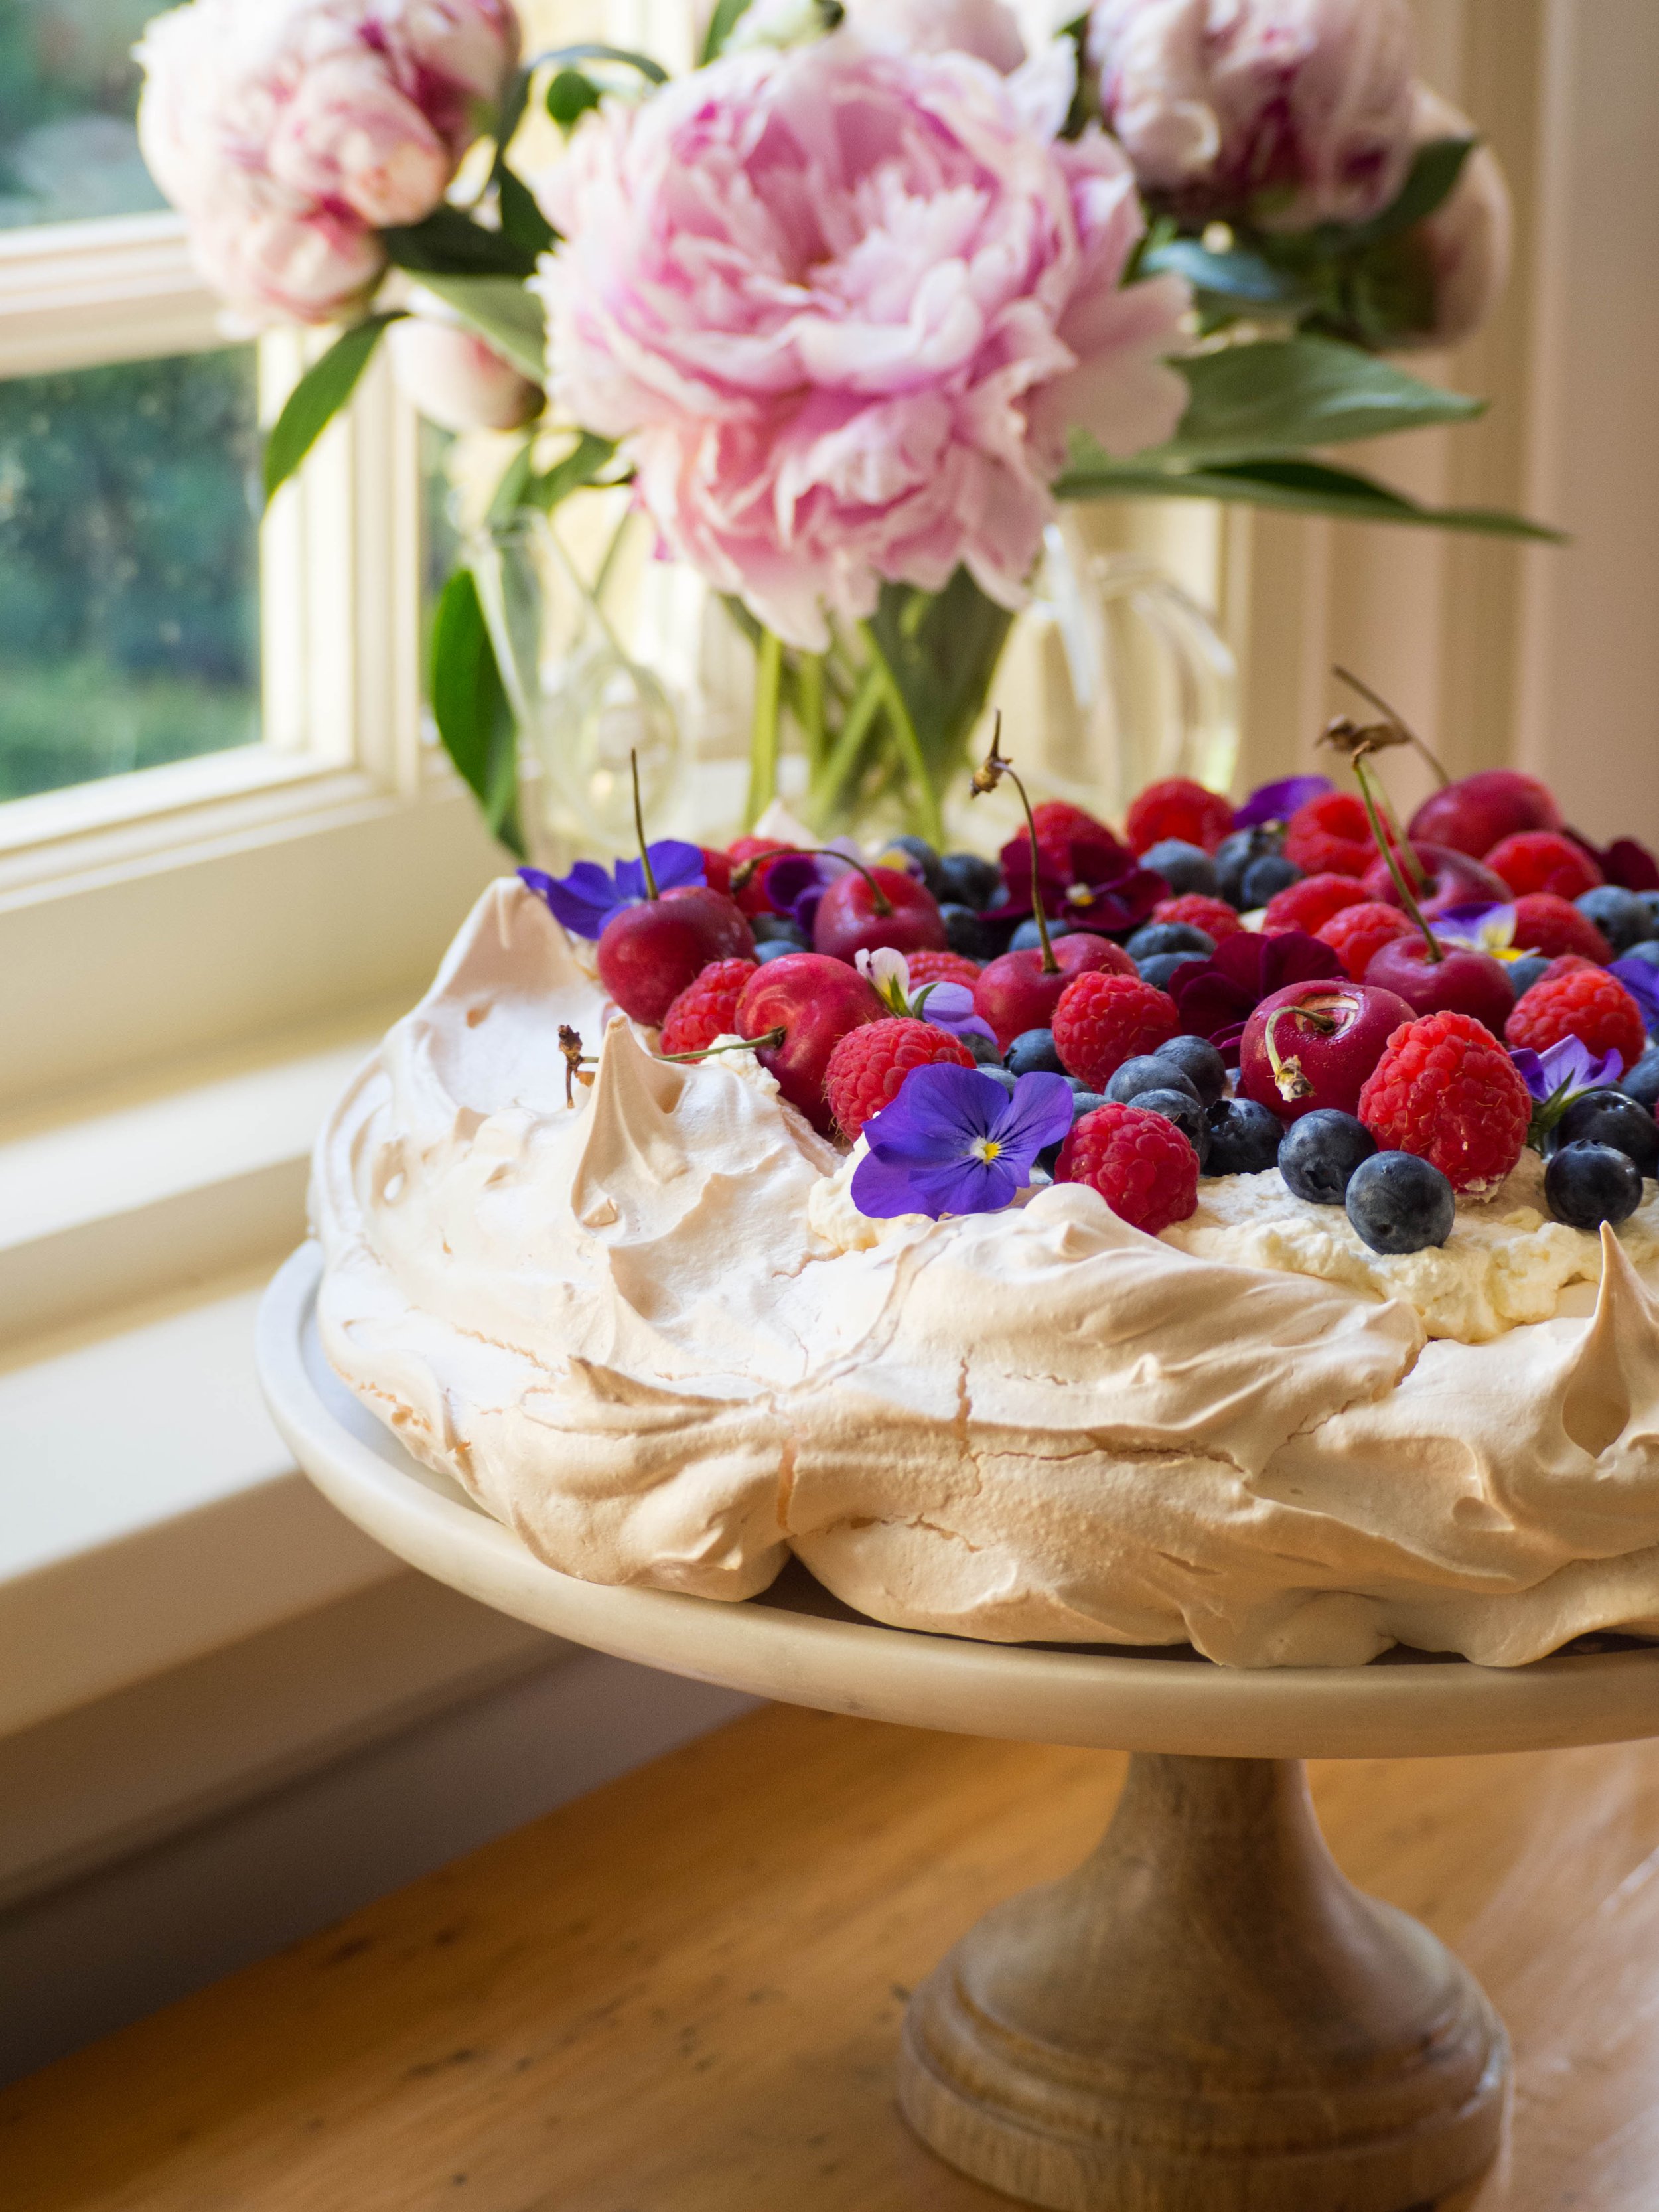
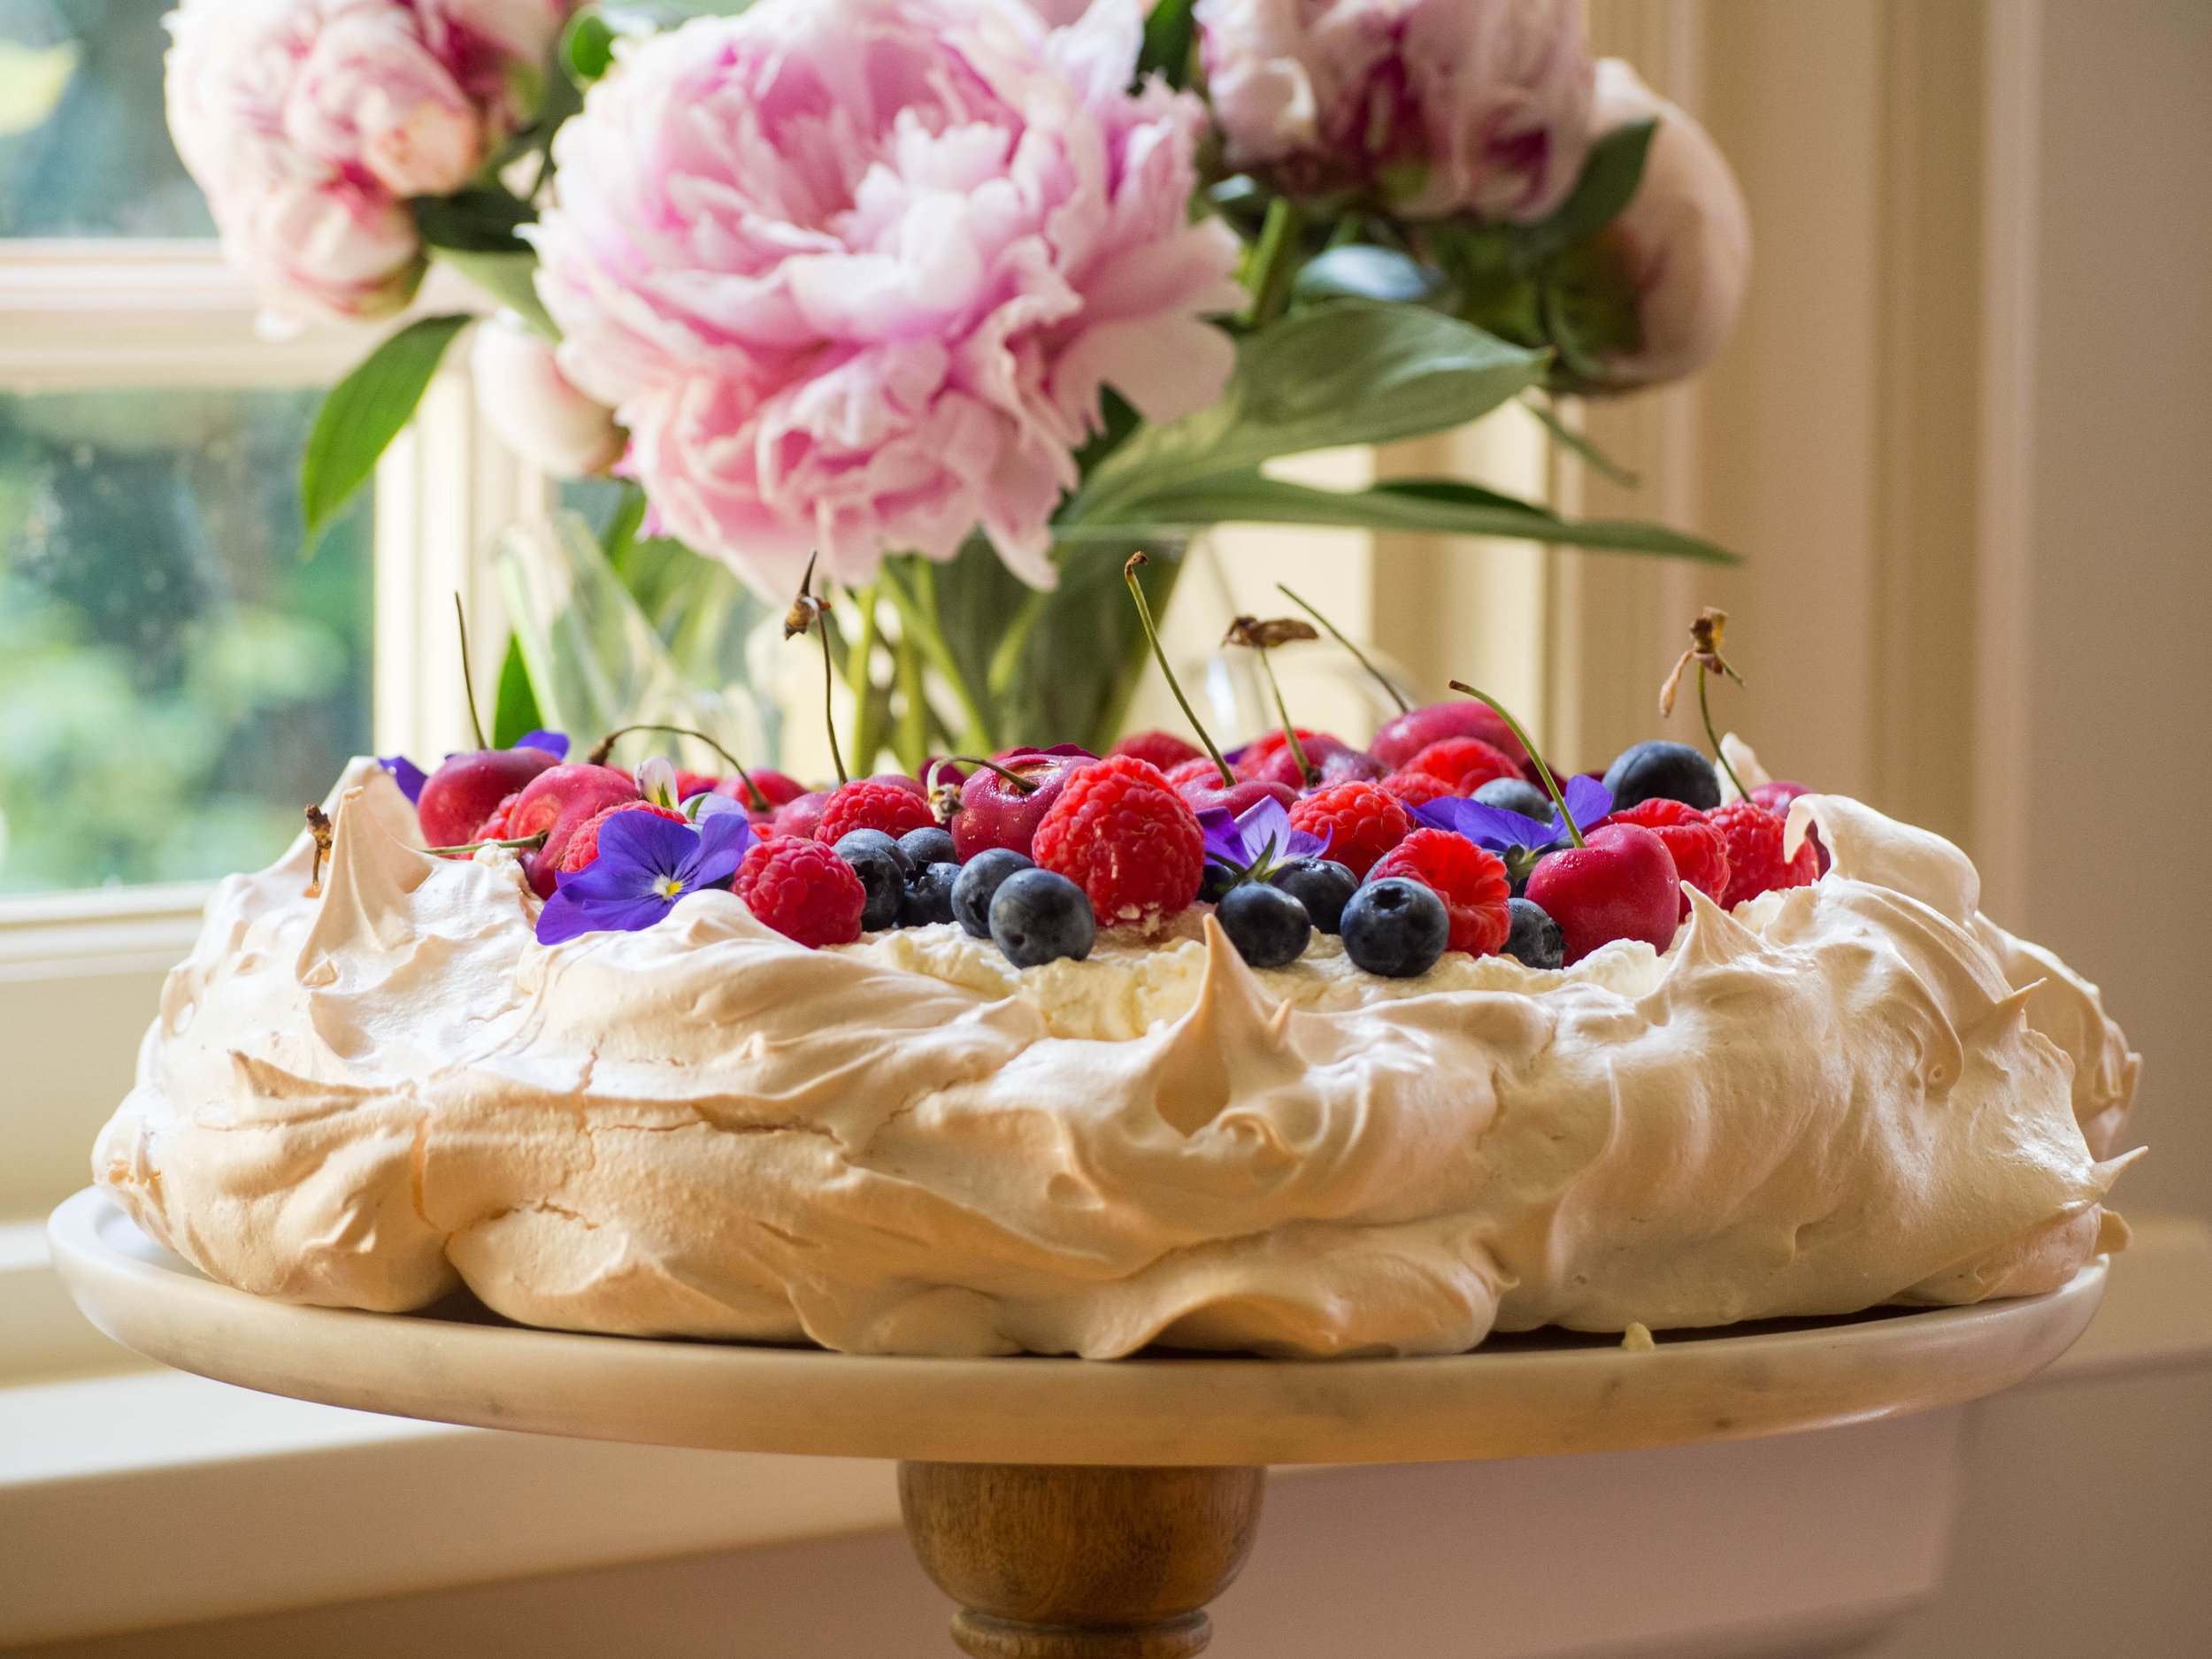
This recipe for pav is the more traditional Australian take on the dessert, compared to the previous recipes I’ve shared. It is based on my Grandma’s recipe which is always the recipe I turn to when I want to make a pav. I shared her original recipe here a few years ago. That one makes a slightly smaller pav and doesn’t have any toppings as that’s how I liked to eat it as a child. Times have very clearly changed since then!

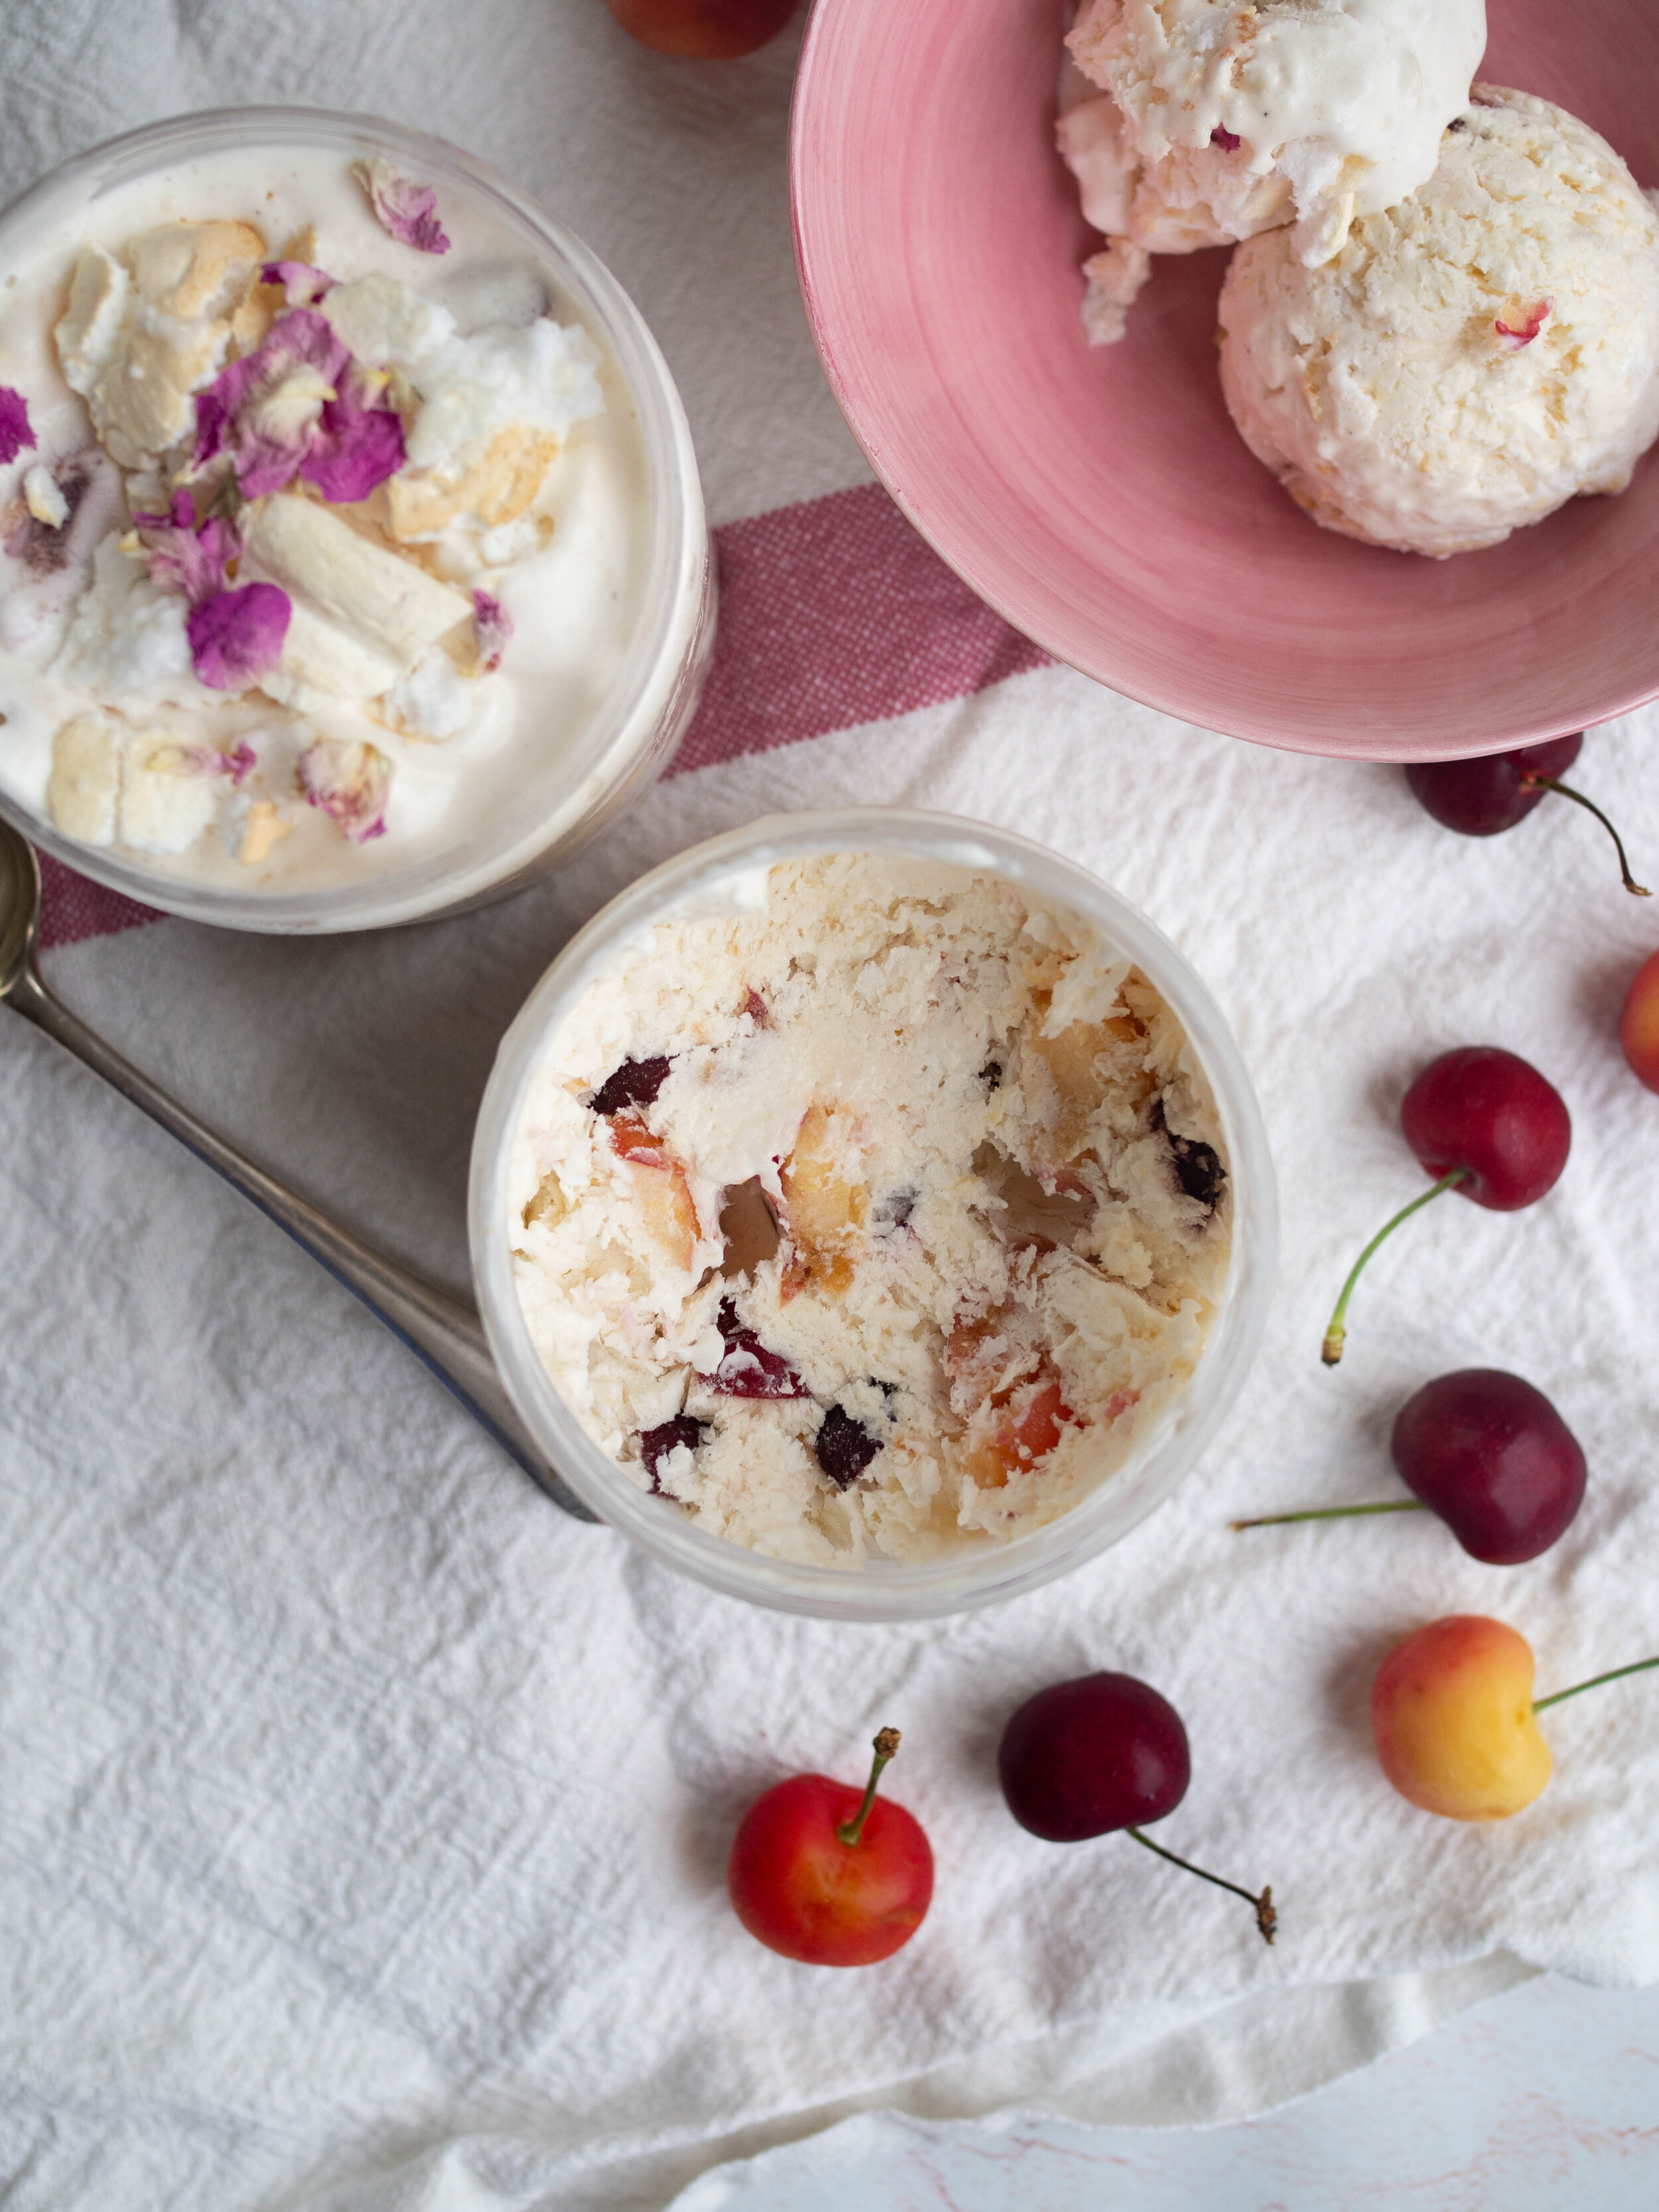
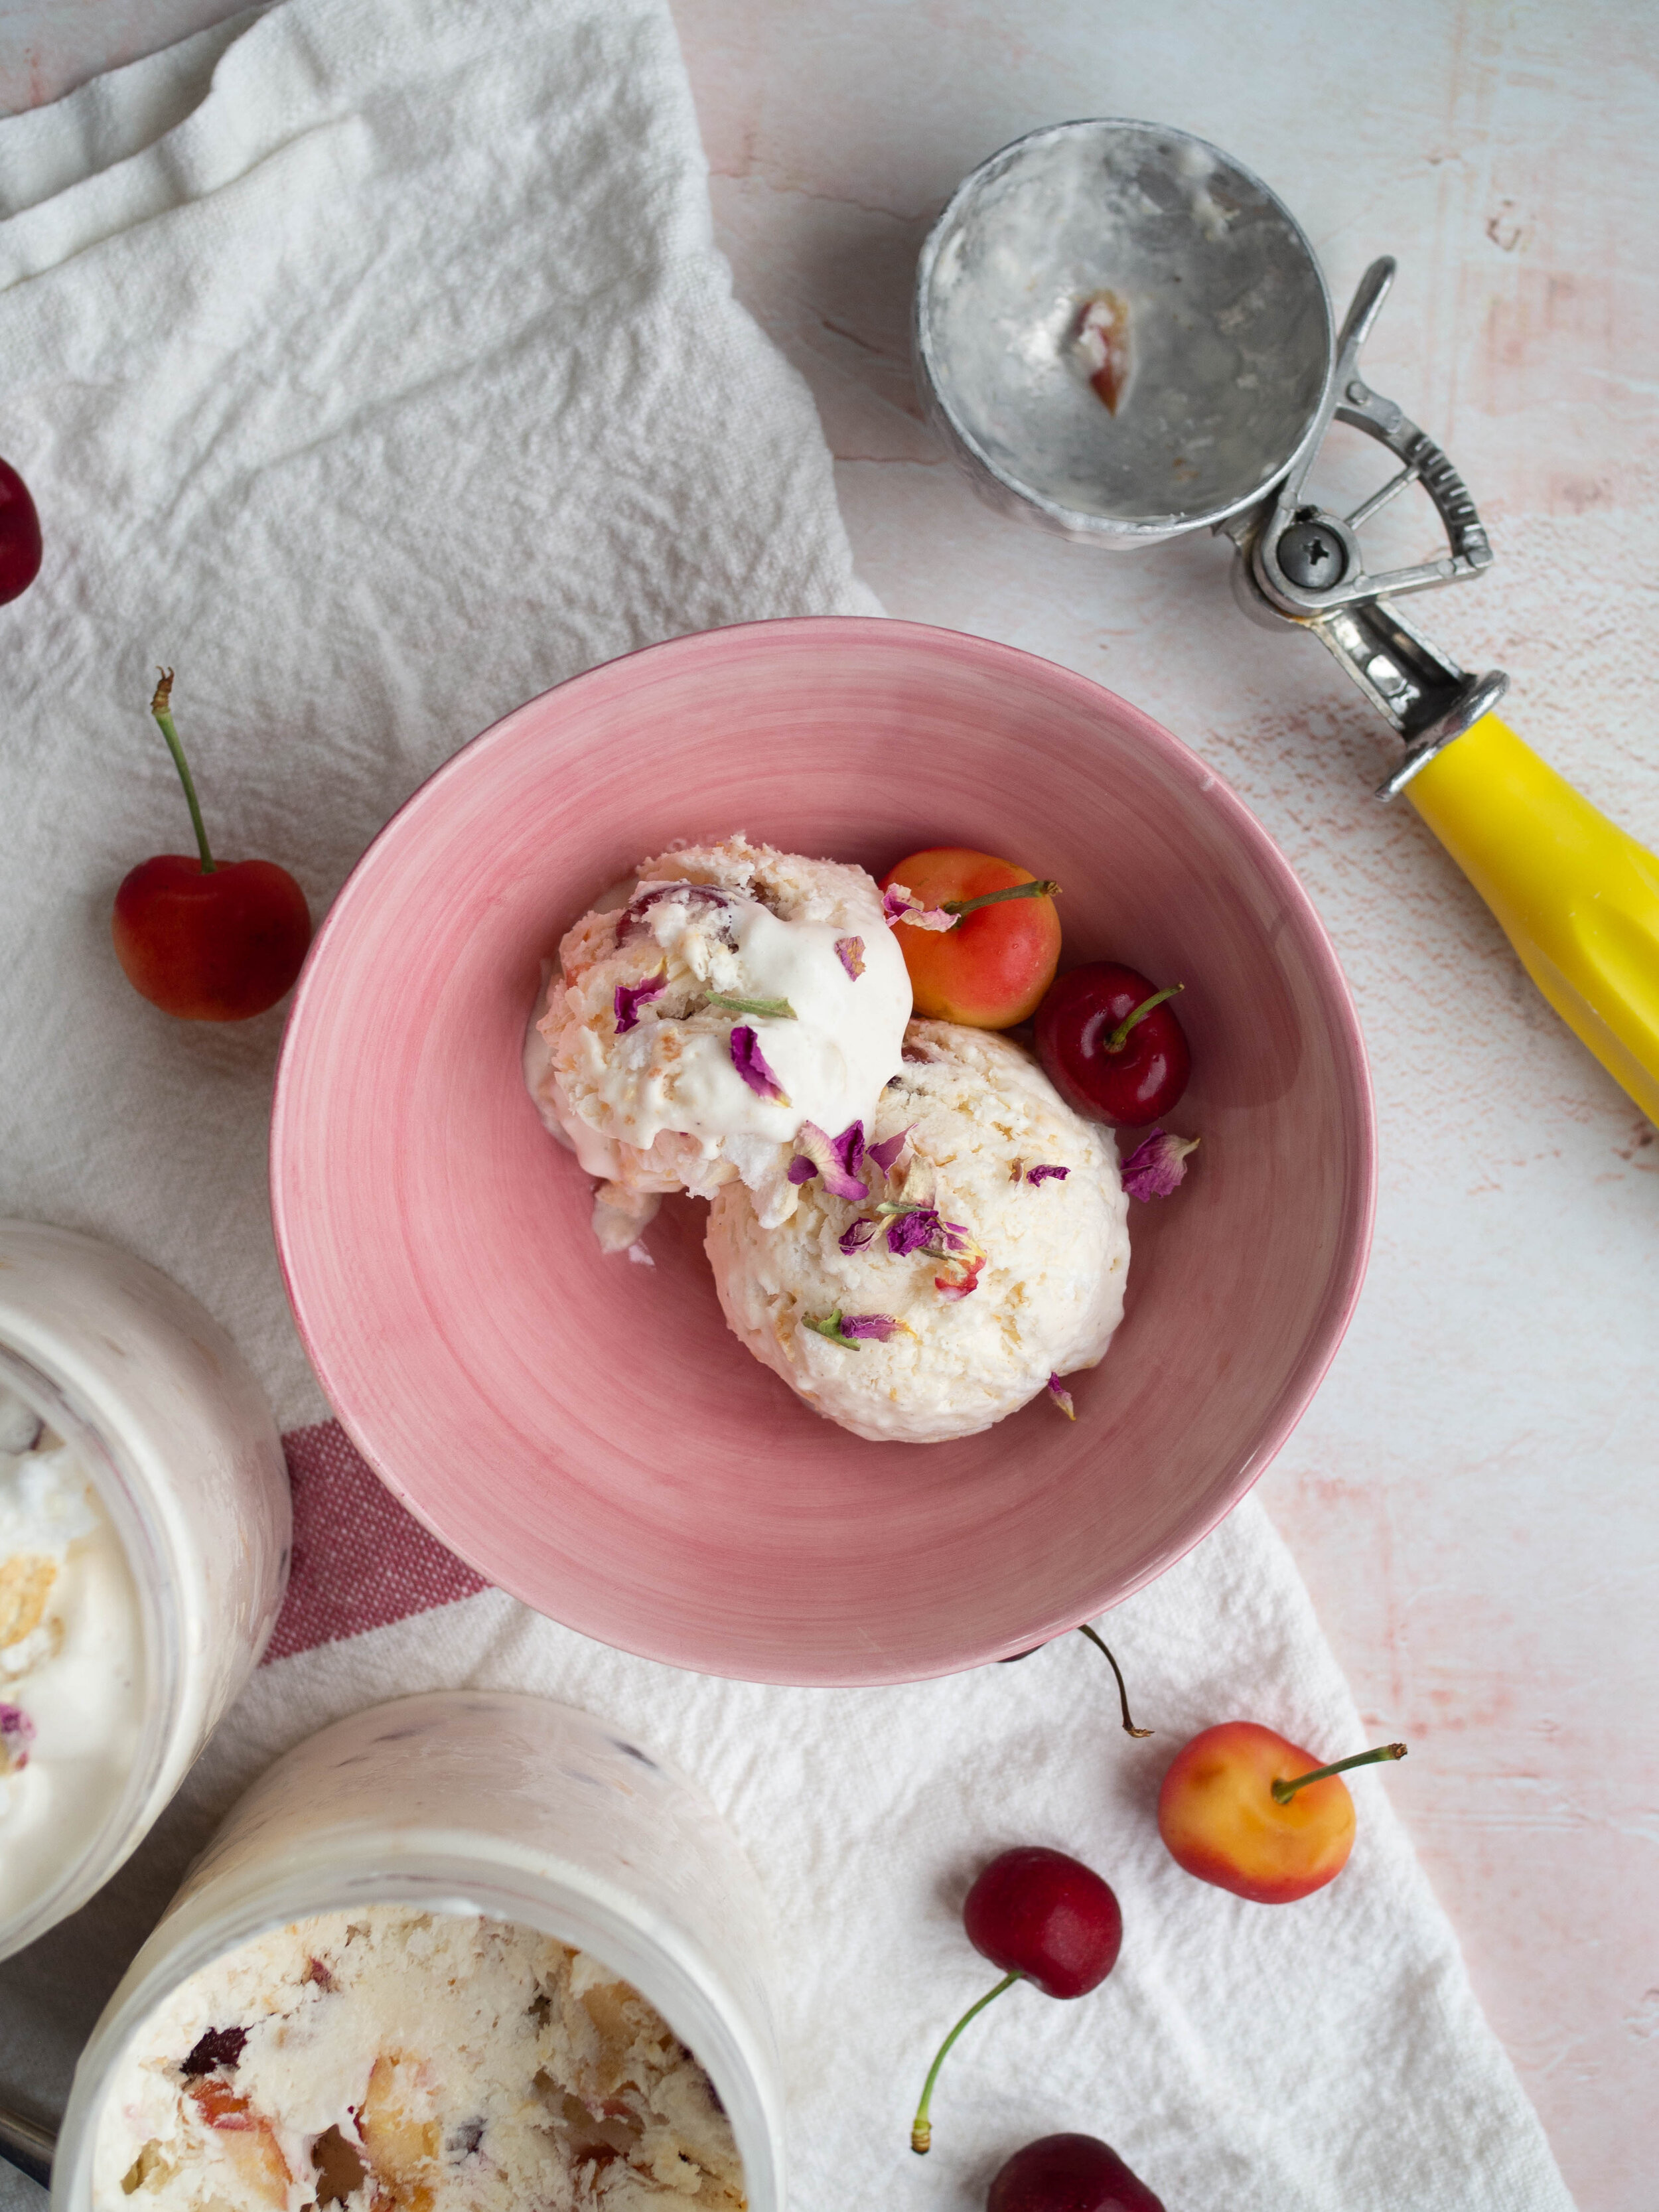
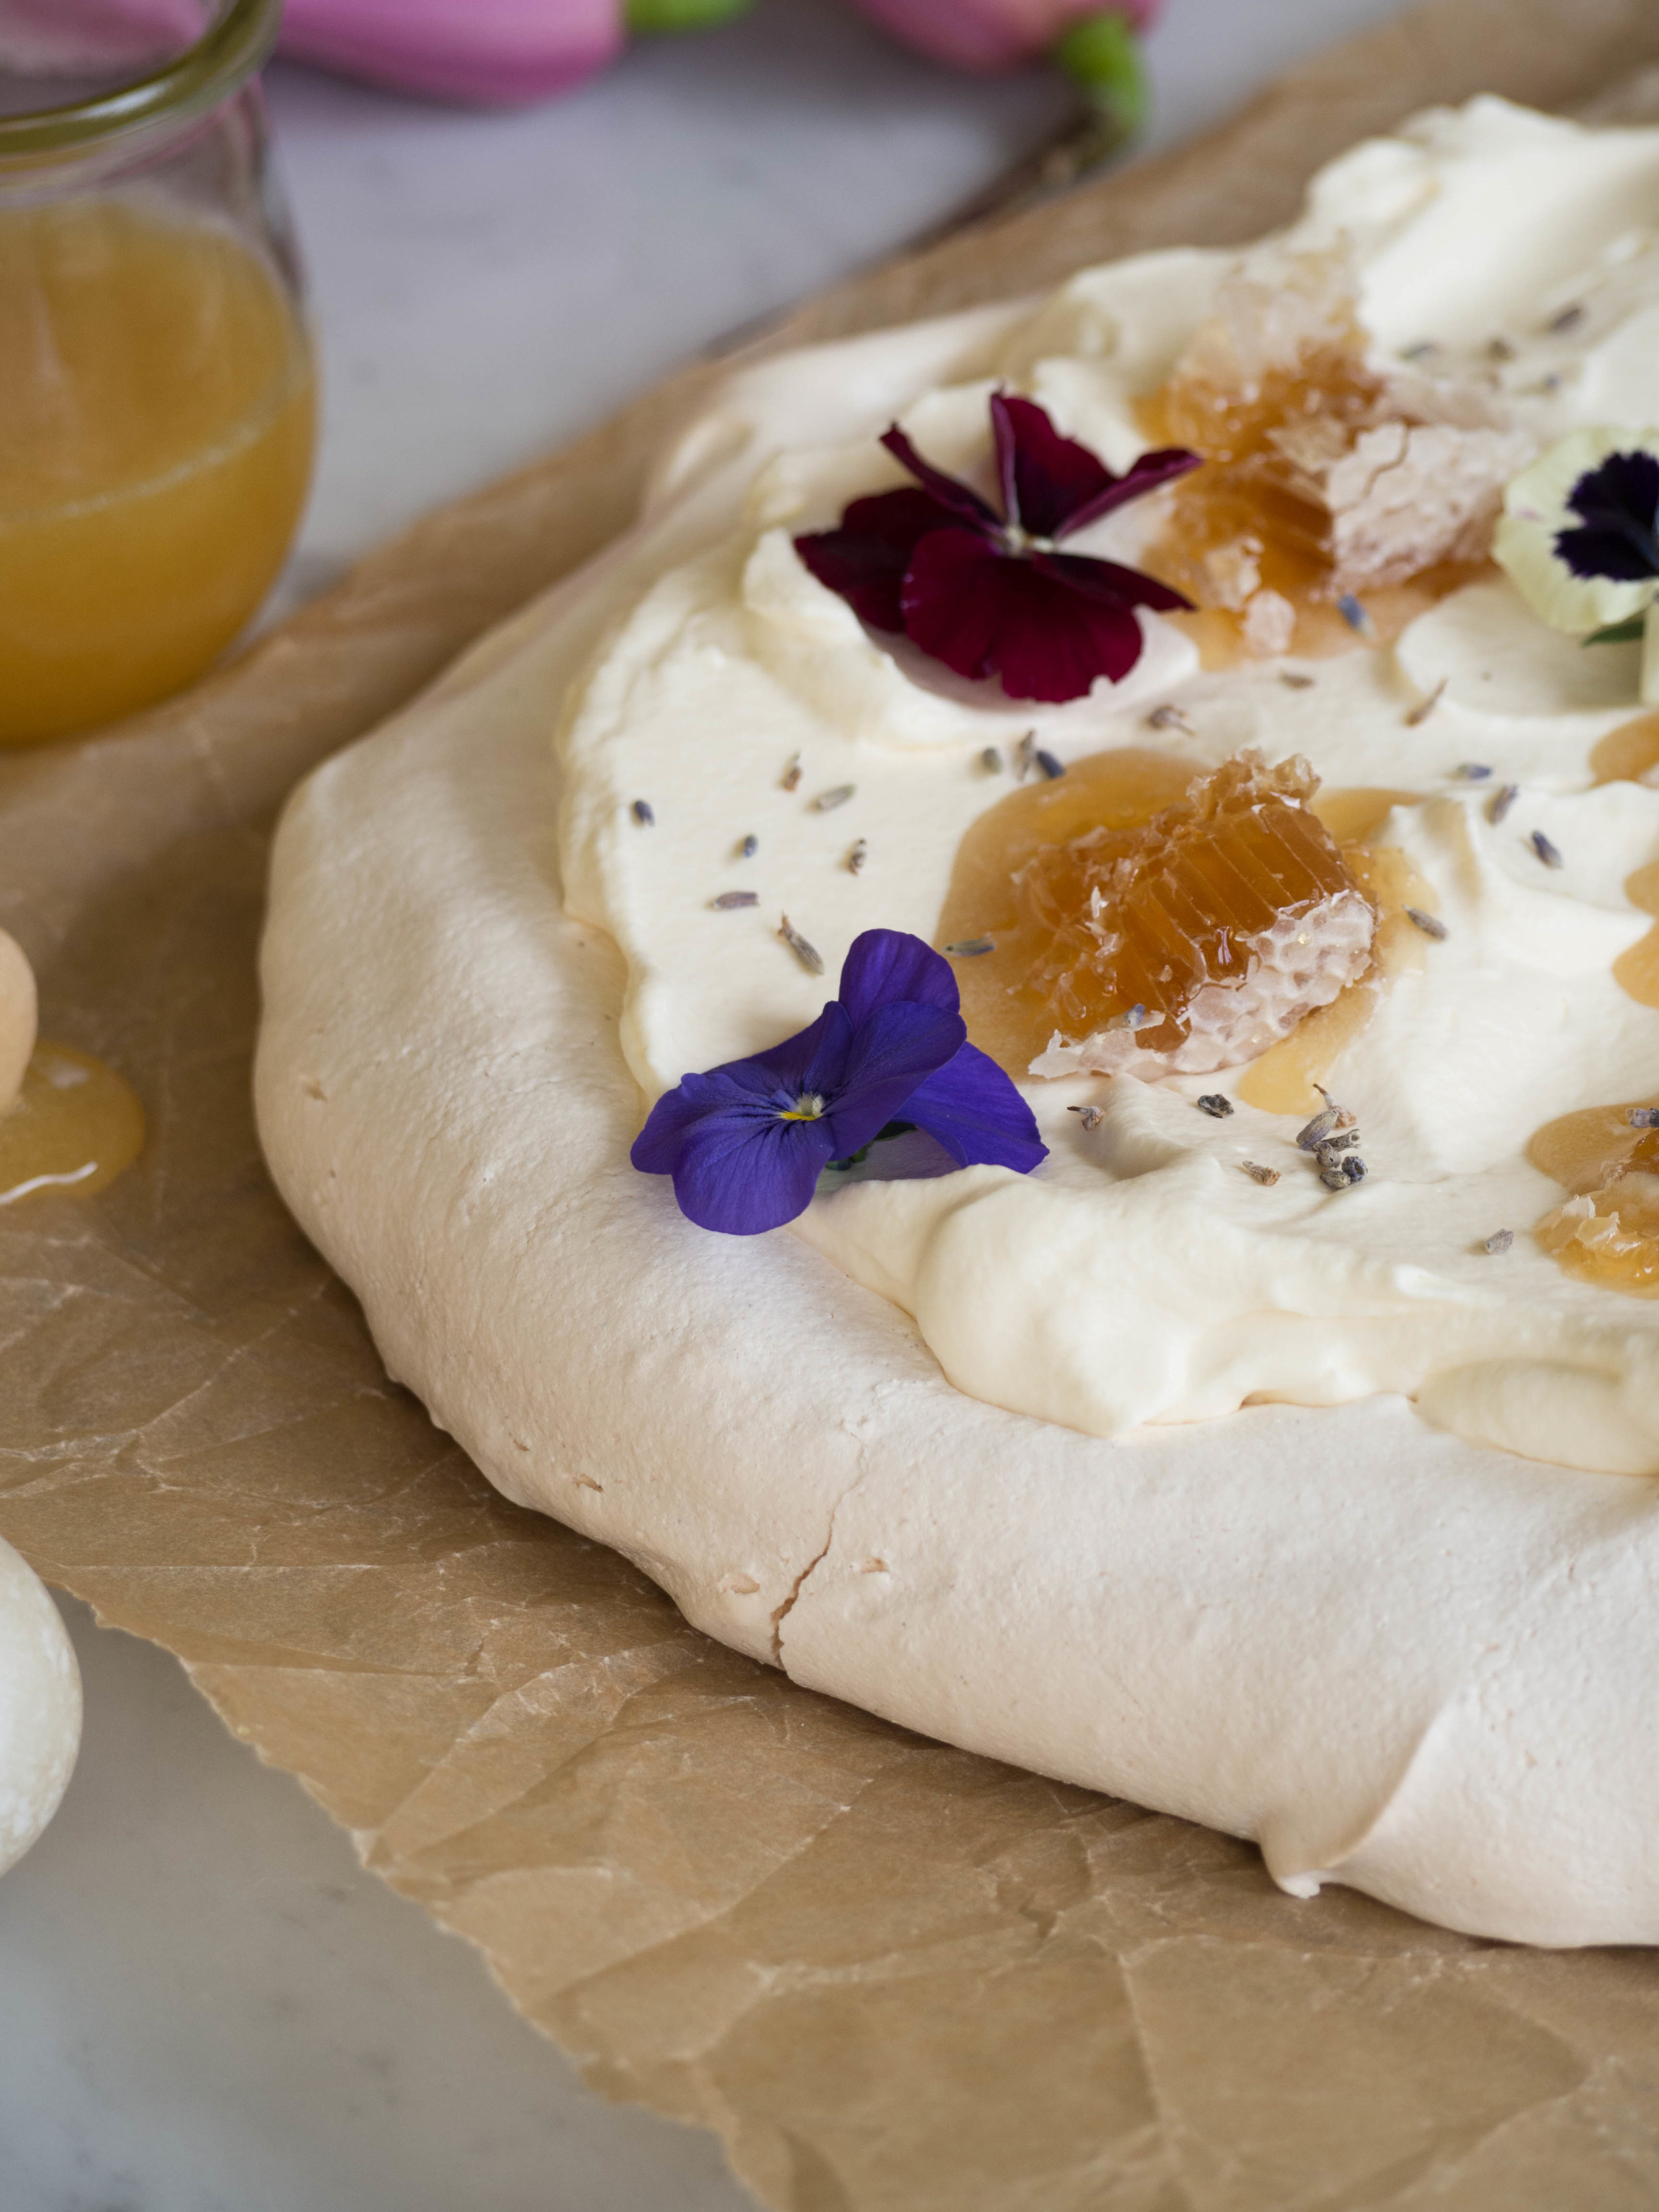
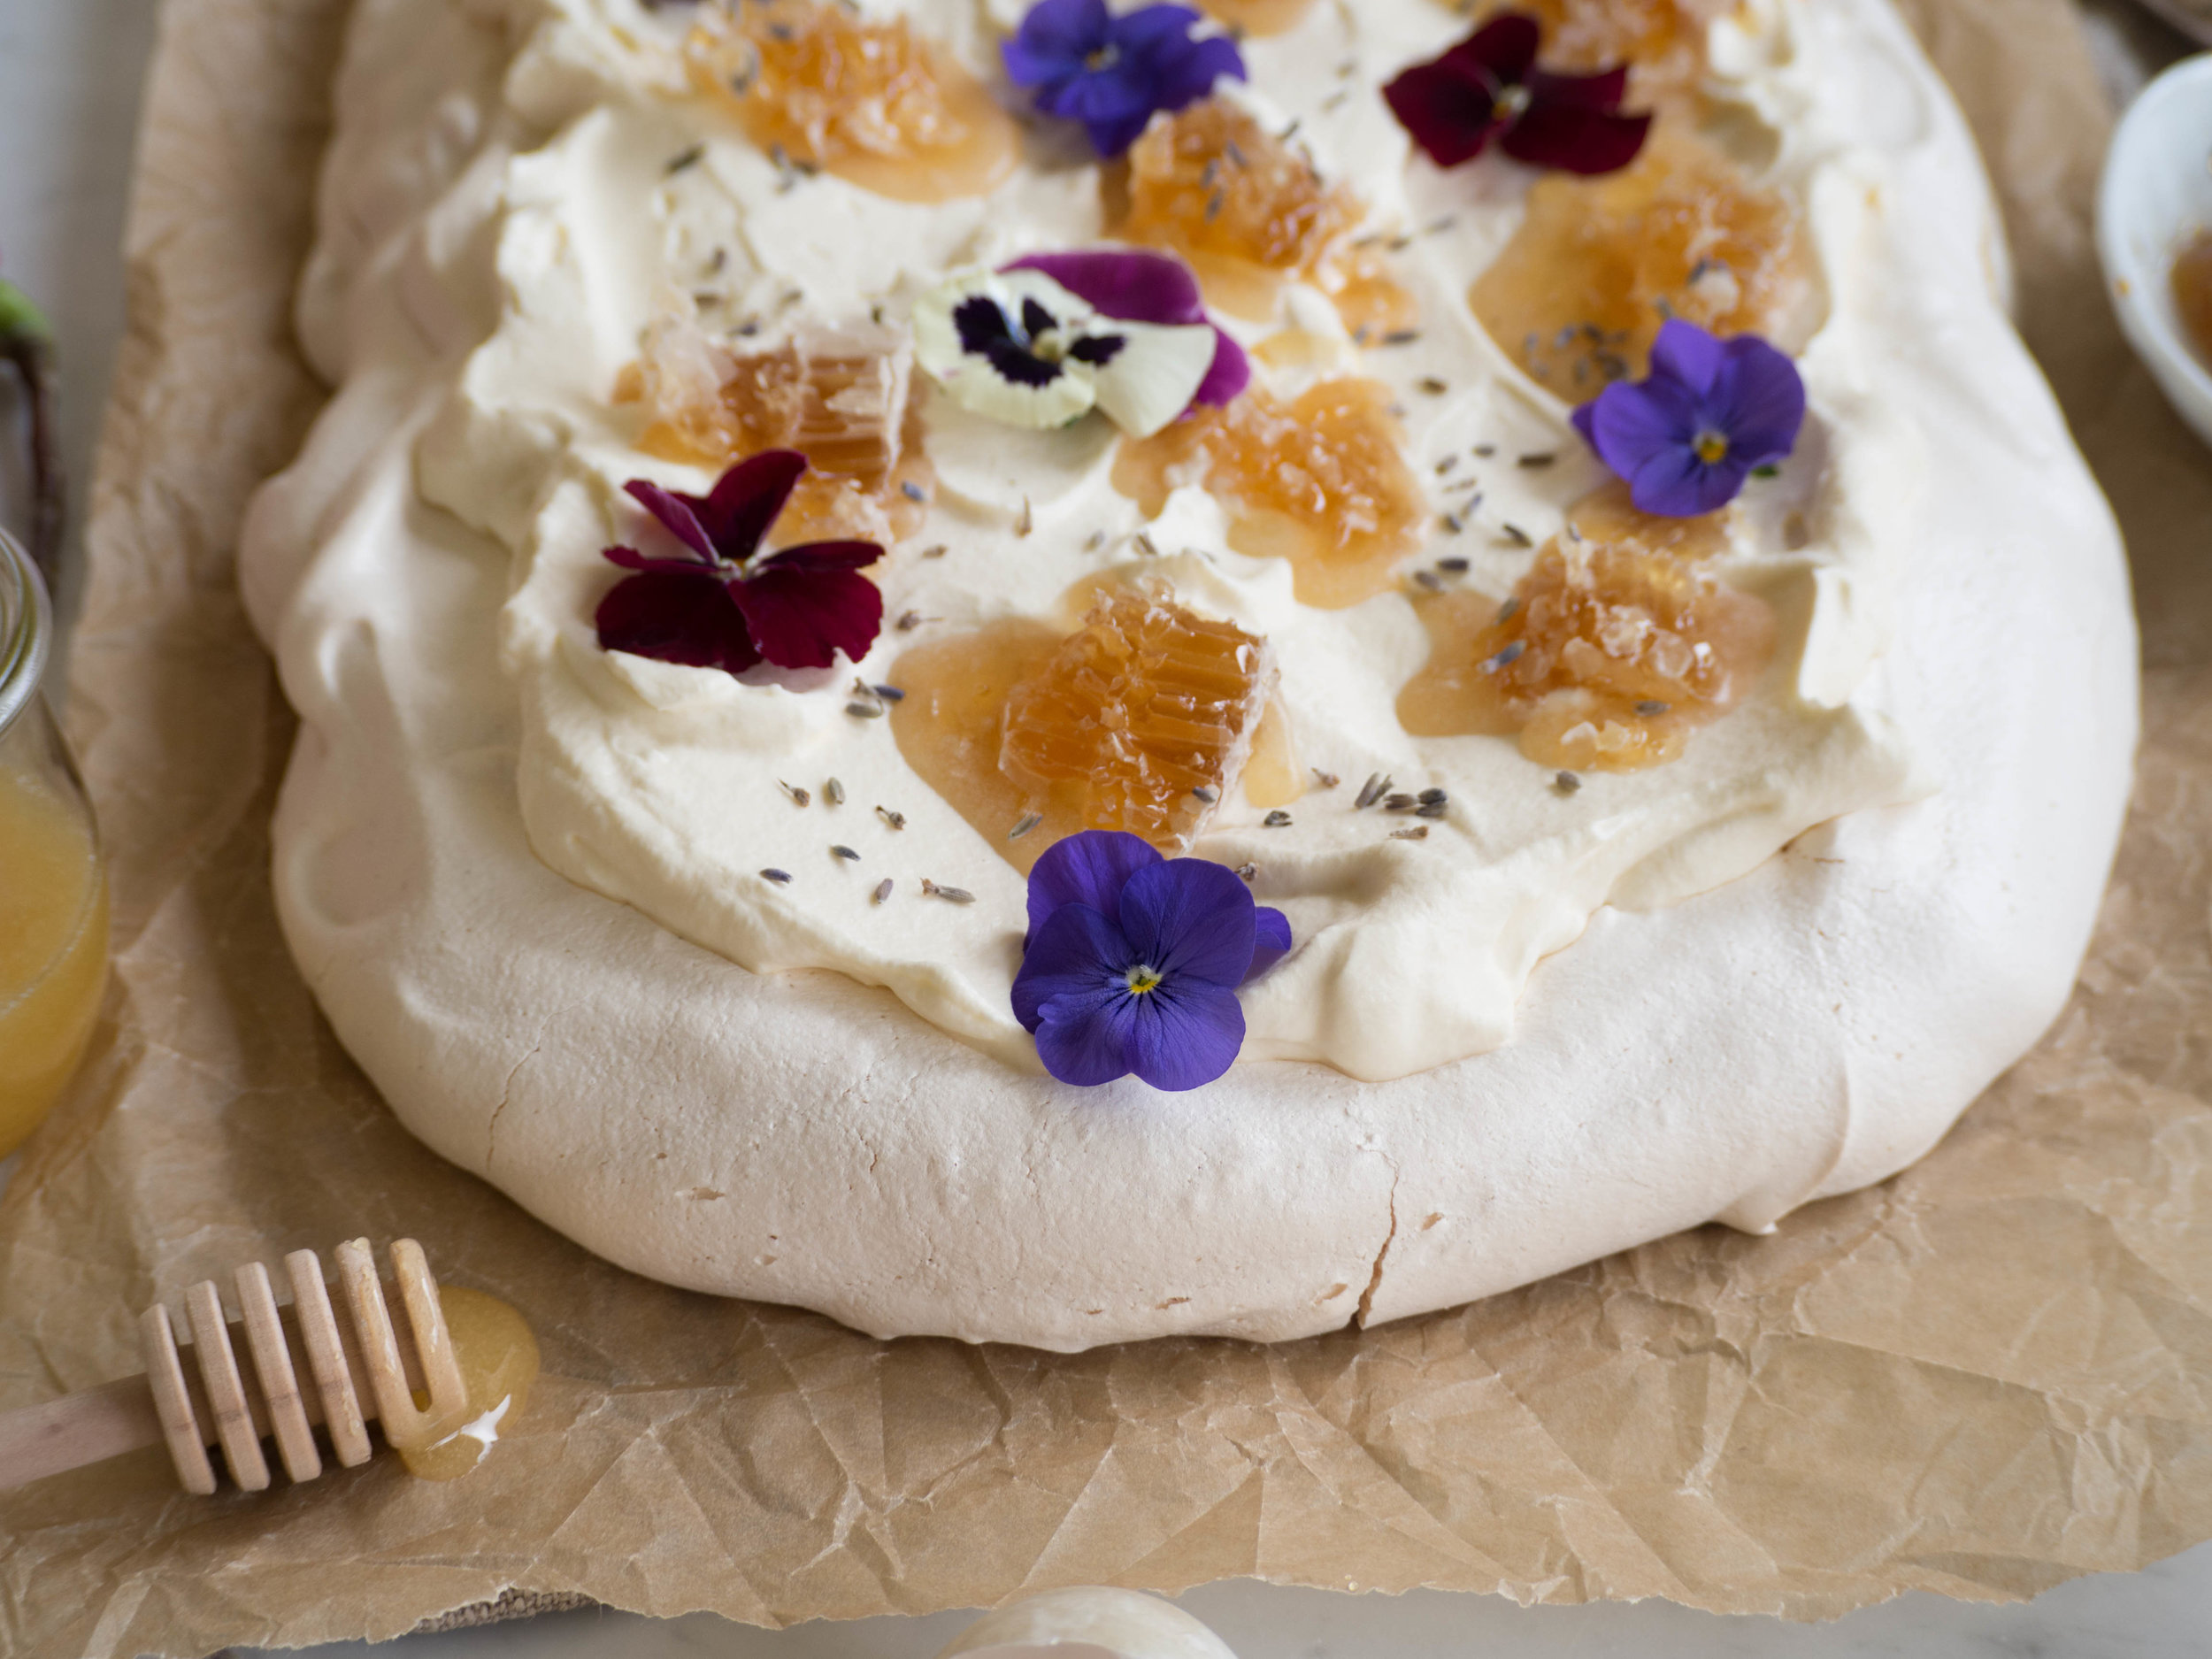
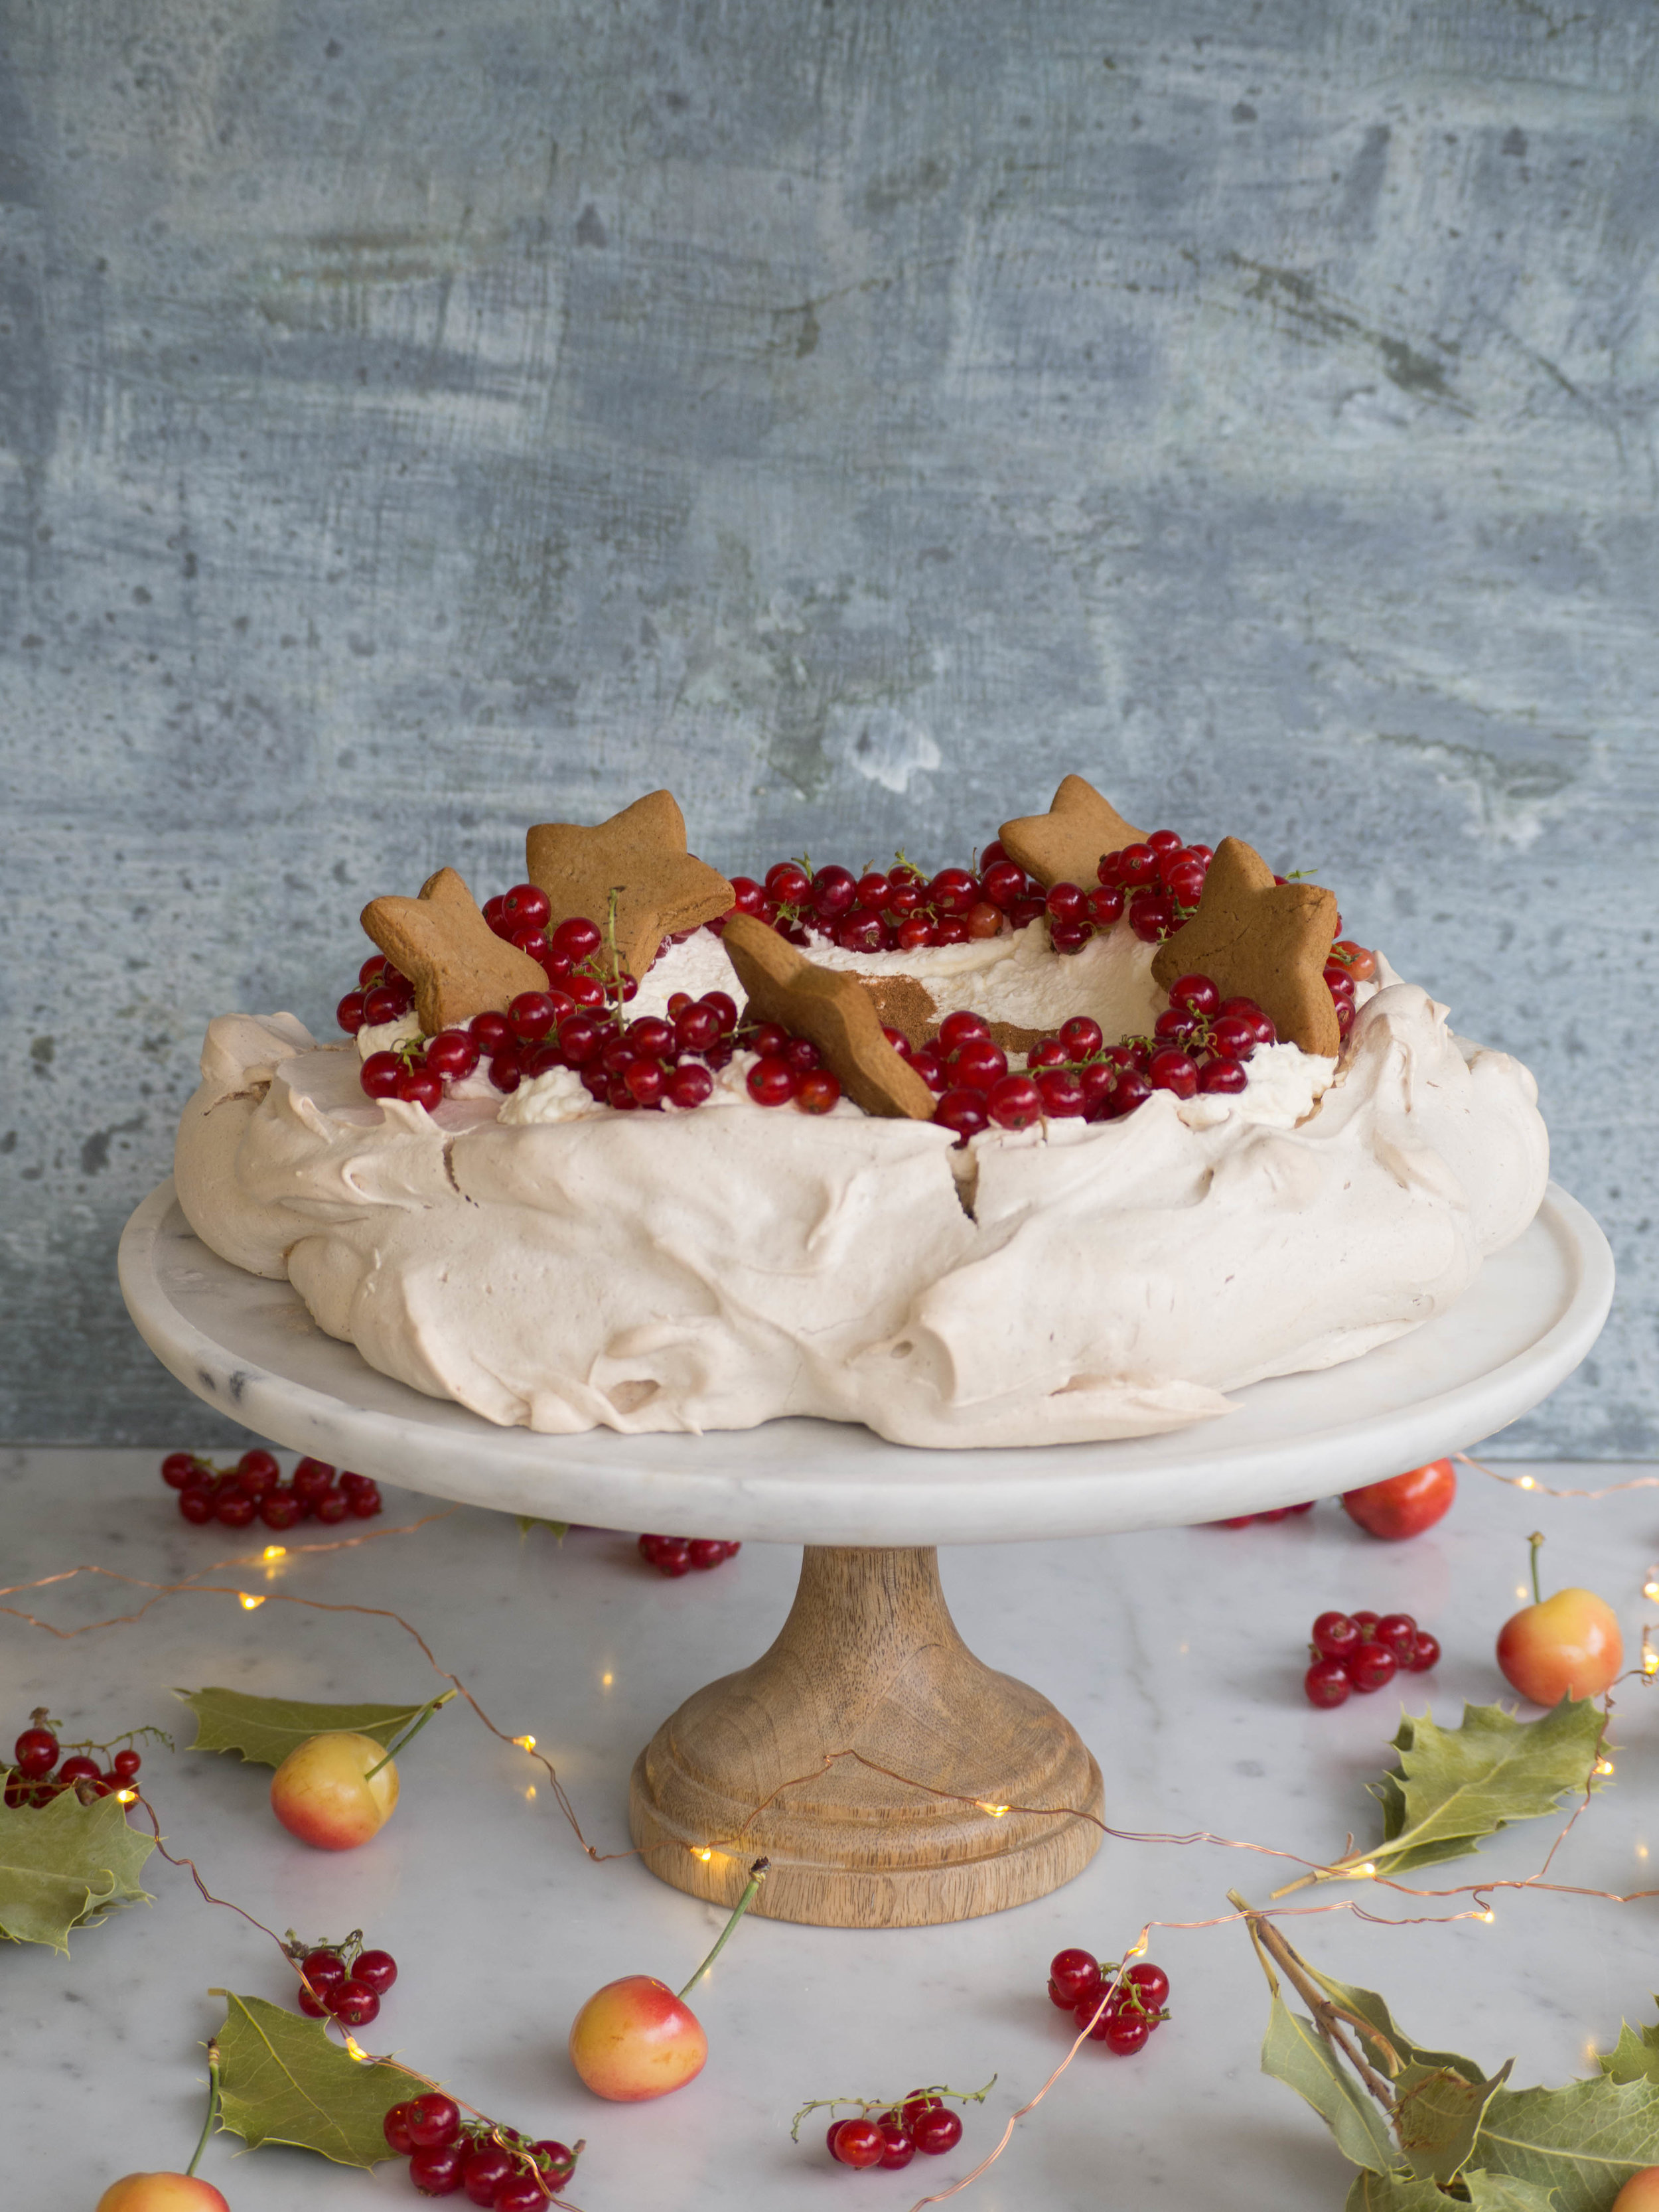
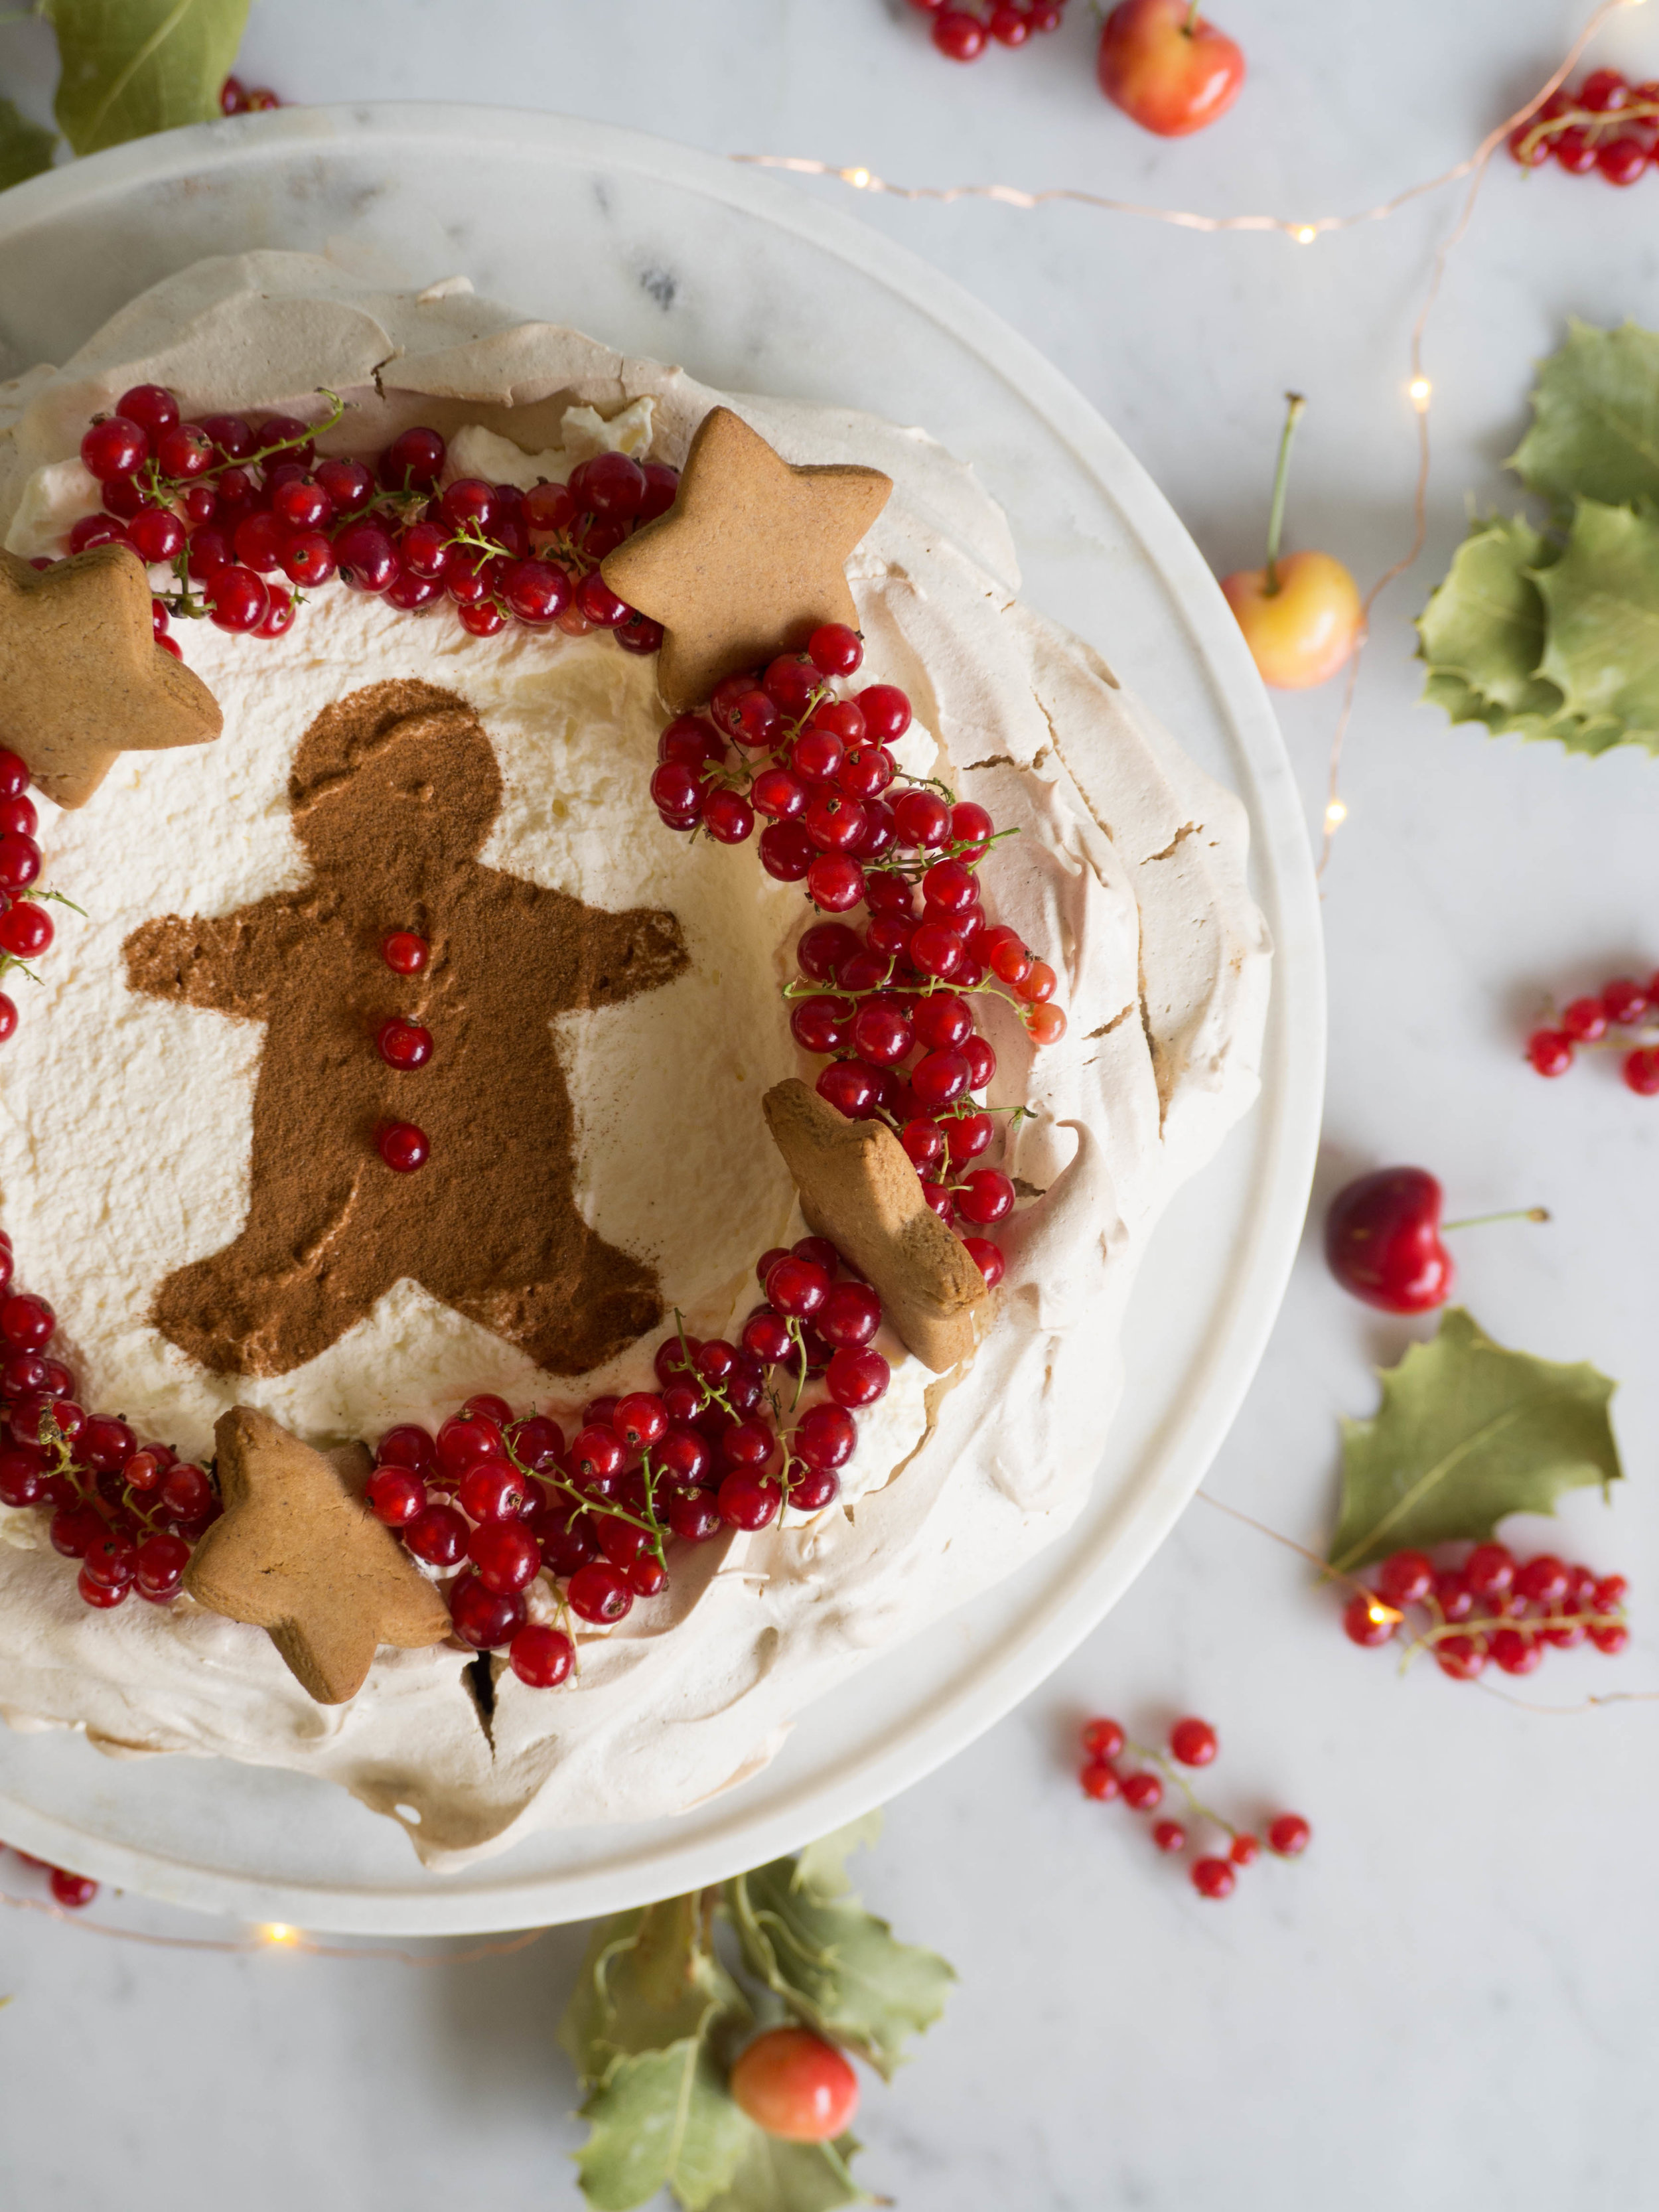
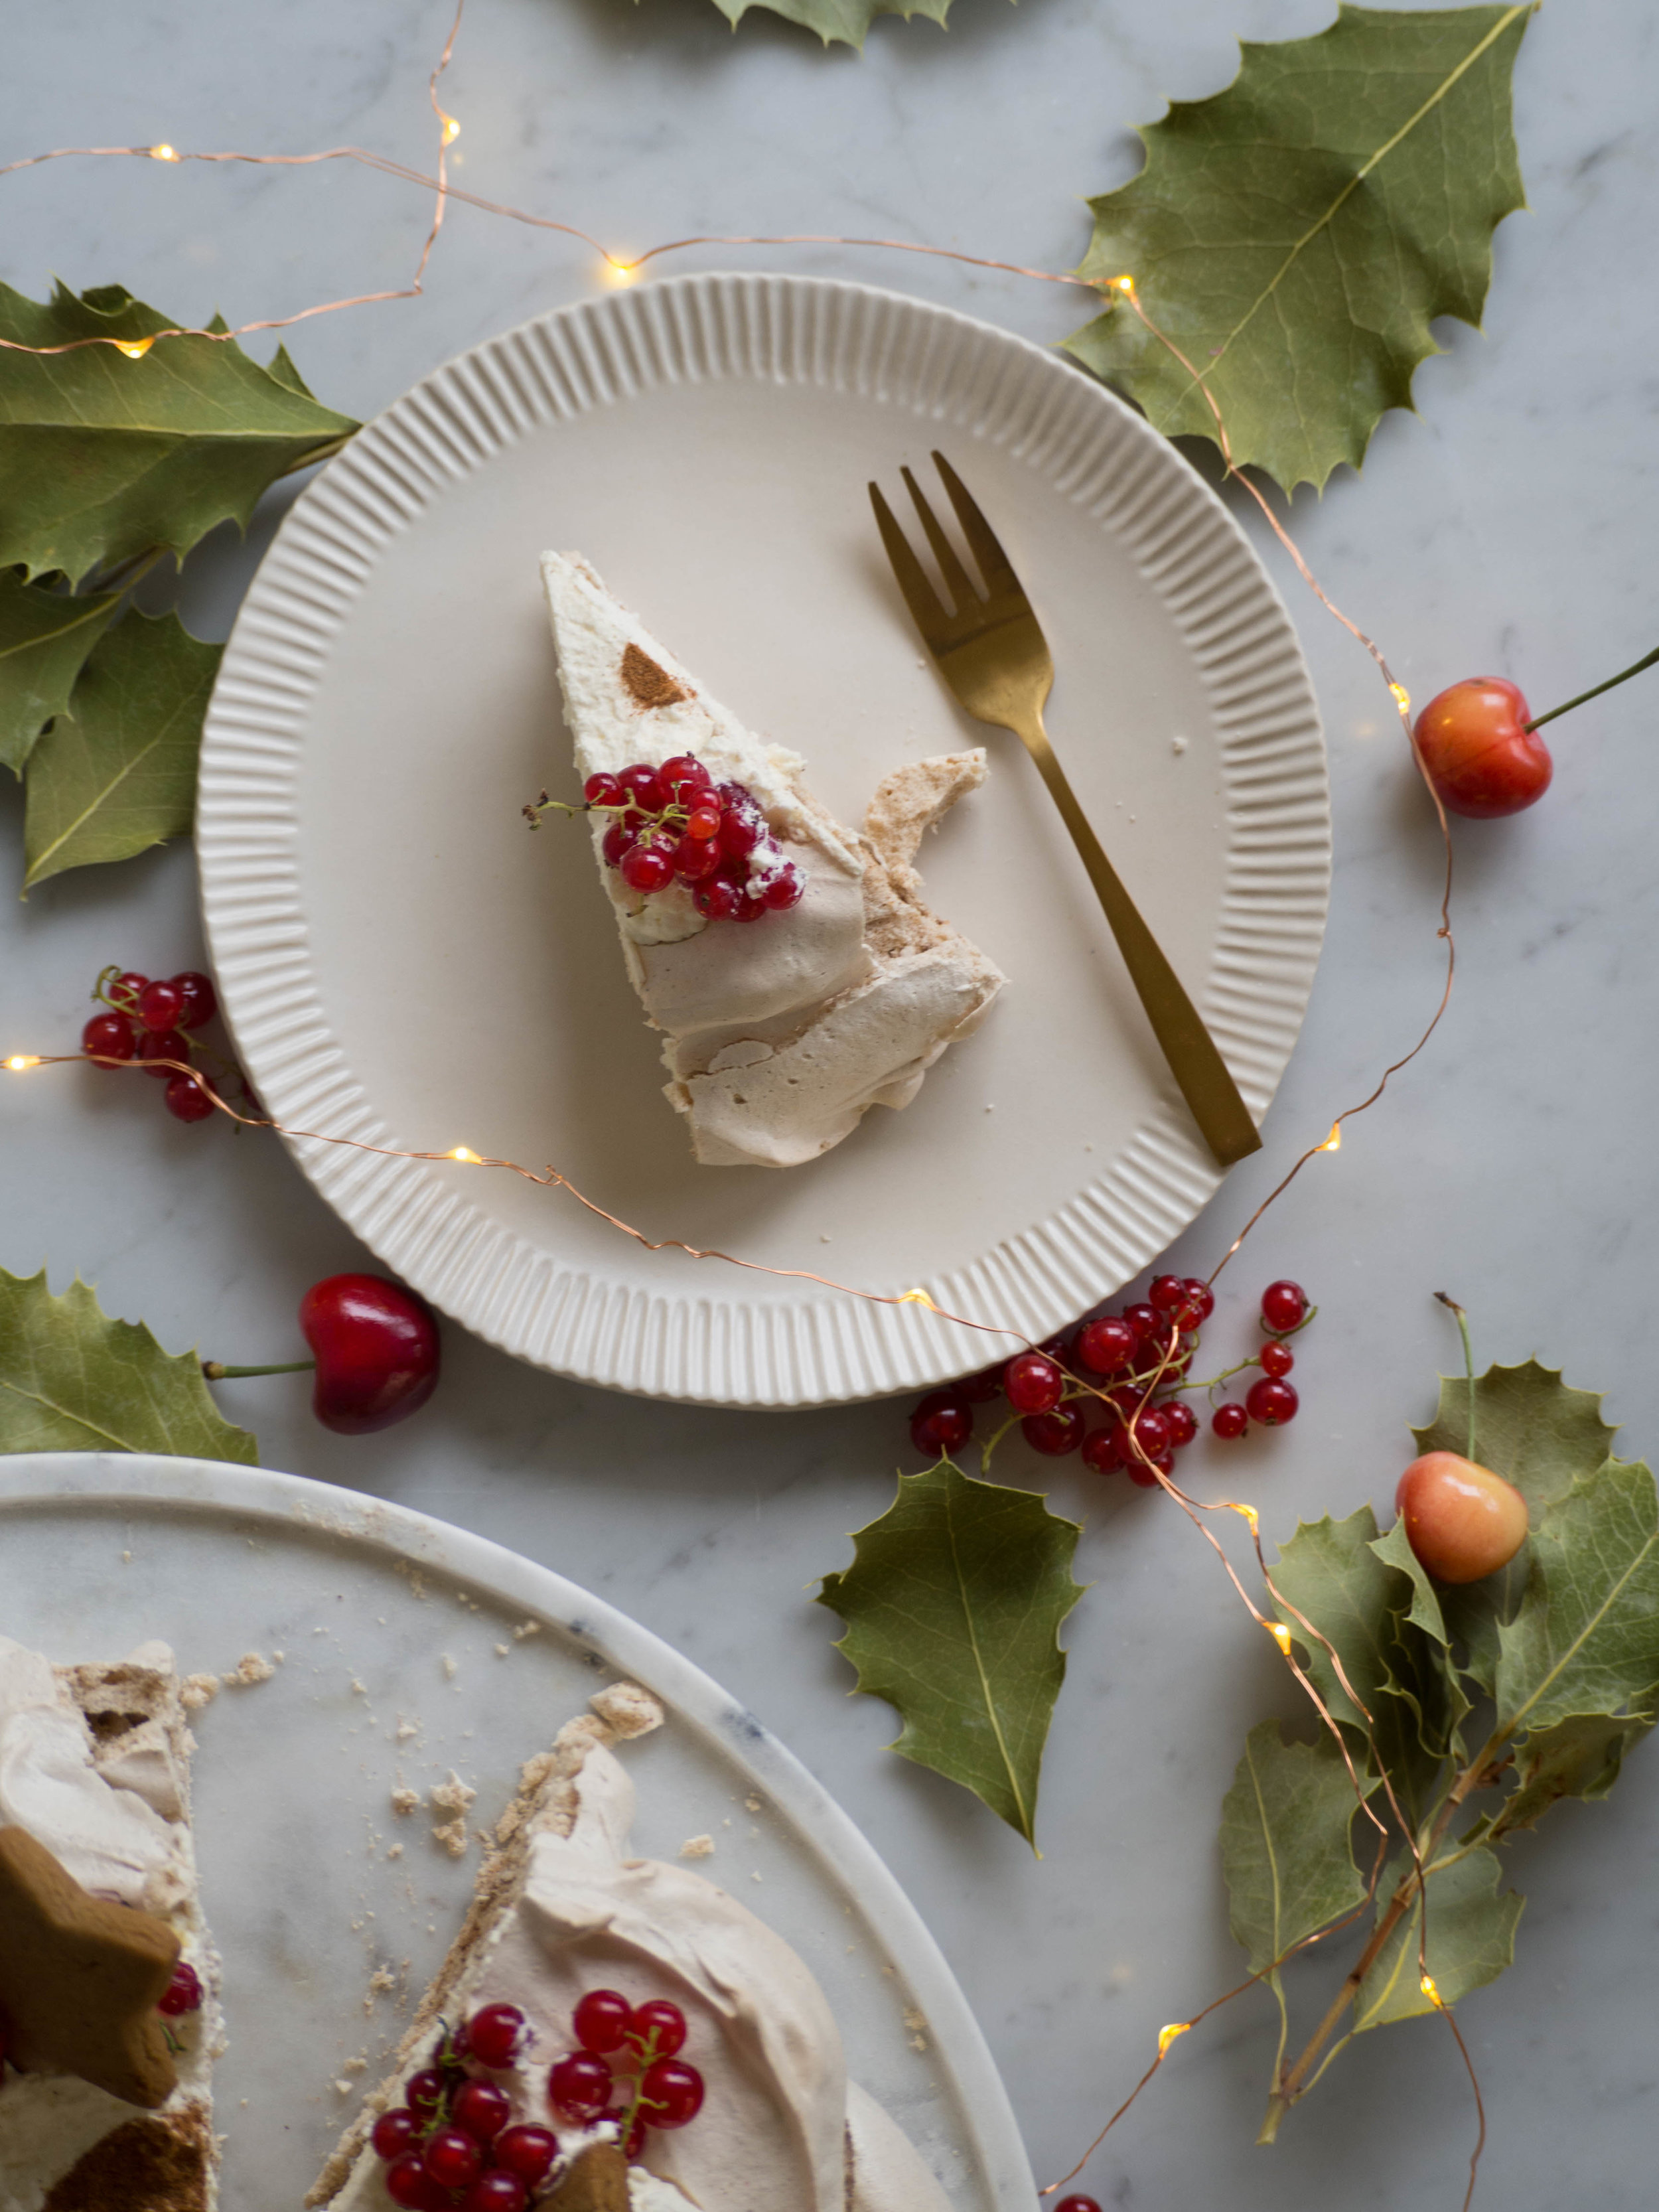
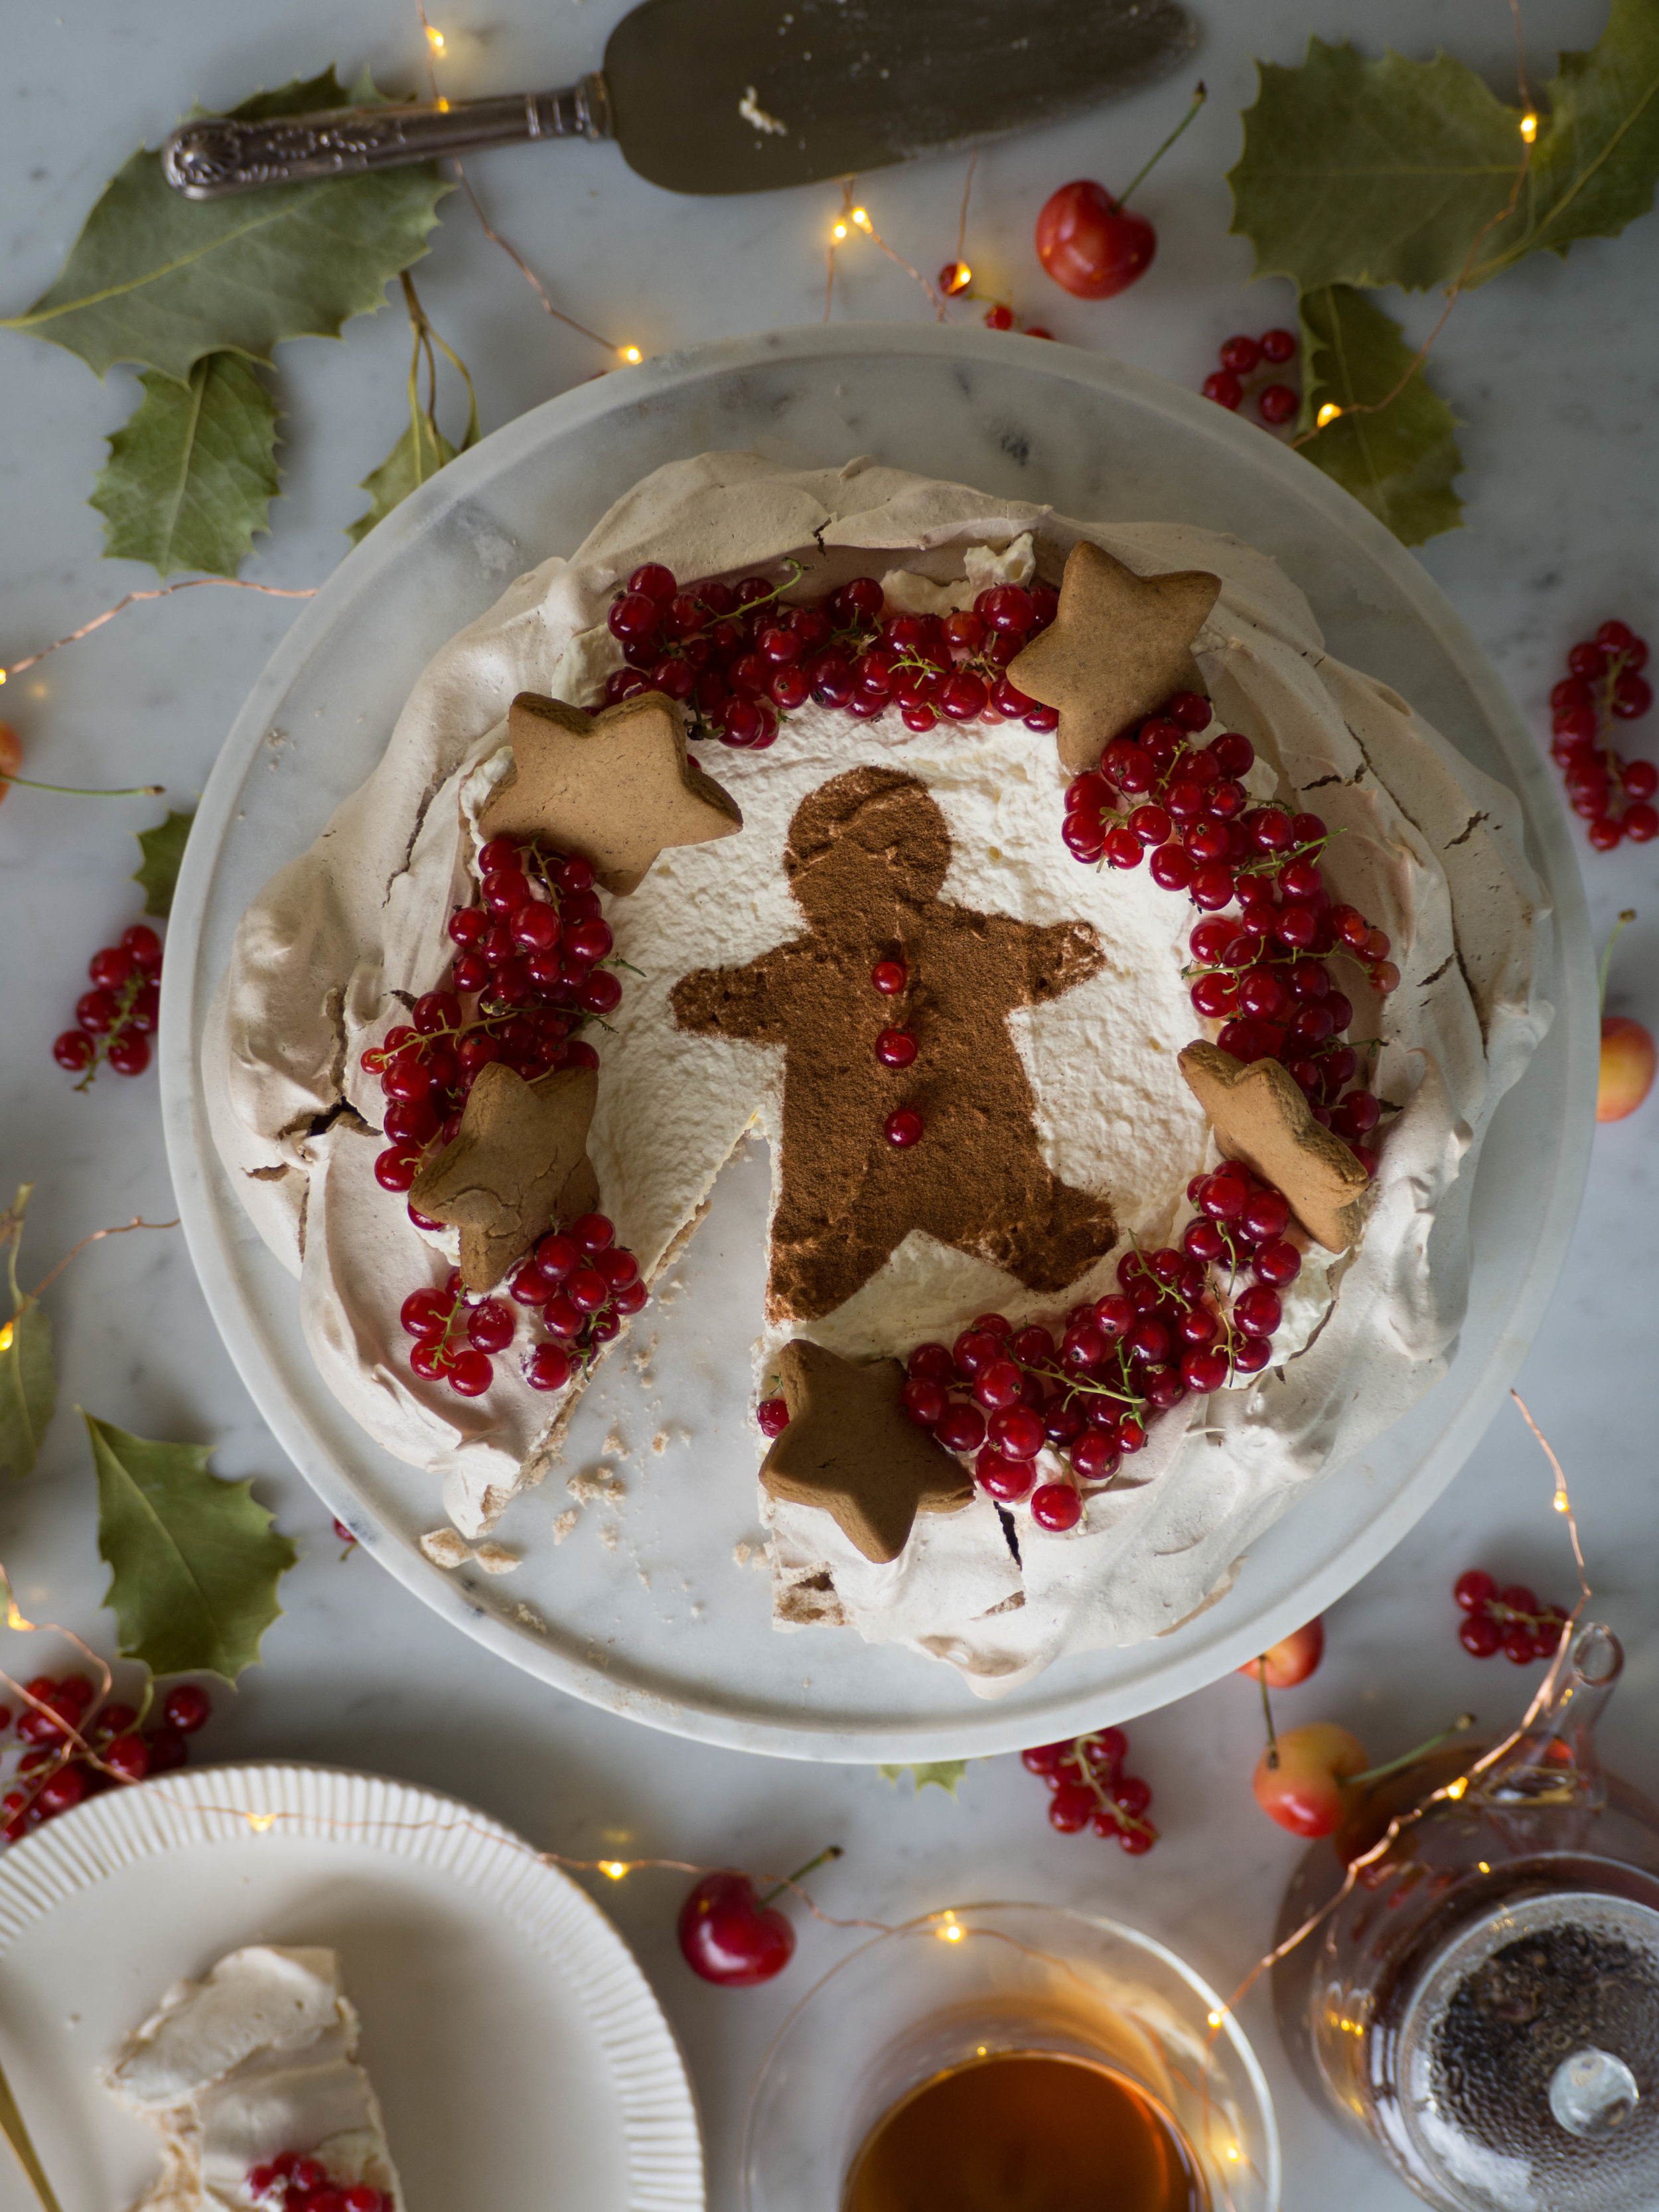
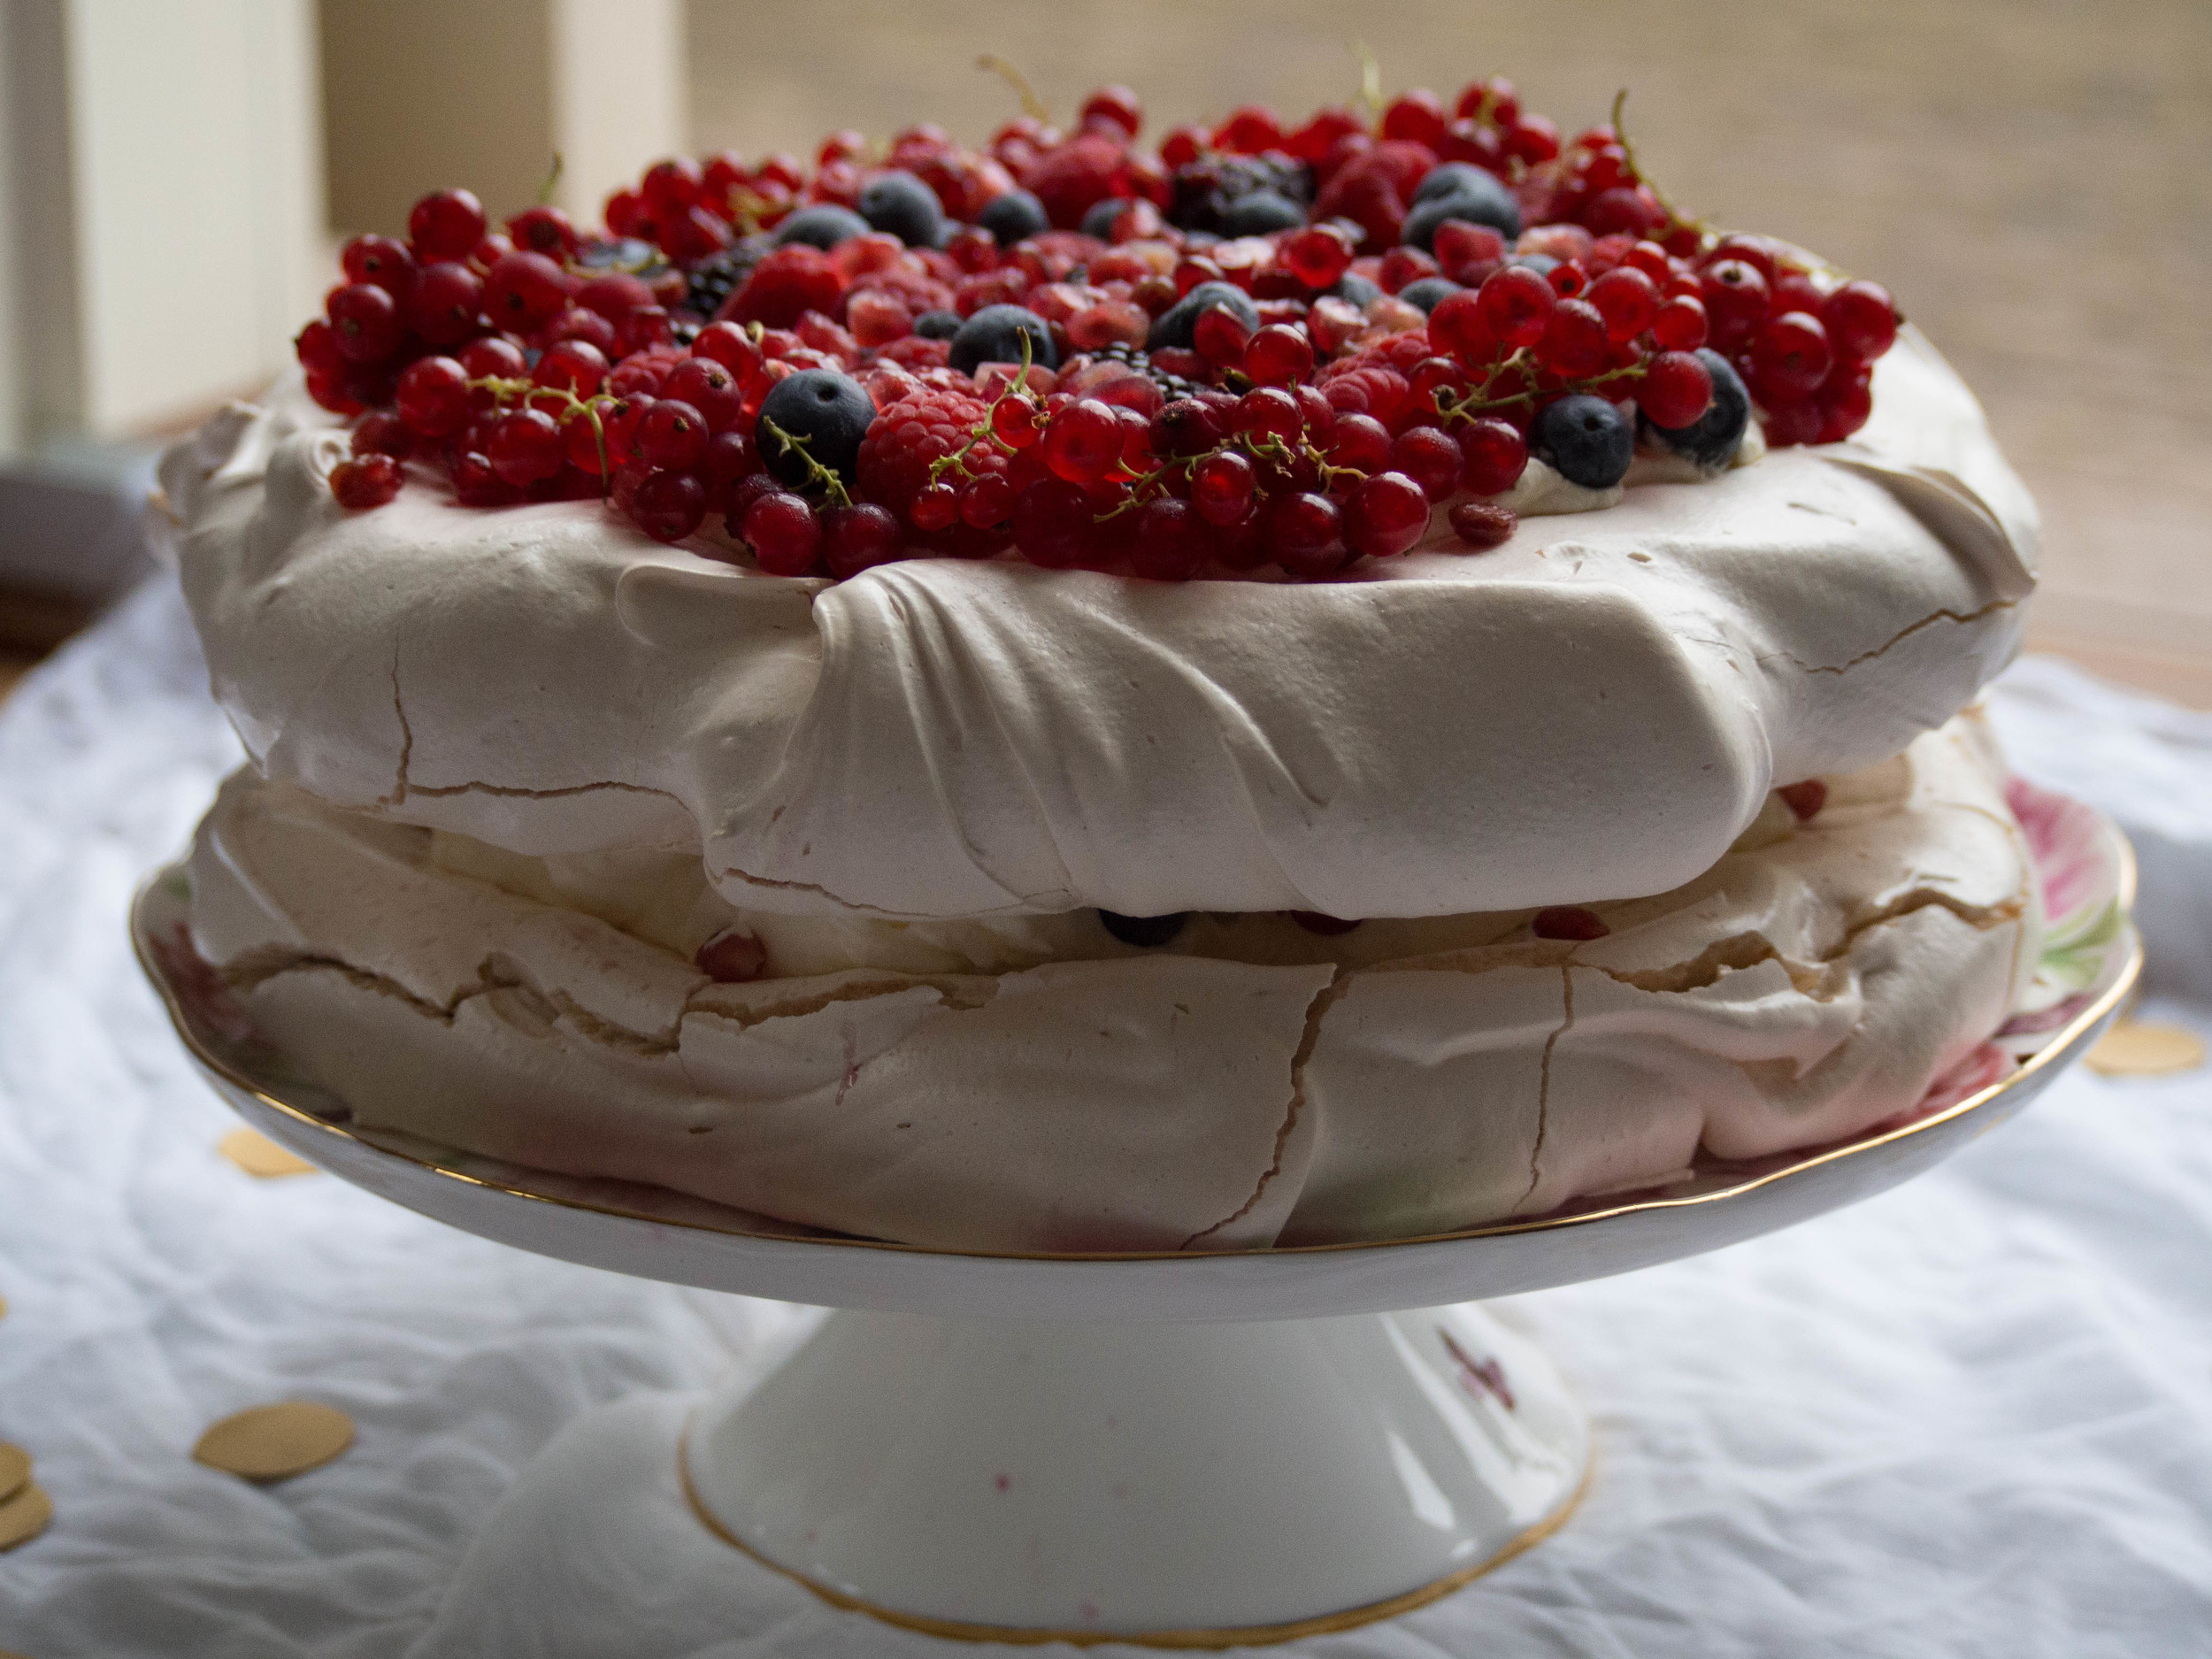
Topped with cream, berries and cherries its delicious and makes the most if the excellent in season fruit we have here at this time of year. You could also top your pav with mix other types of fruit, like mango, kiwi fruit, strawberries, stone fruit etc. It’s really up to you and what you most like to eat.

I haven’t given quantities for the fruit as you can put as little or as much as you like, just go with what looks good. I tend to put a whole punnet of blueberries and raspberries and add in a few cherries, maybe some cut up strawberries and a few edible flowers if I can get any.

If you have any leftovers you can cover the pav and store in the fridge for about 2 days.

An Aussie Pav for Christmas

Ingredients:

6 egg whites

375g caster sugar

1.5 tsp white vinegar

1.5 tsp vanilla bean paste or vanilla extract

30g cornflour

For the Topping:

300ml pouring cream

1/2 tsp vanilla bean paste

mixture of berries, such as blueberries and raspberries

handful of cherries

edible flowers, optional

Method:

Preheat oven to 200 degrees Celsius. Line a large baking tray with baking paper. Trace a circle on to the baking paper, using a plate or cake stand that is about 26-28cm in diameter (you can use whatever plate you will serve it on later).

Add the egg whites to the bowl of a stand mixer, and beat using the whisk attachment for 5-6 minutes. Gradually add the sugar during this time, a tablespoon or so at a time.

Add the vinegar and vanilla and continue to beat until the mixture is glossy and holding its peak.

Sift the cornflour over the mixture and gently fold into the meringue using a spatula until just combined.

Using your finger, place a tiny amount of the meringue mixture under two corners of the baking paper on the prepared tray. This will keep your baking paper in place whilst you shape the pavlova.

Place the meringue onto the prepared tray, keeping within the traced circle. Spread it out using a spatula, keeping the sides of the pavlova high and the middle a little lower (so it can hold the cream and fruit later!). I like to leave a little gap between my pav and the traced circle, rather than pushing the meringue right to the edges. The pav will expand a bit as it cooks, and if you’ve traced around the serving plate you will use later on, this way the pav will still fit on the plate rather than expanding past the traced circle, and therefore becoming bigger than your serving plate or cake stand!

Turn the oven down to 125 degrees Celsius and cook the pav undisturbed (don’t open the oven!), for 1.5 hours. After 1.5 hours, turn the oven off and leave the pav to cool completely in the oven (leaving it overnight to cool is best if you can).

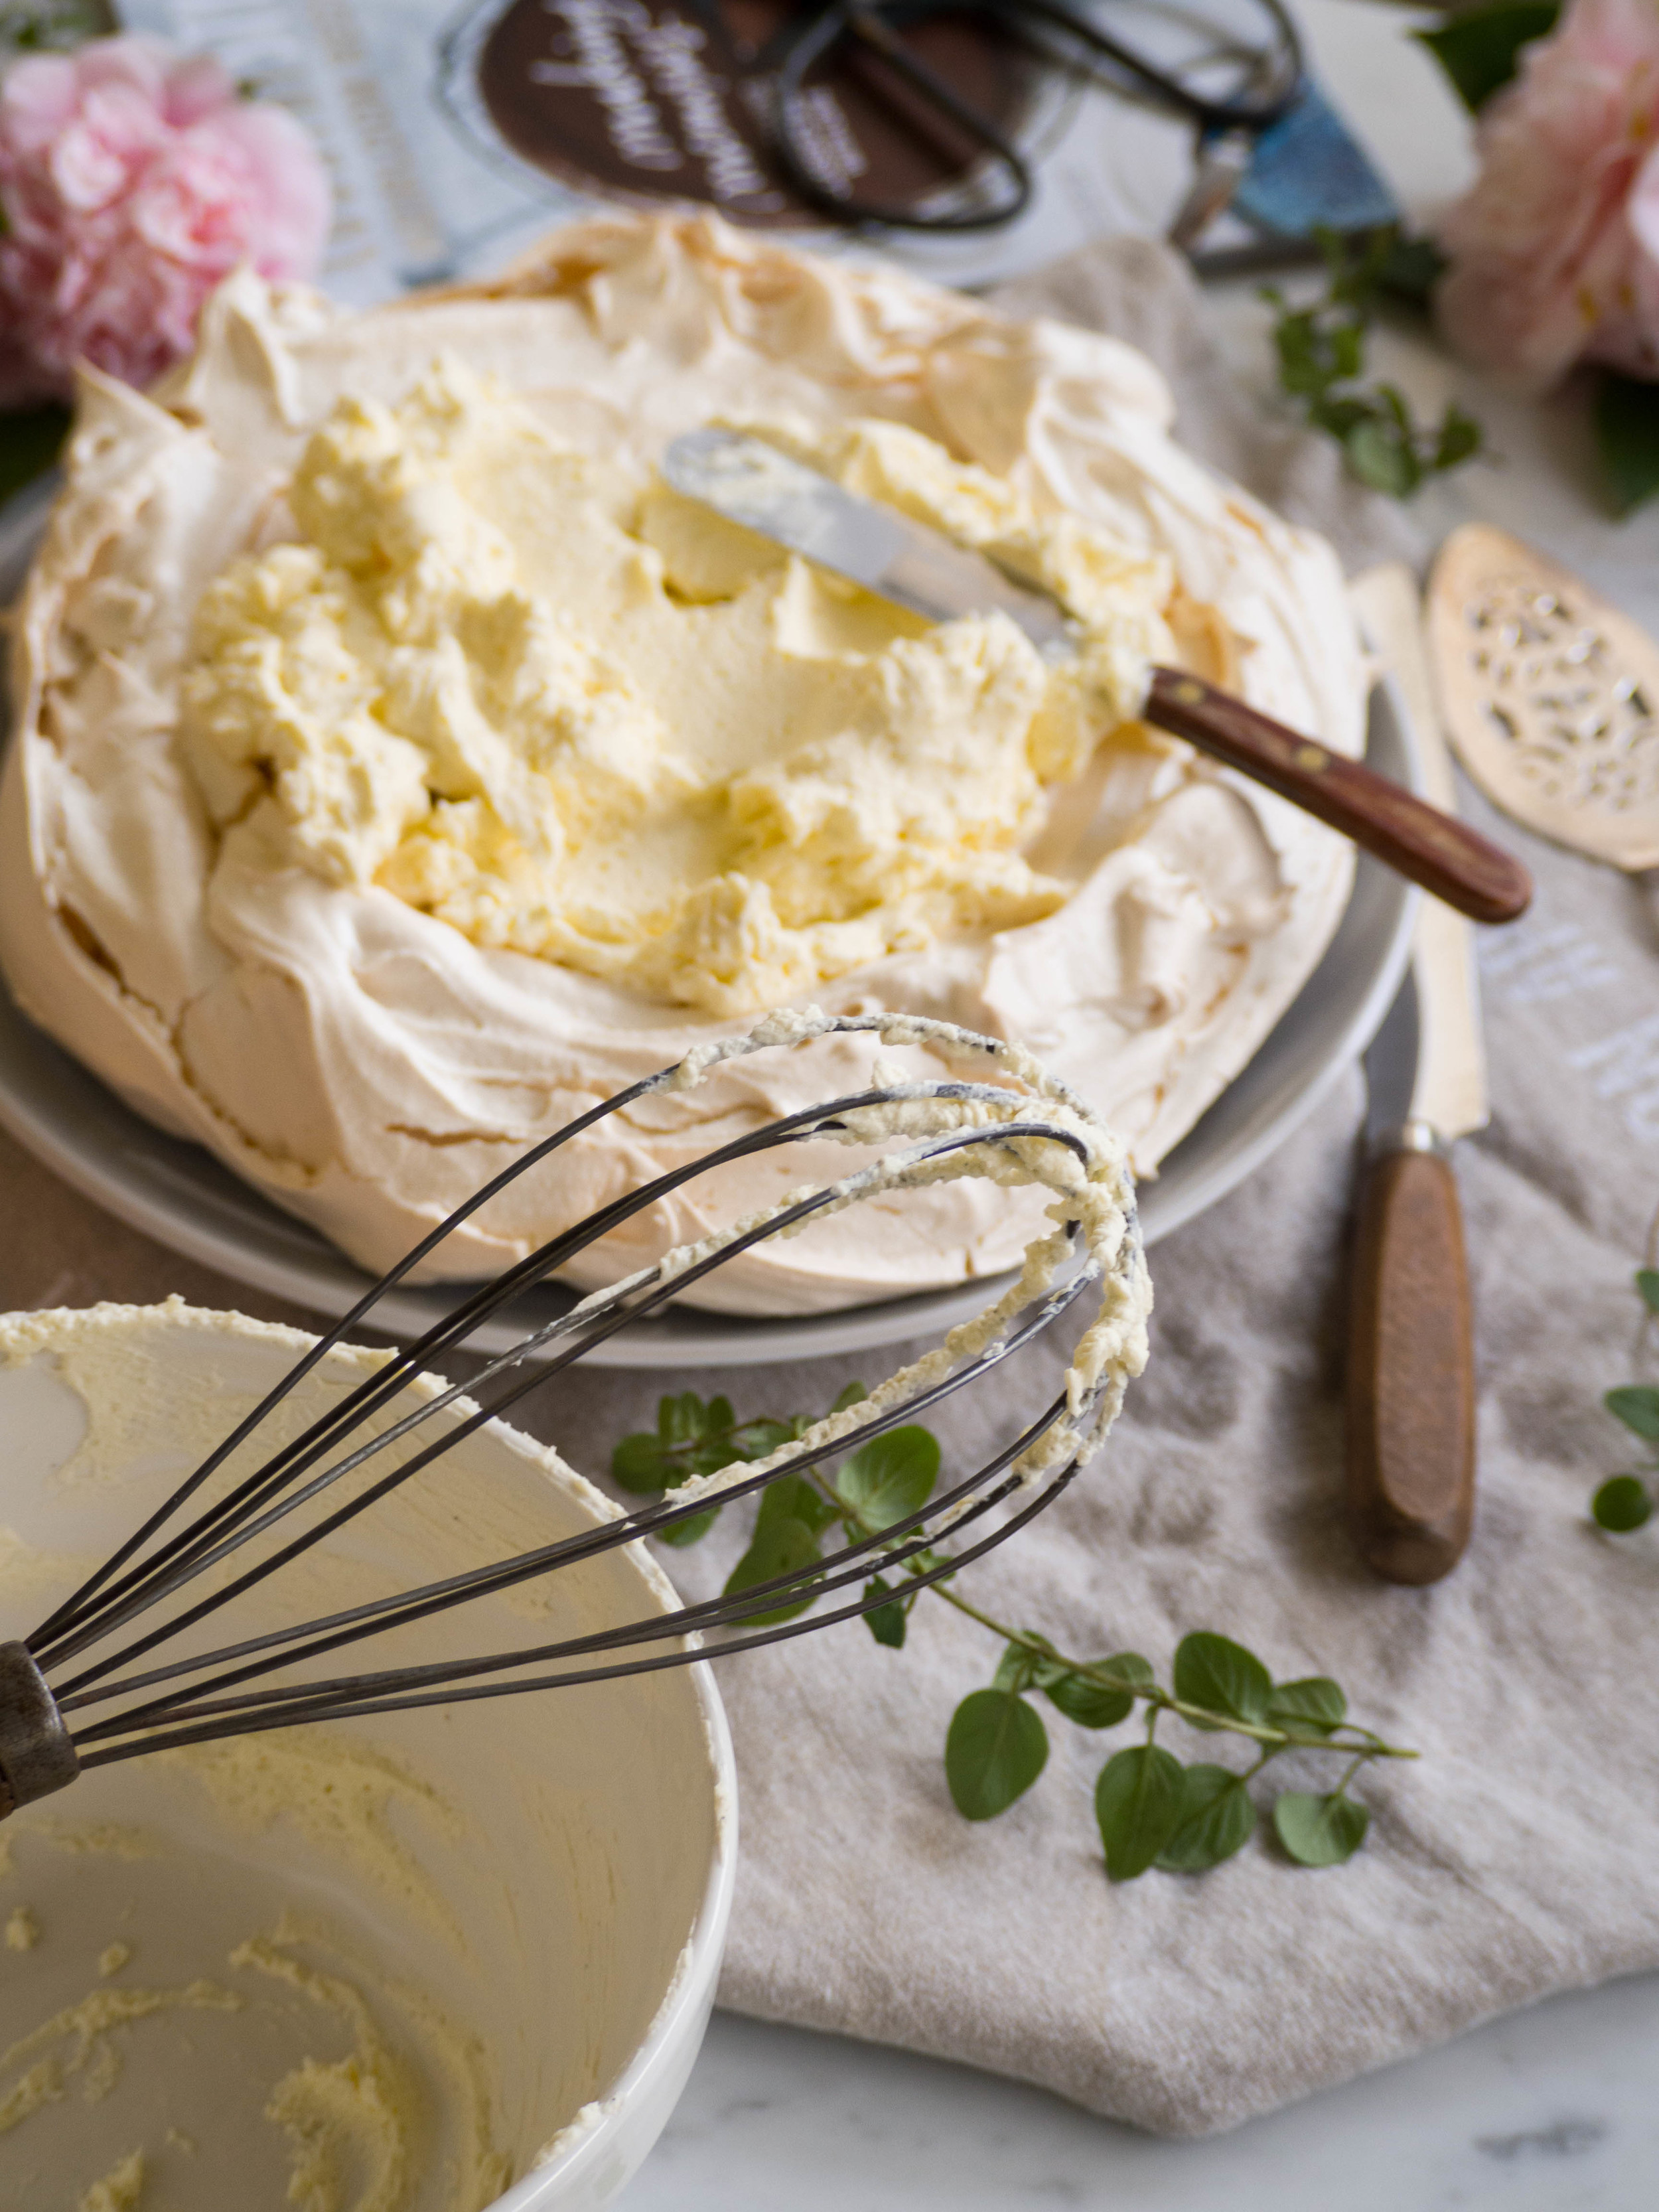
Just before you are reading to serve your pav, whip the cream and the vanilla until the cream has thickened and forms soft peaks.

Spread the cream over centre of the pav, and decorate with the berries (or your fruit of choice), and some edible flowers if you wish.

Serves at least 10 (depends on how generous your slices are!).

Pink Peonies
In Holidays, Other Desserts, Heirloom Recipes Tags Christmas, Pavlova, Grandma, Dessert
Comment
Cherry Pavlova Ice Cream

Cherry Pavlova Ice Cream

Kath December 9, 2020

This recipe came about as a way to use up some leftovers from a Christmas shoot I did for Little Big Dairy Co recently. I had a lot of milk (20 litres to be precise!), and some additional Christmas-y things like cherries and pre-made mini pavlovas that were used for the shoot. I hate things going to waste, especially good quality produce like Little Big Dairy Co milk and Australian cherries so I decided I would go on a ice cream making spree in an attempt to at least use up some of the milk that had been sent to me for the shoot. 

I bought some Little Big Dairy Co cream to use with my ice cream, and I made one lot of this ice cream plus some vanilla ice cream at the house I was staying in for the shoot. I then brought back one 300ml jar of the cream I had left, and needed to make it last for 4 different types of ice cream I wanted to make (all in an attempt to thoughtfully use up some of the delicious milk I had!).

So for this recipe I have split the amount of cream needed between pouring cream and plain Greek style yoghurt. Greek style yoghurt works well in homemade ice creams along side cream, however if you have enough cream you can just use that (250ml total). 

View fullsize Little Big Dairy Co non-homogenised milk
View fullsize Little Big Dairy Co Pouring Cream
View fullsize Australian White Cherries
View fullsize Ice Cream based being whipped before churning
View fullsize Ice Cream Churning
View fullsize All the Ice Creams!
Cherry Pavlova Ice Cream

Cherry Pavlova Ice Cream

Ingredients:

165ml milk

5 tbsp caster or white sugar

150ml pouring cream

100ml plain Greek Style Yoghurt

1 tsp vanilla extract or paste

365g cherries (unpitted weight), pitted and roughly chopped

70-75g pavlova*, roughly chopped, plus extra

Edible dried rose petals, optional

Method: 

In a large bowl, whisk together the milk and sugar until the milk is frothy and the sugar has dissolved. I use an electric hand held mixer for this, but you can also use a stand mixer if you prefer. 

Once the sugar has dissolved into the milk, add the cream, yoghurt and vanilla. Whisk on medium speed until everything is combined and the cream has thickened to form soft mousse like peaks. 

Transfer the mixture to your ice cream maker, and churn according to your machines instructions.  I use the ice cream bowl attachment to my KitchenAid stand mixer and I find this ice cream takes about 5-10 minutes to churn. I find the ice cream is ready once it has frozen/thickened and is clinging to the paddle of the machine. 

Once the has been churned fold through the cherries and pavlova using a spatula. Transfer the mixture to a freezer safe container (about 1.5L capacity). Sprinkle any extra crushed up pavlova over the top, and sprinkle over some dried rose petals if desired.

Allow ice cream to freeze for a few hours before serving. 

*I used about 6 pre made mini pavlovas (I got mine from Woolworths). You could also use pre made meringues. 

Cherry Pavlova Ice Cream
In Ice Cream, Holidays Tags Ice Cream, Cherries, Pavlova, Little Big Dairy Co, Dessert
Comment
Duck Egg Pavlova with Fresh Honeycomb

Duck Egg Pavlova with Fresh Honeycomb

Duck Egg Pavlova with Fresh Honeycomb

Kath October 13, 2017

As you may have noticed from the number of times I have posted a recipe for Pavlova on this blog, I love Pavlova! It was my favourite thing my Grandma made, and I seem to be unable to stop coming up with new adaptations to it. 

After making a Duck Egg Sponge a little while ago, I knew that next time I was able to find duck eggs I would try and bake something different. So when I finally found them again, I decided to make a duck egg Pavlova! A quick Google told me that duck eggs make great Pavlovas so I was keen to try it out. The flavours for this Pavlova are inspired by the honeyed cream from the Duck Egg Sponge I made. Adding honey to whipped cream is just about the most simple thing to do, but it tastes so good! I also love fresh honeycomb, so I couldn’t resist using some to decorate the Pavlova. 

I buy my honeycomb from a farm stand in the north western suburbs of Sydney, and it is super fresh, and not too expensive ($15 for 500g). Fresh honeycomb is the purest form of honey you can eat as it has not gone through any filtering processes. The comb of the honey is fine to eat, and actually contains many beneficial properties. The honey this particular farm stand sells is amazing as well, and is also raw so all the good things are left in the honey rather than being striped out. 

I have found these types of honey’s have a more complex and interesting flavour than the honey sold at supermarkets, and buying it straight from the producer means you can buy it in larger quantities and at a better price than honey’s sold at gourmet food stores. Depending on where you live, you might even be able to find fresh duck eggs at farm stands or farmers markets, its always worth keeping an eye out!

Duck Egg Pavlova with Fresh Honeycomb

Duck Egg Pavlova with Fresh Honeycomb

Duck Egg Pavlova with Fresh Honeycomb 

Duck Egg Pavlova with Fresh Honeycomb 

Duck Egg Pavlova with Fresh Honeycomb

Duck Egg Pavlova with Fresh Honeycomb

Duck Egg Pavlova with Fresh Honeycomb

Duck Egg Pavlova with Fresh Honeycomb

Duck Egg Pavlova with Fresh Honeycomb

Ingredients: 

6 duck egg whites

375g caster sugar

1.5 tsp white vinegar 

1.5 tsp vanilla bean paste 

30g cornflour 


To decorate: 

300ml pouring cream

90ml honey

fresh honeycomb

dried edible lavender

edible flowers, to decorate, optional


Method: 

Pre-heat oven to 200 degrees Celsius. Line a large baking tray with baking paper.

Separate the duck eggs adding the whites to the bowl of a stand mixer. Duck egg shells are tougher than chicken eggs, and take a little more effort to crack, and I have found in the process the shells won’t crack ‘cleanly’. I suggest cracking each over a glass then separating the yolk and the whites over another glass or small bowl so you keep as many shell fragments contained and away from the pavlova mixture as possible! 

Beat the egg whites for 5-6 minutes, whilst gradually adding the sugar. Add the vinegar and vanilla and beat until the mixture is stiff, glossy and holds its peak (for an example of what this looks like see this video on my Facebook page).

Sift cornflour over the mixture, and gently fold to combine. 

Use a little of the mixture to help keep the baking paper in place. Spread the mixture into a rectangle, approximately 20 x 35 cm (this will depend on the size of your tray). If you want a pavlova with a more marshmallowy centre, make the rectangle smaller than 20 x 35 cm, so it will be thicker rather than wide. Try to keep the edges a little higher than the middle so any filling can sit comfortably later. 

Turn the oven down to 125 degrees Celsius, and cook undisturbed for 1.5 hours. 

After 1.5 hours, turn the oven off and leave the pavlova to cool completely in the oven (or overnight). 

Just before you are ready to serve your pavlova, whip the cream until it has thickened and is forming soft peaks. Add the honey and whisk until combined. Spread the cream over the centre of the pavlova. Decorate with a small sprinkling of dried edible lavender, small chunks of fresh honeycomb and some edible flowers. 

Note: If you are preparing the pavlova in advance of serving it, or know you will have left overs, I suggest serving the honeycomb on the side as the honey from the honeycomb will start to drip away when stored in the fridge.

Duck Egg Pavlova with Fresh Honeycomb

Duck Egg Pavlova with Fresh Honeycomb

Duck Egg Pavlova with Fresh Honeycomb

Duck Egg Pavlova with Fresh Honeycomb

Duck Egg Pavlova with Fresh Honeycomb

Duck Egg Pavlova with Fresh Honeycomb

Duck Egg Pavlova with Fresh Honeycomb

Duck Egg Pavlova with Fresh Honeycomb

In Other Desserts Tags Duck Eggs, Pavlova, fresh honeycomb, Edible Flowers
Comment
Gingerbread Pavlova

Gingerbread Pavlova

Festive Gingerbread Pavlova (Gluten Free)

Kath December 21, 2016

Up until about a week ago, I wasn't feeling festive at all. Christmas not only felt a while away, but the previous one still felt so recent. So recent, I wasn't feeling in any way inspired to create or bake something new for Christmas. All I could think of was the gingerbread cake I made last year, which I really liked and the many pavlovas I made made in the years previous to that (the most recent Christmas Pav being this one). So, after mulling this over for a little bit, and starting to slightly freak out that Christmas would come and go without me posting any Christmas related recipe here, it suddenly dawned on me that the perfect Christmas dessert this year would be a combination of my favourites from previous years. And thus this Gingerbread Pavlova was born. 

I am so happy with it, and have almost single handedly eaten most of it myself (calories don’t count at Christmas, right?). I know I have a few Pavlova recipes floating around on the blog, but the base of this recipe (my Grandma’s) is very special to me, and I seem to never cease to come up with new adaptations of it. Pavlova was something my Grandma often made at Christmas, and was her go to Summer time dessert. For me, despite not having too many family Christmas traditions, Pavlova is definitely a dessert that must be on the table for it to be actually Christmas for me. 

My only other Christmas food traditions (or requirements) are a ham, some gingerbread biscuits and a rather large quantity of white cherries. The only other traditions we have that I can think of are that whether the presents are from Santa or not, and whether we are actually adults now or not, the ‘Santa’ presents can only go under the tree after we go to bed on Christmas Eve. None of this being very organised and putting them out early. Like the time, a decade ago Mum and I were away for Christmas and Dad put the presents out a day early. My brother was extraordinarily unimpressed and still to this day mentions how Dad did it all wrong. It’s funny how the things we grow up with still mean so much later in life and have become a family tradition, whether it makes sense or not!

I really enjoyed hearing about the Christmas traditions of others on the most recent My Open Kitchen podcast (series 2 episode 2). I listened whilst baking and it definitely got me thinking about my family’s traditions and got me feeling much more festive. If you have some time before the big day, I definitely recommend giving it a listen. I also really enjoyed Nigella Lawson’s ‘Seasonal Sound Bites’ Christmas podcast series. I never tire of listening or watching Nigella talk about food, and her eloquent musings on Christmas were definitely no exception. 

I hope you have a wonderful holiday season, and a great new year! Thanks for following along with my kulinary adventures this year, see you in 2017 - happy baking!

Gingerbread Pavlova

Ingredients: 

4 egg whites

250g golden caster sugar (or caster sugar)

1 tsp white vinegar 

1/2 tsp vanilla bean paste 

1 tsp ground ginger

1tsp ground cinnamon

1 tsp ground cloves

1/2 tsp all spice 

1/4 tsp maple essence

20g cornflour 


To decorate: 

300 ml pouring cream 

1 tsp ground cinnamon 

1 punnet red currants 

4 small star shaped gingerbread biscuits, optional. I used this recipe, which will make about 70-80 small star shaped biscuits.


Method: 

Pre-heat oven to 200 degrees Celsius. Line a large baking tray with baking paper, and trace a circle approx. 26 cm in diameter (I used a dinner plate). 

In a clean dry bowl, beat the egg whites for 5-6 minutes, whilst gradually adding the sugar. Add the vinegar, vanilla and maple essence and beat until the mixture is stiff and glossy. 

Sift cornflour and spices over the mixture, and gently fold to combine. 

Place mixture onto the tray in the middle of the drawn circle. Push the mixture around to form a circle, leaving a small border around the edges. Try to keep the edges a little higher than the middle so any filling can sit comfortably in the middle later. 

Turn the oven down to 125 degrees Celsius, and cook undisturbed for 1.5 hours. 

After 1.5 hours, turn the oven off and leave the pavlova to cool completely in the oven (or overnight). 

If decorating as pictured you will need to create a gingerbread man stencil. Do so by tracing a medium/large gingerbread man biscuit cutter on to a piece of baking paper (big enough to cover the surface of the pavlova). Cut out the inside of the gingerbread man, so you are left with the piece of baking paper with a gingerbread man shaped hole in the middle. 

Just before you are ready to serve the pavlova, whisk the cream until soft peaks form. Fill the centre of the pavlova with the cream, and smooth the middle a little. Place the gingerbread stencil over the cream, with the gingerbread man centred in the middle of the pavlova. Carefully sift the cinnamon over the cut out, then carefully remove the stencil. Use three red currants to give the gingerbread man some buttons, then use the remaining red currants to decorate the rim on the pavlova (where the edge of the cream and pavlova meet). Add the gingerbread biscuits and serve.

In Heirloom Recipes, Holidays, Other Desserts Tags Pavlova, Gingerbread, Christmas
Comment
Winter Pavlova with Poached Quinces

Winter Pavlova with Poached Quince

A Winter Pavlova + How to Poach Quince

Kath July 25, 2016

After 17 weeks, many frustrating meal times and far too many toasted sandwiches, our new kitchen is done! At the 17 week mark we were able to put most things back in the kitchen and use it (finally!), and after a few more weeks the last finishing touches and changes were done. Now all we need is another coat of paint and the longest kitchen renovation will be officially complete! I have been immensely enjoying being back in the kitchen. Not being able to bake for 4 months was almost like torture for me! Now I am trying to spend every spare moment in there, baking all the things I have been thinking about since late February, and making the most of seasonal produce I have been so desperately wanting to cook with. 

Such seasonal produce, includes quince. Since finding some good poaching recipes last year, my enthusiasm for cooking (and eating) homemade poached quince has only increased. When June arrived, and our kitchen was still in renovation mode, I did begin to panic that I may miss quince season all together and have to wait another whole year to enjoy them. Luckily the renovation finished just in time and I have poached three lots of quince (on a new gas stove none the less!). 

Grandma's Pavlova

Grandma's Pavlova

I have some stored in the fridge, with extra poaching liquid to use for whatever takes my fancy. Though served with ice cream and a drizzle of poaching syrup makes a nice simple dessert, and topping pancakes with them turn lazy weekend breakfasts into thoroughly gourmet affairs. 

After the publication of Country Style’s Heirloom Recipe Cookbook, in which my Grandma’s pavlova recipe was featured, I decided to go back to this favourite family recipe and give it a Winter twist. I also was keen to see how a familiar recipe fared in our new oven! Every oven seems to be different and it takes a little while to adjust. I am finding I’m needing to turn the recommended temperatures down at least 10 degrees in our new oven, and for this recipe I ended up baking the pavlova at 110 degrees Celsius (after the initial pre-heating). I have left the oven temperature in the recipe the same as my Grandma’s original recipe, however if you can smell the pavlova cooking too quickly (it will start to smell like the beginning stages of caramel/burning sugar), turn the temperature down accordingly. 

Country Style's Heirloom Recipes cookbook

Country Style's Heirloom Recipes cookbook

Note: Both the poached quince and the pavlova base can be made in advance. The pavlova can be cooked the night before and left in the oven overnight to cool. 

Poached Quinces

Poached Quince

Poached Quince

Ingredients: 

6 Quince 

900g white sugar

1.2L water

1 tsp vanilla bean paste

2 cinnamon quills 


Method: 

Peel the quince and cut into quarters, removing the cores. Wrap the peel and cores in muslin. In a large pot place the quince and the muslin containing the cores and peel. Add the sugar and water, and cook covered over low heat, allowing the water to simmer, for 1 hour. 

After one hour check the quince by pricking a couple with a fork to check how tender they have become. The quince should become quite tender and soft, however remain whole and not break up. If the quince are not tender enough keep them on the heat, checking again after twenty minutes or so. This process should take between 1-2 hours total. 

Once the quince have become tender, add the vanilla bean paste and cinnamon quills to the pot. Gently stir everything together, then turn off the heat and leave to cool with the lid on. 

Once the quince have begun to cool, sterilise a couple of medium/large jars, by washing them in hot soapy water then placing in the oven for 20 minutes on a low temperature. Transfer the quince into each jar, then cover with as much poaching liquid as will fit. You may want an additional jar to store any remaining poaching liquid. Store in the fridge for up to a month. 

Mascarpone Cream

Mascarpone Cream

Winter Pavlova

Ingredients: 

4 egg whites

125g caster sugar

125g golden caster sugar 

1 tsp white vinegar 

1 tsp vanilla bean paste 

20g cornflour 


To decorate: 

200g mascarpone (I used Pepe Saya) 

150ml thickened cream

1 tsp vanilla extract 

35g icing sugar

8 quarters of poached quince, approx. 

Poaching liquid, to serve


Method: 

Pre-heat oven to 200 degrees Celsius. Line a large baking tray with baking paper, and trace a circle approx. 26 cm in diameter (I used a dinner plate). 

In a clean dry bowl, beat the egg whites for 5-6 minutes, whilst gradually adding the sugar. Add the vinegar and vanilla and beat until the mixture is stiff and glossy. 

Sift cornflour over the mixture, and gently fold to combine. 

Place mixture onto the tray in the middle of the drawn circle. Push the mixture around to form a circle, leaving a small border around the edges. Try to keep the edges a little higher than the middle so any filling can sit comfortably in the middle later. 

Turn the oven down to 125 degrees Celsius, and cook undisturbed for 1.5 hours. 

After 1.5 hours, turn the oven off and leave the pavlova to cool completely in the oven (or overnight). 

Just before you are ready to serve the pavlova, place the mascarpone in a medium sized bowl and whip until it has thickened and soft peaks form. Gradually add the cream, vanilla and icing sugar until all ingredients have combined and stiff peaks form. 

Spread the mascarpone cream into the centre of the pavlova. Drain the quince of syrup and sit them on top of the cream. 

Serve with the quince poaching liquid. 

Winter Pavlova with Poached Quinces

Winter Pavlova with Poached Quince

Reference:  Jamie Magazine, Issue 63 November 2015 p.31. 

In Other Desserts, Heirloom Recipes Tags Quince, Poached Quinces, Pavlova, Country Style Magazine, Heirloom Recipes, Winter, Dessert, Kitchen renovation, Grandma
Comment

Raspberry & Rose Pavlova (Gluten Free) + Christmas 2014

Kath January 2, 2015

This year for Christmas I baked a lot! We don’t have a big family, so we decided to make food the focus for Christmas Day. While the heat and humidity of our Sydney Summer provided a few challenges to my baking efforts, I really enjoyed having the time to bake and cook whatever I wanted, with Christmas being the ‘excuse.’ 

I made four batches of gingerbread, using this recipe, which remains my favourite. A made a gingerbread house, with varying levels of success. I was concerned about is structural soundness, however after just over a week of standing upright and remaining standing once a meat mallet was taken to it, I feel these concerns were slightly unfounded! Mostly, I would have liked it to look prettier, however for my first ever attempt, it’s probably not so bad. 

PC230455.jpg

A few tarts were made as well. All of them stemmed from using up lovely summer fruits that we had bought. Using the same case and filling recipe as the white cherry tart I made in my last post, I used raspberries and peaches, which was so good, then just plain raspberry, then I used up the last of the Christmas cherries to make a cherry tart for New Years Eve. I also just made a plum upside-down cake to use up the last of the plums. It’s safe to say that this holiday season has not been short of cake and sweet treats! 

Peach & Raspberry Tart

Peach & Raspberry Tart

Cherry Tart for New Years Eve

Cherry Tart for New Years Eve

On Christmas morning I had prepared some of Sophie Hansen’s Buttermilk Jam Scrolls, which we ate with tea and some lovely fresh fruits. For Christmas Day lunch my Mum made a glazed ham, turkey wellington and a pear and goats curd salad. I made my favourite Summer Iced Tea. For dessert I created an Epic Pavlova. I call it epic as it was just something I thought I would try and see if it worked. And it ended up being the best pavlova I have ever made! I changed some of the ingredients from my Grandma’s original recipe, after looking at lots of other pavlova recipes. I wanted it to look a little festive, so I decided to decorate it with mostly red berries, and was particularly excited when I found red currants in the green grocer (first time I had ever seen them!). 

Breakfast

Breakfast

Christmas Lunch

Christmas Lunch

Dessert!

Dessert!

Unfortunately, I didn’t get to take many photos of the pavlova, as when I was assembling it, the Christmas Day weather began to turn bad. Thus there was no good light to shoot in. The shots I got were taken at a doorway to the balcony, door open to get as much natural light in as possible, rain coming down just beyond where the pavlova sat! 

Here is the recipe for my pavlova. I used up some of the remaining egg yolks to make the frangipane fruit tarts (substitute one whole egg for two yolks), otherwise you could make some gingerbread or maybe some custard. The quantities for the fruit to decorate are just guides, as you can put as little or as much as you would like, there are no rules! Lots of different fruits are great for pavlova, however I would stick to things that complement rosewater for this recipe. 

I made the pavlova layers on Christmas Eve and left them to cool in the oven overnight, and assembled just before serving on Christmas Day. 

Raspberry & Rose Pavlova

Ingredients for the Pavlova: 

8 egg whites 

500 g caster sugar

2 tsp raspberry vinegar 

1 tsp rosewater 

40g cornflour


To Decorate: 

450 ml cream 

1 tbsp rosewater 

1-2 punnet raspberries

1 punnet blueberries

seeds from 1-2 pomegranates

1 punnet red currants 


Method: 

Pre-heat oven to 200 degrees Celsius. Line two large baking trays with baking paper, and trace a circle on each, approx. 26 cm in diameter (I used a dinner plate). 

In a clean dry bowl, beat the egg whites for 5-6 minutes, whilst gradually adding the sugar. Add the raspberry vinegar and rosewater and beat until the mixture is stiff and glossy. 

Sift cornflour over the mixture, and gently fold to combine. 

Place half the mixture on one tray, using the circle as a guide. Push the mixture around to form a circle, leaving a small border around the edges. Repeat with the remaining mixture on the other tray. 

Turn the oven down to 125 degrees Celsius, and cook undisturbed for 1.5 hours. 

After 1.5 hours, turn the oven off and leave the pavlova layers to cool completely in the oven. 

When ready to assemble the pavlova, whip the cream and rosewater together. Spread half over one of the pavlovas and sprinkle with half the pomegranate seeds, half the raspberries and half the blueberries. Place the remaining pavlova shell on top. Fill the top layer with the remaining cream, and berries, using the red currants to form a border around the fruit on the top layer. 


What did you make during the festive season? Let me know in the comments below!


For more recipes showcasing the best of rose, check out my eBook Baking with Rose by clicking the link below!

get your ebook!
In Other Desserts, Heirloom Recipes, Holidays Tags Christmas, Baking, Tart, Pavlova, Gingerbread Biscuits, Gingerbread House, 2014
2 Comments
  • The Blog
  • Older
  • Newer

recipes

  • Biscuits/Cookies 39
  • Breads Etc. 9
  • Breakfast 7
  • Cakes & Slices 67
  • Confectionary 5
  • Drinks 6
  • Events 14
  • Food Photography Tips 3
  • From The Mailing List 24
  • Heirloom Recipes 12
  • Holidays 44
  • Ice Cream 9
  • Jams Preserves & Spreads 9
  • Muffins 4
  • Off the Shelf 47
  • Other Desserts 25
  • Savoury Dishes/Meals 15
  • Scones 4
  • Tarts & Pastry 9
  • Travel 13

Sign up to Friday Food Chat with Kath, a weekly newsletter for more food, baking, cookbook chat and more!

Sign Up Here!
instagram-unauth pinterest facebook url

Website Accessibility: To enable text to speech function on the blog, click the sound button to the right of each blog post.

All images & content are the property of Kathryn Vincent, unless stated otherwise. Please do not use without permission.

Kulinary Adventures of Kath

Food Photography, Recipes & Baking

instagram-unauth pinterest facebook url