Kulinary Adventures of Kath

Food Photography, Recipes & Baking
  • home
  • About
  • Work with Kath
  • Shop
  • Blog
    • The Blog
    • Recipe Archive
  • Newsletter
  • Contact
  • home
  • About
  • Work with Kath
  • Shop
    • The Blog
    • Recipe Archive
  • Newsletter
  • Contact
Raspberry Pistachio Rose Cake (23 of 25).jpg

The Blog

Recipes and Food Photography by Kath Vincent.

  • The Blog
  • Recipe Archive
  • All
  • Biscuits/Cookies
  • Breads Etc.
  • Breakfast
  • Cakes & Slices
  • Confectionary
  • Drinks
  • Events
  • Food Photography Tips
  • From The Mailing List
  • Heirloom Recipes
  • Holidays
  • Ice Cream
  • Jams Preserves & Spreads
  • Muffins
  • Off the Shelf
  • Other Desserts
  • Savoury Dishes/Meals
  • Scones
  • Tarts & Pastry
  • Travel
Rose & Vanilla Bean Ice Cream

Rose & Vanilla Bean Ice Cream

Rose & Vanilla Bean Ice Creams (Egg Free)

Kath July 17, 2018

This is one of those super Summery recipes that I just can’t get enough of. Having said that, yes I know I am posting this while we are in the middle of Winter here in Australia, and feeling particularly cold if I do say so myself. 

I first made these late last year, when we were at the beginning of what felt like one of the hottest and longest Summers ever. I was inspired by a milkshake I used to order at one of my favourite city haunts, The Tea Salon. Rose and vanilla is a winning combination for me, and in the Summer months it was always nice to have a good alternative to a hot tea. I met up with friends there often, it really became our go to place. 

Located in the Sydney City Westfield it was easy to get to and ticked the boxes in terms of the menu, and the pretty pink decor didn’t hurt either! The Tea Salon closed down a few months ago, much to my friends and my dismay. It felt like the end of an era, and I’m not quite sure what will replace our regular city haunt yet. 

View fullsize Rose & Vanilla Bean Milkshake at The Tea Salon
View fullsize Scone at The Tea Salon

Until we find somewhere just as good, I will have to be content with this recipe being the legacy of our many catch ups over the years at The Tea Salon. And while now doesn’t feel like the opportune time to be posting a recipe for ice cream for most of us here in Australia, it is definitely the perfect time for everyone in the Northern Hemisphere who seem to be enjoying endless Summer days. 

Not being a warm weather person, I am certainly not jealous of the weather everyone up there is having. I am however loving all the beautiful Instagram posts with all the Summer blooms, beautiful fashions, and fun outdoor activities. Summer in the UK in particular, through the lens of Instagram, looks utterly delightful compared to the hot and humid, sometimes almost 40 degrees days we can have here in Sydney. 

I can definitely see myself enjoying some of this ice cream again later in the year when the weather warms up, and maybe reminisce over some of the good times this recipe was inspired by. But for now I’ll just leave this recipe here till then, and continue to enjoy my warming cups of tea, soups and multitudes of blankets. 

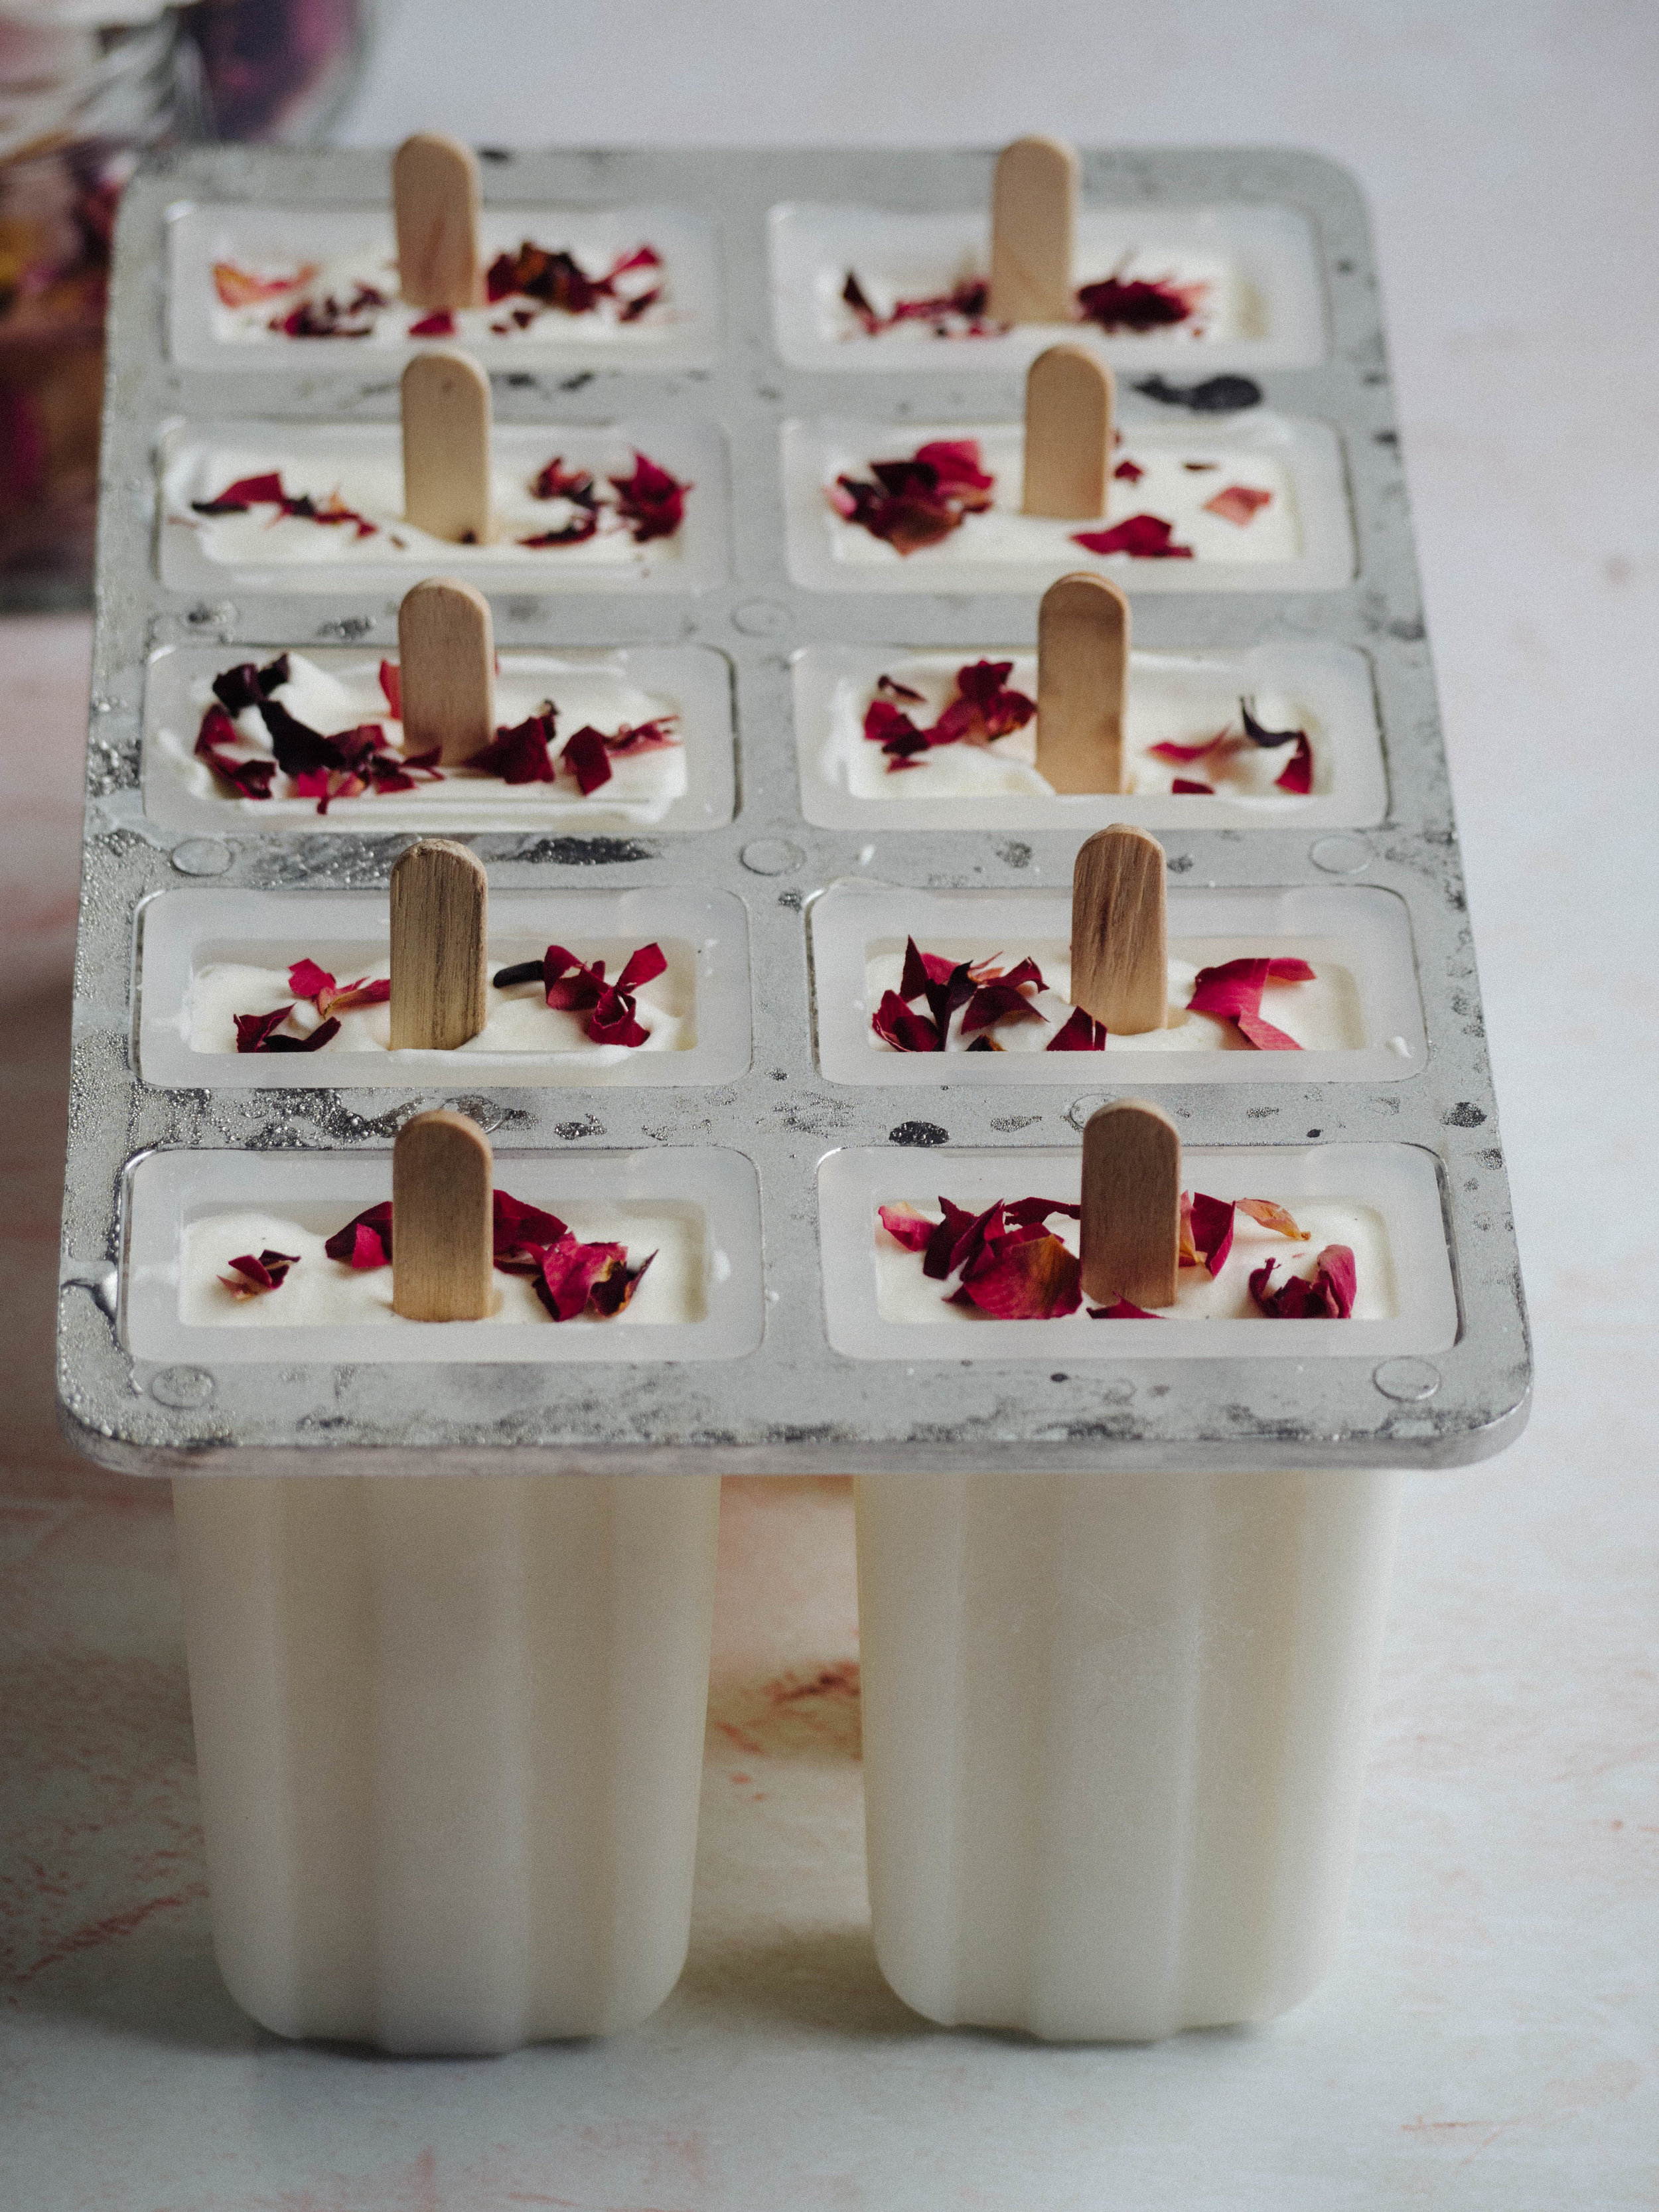
Rose & Vanilla Bean Ice Creams

Rose & Vanilla Bean Ice Creams

Rose & Vanilla Bean Ice Creams

Rose & Vanilla Bean Ice Creams

Rose & Vanilla Bean Ice Creams (Egg Free)

Ingredients: 

165ml milk 

6 tbsp white sugar

250ml pouring cream 

1 vanilla bean seeds scraped or 1 tsp vanilla bean paste

2 tbsp rosewater (or to taste) 

Dried rose petals chopped, optional


Method: 

Whisk the milk and sugar together until the sugar has dissolved and the milk has become frothy. Then add the cream, the vanilla, and rosewater. Whisk until combined and the mixture has thickened a little. 

Transfer mixture into the bowl of an ice cream machine, and process according to machine instructions. I find the churning process takes about 10 minutes (weather depending), and is ready once the ice cream has thickened, slightly frozen and is clinging to the paddle of the ice cream machine. 

Once ready, transfer to a large piping bag and pipe into ice cream mould. Sprinkle some of the dried rose petals over the top, insert food safe wooden sticks into the centre of each one and place in the freezer. To keep the sticks in place I often cover the whole mould with a couple of layers of plastic wrap. Alternatively, transfer ice cream to a freezer safe container (at least 1L capacity) and freeze overnight. 

If making the individual ice creams, carefully remove them from the mould when ready to eat, the ice cream will melt quite quickly in the warmer Summer months! I found it easier to remove all of them from the mould once they were properly frozen and individually wrap them in plastic wrap to store in the freezer. 

Makes 10 individual ice creams or about 1L of ice cream. 

Rose & Vanilla Bean Ice Creams

Rose & Vanilla Bean Ice Creams

Reference: ‘Lomelino’s Ice Cream’ by Linda Lomelino (Roost Books, 2015), p.13

Rose & Vanilla Bean Ice Creams

Rose & Vanilla Bean Ice Creams

Dried Rose Petals

Dried Rose Petals

For more recipes showcasing the best of rose, check out my eBook Baking with Rose by clicking the link below!

get your ebook!
In Other Desserts, Ice Cream Tags Ice Cream, Rose, Rose Petals, Vanilla, The Tea Salon
Comment
Fortnum & Masons's Rose Biscuits with Homemade Crystallised Rose Petals

Fortnum & Masons's Rose Biscuits with Homemade Crystallised Rose Petals

Fortnum & Mason’s Rose Biscuits Revisited + How to Make Crystallised Rose Petals

Kath March 7, 2016

It has been about two years since I was last at Fortnum & Mason, and almost the same amount of time since I first attempted making these biscuits. In a previous post, which can be found here, I shared my version of Fortnum & Mason’s rose biscuits. And over the past couple of years, I have noticed it has consistently been a popular post on the blog - which I love, as I feel it means there are others out there who either like me have an obsession with using rose in baking, or, are just as in love with Fortnum & Mason’s biscuits as I am. 

The original recipe for Fortnum & Mason’s rose scented biscuits requires some crystallised (or sugared) rose petals, of which I have never been able to find in Australia. I still dream of the packets of crystallised rose and violet petals I saw in the shop G. Detou in Paris, and still kick myself for not buying them. Since I could never find any crystallised rose petals, and fresh edible rose petals still eluded me then, my version of Fortnum & Mason’s rose scented biscuits omitted the rose petals, but included a rose icing to enhance the flavour. While I have always been happy with my adaptation, I still kept the original recipe in mind, just in case I was ever able to make it properly. 

More recently, I posted a recipe for a cake which used edible flowers, including rose petals to decorate the cake. I mentioned in that post how exciting it finally was to find edible flowers, and the recipe in this post is another reason why. I was able to crystallise the rose petals myself, then add them to the biscuit mixture as per the original Fortnum & Mason recipe. I am so very glad I was finally able to make these biscuits. They taste exactly like the ones Fortnum & Mason sell packaged in the pretty pink cylindrical tins. 

How to Crystallise Rose Petals

If you wish to make the biscuit recipe below, I would suggest making the crystallised rose petals first, a few hours in advance to give them time to dry out before making the biscuits. I did not find the rose petals, once crystallised, had a very long shelf life, so I would not advise making them days in advance.

Ingredients: 

Fresh unsprayed rose petals, gently rinsed and dried

1 egg white

50g sugar (approx.) 


Method: 

Prepare two or three large baking trays by lining them with baking paper. 

Gently whisk the egg white with a fork until lightly frothy. 

Working slowly and doing each rose petal individually, use a small soft bristled (new or kitchen purpose) paint brush, and brush a small amount of the egg white over both sides of the rose petal. Ensure every part of the petal is covered in egg white. It is easiest to hold the rose petal at the narrower end, where it is a little white in colour. 

Then, gently toss the petal in some of the sugar, again ensuring the whole petal has been coated in the sugar. Dust of any excess sugar, and place on one of the prepared trays. 

Continue doing the same for each rose petal. Leave the sugared rose petals to dry on the prepared trays for at least a couple of hours.

In humid conditions the petals may take longer to crystallise, and they can be dried out in the oven at an extremely low temperature, about 20 degrees Celsius. I tried both methods of drying and found they dried better when left out for a couple of hours or so. 

Once the petals have dried they will be crunchy and ready to use in the recipe below or as a garnish for cakes and desserts. 

Homemade crystallised rose petals last a maximum of a couple of days after crystallising, when they are left out so they remain dry. I found keeping them in an airtight container wasn’t the best option for storing them. 

Homemade Crystallised Rose Petals

Homemade Crystallised Rose Petals

Some examples of recipes where crystallised rose petals would make a great garnish can be found in the links below: 

Raspberry & Rose Cupcakes

Pavlova

Rose Sponge Cake

Summer Celebration Cake

Raspberry & Almond Layer Cake

Rose Pound Cake

Rose & Pistachio Cake

Raspberry & Rose Celebration Cake

Fortnum & Mason’s Rose Scented Biscuits

Ingredients: 

100g unsalted butter, softened

50g golden caster sugar or caster sugar 

1 tbsp rosewater

100g plain flour

50g almond meal

15 g/10 medium/large (whole) crystallised rose petals, roughly chopped


Method: 

Preheat oven to 180 degrees Celsius, and line a baking tray with baking paper. 

In a large bowl, cream butter, sugar and rosewater until all combined. Sift in the flour, add the almond meal and crystallised rose petals and mix until combined. 

Using a teaspoon, take spoonfuls of the mixture and roll into balls and place on the baking trays. Flatten the balls a little so they form fat round discs. 

Cook for 15-20 minutes, or until slightly golden. If you are unsure if they are cooked, use a palette knife to gently lift a biscuit - if it is evenly golden on the base of the biscuit, it is cooked. Cool biscuits on the trays or on a wire rack. 

This recipe only makes about 20 biscuits, but after all the fuss of crystallising your own rose petals, I suggest doubling the quantities and making more! The cooked biscuits last about one week.

Reference: ‘Tea at Fortnum and Mason’ (Ebury Press, 2010), p.61.

For more recipes showcasing the best of rose, check out my eBook Baking with Rose by clicking the link below!

get your ebook!
In Travel, Biscuits/Cookies Tags Fortnum & Mason, Fortnum and Mason, Crystallised Rose Petals, Sugared Rose Petals, Rose Biscuits, Rose Petals, Edible Flowers, London, Biscuits, Cookies
Comment

Simple Summer Celebration Cake & Two Years of Blogging

Kath January 17, 2016

Happy New Year! I hope everyone had a lovely start to the new year. This is my first blog post for 2016, and I am quite excited about 2016 on the blog front. I have lots of new recipes to try and lots of ideas for my own, and I can’t wait to share them with you. The first of which, is this cake. This cake is my idea of using the best summer berries and edible flowers, and creating something very simple yet still spectacular. 

And for this post, I am using this simple yet spectacular cake to celebrate two years since I started this blog. It’s quite surreal to think about how that amount of time has gone by already. I love looking back at the recipes I have done in the past, and seeing how even now, some of them are still the most popular recipes on the blog. I am very much looking forward to working on this blog into the future, and I hope you will all continue to check back here every now and then and see where my kulinary adventures have led. 

The base recipe for this cake, has appeared in various forms on the blog a few times in the past two years. This is probably my favourite to date, although the passionfruit version would have to be a super close second. The idea for this particular cake came from my undying and rather obsessive need to use edible flowers. And once I (finally, oh finally!) found some, in the amazing fruit market near my work nonetheless, this cake was born. As a side note to explain how obsessive I have become on this, ever since I found that this fruit market sells edible flowers, I check back almost every lunch time to see if they have any and whether my obsessive need to use them will be fulfilled yet another time - I may require some kind of intervention at some point, just FYI, I’ll let you know when the situation becomes dire.

Obsessiveness aside, I think this cake would be fantastic for lots of occasions, but kitchen teas, afternoon teas and birthdays spring to mind first. Use whatever edible flowers you can find, otherwise a nice combination of berries will still look lovely. A regular loaf tin will work too, I found this long skinny one at Donna Hay’s pop up shop at Fox Studios in Sydney. 

Simple Summer Celebration Cake

Ingredients: 

125g margarine, or unsalted butter (softened)

165g caster sugar

1 tsp vanilla bean paste/vanilla extract

2 eggs 

250g self-raising flour

105ml milk (preferably skimmed)

100g raspberries


For the Icing: 

1 1/2 cups icing sugar 

1-2 tbsp rosewater

berries (raspberries, blackberries) and edible flowers (rose petals, violets, cornflowers), to decorate 


Method: 

Pre-heat oven to 160 degrees Celsius, and line a loaf tin with baking paper. 

In the bowl of an electric mixer, beat the margarine, sugar and vanilla until light and fluffy. 

Beat in the eggs one at a time, then add half the flour and half the milk and mix. Add the remaining flour and milk and mix on medium speed until well combined. Gently fold in the raspberries. 

Transfer the mixture into the loaf tin, smoothing the top. Bake for 50 minutes, or until the cake springs back when touched lightly and a skewer comes out clean. 

Cool in the tin for a few minutes then transfer to a cooling rack, leaving the baking paper underneath the cake (this will prevent the cake from sticking to the rack, and catch any runaway icing later). 

Once the loaf has cooled completely, sift the icing sugar into a bowl. Add one tablespoon of rosewater, and stir. Continue to add rosewater (or water for a more subtle flavour) and stir well, until the icing is a nice smooth consistency. Drizzle the icing over the cake, allowing it to fall down the sides. Decorate with the berries and edible flowers immediately. Allow the icing to set a little before serving. If there are any leftovers store in the fridge, as the decoration will not store well at room temperature. 

Original cake recipe adapted from The Australian Women’s Weekly Cakes & Slices Cookbook, p.89.

In Cakes & Slices Tags cake, Summer, Berries, Raspberries, Blackberries, Edible Flowers, Rose Petals, Violets, Cornflowers, Celebration cake, blogging
Comment

recipes

  • Biscuits/Cookies 39
  • Breads Etc. 9
  • Breakfast 7
  • Cakes & Slices 67
  • Confectionary 5
  • Drinks 6
  • Events 14
  • Food Photography Tips 3
  • From The Mailing List 24
  • Heirloom Recipes 12
  • Holidays 44
  • Ice Cream 9
  • Jams Preserves & Spreads 9
  • Muffins 4
  • Off the Shelf 47
  • Other Desserts 25
  • Savoury Dishes/Meals 15
  • Scones 4
  • Tarts & Pastry 9
  • Travel 13

Sign up to Friday Food Chat with Kath, a weekly newsletter for more food, baking, cookbook chat and more!

Sign Up Here!
instagram-unauth pinterest facebook url

Website Accessibility: To enable text to speech function on the blog, click the sound button to the right of each blog post.

All images & content are the property of Kathryn Vincent, unless stated otherwise. Please do not use without permission.

Kulinary Adventures of Kath

Food Photography, Recipes & Baking

instagram-unauth pinterest facebook url