Kulinary Adventures of Kath

Food Photography, Recipes & Baking
  • home
  • About
  • Work with Kath
  • Shop
  • Blog
    • The Blog
    • Recipe Archive
  • Newsletter
  • Contact
  • home
  • About
  • Work with Kath
  • Shop
    • The Blog
    • Recipe Archive
  • Newsletter
  • Contact
Raspberry Pistachio Rose Cake (23 of 25).jpg

The Blog

Recipes and Food Photography by Kath Vincent.

  • The Blog
  • Recipe Archive
  • All
  • Biscuits/Cookies
  • Breads Etc.
  • Breakfast
  • Cakes & Slices
  • Confectionary
  • Drinks
  • Events
  • Food Photography Tips
  • From The Mailing List
  • Heirloom Recipes
  • Holidays
  • Ice Cream
  • Jams Preserves & Spreads
  • Muffins
  • Off the Shelf
  • Other Desserts
  • Savoury Dishes/Meals
  • Scones
  • Tarts & Pastry
  • Travel
Biscoff Hamantaschen

Biscoff Hamantaschen

Kath March 6, 2023

I had this recipe in mind to make at Purim a couple of years ago, and for some reason didn’t get around to it until this year. I originally shared this recipe (if I can really call it that, as it’s just an assembly job) over on Instagram as part of my ‘Year of Everyday Bakes’ series.

As I explained in this post, I am sharing a recipe a week that is simple, easy and could fit into your everyday life. I hope it inspires you to bake a little more without adding any stress to your day.

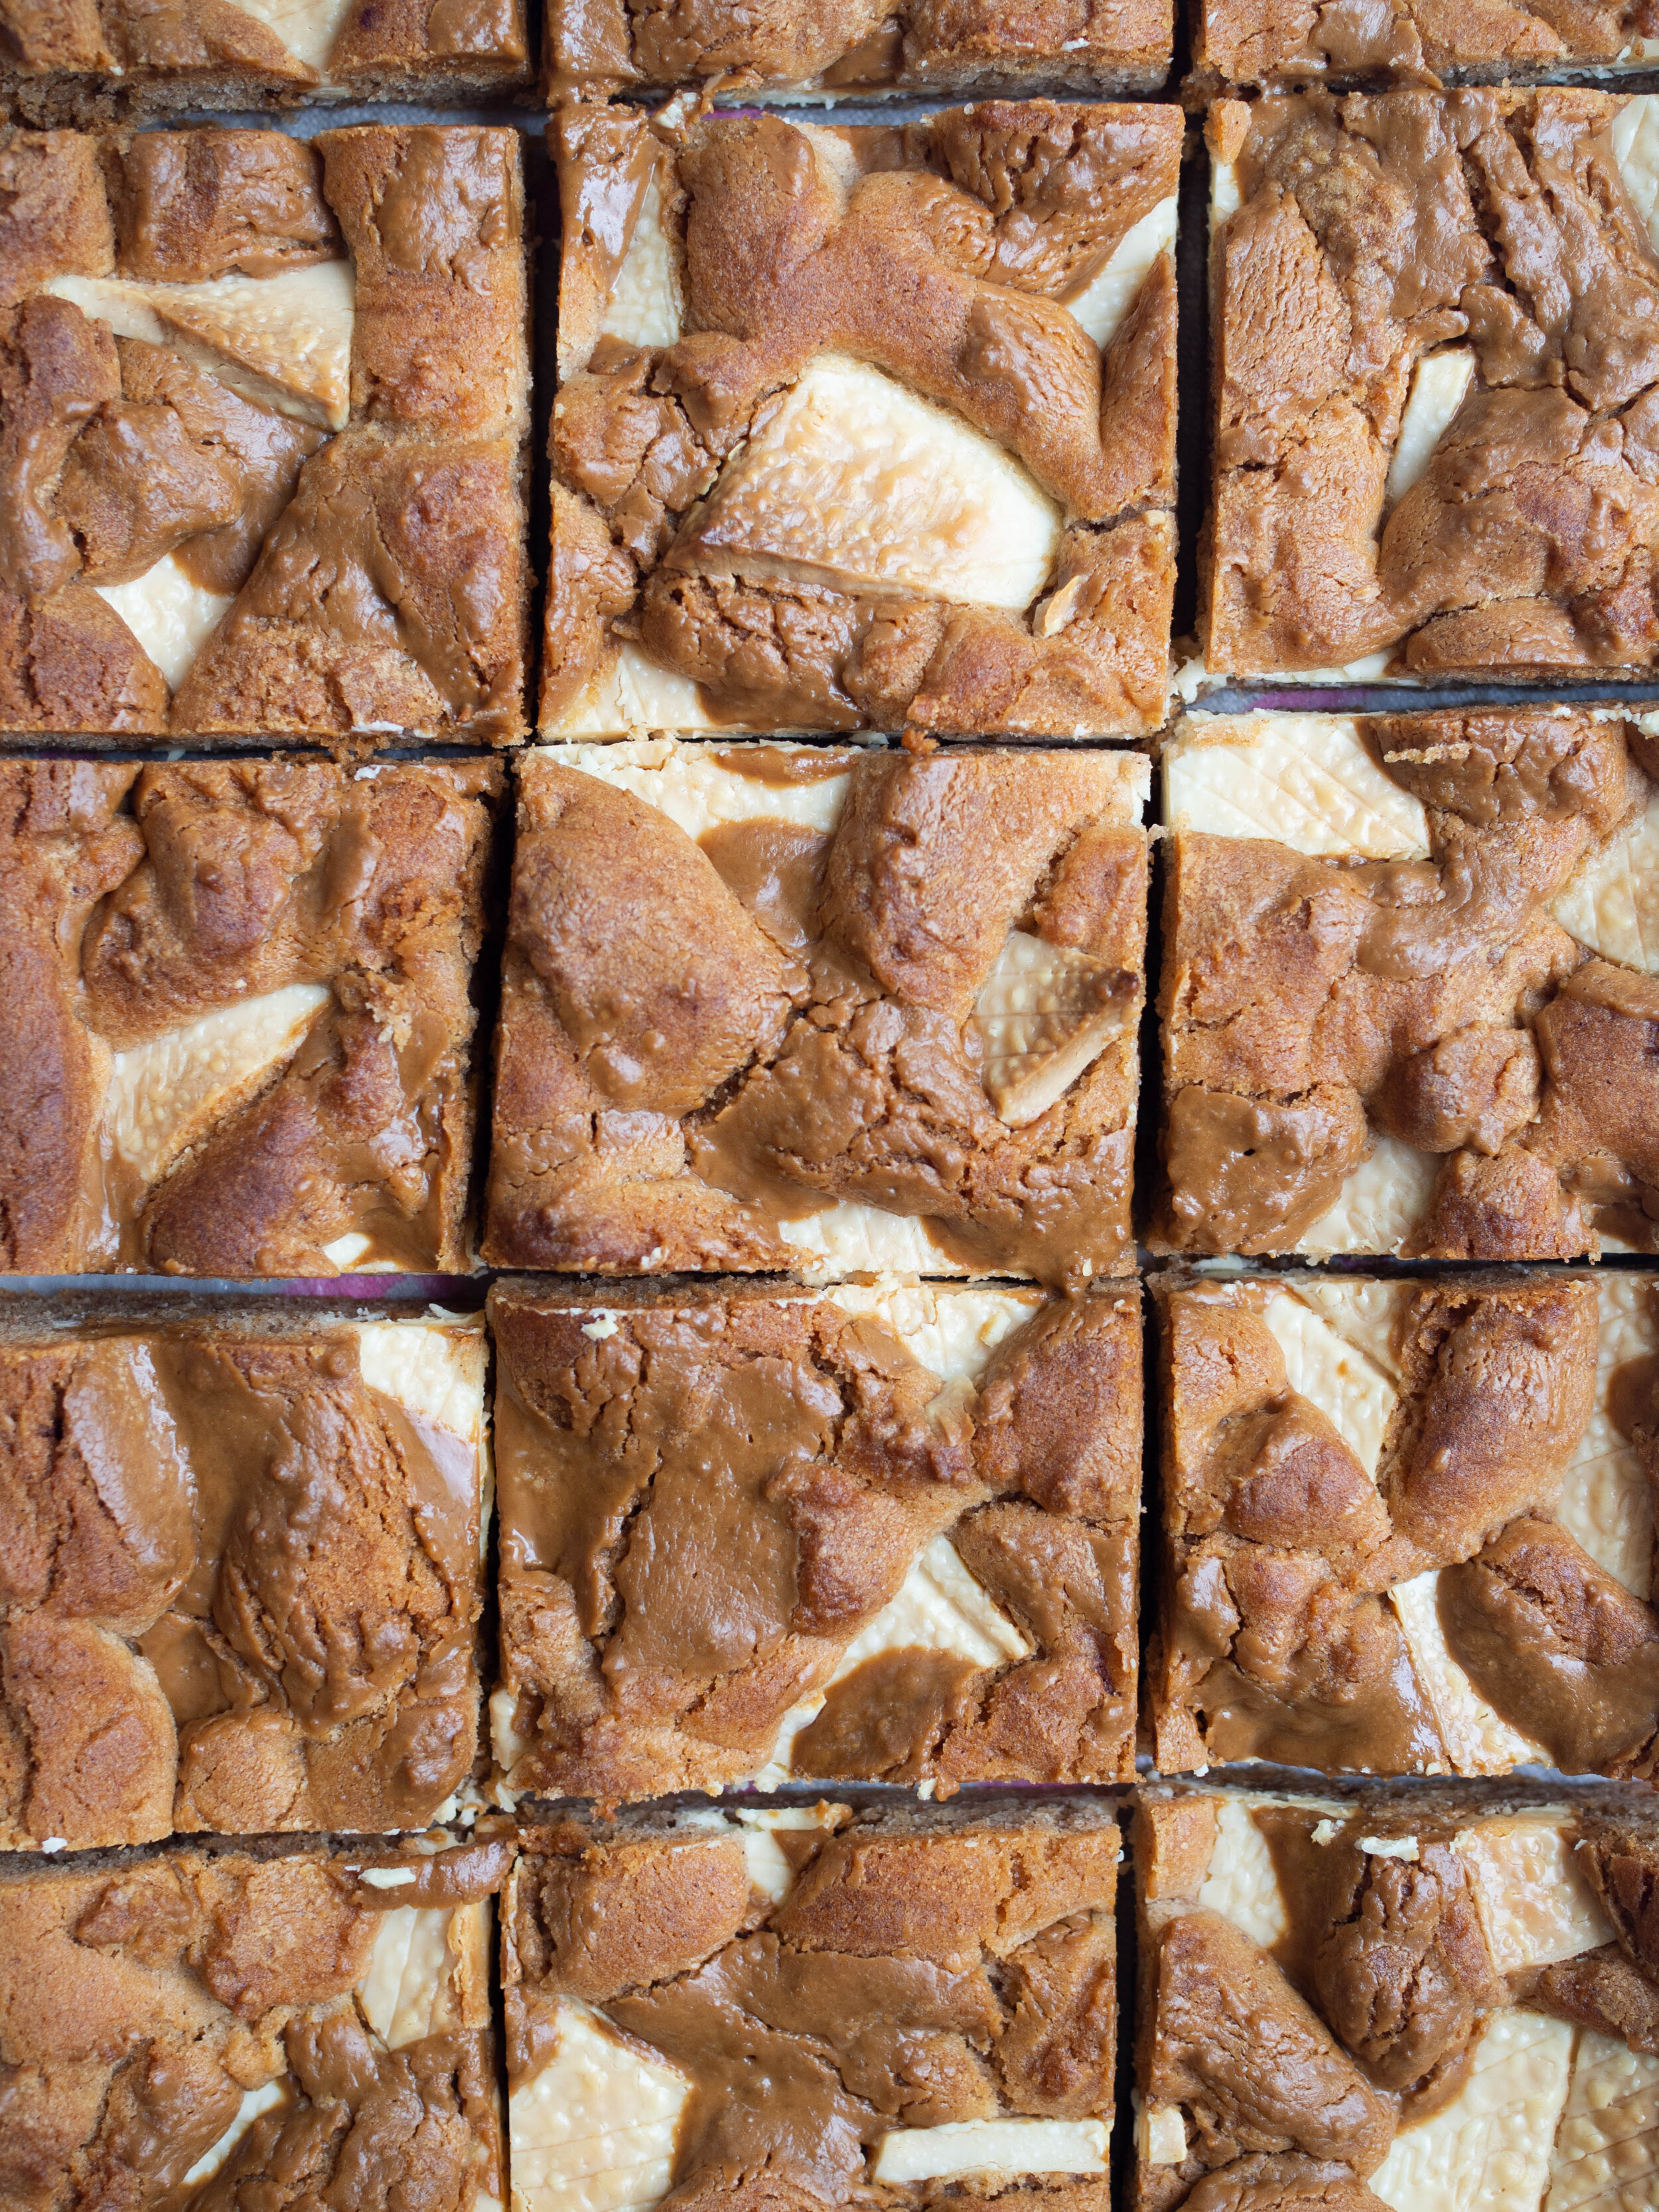
Hamanstachen are small triangle shaped pastries, some are more biscuit like as these are, while there are other varieties that use a yeasted dough. They are traditionally made and eaten during the Jewish holiday of Purim, and while Biscoff hamantaschen are in no way traditional, like I said they are very easy to make and require much less time than making each element from scratch.

This recipe is very low stress as I am asking you to use bought pastry, though homemade would be lovely too, and Biscoff spread. All pre-made, all easy but most importantly all tasty. You can think of these like a little free form individual tarts if you like (maybe an alternative to a jam tart or similar?), a quick and easy baking project with very tasty results

Biscoff Hamantaschen

Biscoff Hamantaschen

Ingredients:

1 sheet shortcrust pastry (approx.435g - I used Careme brand, if you use another brand who make smaller sheets of pastry you made need 2-3 sheets).

1 jar Crunchy Biscoff Spread

1 egg, beaten

Sprinkles, optional


Method:

Line three large baking trays with baking paper.

Leave the pastry on the plastic sheet it comes on, and using a 7.5-8cm round biscuit or scone cutter, cut out rounds of the pastry and place on the prepared trays. Cut out the rounds as close toegtehr as possible, so you have minimal pastry scraps left over.

Re-roll the remaining pastry - you can do this inbetween the plastic sheet the pastry came on so you don’t have to flour your bench or rolling pin - and cut out the remaining pastry.

Brush the beaten egg around the edges of each pastry round (you won’t use all of the egg). Drop teaspoonfuls of the Biscoff spread (no more than 1 tsp per pastry round, you shouldn’t need the whole jar - I used about 3/4 of one jar) into the centre of each pastry round. Then pinch the rounds into triangle shapes, esnure the corners are well sealed. You can brush with more egg if needed. See this post for more detailed instructions on how to fold the hamantaschen* - if you create a smaller hole in the centre and fold your hamantaschen up tigther than what I have done here, it will also help them not break open or spill over in the oven - you can see in the photos some of mine have spilled a little.

Place the trays of hamantaschen in the fridge for at least 30 minutes so the pastry can chill. Do not skip this step - this, along with not overfilling the hamantaschen will help ensure your hamantaschen don’t spill over and loose their shape when baking.

Preheat oven to 180 degrees Celsius.

After at least 30 minutes, remove the trays of hamantaschen from the fridge, sprinkle with sprinkles and bake for 15-20 minutes or until the pastry is golden.

Once removed from the oven you can sprinkle more sprinkles over the hamantaschen for an extra pop of colour. Allow the hamantaschen to cool on their trays.

Hamantaschen will store well in an airtight container for at least 7 days.

Makes about 24 hamantaschen - however this may vary depending on your cutter size and type of pastry used.

*for a great video demonstration of how to fold hamantaschen (plus another great recipe as well as more good hints and tips at making them) check out Lisa Goldberg’s (of the Monday Morning Cooking Club) Walking Up An Appetite YouTube Channel, as she has a great YouTube live video of making hamantaschen that shows how to fold them really well.

Biscoff Hamantaschen
In Tarts & Pastry Tags Hamantaschen, Cheats Hamantaschen, biscoff spread, Purim, Mixer Free Recipes, Holiday Baking, Easy Baking
Comment
Biscoff White Choc Cookie Slice

Biscoff & White Chocolate Cookie Slice

Kath September 28, 2021

I have been thinking a lot lately about the impact of over three months of lockdown, plus restrictions for so long before that with all these ‘unprecedented times’ (or are they just ‘precedented’ times now?) we have been experiencing. 

Some changes have been big, and have taken a lot to adjust to. Others have been smaller and seem to have crept up on me with what feels like little warning. One major change I have noticed since this lockdown began in late June, is that coming up with new recipes has proved more of a challenge. A lot of my inspiration for recipes comes from going to the shops and seeing what is in season and stumbling across a new ingredient I just have to try. In store food shopping these days is few and far between, there is no browsing or looking, its just get in and out as quick as humanly possible. 

Eating out can also prove to be a great inspiration for new recipes too, but that has been almost non-existent for some time now. 

When coming up with new recipes for my blog, technically the possibilities are endless. But somehow that lack of structure means no new ideas come at all, especially when inspiration is few and far between. When I work with clients on recipes they will have their own requirements and ideas on what they want, so there are automatically boundaries around what a new recipe will be. These boundaries help narrow things down and I find it a easy to come up with new ideas. 

The only source of food inspiration now comes from the few special home deliveries I have been able to get, which I spoke about in this recent post. These deliveries prove to be welcome in more ways than one, especially as they provide a tiny element of food inspiration and a window into what might be happening outside my own home. 

This particular slice recipe was inspired by a cookie delivery I got from Butter Boy Bake. I have ordered twice from them now and have really enjoyed them and will definitely miss them if they cease delivering once lockdown ends. 

The combination of cinnamon, white chocolate and biscoff spread forms the basis of Butter Boy’s ‘snickerdoodle’ cookie and the combination got me thinking about how I could made something similar, but even easier. Which then make me think of my Funfetti Cookie Slice and how that could be adapted to incorporating Butter Boy’s ‘snickerdoodle’ cookie flavours. 

I am happy to report that these flavours work so well in a cookie slice and I can now rest easy that even if I never get a delivery from Butter Boy Bake again, or never actually get to visit their store in Manly, I will always be able to recreate at least one of their flavours myself.

I hope you enjoy making this cookie slice as well, it is a lot easier to make than many other baked goods even if you are low on time or motivation, is excellent to snack on and very tasty. 

Biscoff Slice
Snickerdoodle Slice

Biscoff and White Chocolate Cookie Slice 

a.k.a Butter Boy Bake’s Snickerdoodle Cookie but in a Slice

Ingredients:

120g unsalted butter, melted

200g caster sugar 

2 tbsp golden syrup

1 tsp vanilla extract

1 egg

290g self raising flour

2 tsp ground cinnamon

120g Biscoff Spread

120g white chocolate, roughly chopped

Method:

Preheat oven to 180 degrees Celsius and line a 30x20cm brownie or Lamington tin with baking paper. 

In a large bowl whisk together the butter, sugar, golden syrup, vanilla and egg.

Then add the flour and cinnamon and mix to combine with a wooden spoon.

Tip the dough into the prepared tray, and spread it out, pushing it into the sides. Dollop the Biscoff spread over the dough and swirl/push in with a knife. Scatter the chopped white chocolate over the dough, pushing them in a little.

Bake for 15-20 minutes or until golden brown and cooked through. 

Allow to cool completely in the tin. Then remove and cut into slices or chunks of your choice.

Serves 12-15. 

Butter Boy Bake Snickerdoodle Slice
In Biscuits/Cookies, Cakes & Slices Tags Butter Boy Bake, Snickerdoodle, biscoff spread, White Chocolate, Biscuits/Cookies, Slices, Mixer Free Recipes, Easy Baking
Comment
Carrot Cake with Biscoff Buttercream

Carrot Cake with Biscoff Buttercream for Easter

Kath April 2, 2021

Yes, I know. Again with the Biscoff Spread!

Since discovering this caramelised biscuit spread, I have had many ideas for what I could do with it, apart from just using it as a spread. Adding it to a buttercream was one of them, and I can confirm it is delicious!

Since I don’t eat chocolate, I always need to think of something a little different to enjoy at Easter. I thought a carrot cake was quite a fitting alternative, especially decorated with a few pastel Easter eggs.

I have used panela sugar in this recipe as I love the caramel flavour it gives, however you can use the same quantity of brown sugar. I have also used some date syrup to add a little deeper flavour and colour to the cake, but if you don’t have any it can be substituted for more honey.

I hope you have a lovely long weekend, and get to enjoy a slice of cake, Easter egg or hot cross bun - or even better get to spend some time in the kitchen and bake some for yourself!

Carrot Cake with Biscoff Buttercream
Easter Picnic

Carrot Cake with Biscoff Buttercream

Ingredients: 

110g panela sugar (or light/dark brown sugar) 

185ml canola/vegetable oil 

85ml date syrup

100ml honey

4 eggs 

1.5 tsp vanilla bean paste 

335g plain flour

3 tsp baking powder

1.5 tsp bicarb soda 

2 tsp Hot Cross Bun spice*

4 large carrots, grated

Ingredients for the Buttercream: 

150g unsalted butter, at room temp

190g icing mixture/sugar 

130g (approx. 1/2 cup) smooth Biscoff spread

pastel Easter eggs, optional

edible flowers, optional

Method: 

Preheat oven to 170 degrees Celsius and line two 20 cm round springform baking tins with baking paper. 

In a large bowl whisk together the sugar, oil, date syrup, honey, eggs and vanilla.

Then add the flour, baking powder and Hot Cross Bun Spice. Sift in the bicarb soda and whisk together until combined.

Then add the grated carrots to the cake mixture and mix to combine. 

Equally divide the batter between the two prepared tins and bake for about 35-40 minutes, or until each cake is springy to the touch and a skewer inserted in the centre comes out clean.

Leave the cakes the cool on a wire rack for about 30 minutes, then remove from the tin and leave to cool completely. 

To make the icing, beat the butter using a stand mixer and the whisk or paddle attachment for 1-2 minutes, or until it is pale and creamy (if your butter is still a bit cold, you will need to beat it a bit longer than this). Add in the icing sugar, and beat for another 1-2 minutes or until the icing is fluffy.

Add the Biscoff spread and beat until combined.

Place one of the cakes on a plate or cake stand, and spread half the buttercream over the top. Top with the second cake, and spread over the remaining buttercream. Decorate with pastel Easter eggs and edible flowers if you wish.

Serves about 8.

*I have used the Hot Cross Bun Spice from Gewurzhaus, as they kindly sent me some. This spice is a combination of cassia, coriander, ginger and clove. You can substitute with your own mixture of these spices or just add 1tsp cinnamon and 1tsp mixed spice.

Carrot Cake with Biscoff Buttercream
In Cakes & Slices, Holidays Tags carrot cake, carrot, biscoff spread, Easter, bicoff buttercream, Holiday Baking, cake
2 Comments
Biscoff Babka

Biscoff Babka (Dairy Free)

Kath March 3, 2021

It’s been a while since I ventured into making babka. I love my pistachio version, but the filling I used was unavailable here in Australia for the majority of last year, only coming back on the shelves in November or December. 

It was definitely time to try a new flavour, so when I bought a jar of Crunchy Biscoff Spread, it occurred to me that it could be a really good filling for a babka, amongst other things. I tried it, and can confirm it is delicious. It’s also something that is easily bought at many supermarkets (I bought mine at Woolworths), and is dairy free. And since I still believe that challah is the best type of bread, I again used that as my babka base, and that combined with the Biscoff spread makes this whole recipe dairy free.

You could of course use many other things as your babka filling, Nutella is another spread that is easy to come by. If using, you’d only need about 200g or so of it, since it has a smoother, thinner and even more spreadable consistency than Biscoff spread. 

And as a note, I am still exclusively using the Monday Morning Cooking Club challah recipe, as it genuinely works every time and tastes great made a traditional challah or adapted into something like this. The recipe is in their first self titled book (which I highly recommend, you can read more about it here), and can be found on their website here as well. 

Biscoff Babka
Biscoff Babka

Biscoff (Challah) Babka

Ingredients: 

500g plain flour, plus extra

250ml warm water

9g dried yeast

85g caster sugar

3/4 tsp salt

1 egg, beaten

63ml canola or vegetable oil

250-300g Crunchy Biscoff Spread 

cooking spray


Ingredients for the Glaze: 

50g white sugar

60ml water


Method:

Place the flour into a large bowl (one that fits your stand mixer if you have one). Make a well in the centre of the flour, then pour in the warm water. Add the yeast and 60g of the caster sugar and stir (don’t mix in the flour at this stage). Leave for 10-15 minutes, or until the yeast has become foamy. 

Then add the salt and remaining sugar, stir again (don’t mix in the flour at this stage), and wait 5-10 minutes for the yeast to become foamy again. 

Once the yeast is foamy, add the egg and the oil to the yeast mixture and combine. Then start to gradually incorporate the flour into the wet mixture. Once everything is combined, attach your bowl to your stand mixer fitted with the dough hook, and knead on a medium speed for about five minutes. The dough will be smooth and a little sticky once done. If the dough is too sticky, add a little more flour (1-2 tbsp). 

While the dough is kneading, lightly oil a large bowl. 

Once the dough is ready, place into the oiled bowl and cover. Leave in a warm spot for 1-1.5 hours, or until the dough has risen and doubled in size. 

Spray a 22 x 10 x 8.5cm (approx.) loaf tin with the cooking spray. 

Once the dough has risen, flour your work surface and tip the dough out. Lightly flour the top of the dough to prevent it sticking to your rolling pin. Using a rolling pin, roll out the dough into a rectangle (approx. 20 x 5cm). 

Place the Biscoff spread in a heatproof bowl or dish, and put in the microwave for about 10 seconds. This will made it easier to spread over the dough.

Dust any excess flour from the top of the dough, then spread the Biscoff Spread over the surface of the dough. Don’t worry if your sough stretches as you spread the filling over, once the dough is rolled up you can gently push it from either end to make it a little less long.

Roll the dough tightly from one of the long edges to form a long log. Trim the ends off to neaten it up, and cut the log evenly down the middle. 

Turn the cut side of each piece of dough so it is facing up, then twist the two strands of dough together. Tuck the ends under, and gently squash the dough from either end to make it a bit more tight if it has become quite long. 

Place the dough into the prepared tin, cover and leave in a warm spot for about 30 minutes, or until the dough has risen. 

While the dough is rising, preheat oven to 180 degrees Celsius.

Once the dough has risen, place in the oven for 40 minutes. Check after 20 minutes, and loosely place some foil over the top to prevent the babka from over browning. 

While the babka is baking, make the glaze. Place the water and sugar in a small saucepan over medium heat and stir until the sugar has dissolved. Allow it to come to the boil, and then simmer for 3-5 minutes. Remove from the heat and allow to cool. 

The babka will be ready when it is golden on top, and sounds hollow when gently tapped. Remove babka from the oven, and place on a wire rack. Using a pastry brush, paint the top of the babka in about three layers of the syrup (this will help preserve the babka and stop it drying out), then leave to cool for 15-20 minutes. 

Once the babka has had a little time to cool, remove from the tin, and either cut into slices and serve immediately or allow to cool completely then slice. 

Babka like many homemade breads, is best eaten on the day it is made. If you won’t be eating all on day it is made, once the babka has cooled, cut into slices and freeze each individually.

Biscoff Babka

Reference: ‘Monday Morning Cooking Club - The Food, The Stories, The Sisterhood’ by Merelyn Frank Chalmers, Natanya Eskin, Lauren Fink, Lisa Goldberg, Paula Horwitz and Jacqui Israel (HarperCollins, 2013), p.263.

Biscoff Babka
In Breads Etc. Tags babka, biscoff spread, biscoff babka, challah, Monday Morning Cooking Club, Dairy Free, Breads
Comment

recipes

  • Biscuits/Cookies 39
  • Breads Etc. 9
  • Breakfast 7
  • Cakes & Slices 67
  • Confectionary 5
  • Drinks 6
  • Events 14
  • Food Photography Tips 3
  • From The Mailing List 24
  • Heirloom Recipes 12
  • Holidays 44
  • Ice Cream 9
  • Jams Preserves & Spreads 9
  • Muffins 4
  • Off the Shelf 48
  • Other Desserts 25
  • Savoury Dishes/Meals 15
  • Scones 4
  • Tarts & Pastry 9
  • Travel 13

Sign up to Friday Food Chat with Kath, a weekly newsletter for more food, baking, cookbook chat and more!

Sign Up Here!
instagram-unauth pinterest facebook url

Website Accessibility: To enable text to speech function on the blog, click the sound button to the right of each blog post.

All images & content are the property of Kathryn Vincent, unless stated otherwise. Please do not use without permission.

Kulinary Adventures of Kath

Food Photography, Recipes & Baking

instagram-unauth pinterest facebook url