Kulinary Adventures of Kath

Food Photography, Recipes & Baking
  • home
  • About
  • Work with Kath
  • Shop
  • Blog
    • The Blog
    • Recipe Archive
  • Newsletter
  • Contact
  • home
  • About
  • Work with Kath
  • Shop
    • The Blog
    • Recipe Archive
  • Newsletter
  • Contact
Raspberry Pistachio Rose Cake (23 of 25).jpg

The Blog

Recipes and Food Photography by Kath Vincent.

  • The Blog
  • Recipe Archive
  • All
  • Biscuits/Cookies
  • Breads Etc.
  • Breakfast
  • Cakes & Slices
  • Confectionary
  • Drinks
  • Events
  • Food Photography Tips
  • From The Mailing List
  • Heirloom Recipes
  • Holidays
  • Ice Cream
  • Jams Preserves & Spreads
  • Muffins
  • Off the Shelf
  • Other Desserts
  • Savoury Dishes/Meals
  • Scones
  • Tarts & Pastry
  • Travel

Blood Orange Yoghurt Cake

Kath September 7, 2023

I rarely make cakes that I cannot eat. Where’s the fun in baking something that I cannot enjoy? 

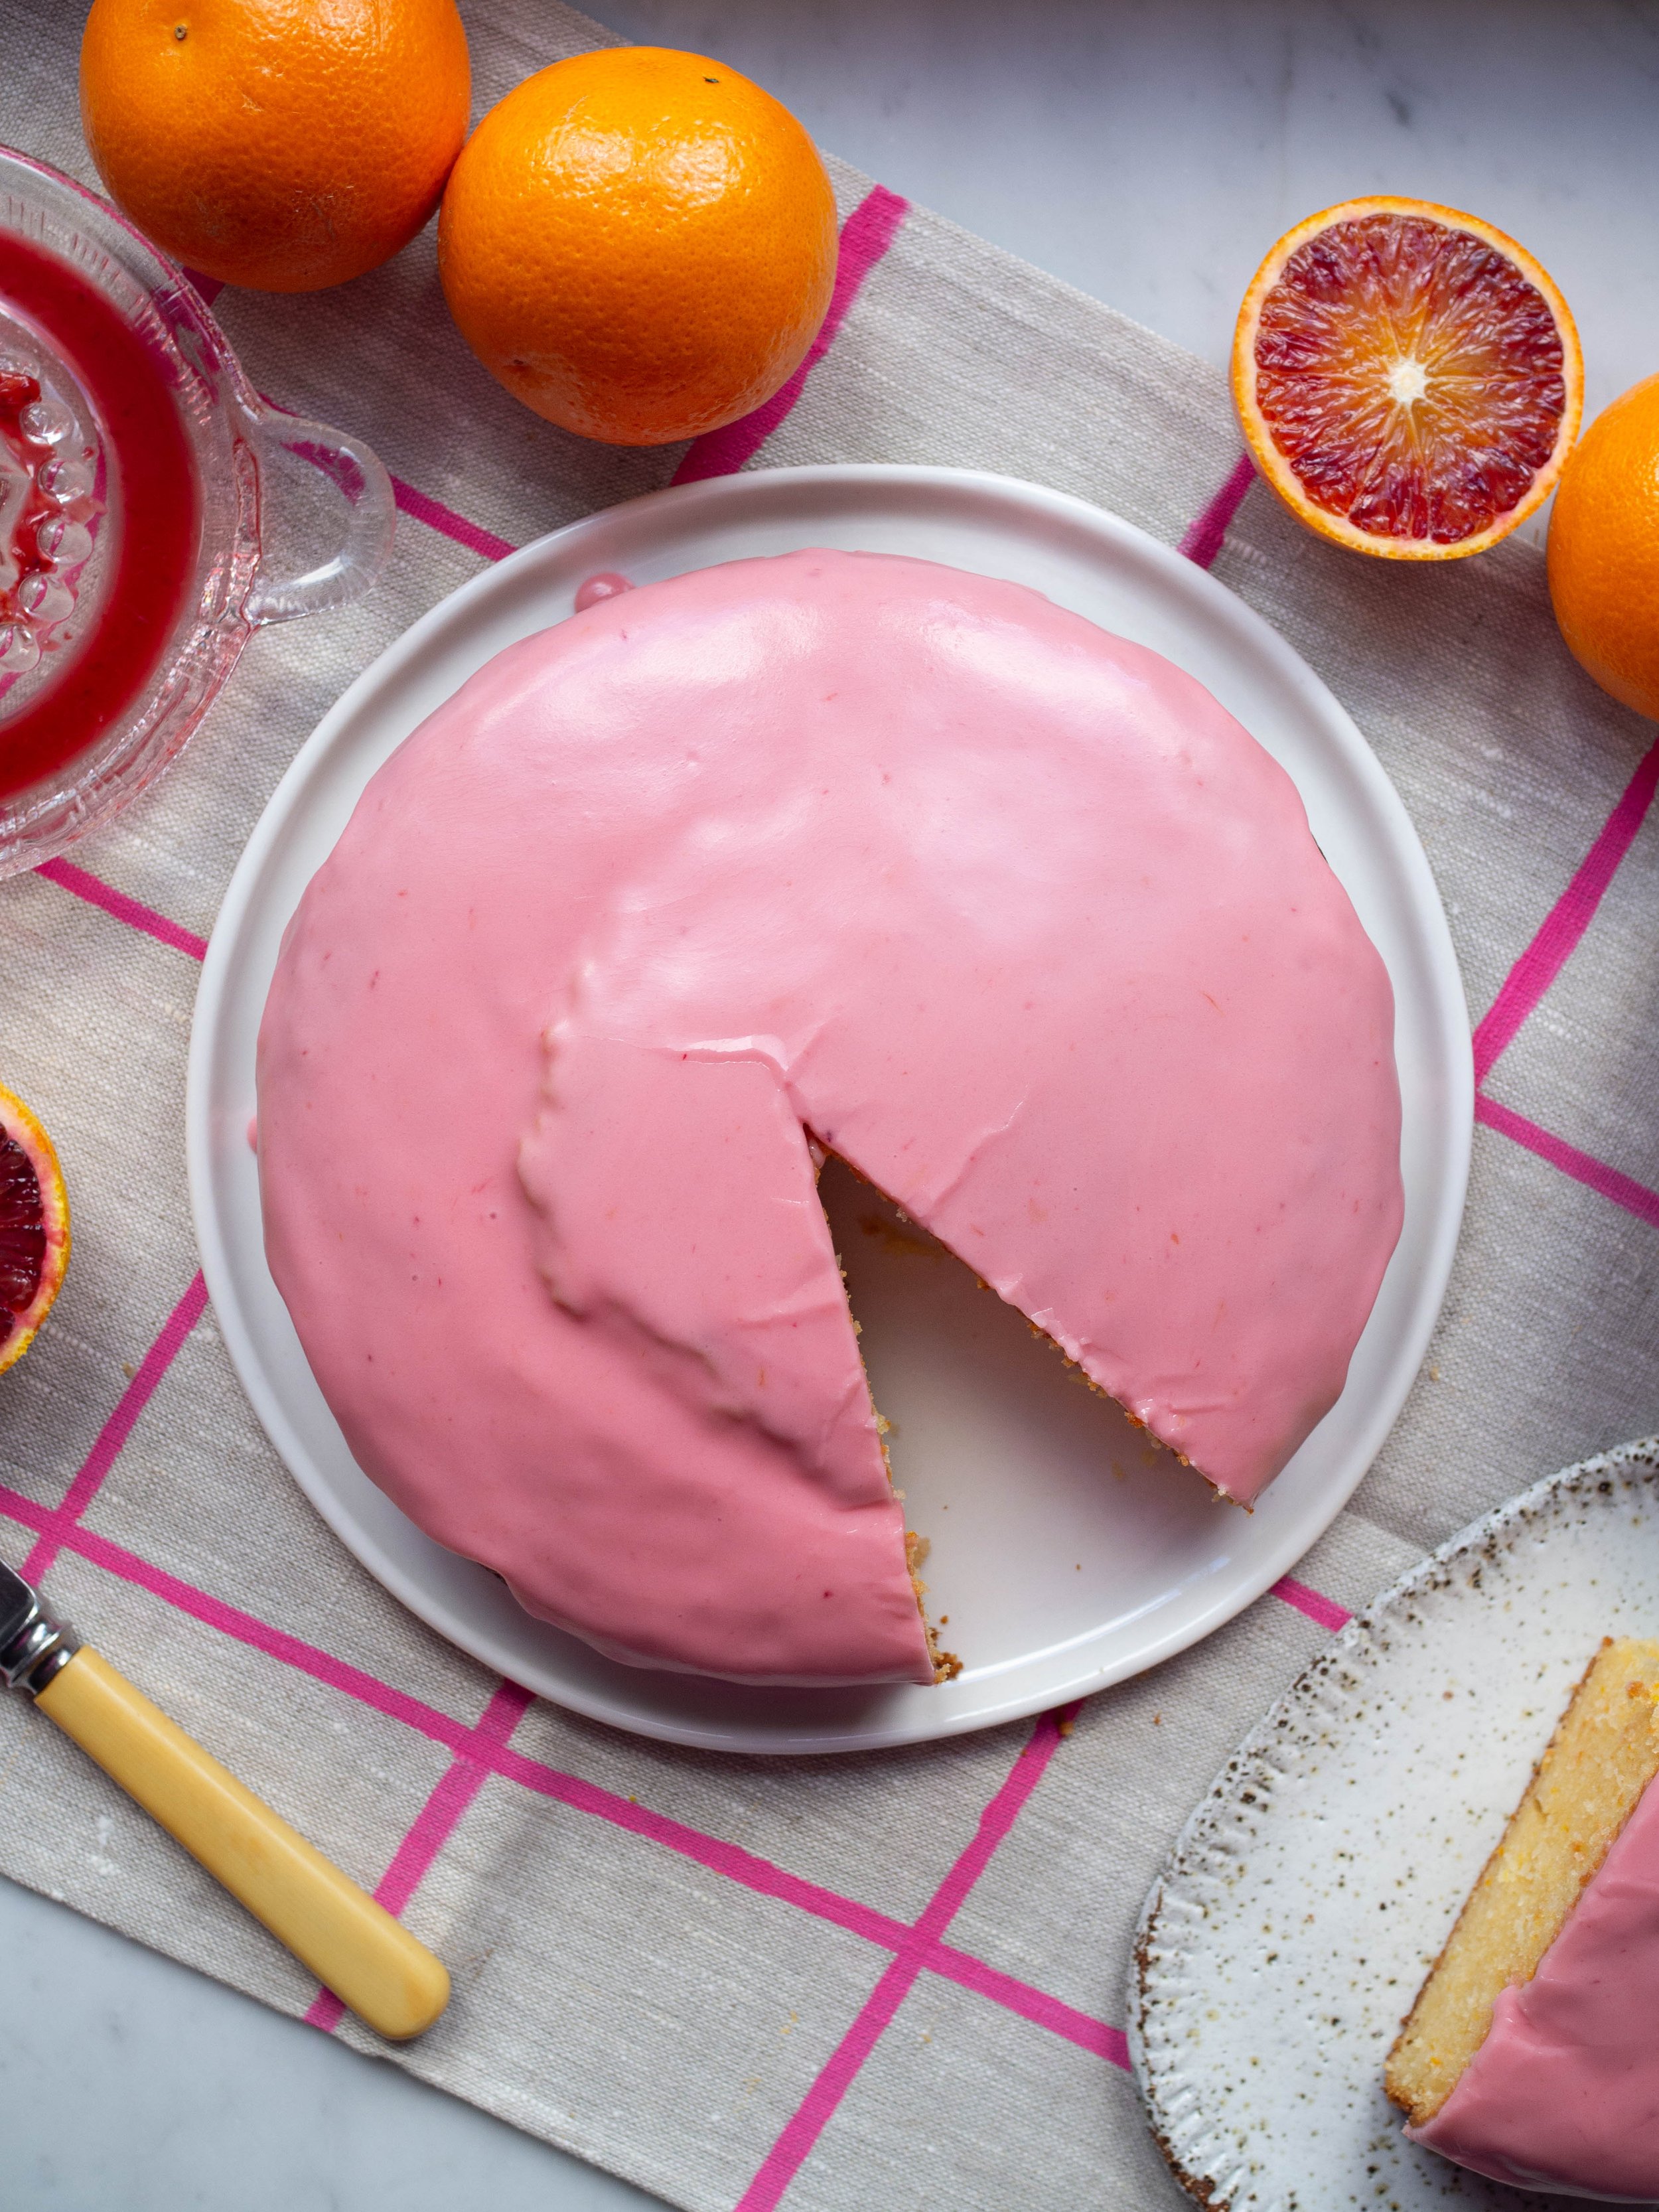
But sometimes ingredients need to be used up, and cakes need to be made. In this case we had blood oranges and yoghurt that needed using so this Blood Orange Yoghurt Cake was the perfect solution. 

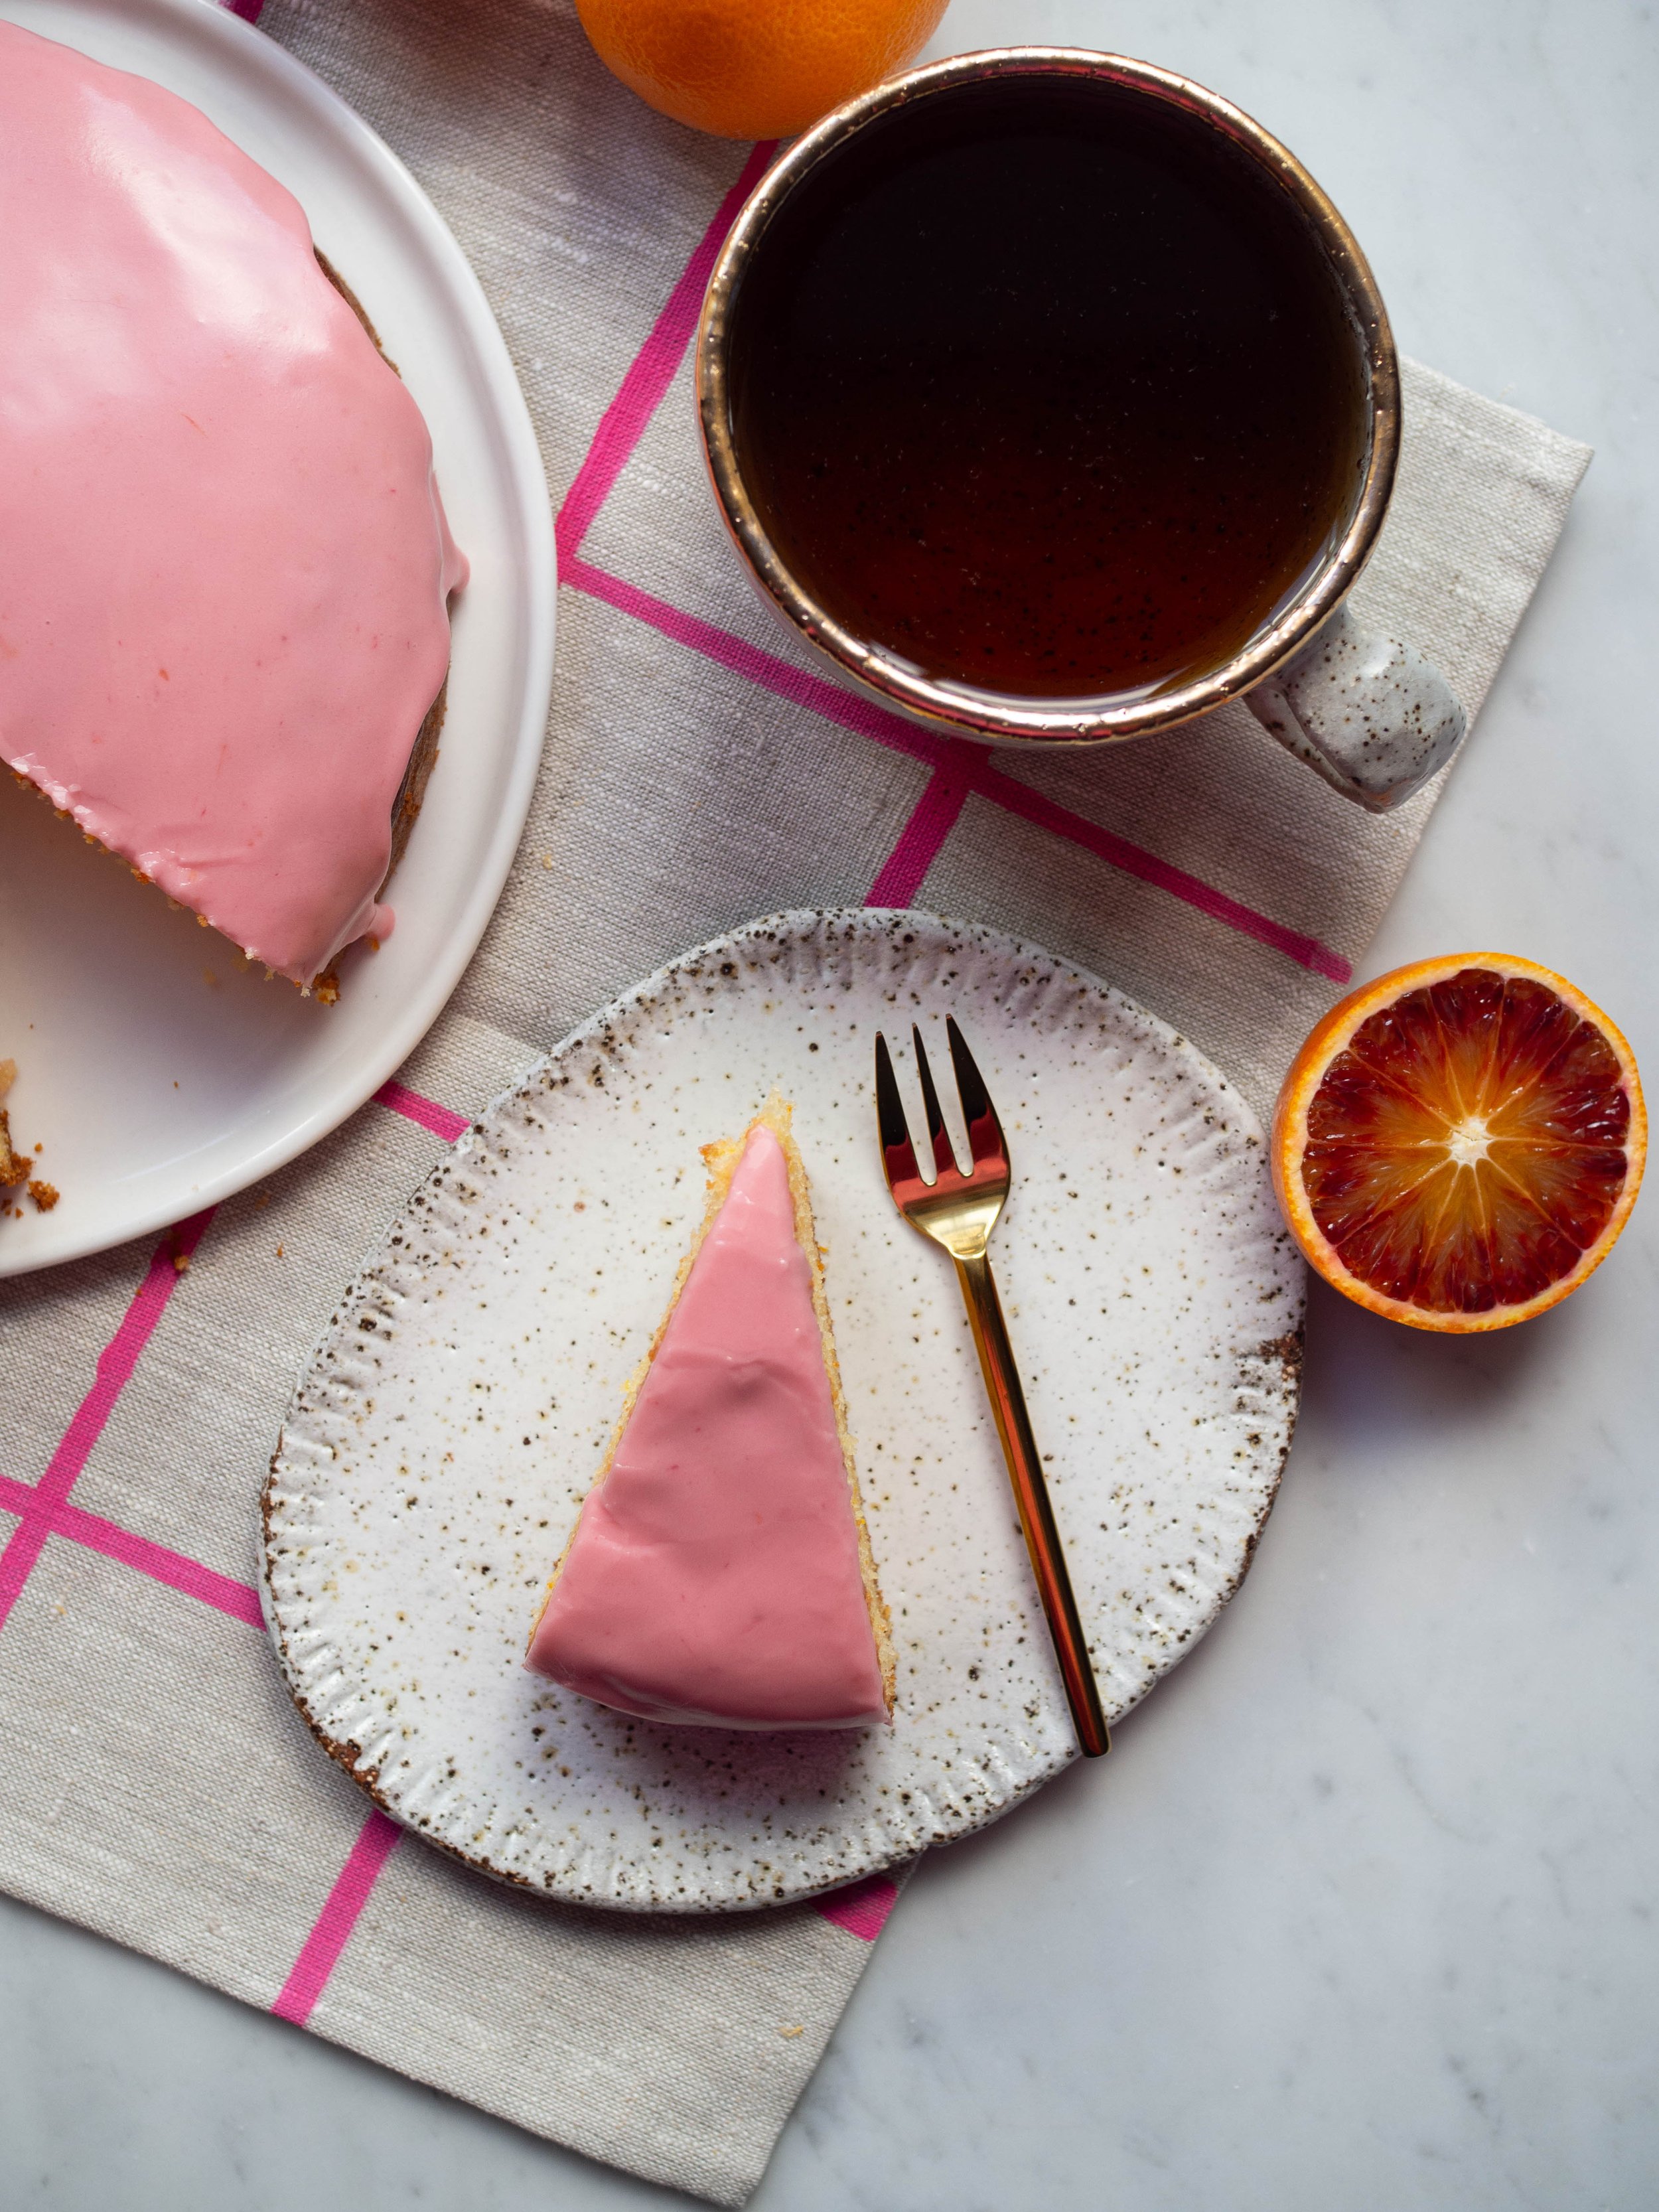
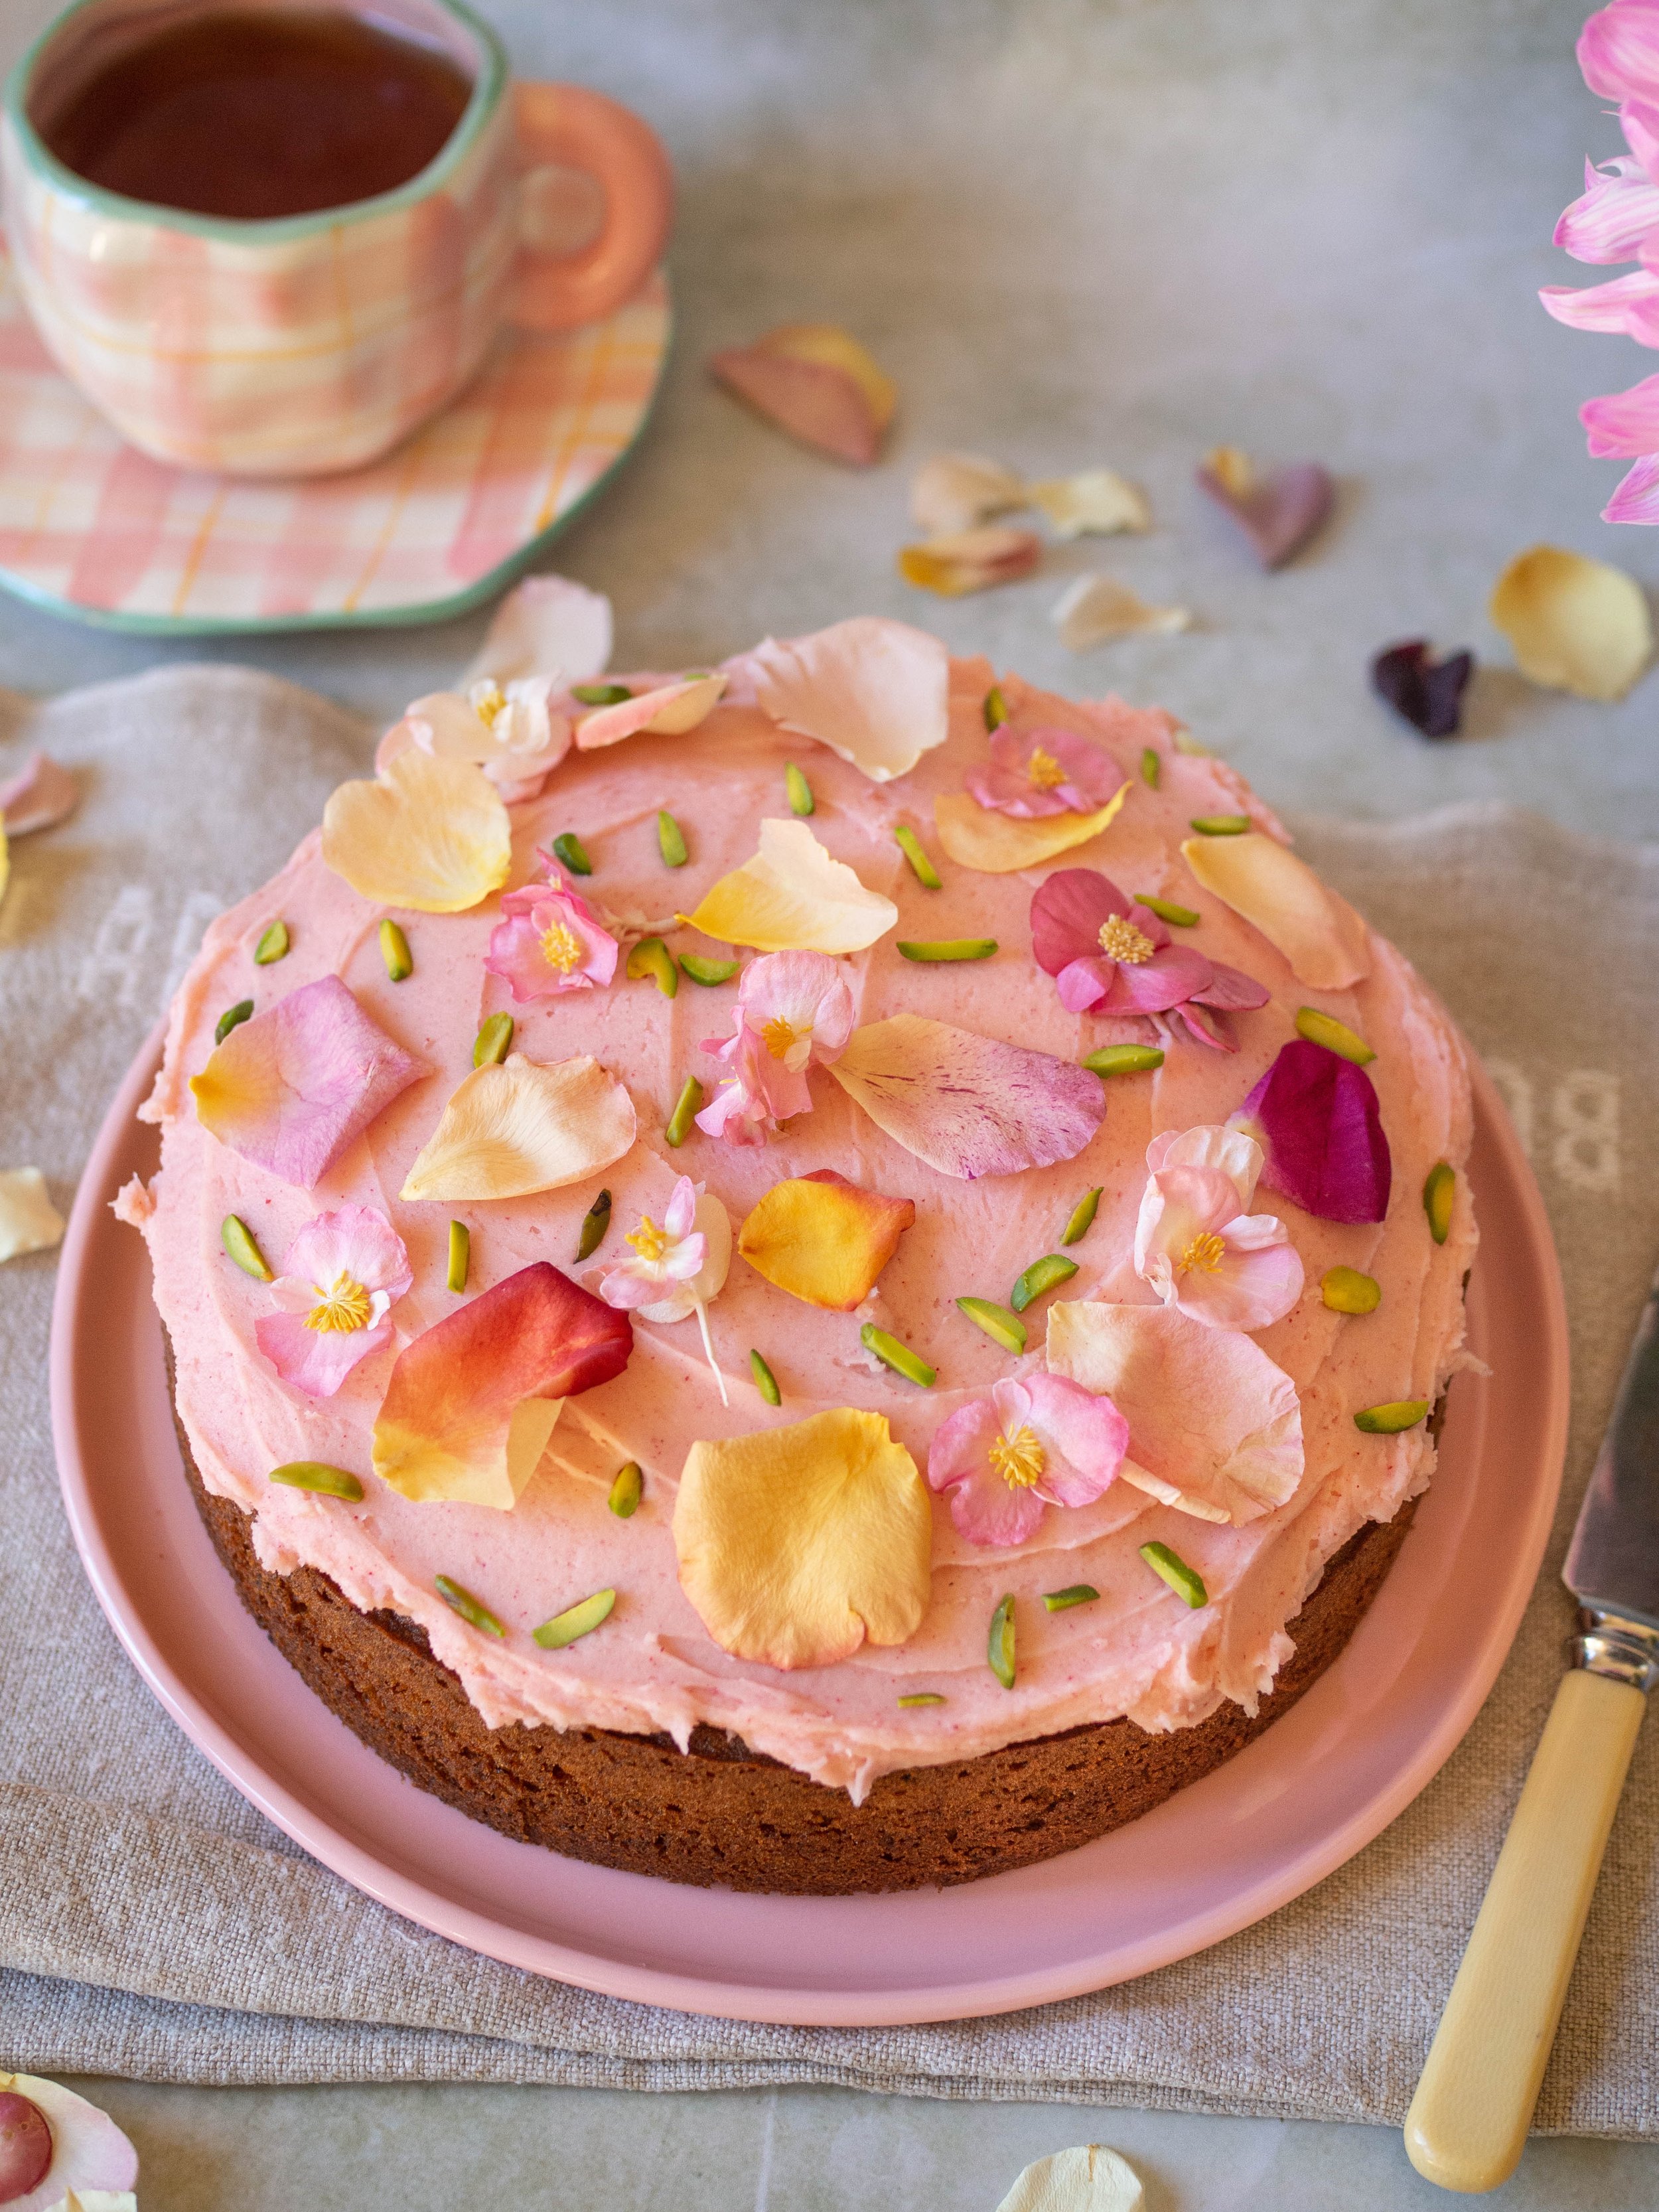
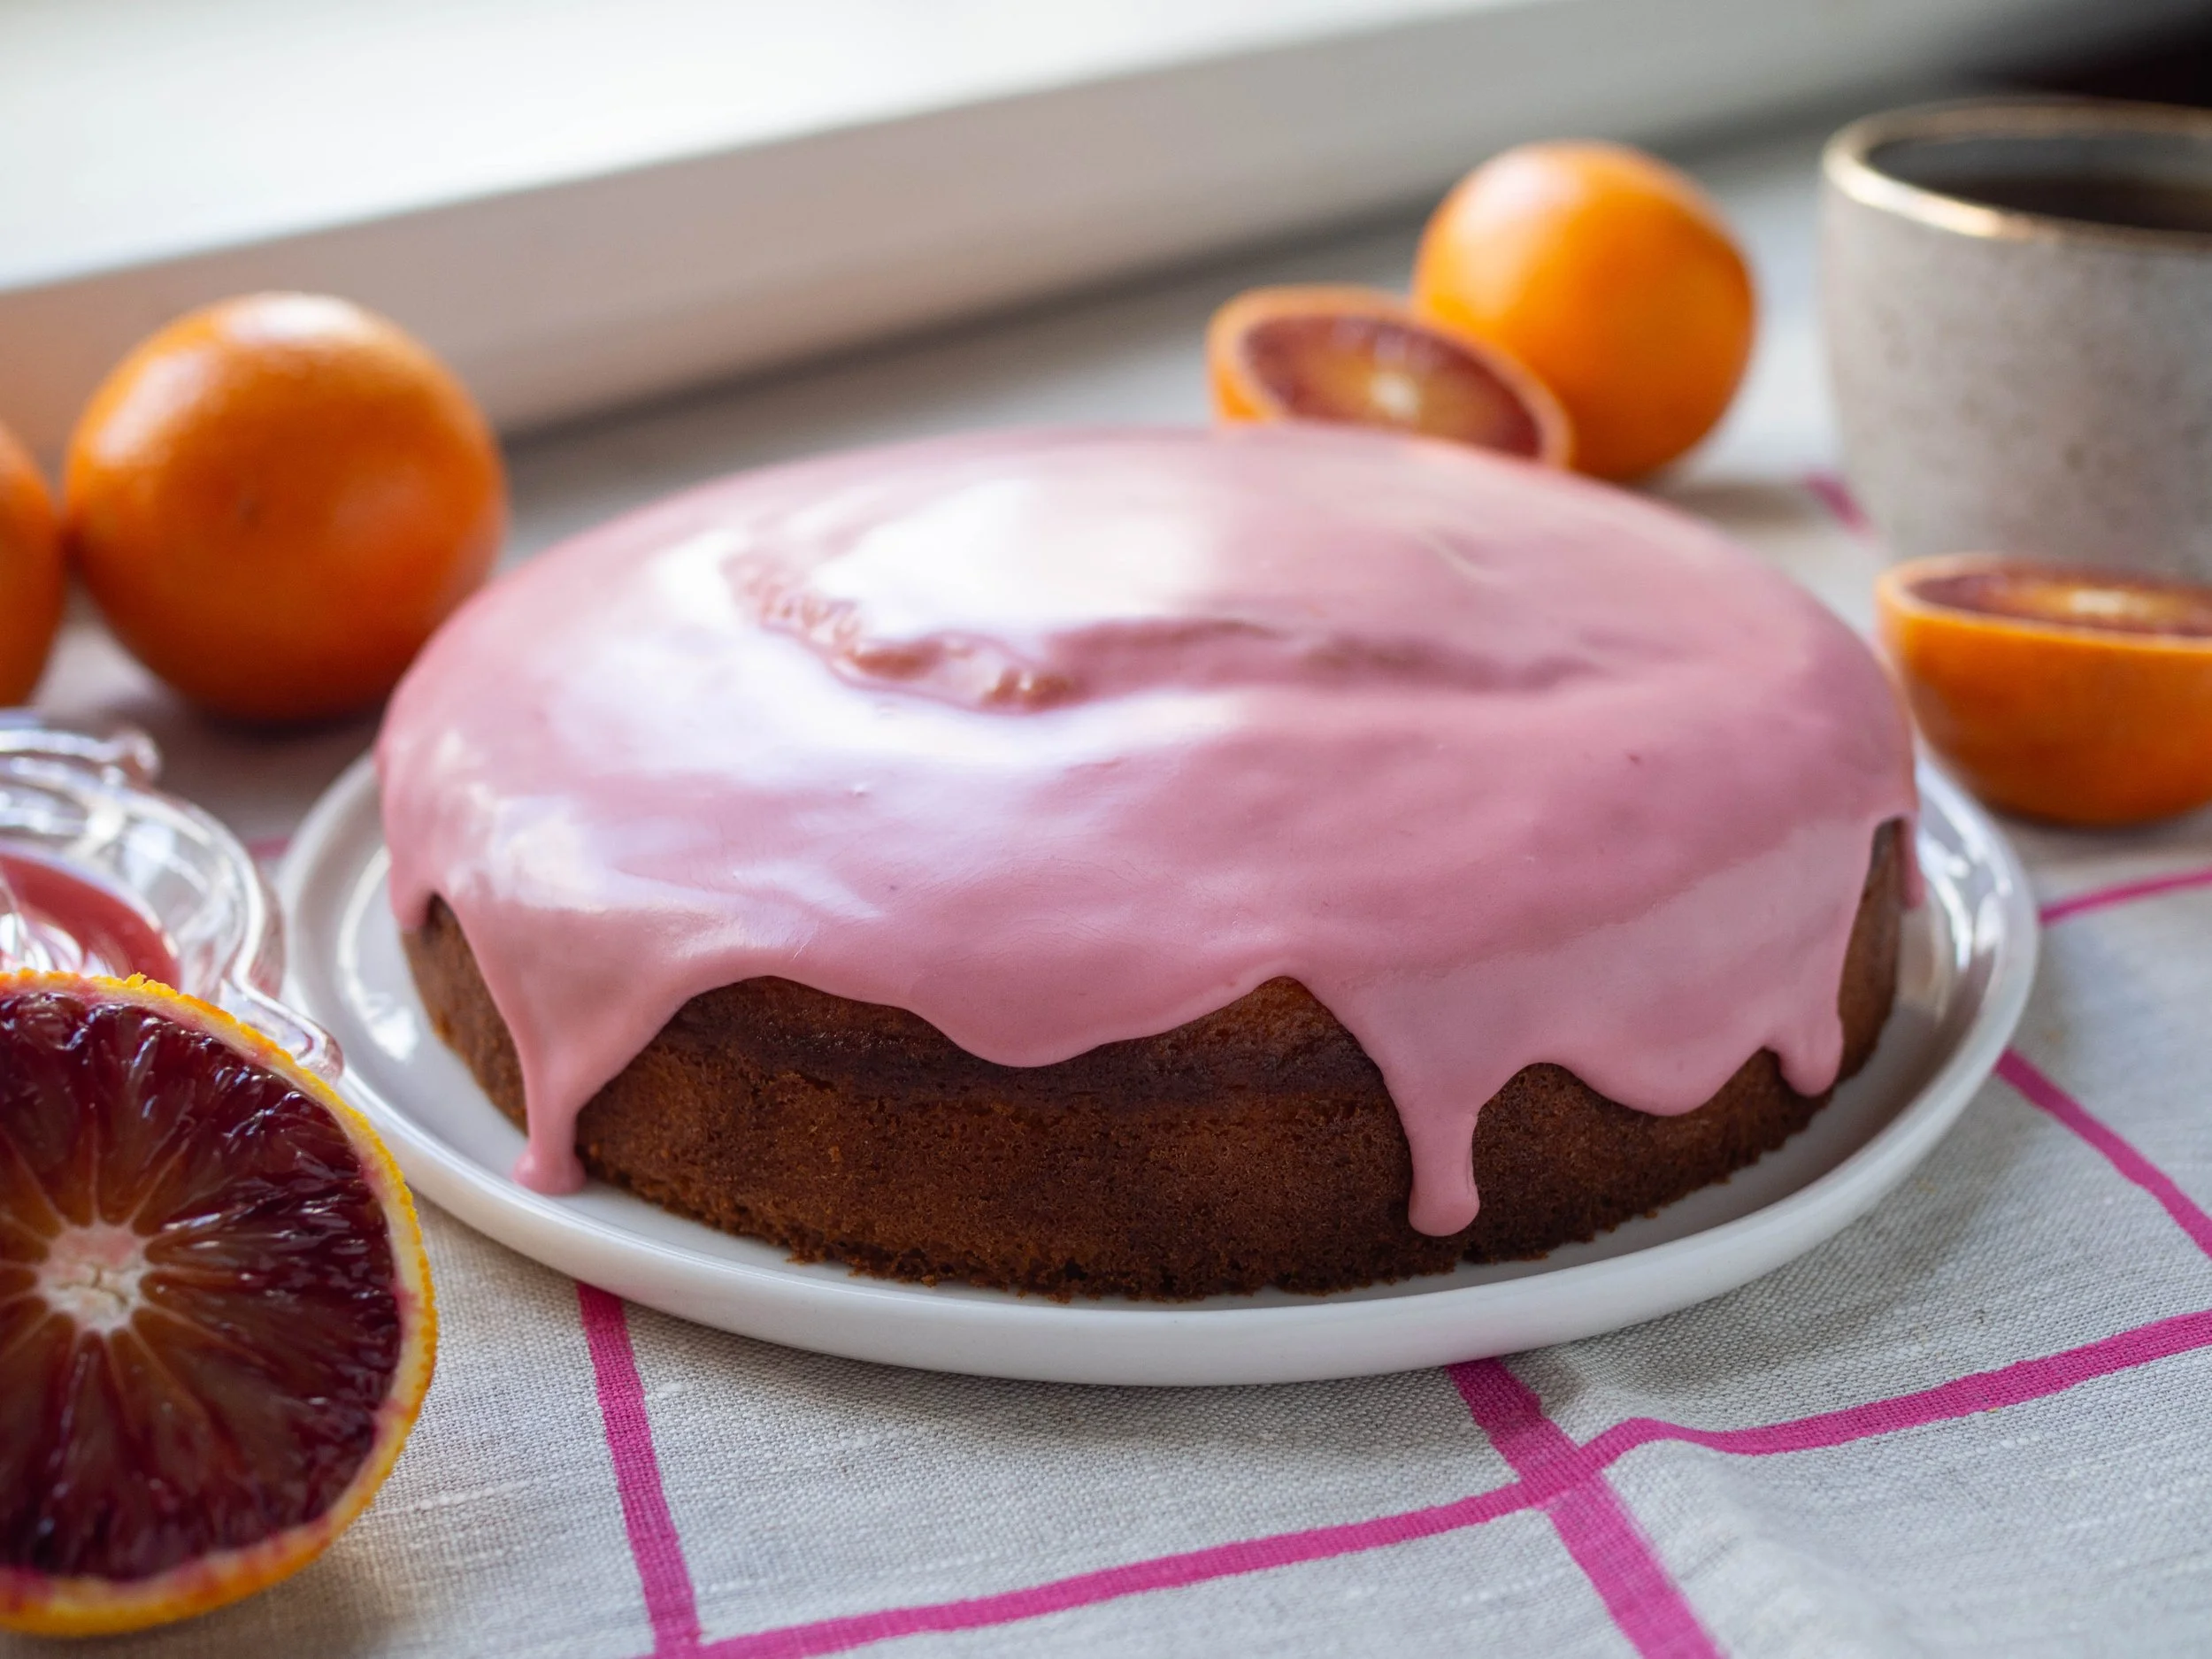
I really like blood oranges, however they do not like me. Anything vaguely orange citrus wise triggers migraine attacks for me (as does many other things), so I have had to give them up. I still so enjoy the surprise of what the blood orange will look like inside when first cut, and the fact that the juice will make the best naturally pink icing. 

So if unlike me, you can enjoy blood oranges please make this very easy cake and enjoy it in my stead!

Blood Orange Yoghurt Cake

Ingredients: 

175g Greek Style Yoghurt

150g caster sugar

2 eggs

125ml canola/sunflower/vegetable oil

finely grated zest of one blood orange

175g self-raising flour

cooking spray

Ingredients for the Icing:

125g icing mixture*

1-2 tbsp fresh blood orange juice

Method:

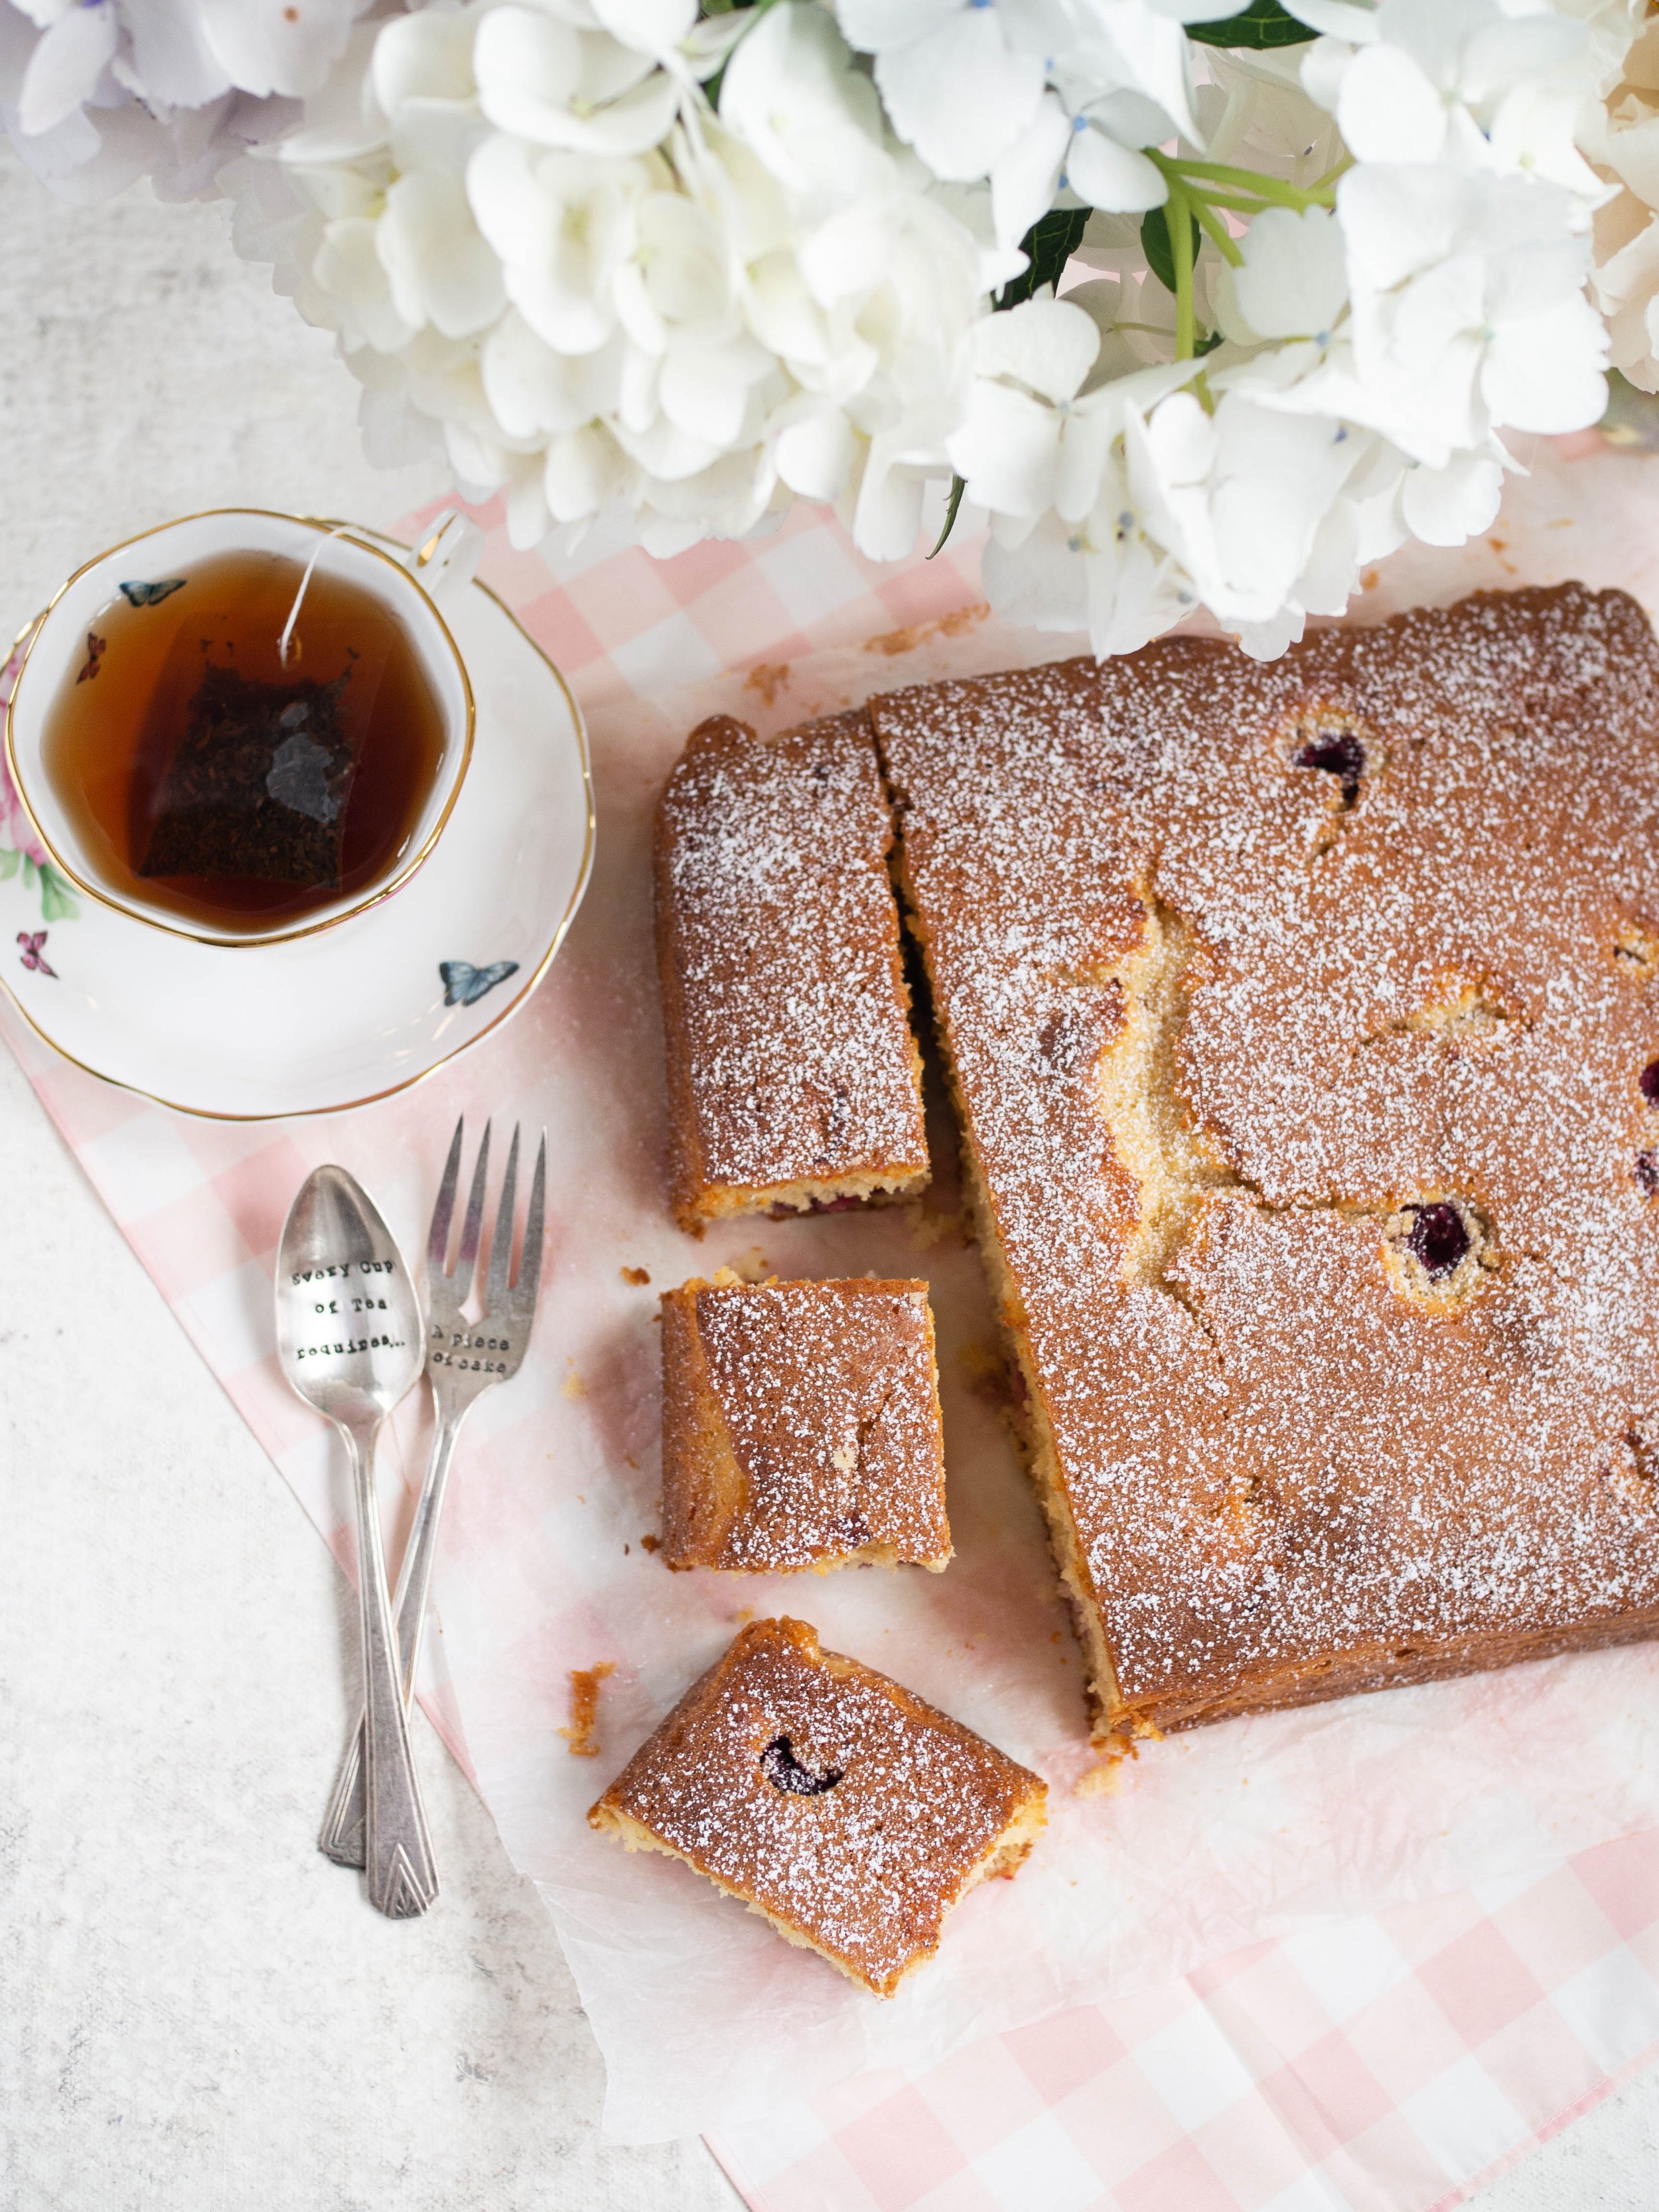
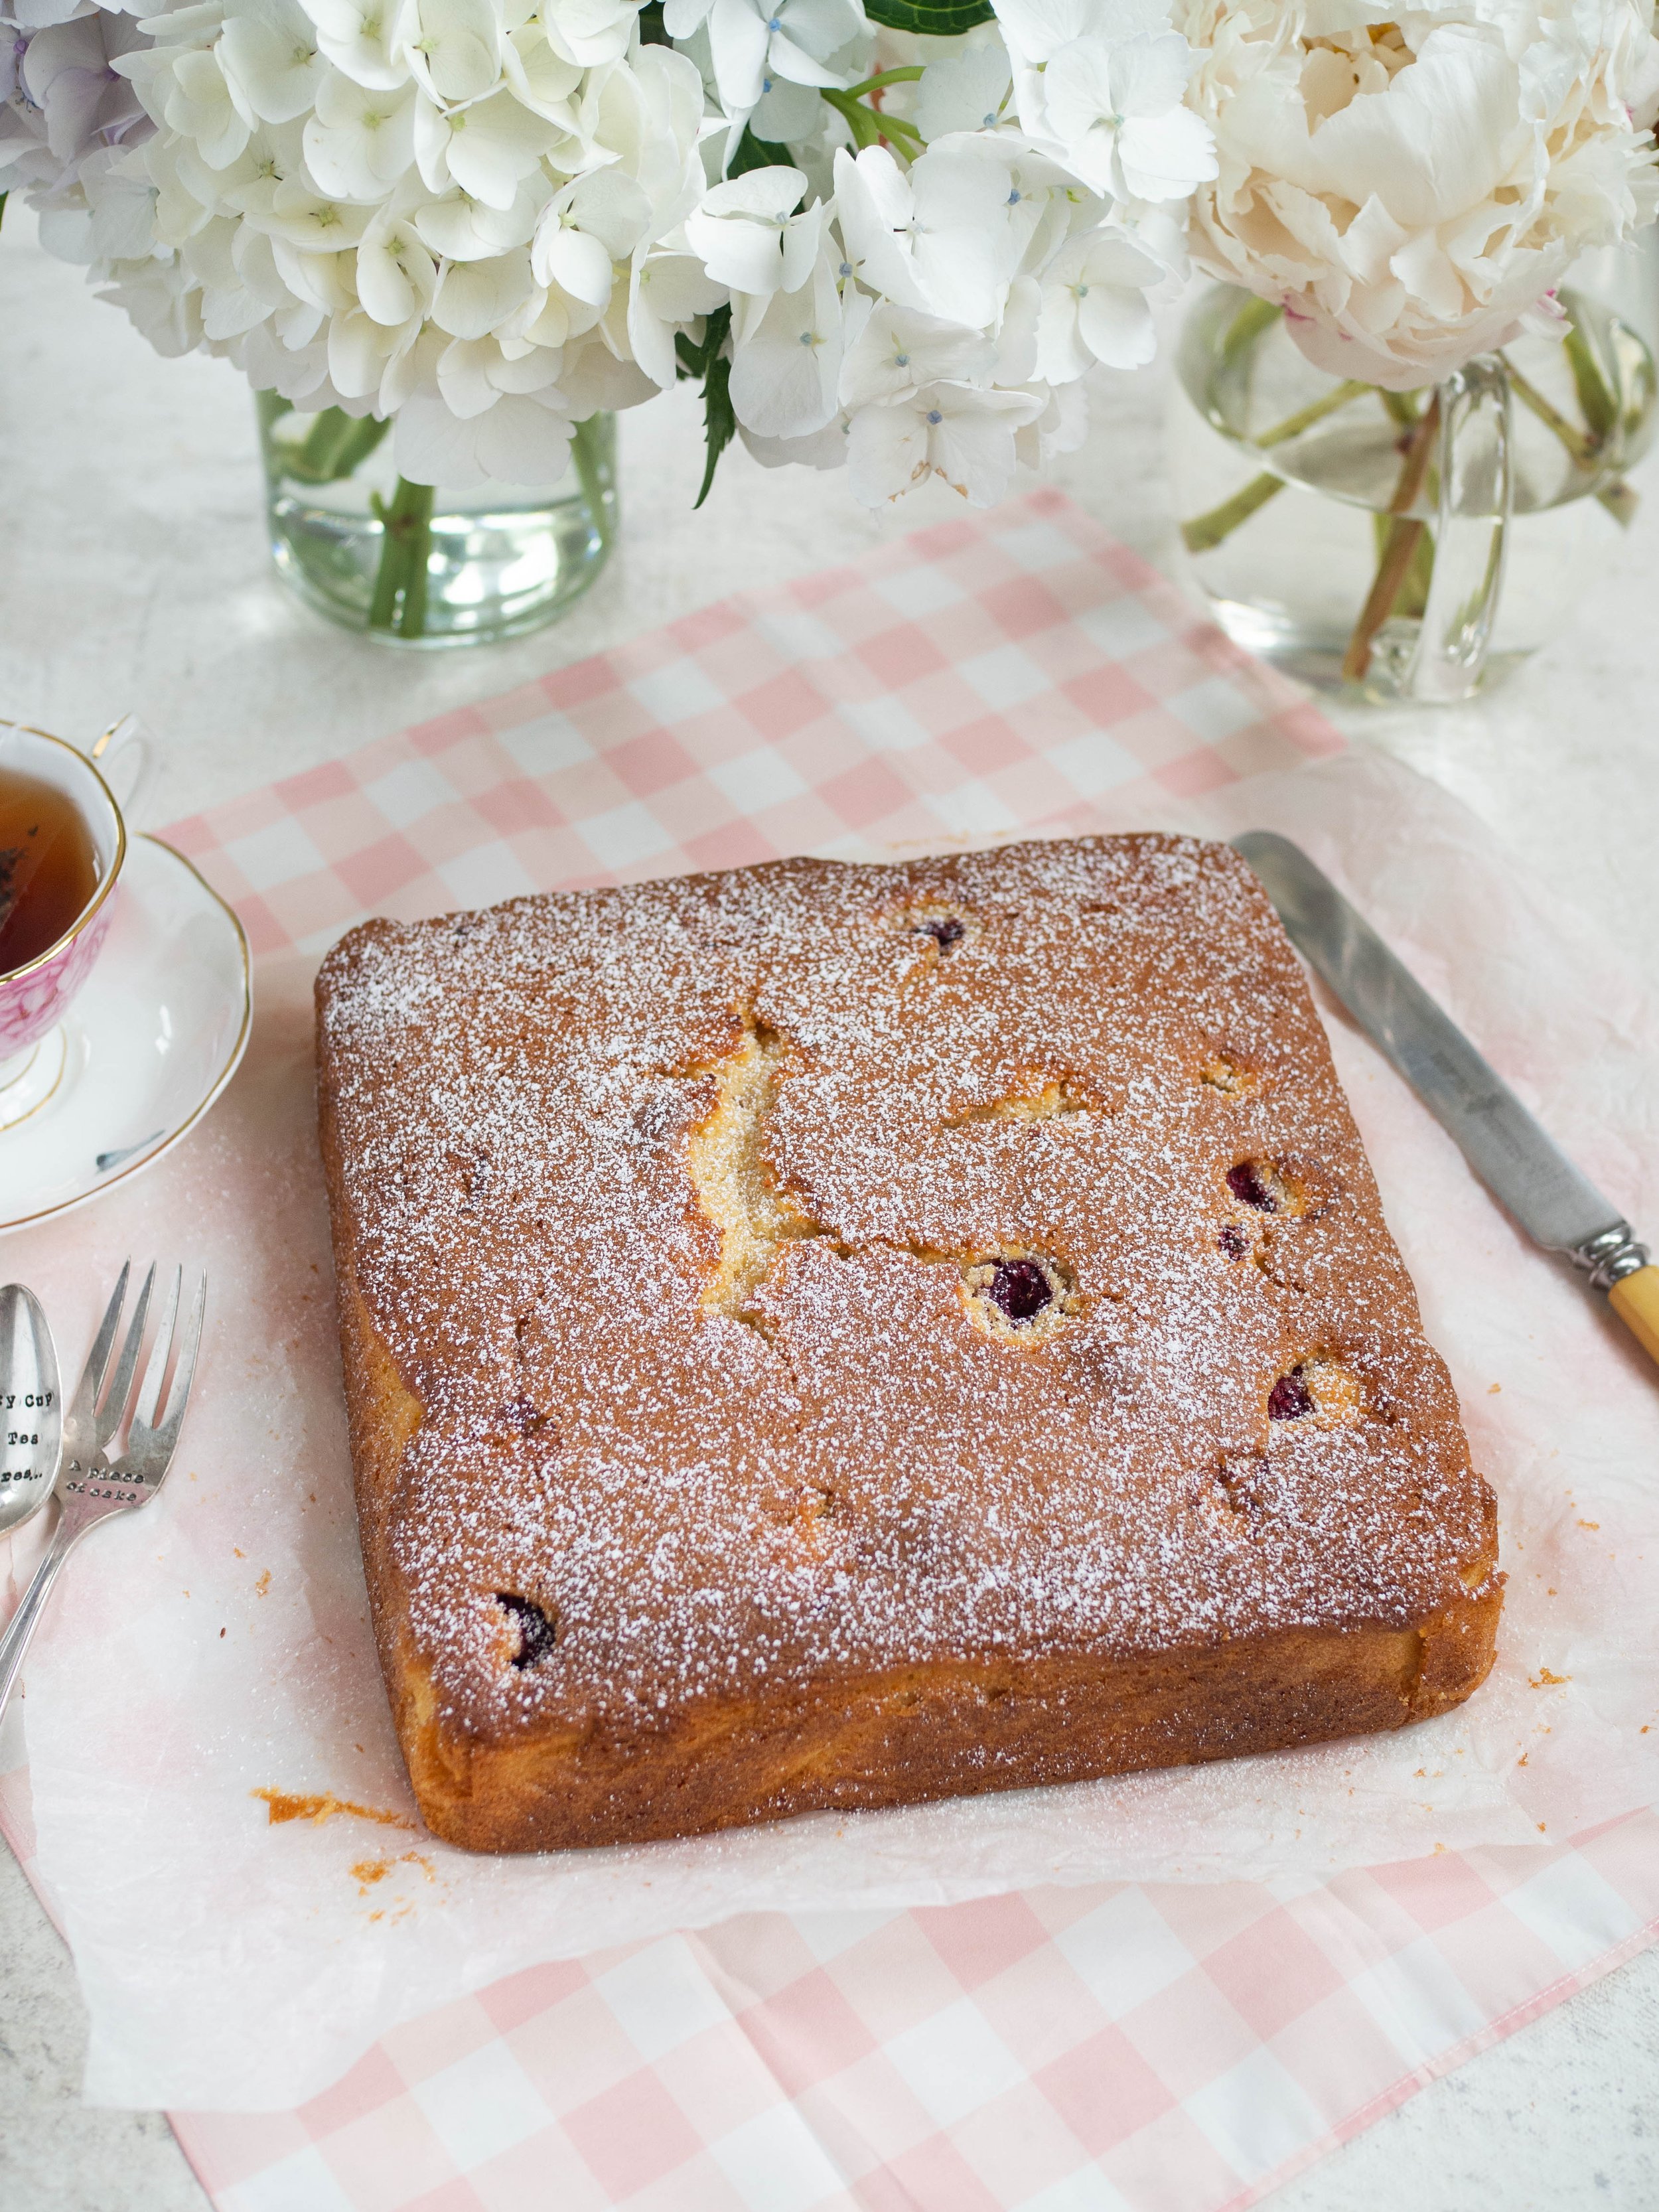
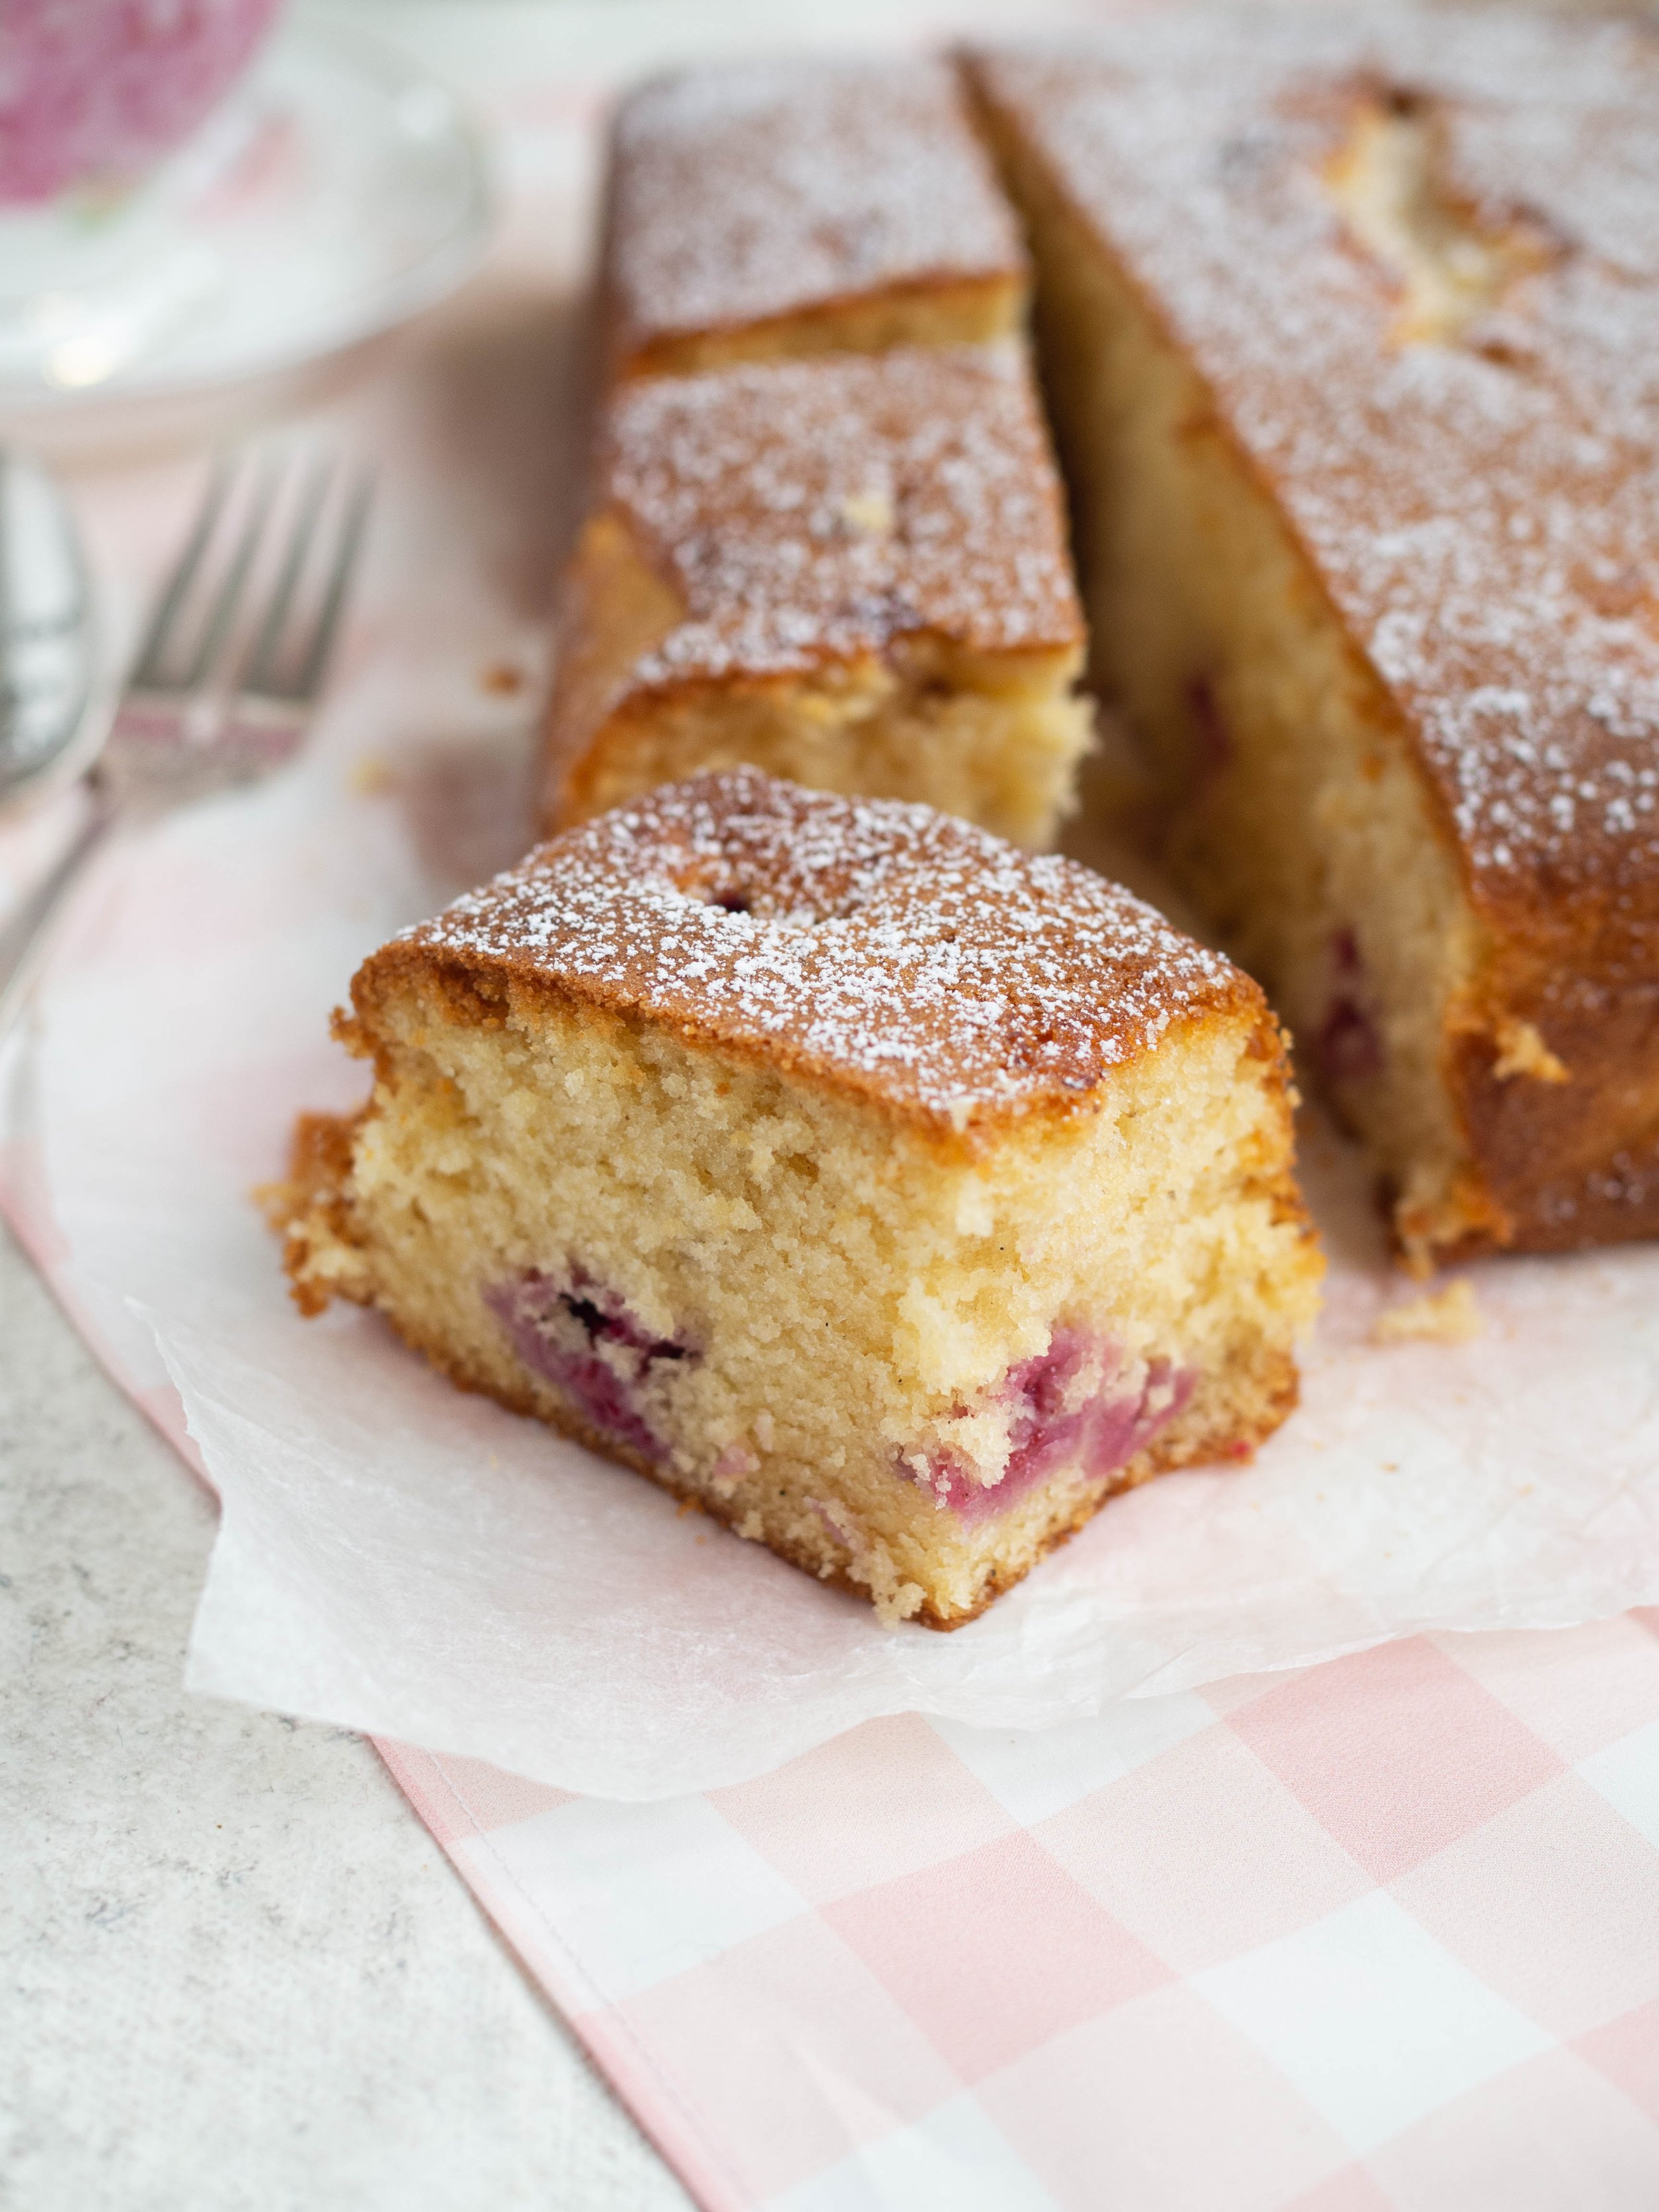
Preheat oven to 160 degrees Celsius (fan), and grease and line a 20cm round springform cake tin. 

In a large bowl whisk together the yoghurt, sugar, eggs, oil and blood orange zest until combined. 

Add the self-raising flour and whisk until combined, and there are no lumps. 

Pour into the prepared cake tin, and bake for about 45 minutes. The cake will be golden in colour when its ready, and a skewer will come out clean. If the cake looks like its peaking too much (this will depend on your oven), you can turn the temperature down by 5-10 degrees Celsius. 

Allow the cake to cool in its tin for a few minutes, before removing from the in and leaving to cool completely on a wire rack.

Once the cake has cooled, make the icing by combining the icing mixture and 1 tbsp of the blood orange juice in a medium bowl. Add a little more juice, a teaspoon at a time until you have a smooth thick icing. Don’t make the icing too thin or it will run off the cake, if it looks too thin you can add more icing mixture a little at a time to rectify. 

Spread the icing over the cake, allowing it to fall over the sides a bit. 

Serves 8-10, will keep for a few days in an airtight container. 

*you can use pure icing sugar instead it will just need to be sifted first.

In Cakes & Slices Tags Blood Orange, cake, Mixer Free Recipes, Easy Baking
Comment
cupcake with red wrapper vanilla icing and festive topper

Spiced Christmas Cupcakes with Very Vanilla Buttercream

Kath December 15, 2022

Since I already have quite a few festive recipes on my blog, I decided this year something simple was in order. 

Basic cupcakes like these are great to make when you don’t have time for more complex baking, and they would be a good thing to make with kids as well since the cook time is short (and the decoration options are endless!).

These cupcakes are spiced with the Gewürzhaus Christmas Cake and Pudding Spice which I was gifted in November when I went to visit the new Gewürzhaus store in Sydney’s QVB. It elevates these cupcakes from basic to festive, and provides all the Christmas-y flavour you could need (with very little effort). Other festive spice mixes can be used - a gingerbread style spice mix would also work really well, or a combination of spices such as cinnamon, mixed spice and nutmeg.

The vanilla buttercream is a favourite of mine and has a great vanilla flavour thanks to both vanilla extract and paste. The recipe makes a generous amount so you will have a decent amount of icing on each cupcake, ready to decorate whichever way you please.

Gewurzhaus Christmas cake and pudding spice with cupcake
Spiced Christmas Cupcakes with festive toppers

Spiced Christmas Cupcakes with Very Vanilla Buttercream

Ingredients: 

125g unsalted butter, at room temp

95g caster sugar 

70g vanilla bean sugar

1 tsp vanilla extract

2 eggs 

250g self raising flour

3 tsp Gewürzhaus Christmas Cake and Pudding Spice*

105ml buttermilk

Ingredients for Vanilla Buttercream: 

200g unsalted butter, at room temp 

1 tsp vanilla extract

1 tsp vanilla bean paste

240g icing sugar, sifted

festive sprinkles, to decorate (optional)

festive cupcake toppers, to decorate (optional)

Method: 

Pre-heat oven to 160 degrees Celsius, and line a 12 hole cupcake tray with cupcake cases. 

In the bowl of an electric mixer, beat the butter, sugars and vanilla until light and fluffy.

Beat in the eggs one at a time and mix well. 

Then add half the flour and mix on low speed until combined. Add the milk and mix on low speed until combined. Then add the remaining flour and Christmas Cake and Pudding Spice and gently mix until everything is combined and there are no lumps.

Spoon the mixture evenly amongst the cupcake cases, filling so the cases are about 3/4 full.

Bake for 20 minutes, or until a skewer comes out clean and the cakes spring back to the touch. Remove the cupcakes from the tray and allow to cool on a wire rack.

To make the icing, beat the butter and vanillas in a stand mixer with the paddle attachment for at least 1 minute, or until the butter is light and fluffy. Add the icing sugar and beat for a further minute or two, or until the icing sugar is well combined and the icing is light and fluffy. 

Spread or pipe icing onto the top of each cupcake, and decorate as desired.

Makes 12 cupcakes, will keep for a few days in an airtight container.

*This spice mix is a mixture of cassia, coriander, ginger, clove, nutmeg, so a similar mix of spices could be used in its place. 

Gewürzhaus Christmas Cake and Pudding Spice was gifted by Gewürzhaus.

Spiced Christmas Cupcakes with cup of tea
spiced Christmas cupcakes cut open with cup of tea
In Cakes & Slices, Holidays Tags Cupcakes, Christmas, Gewurzhaus, Christmas Cake and Pudding Spice, cake, Holiday Baking
Comment
Pink layer cake with edible flowers and gold

Let Them Eat Cake - A Marie Antoinette Inspired Layer Cake

Kath October 11, 2022

Let them eat cake, is a phrase we all associate with Marie Antoinette, despite the fact that she probably never actually said it.

The phrase and the opulence that can also be associated with the French Royal family which Marie Antoinette married into, has inspired many an artist, film maker and cake decorator over the years. 

This history and opulence was in part the inspiration for this cake, which I recently developed for The Healthy Baker. The brief was that the cake must have pink icing, and use flowers to decorate. 

While maybe not as opulent as some ‘let them eat cake’ inspired cakes, I think this cake presents well but is also quite easy to achieve. 

You will see that the buttercream icing is not perfectly smooth, this is not only as I felt it unnecessary as the whole cake will be covered with decoration, but it also avoided the cake having too thick a layer of buttercream. Since the cake is filled with passionfruit curd, that is where the cake is getting a lot of its flavour, and too much buttercream may detract from that. 

Too make the cake even easier I used bought passionfruit curd, and in terms of the decoration I can assure you that very little skill is involved when it comes to placing the flowers (both fresh and freeze dried) all over the cake! I also used some edible gold leaf which was easy to buy online from Woolworths.

You can find the recipe via The Healthy Baker’s website - it would make a great celebration cake or just a fun weekend baking project!

Recipe here

Recipe development projects like this one, are my favourite part of my job. Creating a recipe with businesses products means I get to think of new ideas, be creative and also try new things. I also get to eat the cake after, which is a pretty good job perk if you ask me!

If you have a product you’d love me to create some recipes with, just contact me and we can chat about what your business needs. Recipes for your website or blog are great ways to show your customers how to use your products, and the images are great for social media and other marketing content too!

Click here to find out a little bit more about working with me.

close up of pink layer cake decorated with edible flowers and gold leaf
Pink layer cake decorated with gold leaf and edible flowers
In Cakes & Slices, From The Mailing List Tags Marie Antoinette Inspired Cake, Edible Flowers, Gold Leaf, Passionfruit Curd, The Healthy Baker, Recipe Development, cake
Comment
round cake with pink icing and decorated with rose petals

Another Pistachio and Rose Cake

Kath June 8, 2022

Another pistachio and rose cake. I promise this one is a bit different to the rest. 

Pistachio and rose is a flavour combination I will never tire of, and since I am still enjoying my new found like of buttercream, I decided a rose buttercream would be worth a try. 

I have used freeze dried raspberry powder to colour my icing, however any pink food colouring will also work well. I find the rose flavour comes through really well the day after this cake is made, so if you wanted to make it in advance you definitely could, I would just leave the final decorations till the day you wished to serve it (if using any kind of edible flowers). 

Unlike the last few pistachio cake recipes I have posted here, this cake only needs raw pistachios blitzed to a crumb/meal, rather than a ready made pistachio spread. Which I hope makes this cake a bit easier to make and more accessible ingredient wise too. 

round cake with pink icing decorated with rose petals

Another Pistachio and Rose Cake a.k.a Pistachio Cake with Rose Buttercream

Ingredients: 

150g pistachios

175g unsalted butter, softened

2 tsp rosewater

100g light brown sugar

75g caster sugar

3 eggs

150g self raising flour

Ingredients for the Icing: 

150g unsalted butter, at room temp 

1.5 tbsp rosewater

190g icing sugar, sifted

Pink food colouring/2-2.5 tsp freeze dried raspberry powder, optional

Edible flowers fresh or dried, to decorate (optional)

1 tbsp slivered or roughly chopped pistachios, to decorate

Method: 

Pre-heat oven to 160 degrees Celsius and grease and line a 20cm round springform cake tin.

While the oven is heating up, place the pistachios on a lined baking tray to gently toast. Remove the pistachios once the oven has pre-heated or after 3 minutes or so. 

Allow the pistachios to cool down a bit, then place in a food processor and blitz until a fine crumb/meal forms.

In the bowl of a stand mixer beat the butter, rosewater and sugars using the paddle attachment. Beat until light and fluffy. 

Then add the eggs one at a time, beating well after each. Gently mix in the blitzed pistachios until combined.

Add the self raising flour and gently fold by hand using a spatula in until combined.

Transfer the cake batter into the tin and smooth the top. 

Bake for about 50 minutes or until the cake is springy to the touch and a skewer comes out clean when inserted into the cake. 

Leave the cake to cool before removing from the tin. 

Once the cake has cooled, place it on a serving plate. 

Then make the icing by beating the butter and 1 tbsp of the rosewater in the bowl of a stand mixer with the paddle attachment. Beat for about 1-2 minutes, or until the butter is nice and fluffy. 

Add the icing sugar and 2 tsp of the freeze dried raspberry powder (if using), and beat again until the icing is soft and fluffy, about 1 minute. 

If using food colouring, add that in now, starting with a small amount and adding more as needed. You can also add in the extra 1/2 tbsp of rosewater if you would like a stronger rose flavour, and if using the freeze dried raspberry powder, add in the additional 1/2 tsp to deepen the colour of the icing if you wish. 

Evenly spread the icing over the top of the cake, then decorate with any edible flowers you may have, and some slivered or roughly chopped pistachios. 

Serves 8-10. Will keep for a few days at room temperature in an airtight container.

slice of cake side on, cake is light green in colour with layer of pink icing on top
In Cakes & Slices Tags Pistachio, Rose, Buttercream, cake
2 Comments
Raspberry and Vanilla Snacking Cake

Raspberry and Vanilla Snacking Cake

Kath January 16, 2022

This cake came about because I bought 12 punnets of raspberries for $12 and then had a freezer full of raspberries. Not a bad problem to have, but amongst all the bread we also had in the freezer it felt like something needed to be used up! 

I liked the idea of just adding some of the raspberries to a nice plain vanilla cake and being able to snack on it whenever it felt necessary. This cake is fairly decent in size so you could definitely snack on it with a few other people as well.

The cake could have a few more raspberries in it than I have suggested in the recipe, maybe 200g or 2 cups if you would like it more filled with fruit. 

The cake could be iced with a simple glaze icing if you like, but I liked the simplicity and ease of a dusting of icing sugar. Plus I love the crisp top and sides of a plain cake like this one on the first day it is baked, which will get a bit lost if there is icing. It also means you don’t have to wait for the cake to be completely cool to eat it if you aren’t waiting to ice it - a win win in my books!

Raspberry and Vanilla Snacking Cake

Raspberry and Vanilla Snacking Cake

Ingredients:

225g unsalted butter, softened

340g caster sugar  

1 tsp vanilla bean paste

1 tsp vanilla extract

3 eggs

375g self raising flour 

220ml milk 

150g (1.5 cups) frozen raspberries

1-2 tsp icing sugar, for dusting

Method: 

Preheat oven to 160 degrees Celsius and line a 23cm square cake tin with baking paper.

In the bowl of a stand mixer cream the butter, sugar and vanillas until pale and fluffy.

Add the eggs one at a time, mixing well after each. 

Then add half the flour mix to combine. Add the milk and mix (you might want to cover your mixer with a tea towel for the first few seconds while the milk begins to incorporate). Then add the remaining flour and gently mix on low speed until it is incorporated and there are no lumps.

Pour half the batter into the prepared cake tin, then top with half the raspberries and push them into the batter a little. Then cover with the remaining batter and top with the remaining raspberries (no need to push the raspberries into the batter, the batter will swallow them up as it cooks and rises).

Bake for about 1 hour or until the cake is nicely golden and a skewer comes out clean. 

Allow to cool in it’s tin for a few minutes before turning out onto a wire rack to cool further. 

Once the cake has cooled down a bit, but is still a little warm dust over the icing sugar and serve (with nice cream if you have it). 

Serves 12 (at least), store in an airtight container, will keep for a few days. 

Every cup of tea requires a piece of cake
View fullsize Rasp Cake and Flowers (8 of 11).jpg
View fullsize Rasp Cake and Flowers (9 of 11).jpg
In Cakes & Slices Tags Raspberries, Vanilla, Easy Baking, cake, Mixer Free Recipes
2 Comments
Fluffy Bergamot Cake

Fluffy Bergamot Cake with Buttermilk

Kath July 14, 2021

This cake came about in the same way many others do in my kitchen. I had certain ingredients to use, and I really just wanted to bake something quick and easy that was also going to be very tasty. 

I have a few homegrown bergamots and some bought ones too at the moment, so I am constantly thinking about how I could use them. I love bergamot season, it is honestly my favourite citrus. I love the floral notes of it, and how it has the ability to lift a dish or a cake to another level flavour wise. 

I also had some Pepe Saya Buttermilk. I made an online order with Pepe Saya, as many other Sydney-siders when Pepe Saya offered 20% off for those of us in lockdown. I really like baking with this buttermilk, but I also like using it as I like having a dedicated milk to use for baking. This way the milk bought for tea and cereal etc won’t get used up as quickly as I’m not using it for baking. Which is helpful particularly as we are still in lockdown, and unnecessary trips to the shops and just well, unnecessary. 

I had planned to use some of the buttermilk for baking, and freeze any leftover for future use. However after making this particular bergamot cake once, I now have so many ideas for using it I’m not sure any will end up frozen. 

The bergamot cake is a little different to the other citrus cakes I usually make as I often make citrus cakes with an oil based recipe that uses yoghurt. I love cakes made this way as they are simple, reliable and tasty. This new Bergamot cake is still those things, however the texture mostly thanks to the buttermilk, its so fluffy it seems like a cake you’ve put a lot more effort into. 

I also think the lightness comes from the fact that I mostly bake with margarine rather than butter. Pretty much all my recipes say to use butter, as I know that’s what most people will use when baking. But I much prefer the lightness that a good margarine can give a cake. Whatever you use, it will still be a good cake and a nice fluffy one if you use buttermilk. 

I used a rectangular cake/slice tin for this cake as baking it in this shape will mean a quicker cook time. But you can of course use a 20cm round tin, however the cook time will be at least double what is stipulated in the recipe. 

Fluffy Bergamot Cake

Fluffy Bergamot Cake with Buttermilk

Ingredients: 

125g unsalted butter, softened or flavourless margarine*

165g caster sugar

finely grated zest of one bergamot/lemon

2 eggs 

250g self raising flour

125ml buttermilk (e.g. Pepe Saya)


Ingredients for the Icing: 

170g icing mixture

1-2 tbsp fresh bergamot/lemon juice

Method: 

Pre-heat oven to 160 degrees Celsius, and grease and line a 30x20cm rectangular slice or lamington tin with baking paper. 

In a large mixing bowl, beat the butter, sugar, and zest with a wooden spoon until light and fluffy.

Beat in the eggs one at a time, then add the flour and the buttermilk and slowly mix until combined. If the mixture is a little lump, mix using a whisk.

Tip the mixture into the prepared tray and smooth the top.

Bake for 20-25 minutes, or until the cake spring backs when touched lightly and a skewer comes out clean. The cake will be lightly golden when done. Allow the cake to cool on a wire rack.

To make the icing, mix 1 tbsp of the bergamot/lemon juice with the icing mixture in a medium bowl. Continue to add more juice, a little at a time until you have a smooth icing that you can spread over the cake - a slightly thinner consistency is good for this cake as there is more surface area to spread over, if the icing is too thick it might not cover the entire cake!

*if using margarine, use straight from the fridge no need to soften like butter. 

Fluffy Bergamot Cake
In Cakes & Slices Tags Bergamot, Buttermilk, Citrus, cake, Easy Baking, Mixer Free Recipes
Comment
  • The Blog
  • Older
  • Newer

recipes

  • Biscuits/Cookies 39
  • Breads Etc. 9
  • Breakfast 7
  • Cakes & Slices 67
  • Confectionary 5
  • Drinks 6
  • Events 14
  • Food Photography Tips 3
  • From The Mailing List 24
  • Heirloom Recipes 12
  • Holidays 44
  • Ice Cream 9
  • Jams Preserves & Spreads 9
  • Muffins 4
  • Off the Shelf 47
  • Other Desserts 25
  • Savoury Dishes/Meals 15
  • Scones 4
  • Tarts & Pastry 9
  • Travel 13

Sign up to Friday Food Chat with Kath, a weekly newsletter for more food, baking, cookbook chat and more!

Sign Up Here!
instagram-unauth pinterest facebook url

Website Accessibility: To enable text to speech function on the blog, click the sound button to the right of each blog post.

All images & content are the property of Kathryn Vincent, unless stated otherwise. Please do not use without permission.

Kulinary Adventures of Kath

Food Photography, Recipes & Baking

instagram-unauth pinterest facebook url