Kulinary Adventures of Kath

Food Photography, Recipes & Baking
  • home
  • About
  • Work with Kath
  • Shop
  • Blog
    • The Blog
    • Recipe Archive
  • Newsletter
  • Contact
  • home
  • About
  • Work with Kath
  • Shop
    • The Blog
    • Recipe Archive
  • Newsletter
  • Contact
Raspberry Pistachio Rose Cake (23 of 25).jpg

The Blog

Recipes and Food Photography by Kath Vincent.

  • The Blog
  • Recipe Archive
  • All
  • Biscuits/Cookies
  • Breads Etc.
  • Breakfast
  • Cakes & Slices
  • Confectionary
  • Drinks
  • Events
  • Food Photography Tips
  • From The Mailing List
  • Heirloom Recipes
  • Holidays
  • Ice Cream
  • Jams Preserves & Spreads
  • Muffins
  • Off the Shelf
  • Other Desserts
  • Savoury Dishes/Meals
  • Scones
  • Tarts & Pastry
  • Travel

Strawberries and Cream Rocky Road

Kath October 24, 2024

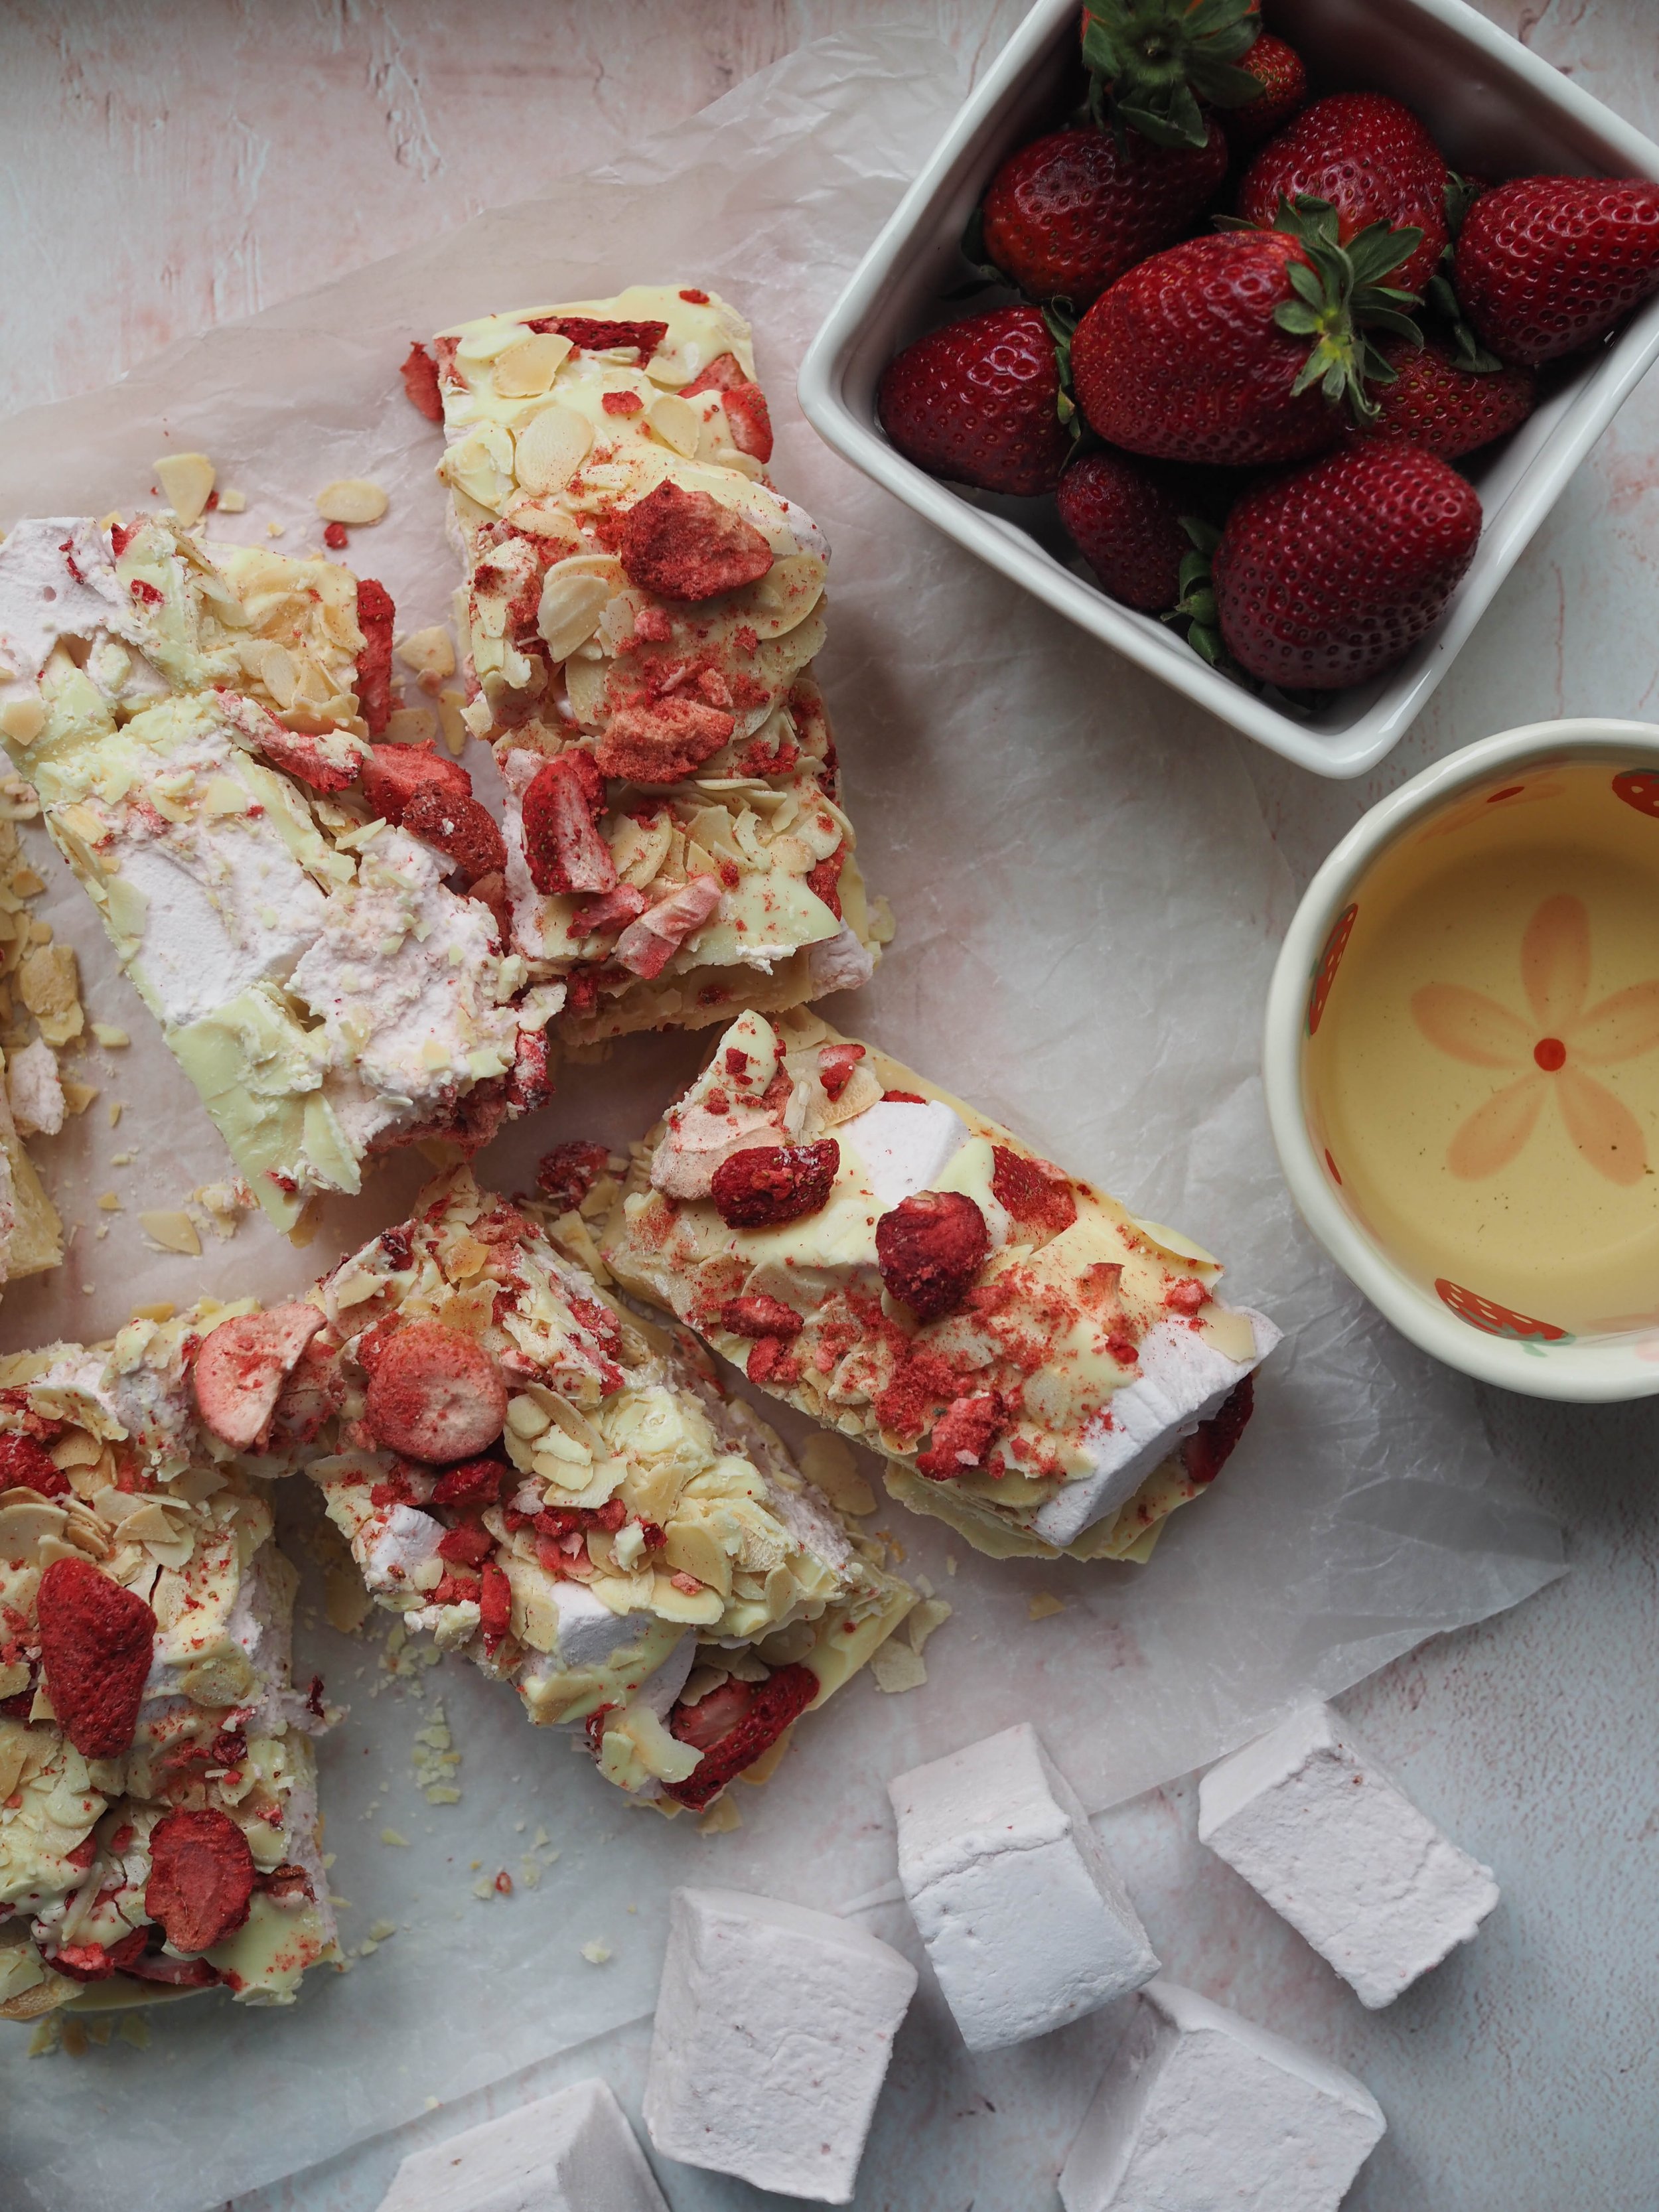
I really enjoy a good white chocolate rocky road, so when the idea came to me for a strawberries and cream version I knew I had to make it ASAP. The strawberry element comes from homemade strawberry marshmallows (made using fresh strawberries) and some freeze dried strawberries too. The cream element comes from the white chocolate,

I have written before that I love marshmallows. I know they can be a divisive thing, people have strong opinions about them. Most of these opinions are formed by the marshmallows found on supermarket shelves. Those marshmallows pale in comparison to homemade ones as are used in this recipe, so please don’t judge them before you try them! Everyone I know who says they don’t like marshmallows has liked these homemade ones, and been very surprised at how different they are to bought ones and how fresh the flavour is (as they are made with fresh fruit not artificial flavourings).

You can make the marshmallows a few days in advance and make the rocky road another day, this recipe can’t be done in one day anyway as the marshmallows need time overnight to set.

You won’t need all the strawberry marshmallows for the rocky road (or you could probably make a double batch of rocky road if you were thinking of using them as gifts), however they are superb on their own, and last around 3 weeks in an airtight container. The marshmallows make wonderful gifts on their own too.

Strawberries & cream Rocky Road

Ingredients for the Marshmallows: 

275g pureed fresh strawberries (the seeds can be strained if you wish, however the total weight still needs to be 275g)

50g gelatine powder

115ml water

820g white/granulated sugar 

320g glucose 

50g potato flour/starch

50g icing sugar (pure or confectioners)

cooking spray

Method: 

Spray a slice tin or lamington tray (at least 30x20cm) with the cooking spray and set aside. A slighly deeper tin will work well for this. If your tin is quite shallow, you may wish to prepare a second smaller tin) or grease some baking paper for any excess marshmallow that doesn’t fit into your main prepared tin.

In the bowl of a stand mixer, briefly mix together the strawberry puree and the gelatine powder. Leave for now, ensuring the whisk attachment is fitted and everything is ready to go once your sugar syrup is ready. 

In a medium/large saucepan place the water, then the sugar, then the glucose. Place over high heat and cook until the syrup reaches 120 degrees Celsius on a candy thermometer.

With the mixer on low, gradually pour the sugar syrup into the strawberry mix. Whisk on medium speed for about 3 minutes, until the mixture turns a more opaque colour. The mixture will also start to thicken. Then increase mixer to high speed for about 8 minutes, until the marshmallow has tripled in volume and has thickened. 

Pour marshmallow into the prepared tray, tapping it down on the bench to remove any air bubbles and to ensure it is sitting in the tray evenly. 

Leave to set overnight before cutting (room temperature is best, preferably covered with a food net or cover).

Once the marshmallow is ready to cut, in a small bowl whisk together the potato flour and the icing sugar (sift if necessary). 

Dust some of this mixture onto your clean work surface. Remove the slab of marshmallow from the tin, use a spatula to pull the sides away from the tin and tip it onto the dusted work surface. 

Dust more of the icing sugar mix over the top of the marshmallow slab, and around the sides. Using a large sharp knife, cut into cubes, by cutting the slab into rows, then cutting rows in the other direction. Dust your knife regularly with the icing sugar mix, and continue to dust the marshmallows as they are cut. The size you cut the marshmallows is completely up to you, I like cutting them into larger cubes (as pictured). 

Ensure every part of the cut marshmallows are covered in the potato flour and icing sugar mix. Toss them around on the bench to remove any excess.

Store in an airtight container. The marshmallows will keep for about 3 weeks. 

Ingredients for the Rocky Road:

700g white chocolate - choose one you like to eat (I used Cadbury Dream)

80g flaked or slivered almonds, lightly toasted

20g (approx.) freeze dried strawberries (sliced or roughly chopped whole strawberries)

500g homemade strawberry marshmallows 

Method: 

Line a square baking tin (approx. 22-23cm) with baking paper - I like to use small bulldog clips to hold the paper in place. 

Have all the rocky road elements ready to go next to your prepared tin. 

Melt the chocolate by placing a small pot with a little water on the stove and allow to simmer. Plate another pot or bowl that will comfortably sit over the top of the water pot, on top of the smaller pan, and add the chocolate to this pot/bowl. Gently mix the chocolate until completely melted. 

Pour about a third of the chocolate into the base of the prepared tin and allow it cover the base completely. Scatter in half the marshmallows, and one third of the almonds and freeze dried strawberries. Cover with another third of the chocolate, then place the remaining marshmallows and another third of the almonds and freeze dried strawberries. Cover with the remaining chocolate, and scatter over the remaining almonds and freeze dried strawberries.

Place in the fridge for at least 30 minutes to set (especially if you are working in warm or humid conditions), however you can prepare this in advance and cut the next day.

Once set use a large sharp knife to cut the rocky road into desired sizes. 

I prefer to keep the rocky road in the fridge. Keeps for about 2-3 weeks. 

Makes 8 generous blocks of rocky road. 

Homemade Rocky Road with Strawberry Marshmallows
Homemade Strawberry Marshmallows
In Confectionary Tags Homemade Marshmallows, Rocky Road, strawberry, confectionary, edible gifts, egg free marshmallow
Comment

Homemade Marshmallows (Gluten + Dairy Free)

Kath December 10, 2015

I have always loved marshmallows. I would eat them by the bowlful as a kid, much to my Mum’s dismay. I’d often melt them in the microwave, add Rice Bubbles, and eat them like a massive LCM (or rice crispy treat), but with much more marshmallow! 

Then while I was at uni, a friend introduced me to Sweetness the Patisserie in Sydney, who make their own marshmallows, known as Sweet Mallows. They are made with natural flavours, and come in an amazing variety of flavour combinations. These homemade, (much) more natural versions of the marshmallows you buy in the lolly isle at the supermarket, make you never ever want to eat the supermarket variety again.

I then stumbled across the below recipe in the recipe book from the Parisian confectioners,  À La Mère de Famille (check out this post for more on the Parisian confectioners). Its not an overly complicated recipe, you just need to be organised, work quickly and have a sugar thermometer. So once I bought a sugar thermometer, there was nothing stopping me finally making marshmallows for myself! 

The flavour combinations are really quite endless, and I think they make cute gifts (cue impending holiday season!). The flavour of the marshmallows develops a lot after a day or so, so I would recommend making them a day or two in advance before giving them as gifts. They also require tossing in the icing sugar and potato flour mix more than once over the first couple of days, particularly in humid conditions. They will otherwise absorb the first lot of icing sugar and potato flour quite quickly and become wet and sticky. And let’s face it, its always handy when you are making gifts, or just cooking generally, to have things that can be prepared in advance! 

Homemade Marshmallows

Ingredients for Raspberry Marshmallows: 

15g gelatine sheets

100g raspberry pulp

20g water

50g mild honey

240g sugar

100g egg whites

1 tsp freeze dried raspberry powder, sifted, optional

75g icing sugar

75g potato flour/starch 


Ingredients for Passionfruit Marshmallows:

15g gelatine sheets 

70g strained passionfruit pulp

40g water

50g mild honey

240g sugar

100g egg whites

1 tsp freeze dried passionfruit powder, optional

75g icing sugar

75g potato flour/starch 


Method: 

Place the gelatine in bowl of cold water, and leave to soak for 5 minutes. Then drain and set aside. 

Place the egg whites in a bowl, and have everything ready to whip them once the sugar syrup starts to heat up (see following step).

In a large saucepan heat, the raspberry pulp or passionfruit pulp, water, honey and sugar until it reaches 114 degrees Celsius on a sugar thermometer. The sugar syrup will start rapidly boiling and increase in size, so make sure you use a large enough saucepan. This shouldn’t take too long, so once the mixture starts to increase in temperature, start whipping the egg whites on a low/medium speed.

Once the sugar mixture has reached 114 degrees Celsius, and the egg whites are whipped to stiff peaks, gently fold the sugar mixture and gelatine in to the egg whites. 

Increase the speed of the mixer (medium to high speed), and allow the marshmallow to thicken and cool. This will take a few minutes. Add the freeze dried raspberry powder or passionfruit powder, if using, and continue to whip the marshmallow until it has cooled to at least 40 degrees Celsius. Whilst the marshmallow is thickening and cooling, lay a sheet of baking paper on a clean dry surface and generously dust with combination of the icing sugar and potato flour. 

Once the marshmallow has thickened and cooled, pour it onto the prepared surface and spread into a rectangular shape, about 1.5-2cm in thickness. Dust with more icing sugar and potato flour, and leave to set. 

I found it didn’t take very long for the marshmallow to set, but leave it about 30 mins to be sure - it will be set when it bounces back when pressed and the outside area dusted with the icing sugar and potato flour is no longer sticky. You may need to dust the marshmallow more than once depending on the humidity. 

Once the marshmallow has set, cut into cubes, and toss cut marshmallows in a bowl filled with icing sugar and potato flour. Cut cubes of marshmallow may need dusting a couple more times as the first lot tends to be absorbed after a few hours (particularly in humid conditions). Keep a bowl or container of the icing sugar and potato flour handy so the marshmallows can be re-dusted if needed. 

Reference: ‘À La Mère de Famille: Artisanal Recipes’ by Julien Merceron (2013, Hardie Grant Books), pp.108-112. 

In Holidays, Confectionary Tags marshmallow, Raspberries, Passionfruit, confectionary, Christmas, edible gifts, A La Mere de Famille, Gluten Free, Dairy Free
Comment

recipes

  • Biscuits/Cookies 39
  • Breads Etc. 9
  • Breakfast 7
  • Cakes & Slices 67
  • Confectionary 5
  • Drinks 6
  • Events 14
  • Food Photography Tips 3
  • From The Mailing List 24
  • Heirloom Recipes 12
  • Holidays 44
  • Ice Cream 9
  • Jams Preserves & Spreads 9
  • Muffins 4
  • Off the Shelf 47
  • Other Desserts 25
  • Savoury Dishes/Meals 15
  • Scones 4
  • Tarts & Pastry 9
  • Travel 13

Sign up to Friday Food Chat with Kath, a weekly newsletter for more food, baking, cookbook chat and more!

Sign Up Here!
instagram-unauth pinterest facebook url

Website Accessibility: To enable text to speech function on the blog, click the sound button to the right of each blog post.

All images & content are the property of Kathryn Vincent, unless stated otherwise. Please do not use without permission.

Kulinary Adventures of Kath

Food Photography, Recipes & Baking

instagram-unauth pinterest facebook url