Kulinary Adventures of Kath

Food Photography, Recipes & Baking
  • home
  • About
  • Work with Kath
  • Shop
  • Blog
    • The Blog
    • Recipe Archive
  • Newsletter
  • Contact
  • home
  • About
  • Work with Kath
  • Shop
    • The Blog
    • Recipe Archive
  • Newsletter
  • Contact
Raspberry Pistachio Rose Cake (23 of 25).jpg

The Blog

Recipes and Food Photography by Kath Vincent.

  • The Blog
  • Recipe Archive
  • All
  • Biscuits/Cookies
  • Breads Etc.
  • Breakfast
  • Cakes & Slices
  • Confectionary
  • Drinks
  • Events
  • Food Photography Tips
  • From The Mailing List
  • Heirloom Recipes
  • Holidays
  • Ice Cream
  • Jams Preserves & Spreads
  • Muffins
  • Off the Shelf
  • Other Desserts
  • Savoury Dishes/Meals
  • Scones
  • Tarts & Pastry
  • Travel
Biscoff White Choc Cookie Slice

Biscoff & White Chocolate Cookie Slice

Kath September 28, 2021

I have been thinking a lot lately about the impact of over three months of lockdown, plus restrictions for so long before that with all these ‘unprecedented times’ (or are they just ‘precedented’ times now?) we have been experiencing. 

Some changes have been big, and have taken a lot to adjust to. Others have been smaller and seem to have crept up on me with what feels like little warning. One major change I have noticed since this lockdown began in late June, is that coming up with new recipes has proved more of a challenge. A lot of my inspiration for recipes comes from going to the shops and seeing what is in season and stumbling across a new ingredient I just have to try. In store food shopping these days is few and far between, there is no browsing or looking, its just get in and out as quick as humanly possible. 

Eating out can also prove to be a great inspiration for new recipes too, but that has been almost non-existent for some time now. 

When coming up with new recipes for my blog, technically the possibilities are endless. But somehow that lack of structure means no new ideas come at all, especially when inspiration is few and far between. When I work with clients on recipes they will have their own requirements and ideas on what they want, so there are automatically boundaries around what a new recipe will be. These boundaries help narrow things down and I find it a easy to come up with new ideas. 

The only source of food inspiration now comes from the few special home deliveries I have been able to get, which I spoke about in this recent post. These deliveries prove to be welcome in more ways than one, especially as they provide a tiny element of food inspiration and a window into what might be happening outside my own home. 

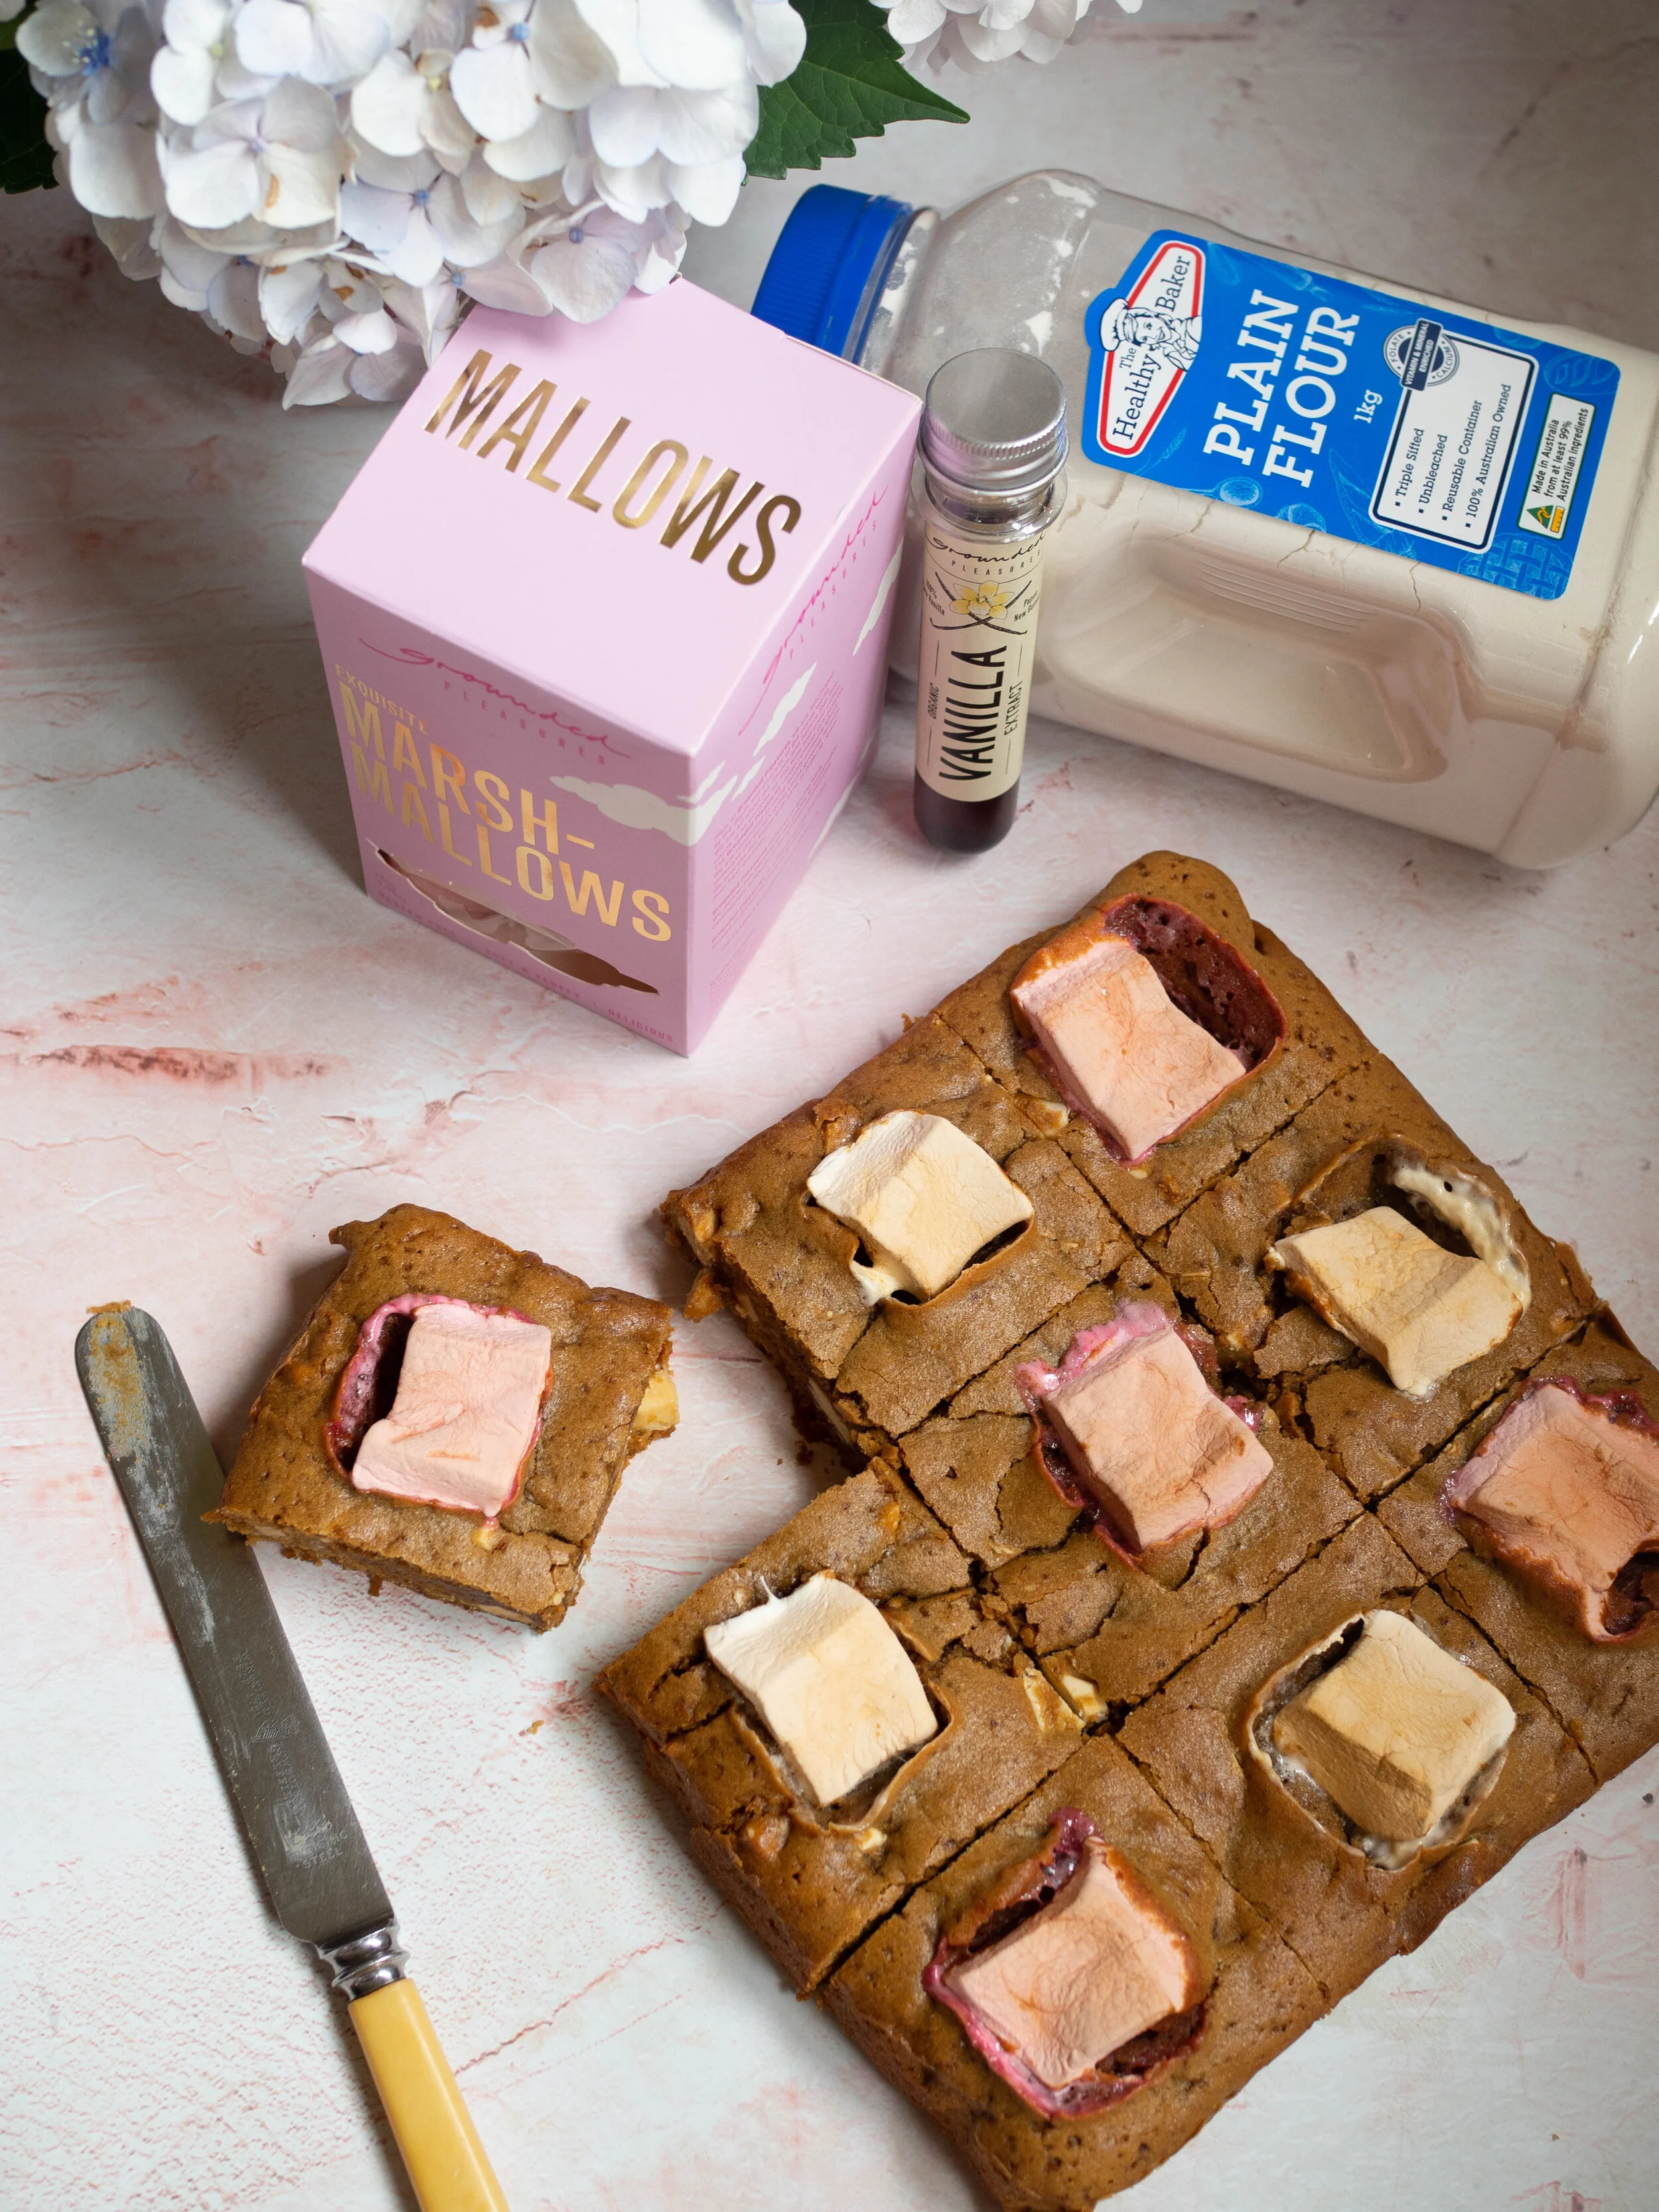
This particular slice recipe was inspired by a cookie delivery I got from Butter Boy Bake. I have ordered twice from them now and have really enjoyed them and will definitely miss them if they cease delivering once lockdown ends. 

The combination of cinnamon, white chocolate and biscoff spread forms the basis of Butter Boy’s ‘snickerdoodle’ cookie and the combination got me thinking about how I could made something similar, but even easier. Which then make me think of my Funfetti Cookie Slice and how that could be adapted to incorporating Butter Boy’s ‘snickerdoodle’ cookie flavours. 

I am happy to report that these flavours work so well in a cookie slice and I can now rest easy that even if I never get a delivery from Butter Boy Bake again, or never actually get to visit their store in Manly, I will always be able to recreate at least one of their flavours myself.

I hope you enjoy making this cookie slice as well, it is a lot easier to make than many other baked goods even if you are low on time or motivation, is excellent to snack on and very tasty. 

Biscoff Slice
Snickerdoodle Slice

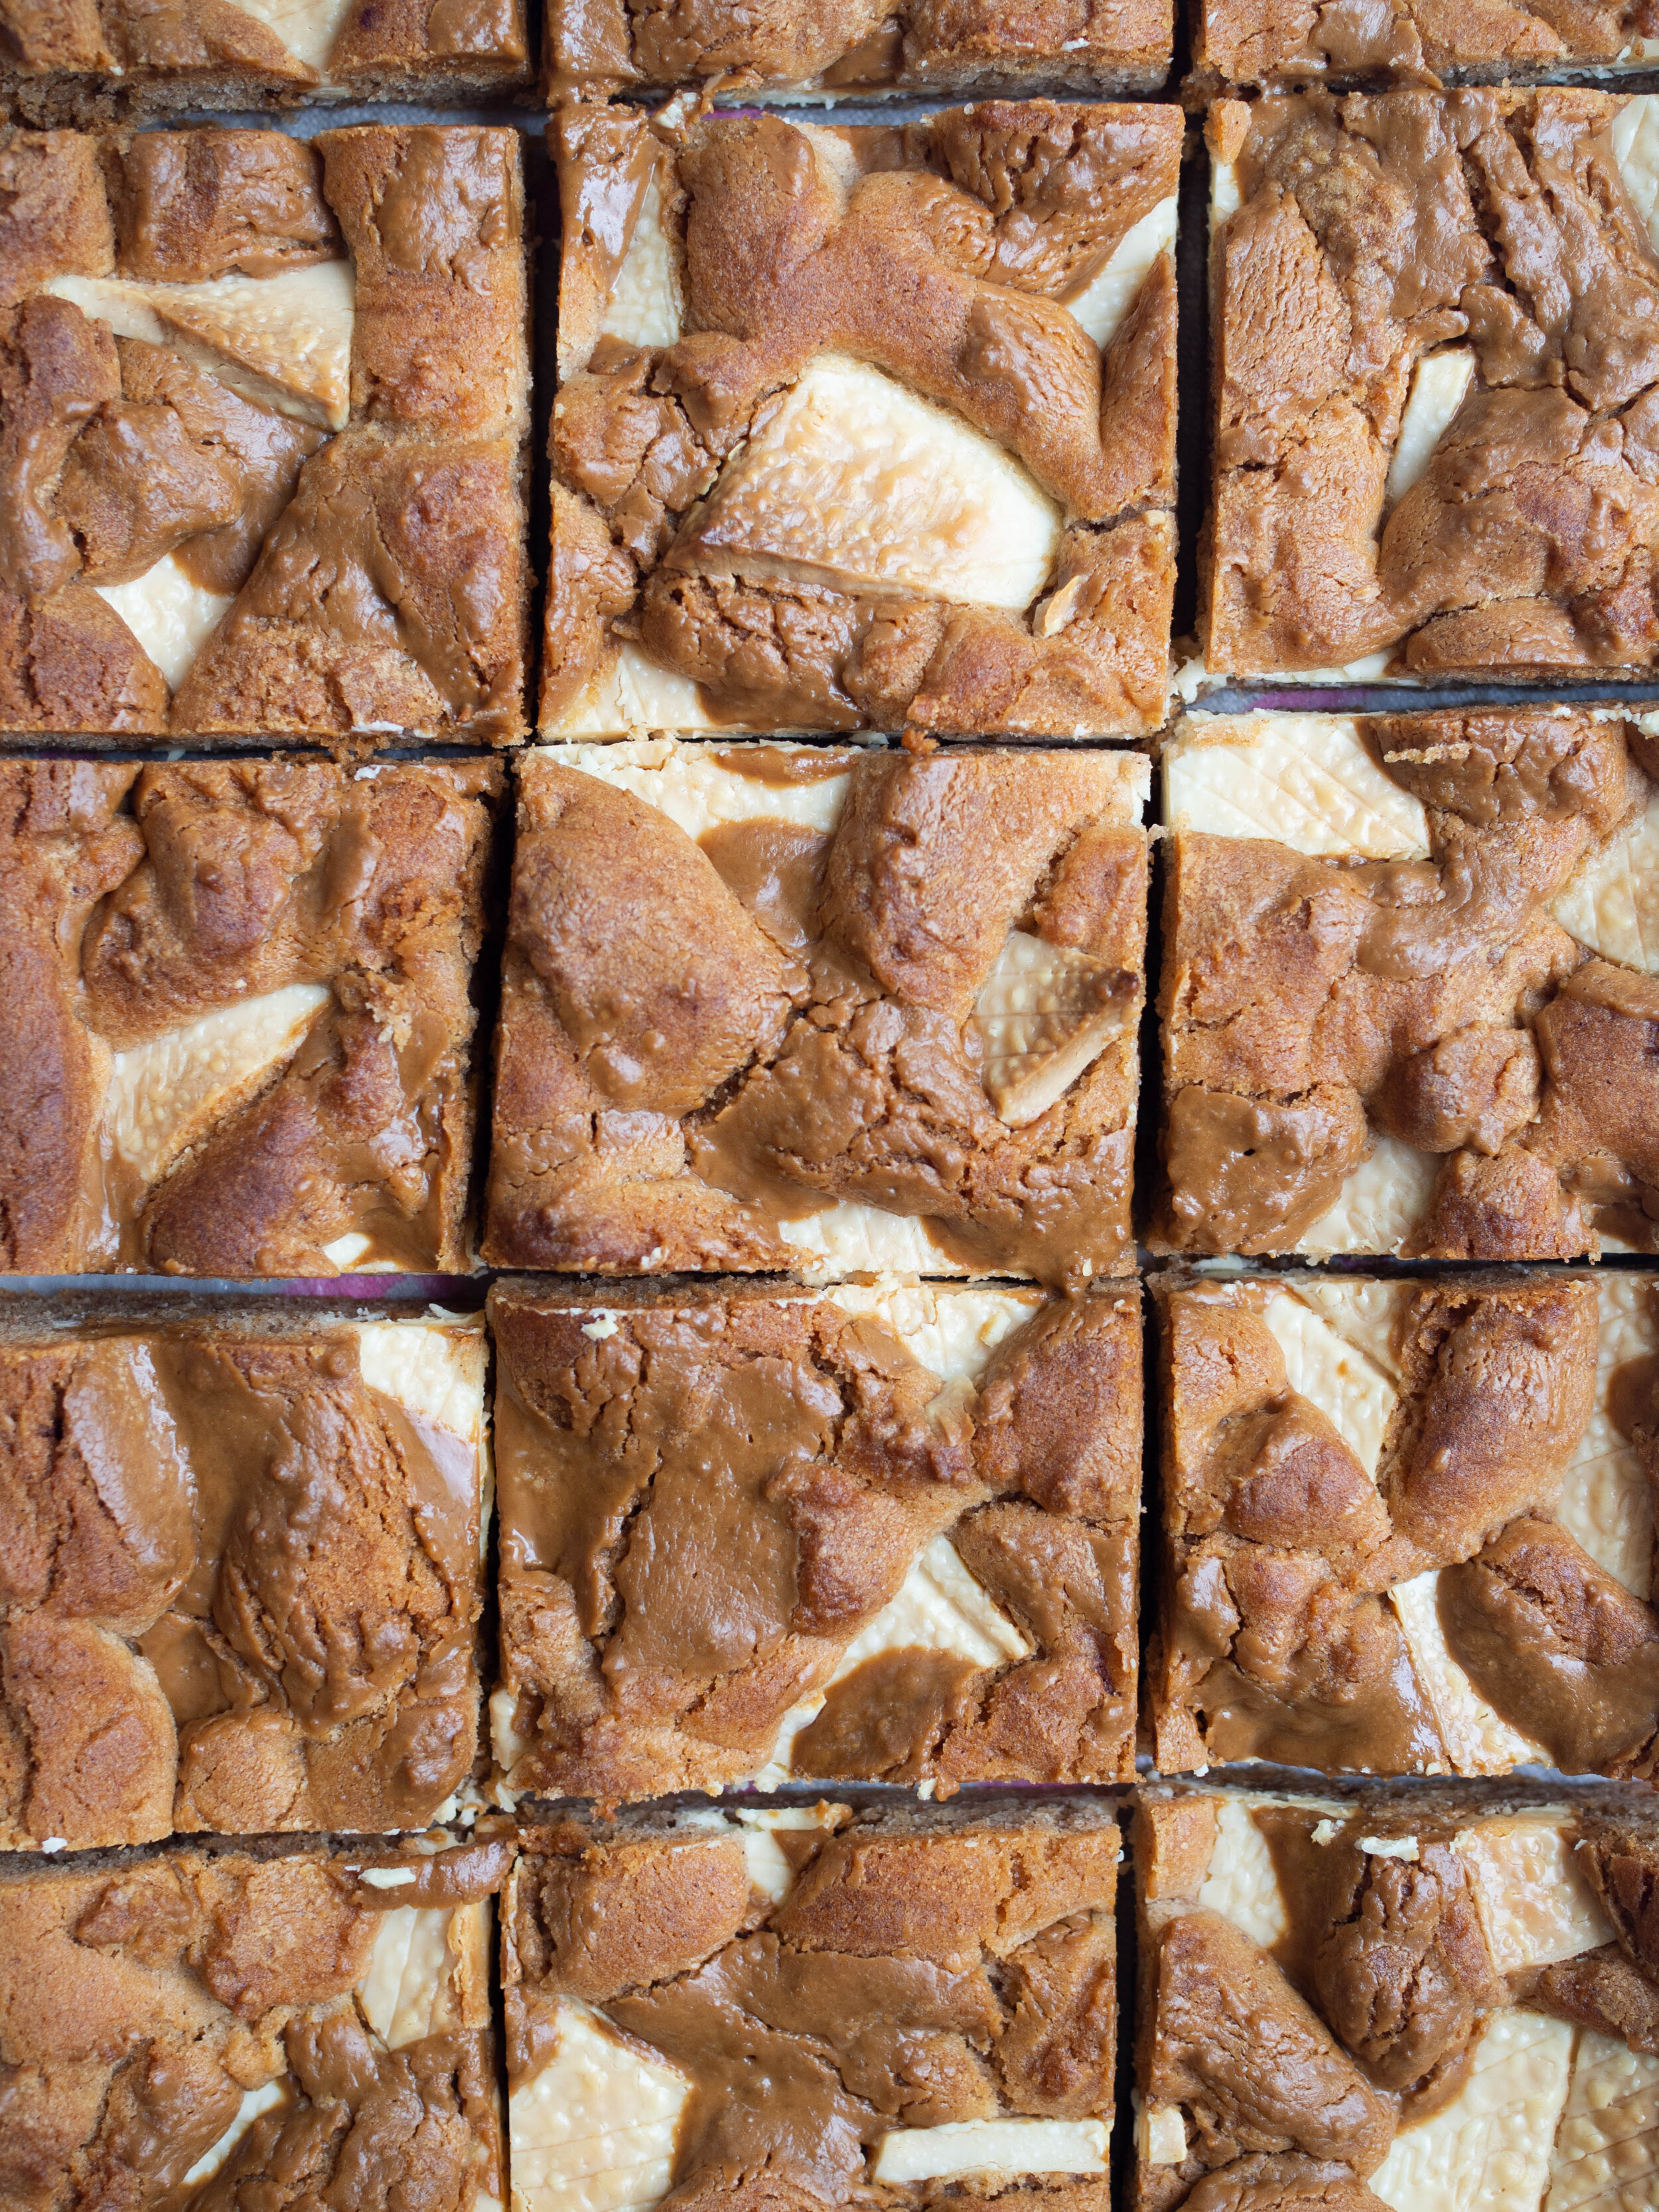
Biscoff and White Chocolate Cookie Slice 

a.k.a Butter Boy Bake’s Snickerdoodle Cookie but in a Slice

Ingredients:

120g unsalted butter, melted

200g caster sugar 

2 tbsp golden syrup

1 tsp vanilla extract

1 egg

290g self raising flour

2 tsp ground cinnamon

120g Biscoff Spread

120g white chocolate, roughly chopped

Method:

Preheat oven to 180 degrees Celsius and line a 30x20cm brownie or Lamington tin with baking paper. 

In a large bowl whisk together the butter, sugar, golden syrup, vanilla and egg.

Then add the flour and cinnamon and mix to combine with a wooden spoon.

Tip the dough into the prepared tray, and spread it out, pushing it into the sides. Dollop the Biscoff spread over the dough and swirl/push in with a knife. Scatter the chopped white chocolate over the dough, pushing them in a little.

Bake for 15-20 minutes or until golden brown and cooked through. 

Allow to cool completely in the tin. Then remove and cut into slices or chunks of your choice.

Serves 12-15. 

Butter Boy Bake Snickerdoodle Slice
In Biscuits/Cookies, Cakes & Slices Tags Butter Boy Bake, Snickerdoodle, biscoff spread, White Chocolate, Biscuits/Cookies, Slices, Mixer Free Recipes, Easy Baking
Comment
Funfetti Cookie Slice

Funfetti Cookie Slice

Kath July 28, 2021

I’m not usually one for adding food colouring or large amounts of sprinkles to my baked goods, but I think I’m at that point in lockdown where any pop of colour adds a tiny bit of joy to my day. 

As does using up an already opened packet of Jimmies (large sprinkles) and some chocolate no one seemed to be eating. With delivery windows in Sydney few and far between from our major supermarkets at the moment, using up things I already have seemed like a good way to go. So there were a couple of motivations for making this recipe, beyond my usual ‘I’d like something nice to eat but don’t want it to take ages to make’. 

You can leave out the sprinkles if you wish, and use any type of chocolate you want. The sprinkles don’t add any flavour, it’s just for the fun colours. However if you do use some sprinkles, those called Jimmies which are bigger sprinkles than the ones us Aussies are used to buying at supermarket, will work best as their colours won’t bleed through your bake. 

Funfetti Cookie Slice

Funfetti Cookie Slice

Ingredients:

120g butter, melted

200g caster sugar 

2 tbsp golden syrup

1 tsp vanilla bean paste

1 egg

290g self raising flour

3.5 tbsp large sprinkles (aka. Jimmies) 

120g choc chips (white, Caramilk, milk or dark) or roughly chopped chocolate


Method:

Preheat oven to 180 degrees Celsius and line a 30 x 20cm brownie or Lamington tin with baking paper. 

In a large bowl whisk together the butter, sugar, golden syrup, vanilla and egg.

Then add the flour and the sprinkles and mix to combine with a wooden spoon.

Tip the dough into the prepared tray, and spread it out, pushing it into the sides. Scatter the chopped chocolate/choc chips over the dough, pushing them in a little.

Bake for 18-20 minutes or until golden brown. 

Allow to cool completely in the tin. The remove and cut into slices or chunks of your choice.

Serves 15. 

Funfetti Cookie Slice
In Biscuits/Cookies, Cakes & Slices Tags Funfetti, Sprinkles, Cookies, Slices, Easy Baking, Biscuits/Cookies, Mixer Free Recipes
Comment
Homemade S’mores - recipe developed for Grounded Pleasures.

Homemade S’mores - recipe developed for Grounded Pleasures.

S'Mores and Other Good Things for Some Time At Home

Kath July 5, 2021

With so many of us stuck at home, or living with restrictions here in Australia at the moment, I thought a good round of up recipes was in order.

Here are a selection of recipes you could try this weekend/school holidays/lockdown/any day really, both things that will take up some time and some that will be more instantly gratifying. All will be delicious. I hope some time in the kitchen can bring you a few moments of calm or welcome distraction, and that having something home made to eat will be like a delicious comfort blanket in these uncertain times we continue to live in. 

  1. For something a little bit different, homemade S’mores with honey graham crackers are the perfect Winter/school holiday treat. This recipe was created last Winter for Grounded Pleasures, and I still have fond memories of all the recipe and taste testing. And if you like me can’t/don’t eat chocolate, I can confirm they are just as tasty and more-ish without. Good luck stopping at one! You can find the recipe on Grounded Pleasures website.

  2. Lumberjack Cake - a delicious combination of apples and dates with a crunchy maple coconut topping. If you have any poached quince left you can use them instead of apples - no need to soak in the hot water with the dates, just chop and add to the mix. 

  3. The original and the best, Caramilk Cookies. Easy. Simple. Delicious. Just make them.

  4. I can say with absolutely certainty these White Choc Blondies with Marshmallows are the best blondies I’ve ever made. You could easily adapt and add milk or dark chocolate chips in the mix too. 

  5. For a bread adventure try this Biscoff Babka (pictured below) made with soft pillowy challah dough. A lovely weekend baking project that is well worth the effort. Leftovers freeze well and it’s dairy free!

S’mores - recipe developed for Grounded Pleasures

S’mores - recipe developed for Grounded Pleasures

View fullsize Lumberjack Cake
Lumberjack Cake
View fullsize Caramilk Cookies
Caramilk Cookies
View fullsize Blondies with Marshmallows
Blondies with Marshmallows
View fullsize Biscoff Babka
Biscoff Babka

If you are after some light (mostly food related) entertainment I can highly recommend the following: 

  1. Alison Roman’s You Tube series ‘Home Movies’ - I have made quite a few of these recipes, some more than once - namely the eggplant parm, carbonara, sheet pan chicken and shallot pasta - and I love her down to earth humour and practical way of cooking. I also appreciate her unwavering love of anchovies and dill, and all things packed with flavour. 

  2. ABC Everyday Videos with Thanh Troung ‘The Fruit Nerd’ all about fruit buying and storing tips. Thanh is a wealth of knowledge in the most enthusiastic way, and has already educated us on choosing mandarins, oranges, storing our fruit (don’t keep it all in the same bowl!) and my favourite one, on what to look for when buying avocados. 

  3. Nadiya Bakes and Time to Eat on Netflix - I love watching Nadiya Hussain’s TV series. The colourful sets, beautiful kitchens, interesting recipes and clam and friendly vibe Nadiya brings is just joyful. 

  4. And finally, I’m sure most of us in Australia discovered Jimmy Rees’ ‘Meanwhile in Australia’ videos at some point in 2020, but on the off chance you haven’t and need a good laugh, please check them out. Each instalment is a parody on what’s going in in relation to COVID in Australia, with each state hilariously represented - sometimes featuring New Zealand too - all played by Jimmy. If you aren’t on social media you can find the videos on Jimmy’s YouTube channel. 

If you have anything you’d add to this list, please let me know in the comments below. And don’t forgot to tell me what you are baking at the moment too :)

S’mores - recipe developed for Grounded Pleasures.

S’mores - recipe developed for Grounded Pleasures.

In From The Mailing List, Biscuits/Cookies, Other Desserts Tags s'mores, lockdown baking
Comment
Giant ANZAC Biscuit

Giant ANZAC Biscuit

Kath April 21, 2021

The idea for this Giant ANZAC Biscuit started when I was watching Nadiya Hussain’s series ‘Time to Eat’ on Netflix a couple of months ago. 

Nadiya made a massive cookie in a pan on the stove, and it got me thinking about what other biscuit recipes could be cooked this way. I soon thought of the humble ANZAC biscuit as the butter already needs to be melted on the stove, and I couldn’t think of anything better than a giant ANZAC biscuit. 

I had some level of trepidation making this recipe. It reminded me a lot of those times in the past where I tried to make frittata on the stove and never understood how anyone got it to actually cook through without burning the bottom. My final attempt ended up with me putting the frustrating frittata in the oven, only to accidentally try pick it up out of the oven with the hand that didn’t have an oven glove on it. 

Needless to say I then sat at the sink with my burnt hand running under cold water (for a long time), picking at bits of the frittata and deciding that I would never attempt this again. I then developed a frittata recipe that only goes in the oven and my frittatas are no longer frustrating. 

I had a feeling that biscuits should really just go in the oven, but Nadiya made it look so easy. My attempts however, were not so easy, and quite frankly a waste of ingredients. 

I initially tried to cook it just on the stove, and once I could smell burning sugar I realised I was back in the land of the frustrating frittata. That attempt went in the bin, once it had cooled down and I had used both bicarb soda and lemon juice to clean the pan. And had the exhaust fan on long enough to get rid of the burnt sugar smell.

I decided one last attempt was in order, and started the biscuit on the stove then put it into the oven. What looked like a perfectly cooked giant biscuit was actually very raw inside. 

I decided now was as good a time as any to give up on my giant stove top ANZAC idea, particularly as I had not wasted so many baking ingredients in a long time. 

Luckily when I posted on my Instagram stories about my baking fail, someone kindly messaged me to say they often make giant ANZAC biscuits, and bake them in a tart tin. This excellent idea led me to think that a cake tin could also do the job, and just like a frittata, ANZAC biscuits, regular sized or giant, should be cooked in the oven (obviously…). 

So here is my third and final attempt at a Giant ANZAC Biscuit, baked in a springform cake tin. And cooked in the oven, as all biscuits/cookies should be. Nadiya’s perfect stovetop cookie will probably always allude me like a frittata cooked perfectly on the stove, but nevertheless I can now eat both frittata and giant biscuits without the fear of excessive burns (to the food and myself), so I’d call that a win.

Giant ANZAC Biscuit
Giant ANZAC Biscuit

Giant ANZAC Biscuit

Ingredients: 

80g rolled oats (not instant oats)

150g plain flour

215g caster sugar

65g coconut

1 tbsp golden syrup

110 g unsalted butter

1 tsp bi-carb soda

2 tbsp warm water 

Method:

Pre-heat the oven to 150 degrees Celsius and grease and line a 23-24cm springform cake tin.

Mix the oats, flour, sugar and coconut in a large bowl. Melt the golden syrup and butter on a medium-low heat, then mix the bi-carb soda and warm water together and add to the butter. The butter mixture should froth a little. 

Take the butter mixture off the heat and add to the dry ingredients and mix together. 

Tip the mixture into the prepared cake tin and smooth out so it reaches the edges and sits evenly. 

Bake for 30 minutes, or until the top is nicely golden. 

Undo the springform tin, leaving the biscuit to cool on the cake tin base, on top of a wire rack. 

Once completely cooled, remove the biscuit from the cake tin base and cut into pieces to eat. 

Store in an airtight container.

Giant ANZAC Biscuit
In Biscuits/Cookies Tags ANZAC Biscuits, Nadiya Hussain, Baking Fails, Giant ANZAC Biscuit, Biscuits/Cookies
Comment
Caramilk Cherry and Pistachio Cookies

Caramilk Dried Cherry and Pistachio Cookies

Kath December 16, 2020

These cookies came about as I have had in my mind for the past year that a dried cherry and pistachio nougat would be an excellent Christmas recipe, but as it always does by this time of the year, time did not allow for a thorough testing of the recipe. 

As it started to become clear that my nougat Christmas dreams weren’t going to come true, I decided my Plan B for a new Christmas recipe would be a cookie with the same flavours. 

Of course, a cookie and nougat are hardly comparable, but what cookies lack in finesse and wide eyed compliments on how much effort you went to, they gain on the fact that they don’t take much effort but are extremely delicious. 

Like the Caramilk Cookies I posted this year on which this recipe is based, these cookies require very little prep, and need no time to chill in the fridge. You could make these in about half an hour. Which at this time of year, sounds pretty good to me. 

You can swap the dried cherries (also labelled as sour cherries sometimes) for dried cranberries and you can use any type of chocolate you wish if you don’t have Caramilk - though I do highly recommend Caramilk for baking as it tastes so good and is considerably cheaper to buy than better quality caramelised white chocolates which I personally find can be a bit lost in baking (save those ones for snacking!). 

So if you have unexpected guests this festive season, or want to drop off homemade goodies if you are socially isolating still, these cookies will have your back and won’t eat up all your time!

Caramilk Cherry and Pistachio Cookies

Caramilk Dried Cherry and Pistachio Cookies

Ingredients:

120ml canola oil

225g caster sugar 

2 tbsp golden syrup

1 tsp vanilla bean paste

1 egg, beaten

290g self raising flour

120g Cadbury Caramilk, roughly chopped

120g dried cherries, roughly chopped

1-2 tbsp slivered or roughly chopped pistachios

Method:

Preheat oven to 170 degrees Celsius and line three large baking trays with baking paper.

In a large bowl whisk together the oil, sugar, golden syrup, vanilla and egg.

Then add the flour and the chopped Caramilk and cherries, and mix to combine with a wooden spoon.

Roll heaped teaspoonfuls of the dough into balls and place on the trays. The cookies will spread as they bake so leave enough room in between. 

Sprinkle the tops of each cookie with some of the pistachio, pressing it in gently so they don’t fall off. 

Bake for 12-15 minutes or until golden brown. Rotate the trays in the oven about halfway through to ensure the cookies cook evenly.  

Allow to cool on their trays, then store in an airtight container (they will last 5-7 days). 

Makes about 30 cookies.

Caramilk Cherry and Pistachio Cookies
In Biscuits/Cookies, Holidays Tags Caramilk, Dried Cherry, Pistachio, Christmas, Cookies, Biscuits/Cookies, Easy Baking, Mixer Free Recipes, Holiday Baking
Comment
Honey Jumbles with Pomegranate Icing

Honey Jumbles with Pomegranate Icing

Honey Jumbles with Pomegranate Icing

Kath September 17, 2020

I always enjoyed honey jumbles as a child, mostly the store bought ones from Arnott’s that I’m sure a lot of Aussie kids grew up with too. But like many things I liked as a child, the store bought version just doesn’t seem as good now. So it was time to make my own. 

Honey Jumbles are a spiced biscuit shaped in a log, with either pink or white icing. Oddly, lots of honey jumble recipes don’t use honey, but golden syrup. While golden syrup can give baked goods a great flavour, I don’t see why honey jumbles wouldn’t actually have honey in them. So for my attempt I have used honey, and I think they taste great - and do what they say on the tin so to speak. 

I had the idea to make honey jumbles with pomegranate icing many months ago. A friend gave me a 2020 planner for my birthday late last year and since I had already bought myself a diary, I decided to use the planner for blog, recipe development and photography work. It’s been great to use (even if having a planner/diary for 2020 has been a little ironic and redundant at times!), and around Christmas last year I sat down and in the notes page before each month listed what holidays etc fell in that month. 

I like using holidays (both ones I celebrate and ones I don’t) as recipe inspiration, and when it came to September, a few honey based recipes for Jewish New Year, Rosh Hashanah, came to mind. Including this one. Both honey and pomegranates are important foods at this holiday, and I thought the combination of the two would be great. Especially considering honey jumbles traditionally have pink icing, and let’s face it the pink ones were the best anyway (everyone fought over them in our house anyway!). 

Using pomegranate juice in a glaze icing like this is also a great way to get a fantastic natural colour in an icing. It doesn’t add much to the taste, but I think it’s well worth it for the amazing natural colour. You could do half the honey jumbles with pomegranate icing, then make a lemon glaze for the rest if you wanted some pink and some white. 

When I first tested this recipe the honey jumbles baked into a jumbo size biscuit. And while everyone said the size was fine, I still felt I needed to perfect the recipe! So this is the final recipe, with honey in like it should, and a bit more regular sized too. If you want to make jumbo ones use all self raising flour instead of the self raising and plain combo, and roll the dough into slighter bigger logs - and leave lots of room in between each on your baking trays as they will be massive (and make a few less than the recipe below)!

NB. You will need three or four large trays to cook these all at once. If you don’t have that many trays or the oven space, bake half and leave the remaining dough in the fridge until you can bake it.

View fullsize Honey Jumbles with Pomegranate Icing
Honey Jumbles with Pomegranate Icing
View fullsize Jumbo Honey Jumbles
Jumbo Honey Jumbles

Honey Jumbles with Pomegranate Icing for Rosh Hashanah

Ingredients:

120g unsalted butter

175g caster sugar

50g dark brown sugar 

50g (2 tbsp) honey

1 tsp vanilla extract

1 egg, beaten

190g self raising flour

100g plain flour

2 tsp ground ginger

1 tsp ground cinnamon

1 tsp mixed spice

1/2 tsp ground cloves

Ingredients for the Icing: 

250g icing sugar (confectioners)

3 tbsp pomegranate juice

Method:

Preheat oven to 160 degrees Celsius and line three large baking trays with baking paper.

In a small/medium saucepan over low heat, mix together the butter, sugars, honey and vanilla extract. Mix until everything has melted and is well combined. Remove from the heat and allow to cool down a bit. 

In a large bowl combined the flour and spices, whisk to remove any lumps.

Once the butter mixture has cooled a little, mix in the egg. Then add to the flour and mix with a wooden spoon until combined.

Cover the bowl and place in the fridge for at least 30-45 minutes so the dough has time to chill and firm up.

Roll small teaspoonfuls of the dough into balls, then shape into a small narrow log and place on the trays, about 3cm long and no more than 1cm wide. The cookies will spread as they bake so leave enough room in between. 

Bake for 12-15 minutes or until the edges are golden brown. Rotate the trays in the oven about halfway through to ensure the cookies cook evenly.  

Allow to cool on their trays. 

Once the honey jumbles have cooled, make the icing by mixing together the icing sugar and 2 tbsp of the pomegranate juice. Continue to add pomegranate juice a little at a time until you have a thick, smooth spreadable icing. If the icing is too runny it will run off the biscuits, so add a little more icing sugar if needed. 

Spread a thick layer of icing over the middle of each biscuit, and leave to set for 2-3 hours. 

Makes about 40-42 biscuits. Store in an airtight container

Rosh Hashanah Honey Cookies
Honey Cookies Rosh Hashanah
In Biscuits/Cookies, Holidays Tags Rosh Hashanah, Honey, Honey Jumbles, Pomegranate, Biscuits/Cookies, Easy Baking, Mixer Free Recipes, Holiday Baking
Comment
  • The Blog
  • Older
  • Newer

recipes

  • Biscuits/Cookies 39
  • Breads Etc. 9
  • Breakfast 7
  • Cakes & Slices 68
  • Confectionary 5
  • Drinks 6
  • Events 14
  • Food Photography Tips 3
  • From The Mailing List 24
  • Heirloom Recipes 12
  • Holidays 44
  • Ice Cream 9
  • Jams Preserves & Spreads 9
  • Muffins 4
  • Off the Shelf 48
  • Other Desserts 25
  • Savoury Dishes/Meals 15
  • Scones 4
  • Tarts & Pastry 9
  • Travel 13

Sign up to Friday Food Chat with Kath, a weekly newsletter for more food, baking, cookbook chat and more!

Sign Up Here!
instagram-unauth pinterest facebook url

Website Accessibility: To enable text to speech function on the blog, click the sound button to the right of each blog post.

All images & content are the property of Kathryn Vincent, unless stated otherwise. Please do not use without permission.

Kulinary Adventures of Kath

Food Photography, Recipes & Baking

instagram-unauth pinterest facebook url