Kulinary Adventures of Kath

Food Photography, Recipes & Baking
  • home
  • About
  • Work with Kath
  • Shop
  • Blog
    • The Blog
    • Recipe Archive
  • Newsletter
  • Contact
  • home
  • About
  • Work with Kath
  • Shop
    • The Blog
    • Recipe Archive
  • Newsletter
  • Contact
Raspberry Pistachio Rose Cake (23 of 25).jpg

The Blog

Recipes and Food Photography by Kath Vincent.

  • The Blog
  • Recipe Archive
  • All
  • Biscuits/Cookies
  • Breads Etc.
  • Breakfast
  • Cakes & Slices
  • Confectionary
  • Drinks
  • Events
  • Food Photography Tips
  • From The Mailing List
  • Heirloom Recipes
  • Holidays
  • Ice Cream
  • Jams Preserves & Spreads
  • Muffins
  • Off the Shelf
  • Other Desserts
  • Savoury Dishes/Meals
  • Scones
  • Tarts & Pastry
  • Travel

A Pink Tinged Birthday Cake

Kath January 15, 2015

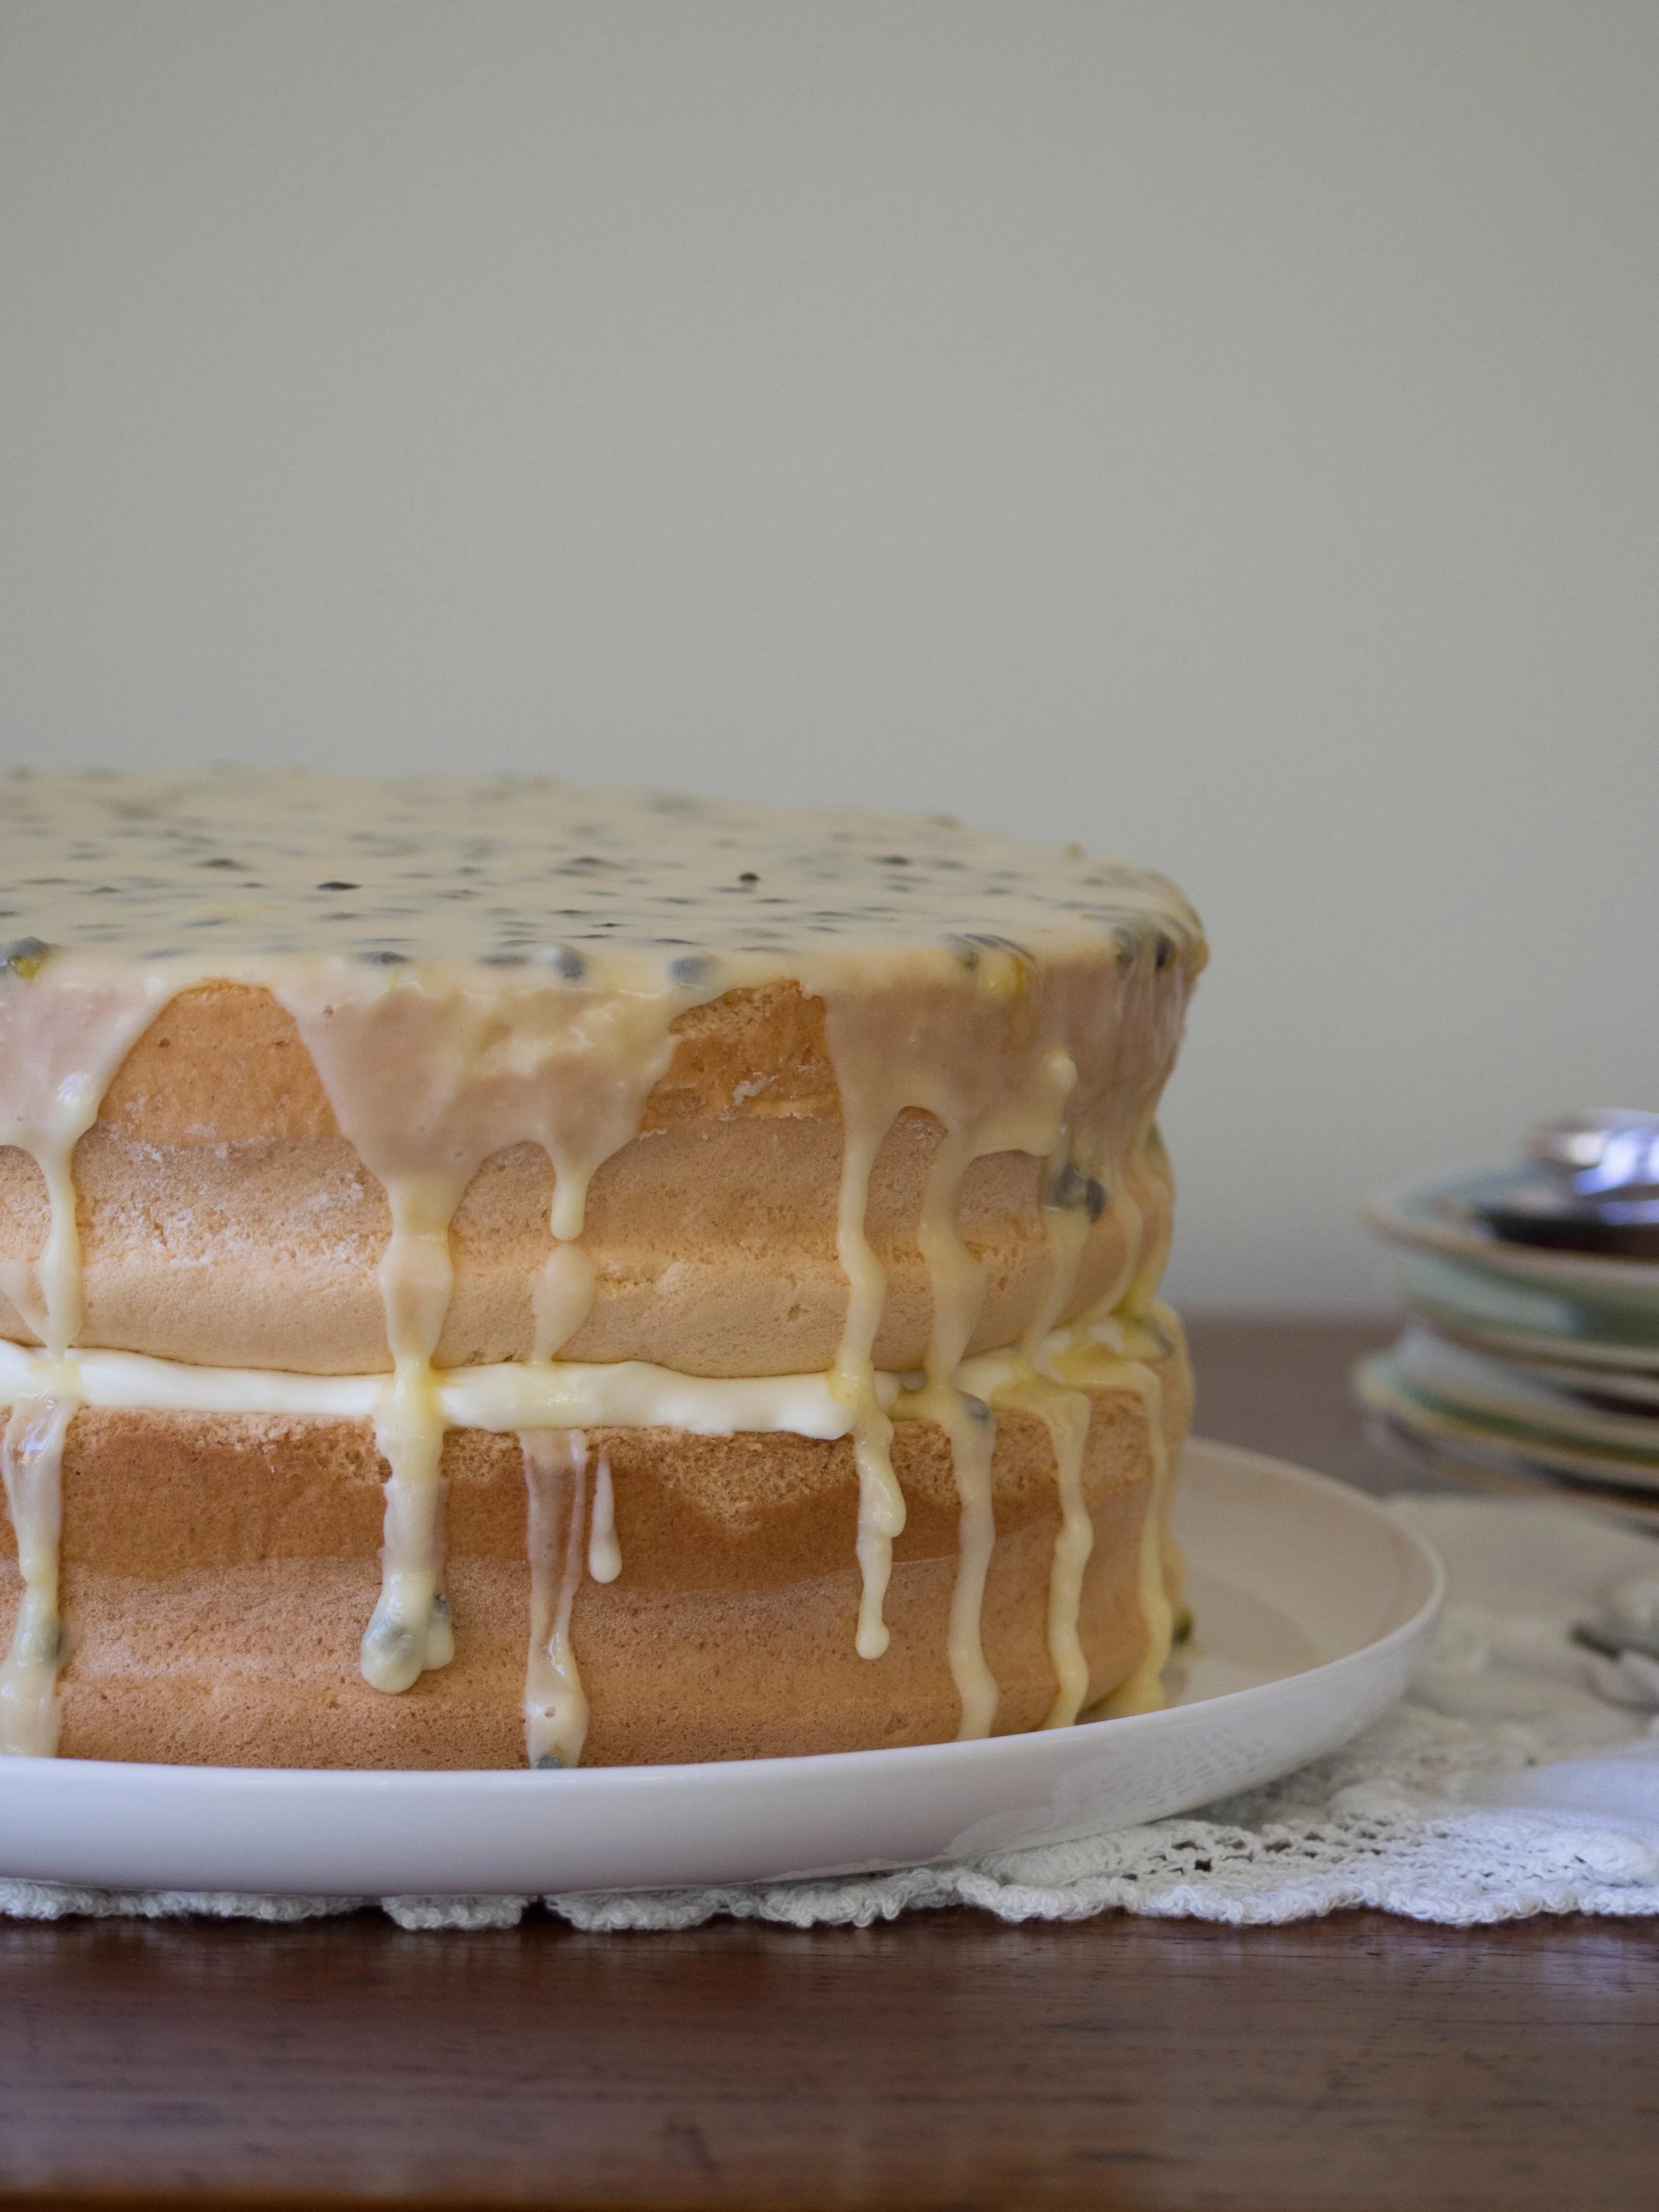
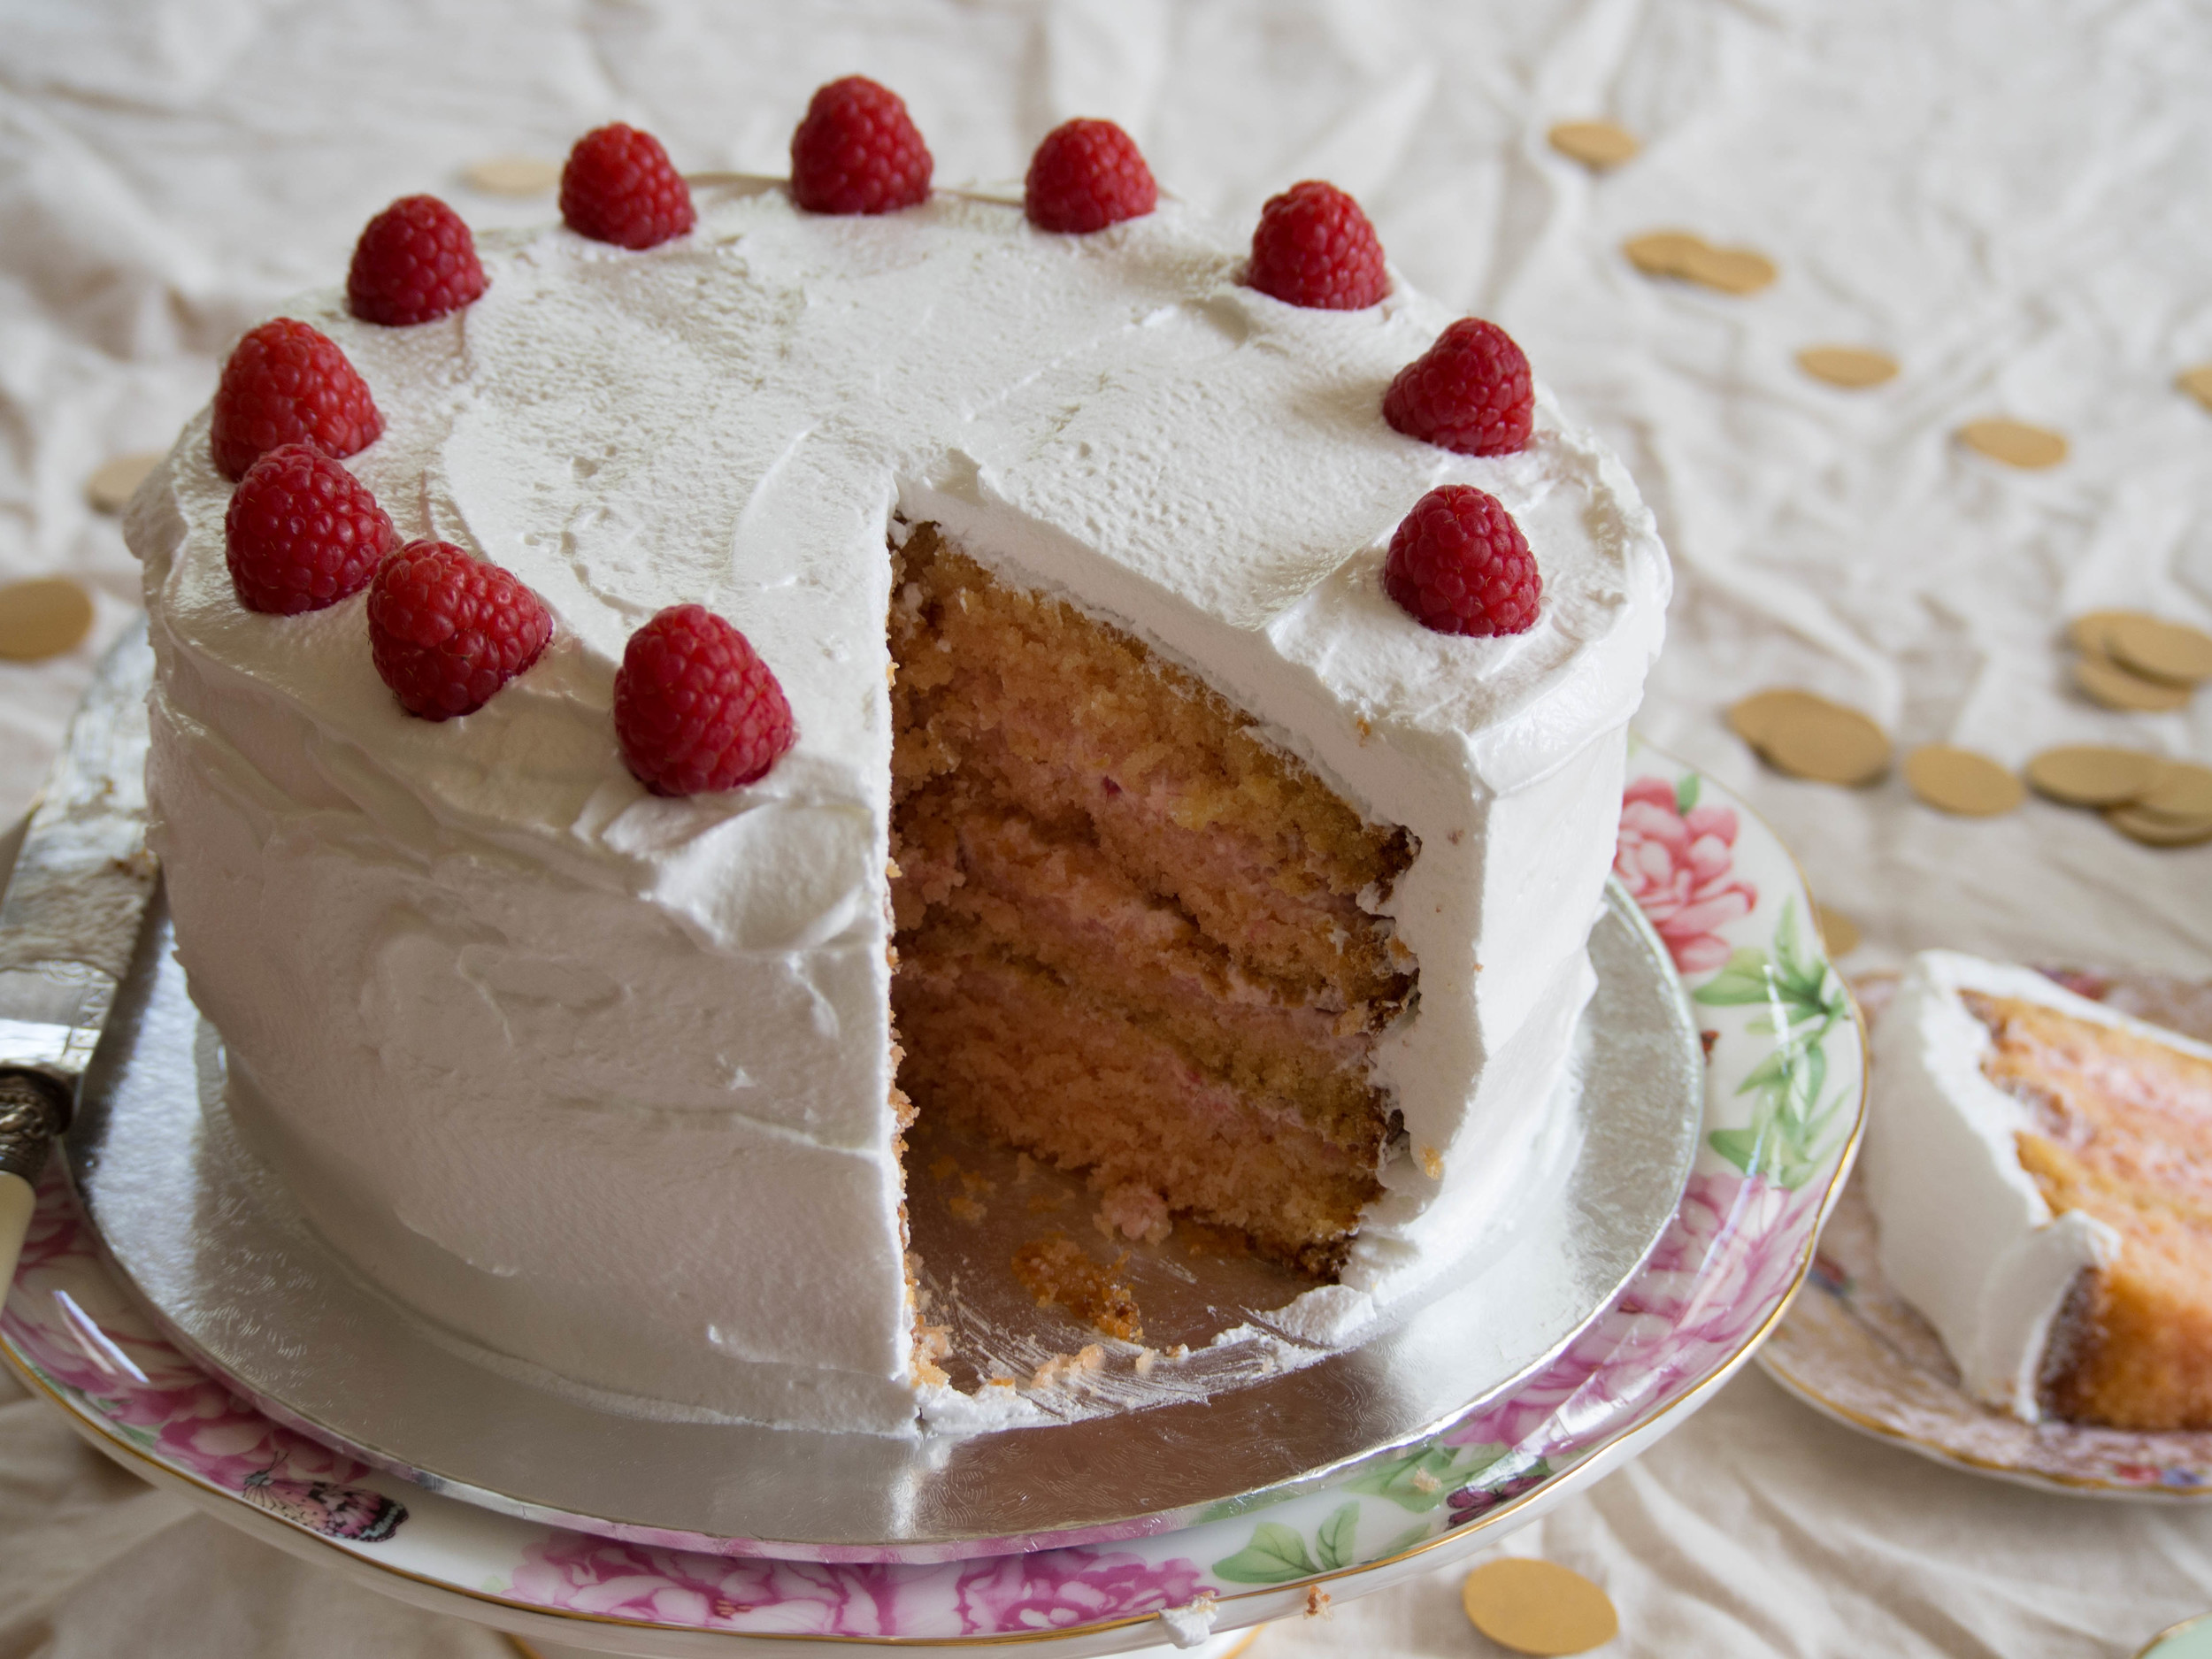
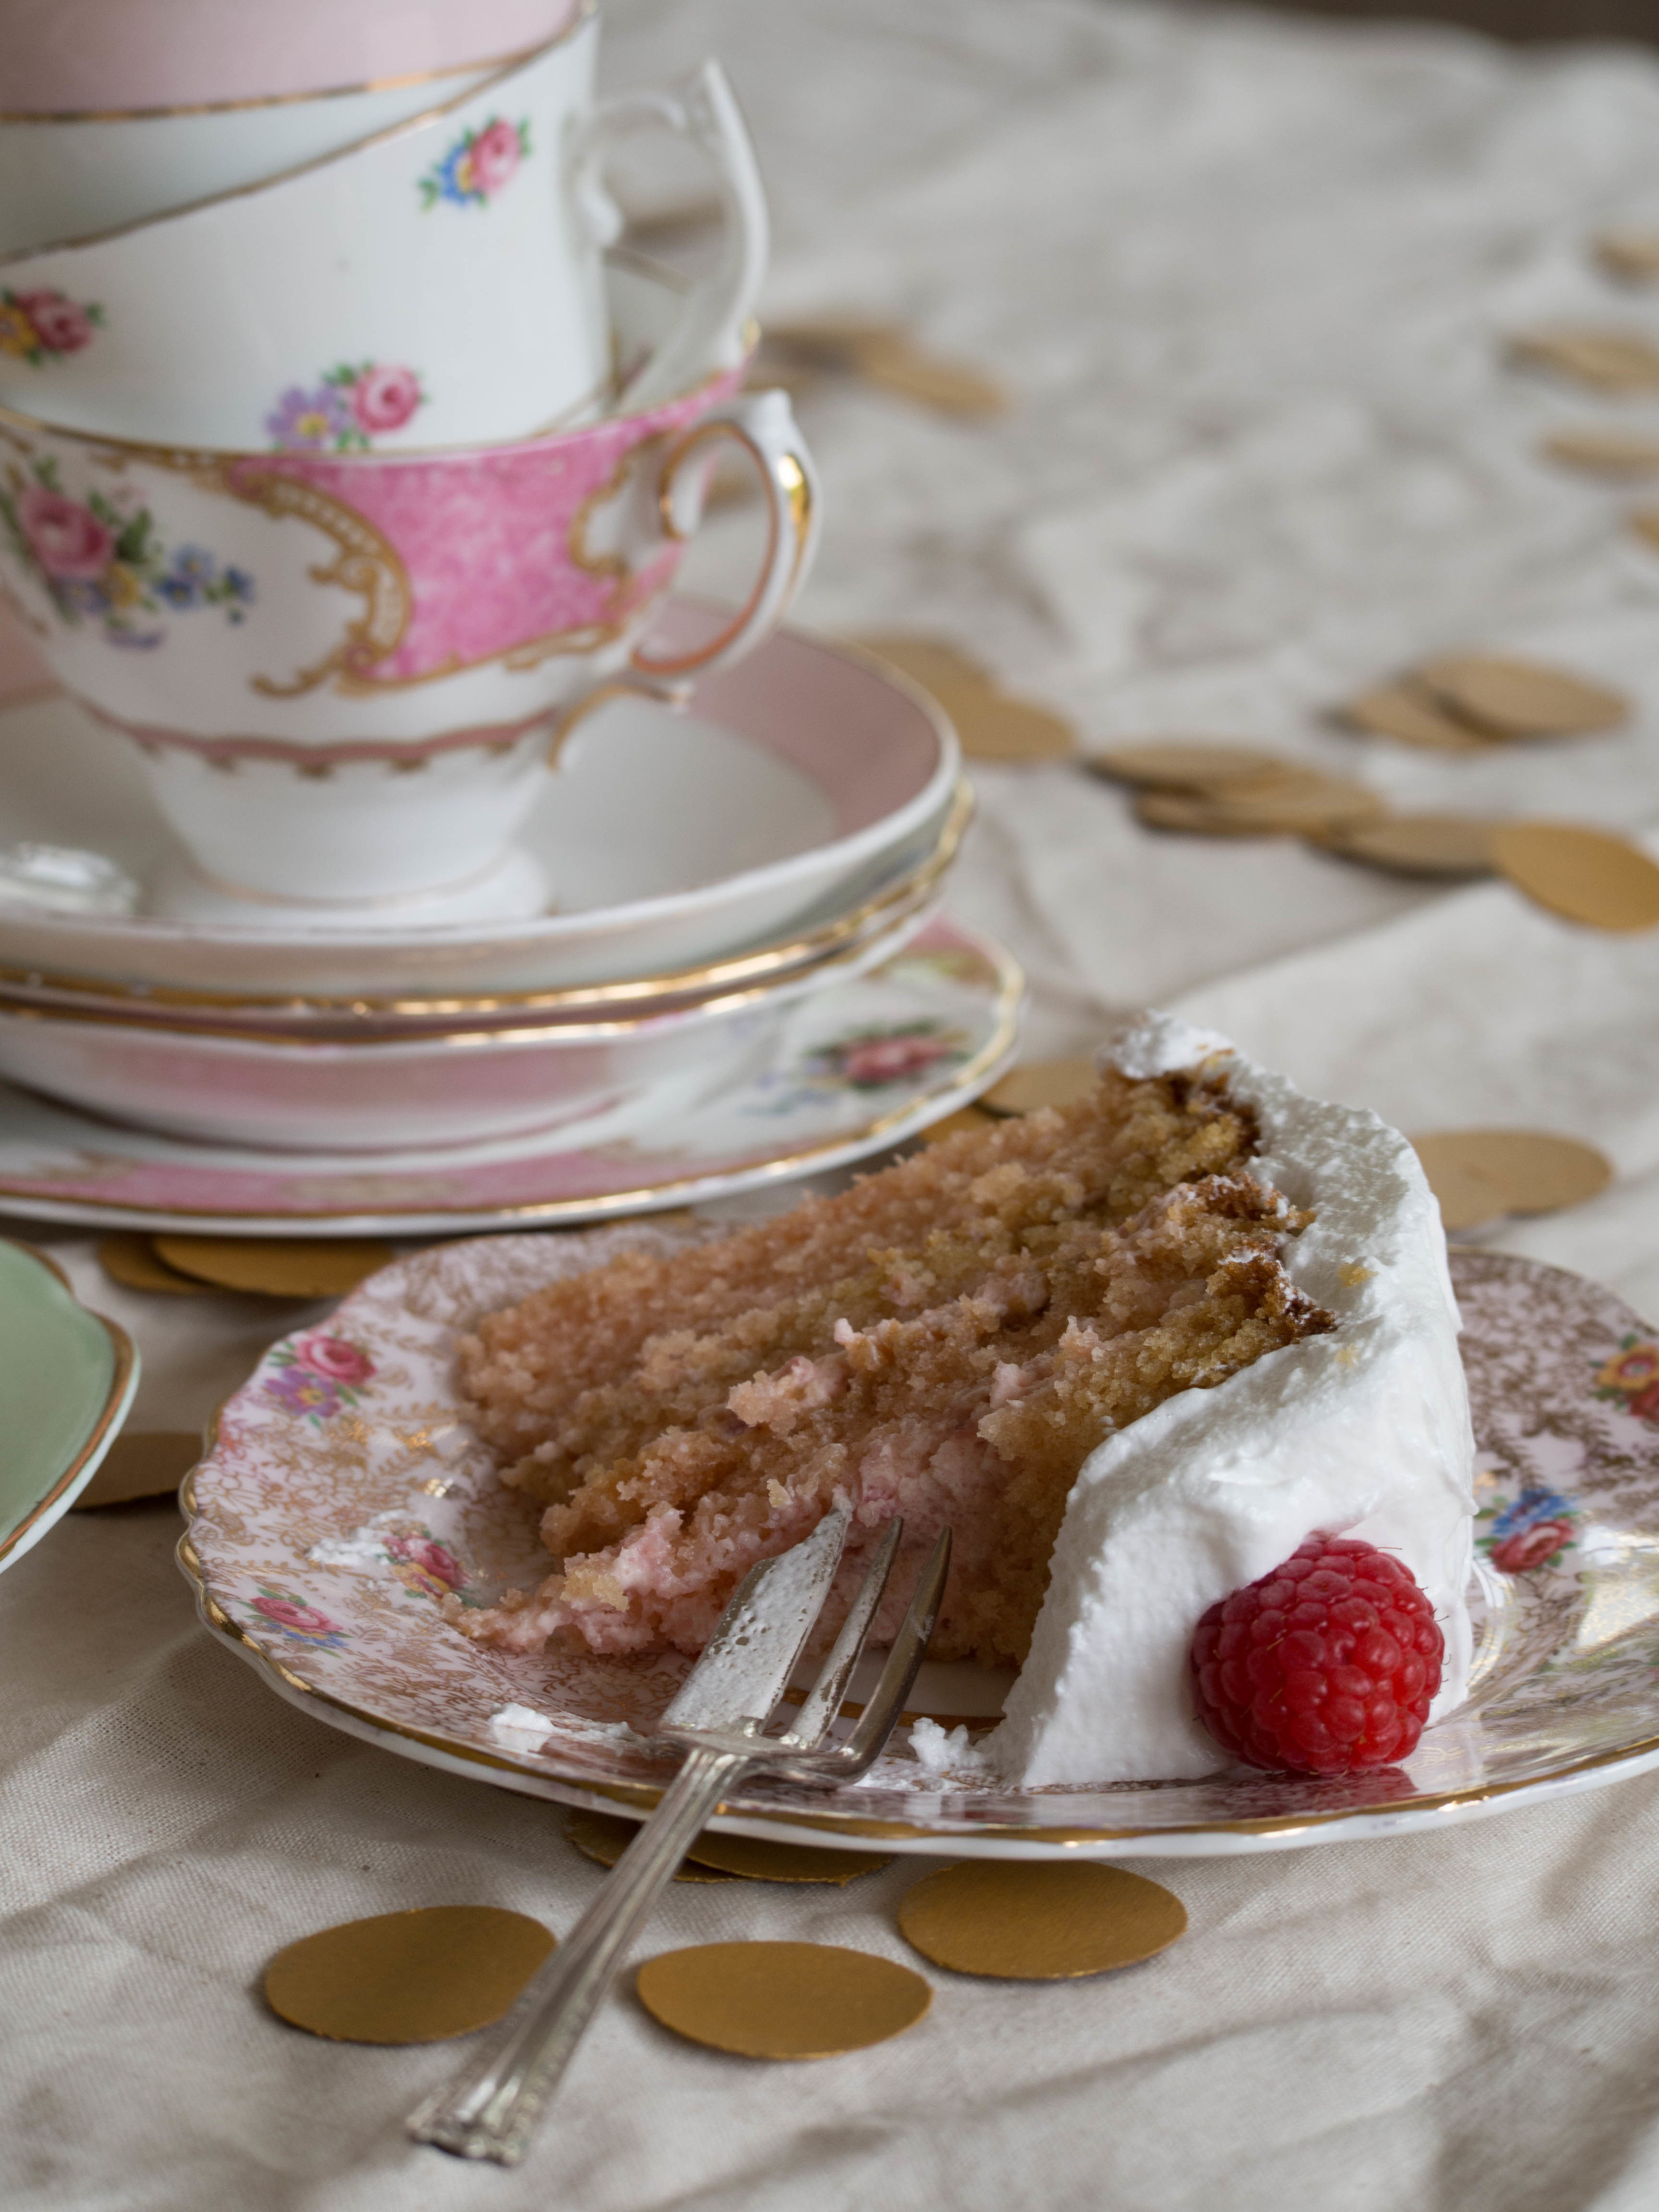
This cake was made early last month for my birthday. Yes, I made my own birthday cake! I had seen this recipe in the Australian Women’s Weekly book ‘Indulgent Cakes’ a few months earlier, and never had a reason to make such a big cake. So when it came to deciding what to make for my birthday, I knew it was the perfect opportunity to make it. 

This cake combines two things that I really love - raspberry and rosewater. You may have noticed I use these two ingredients a lot, particularly together. I actually have to try and not use them so much now, so my blog isn’t just a how-to on using raspberries and rosewater! 

The icing of this cake is marshmallowy, and the cake itself is pink. Also two things I love. Marshmallows and anything pink. This cake was definitely the right choice for my birthday! 

I made the cakes the day before and stored them between baking paper in air-tight containers overnight. The icing needs to be made then used straight away. It is also best to assemble and ice the cake just before you want to serve it, as the icing is at its best straight away. 

This cake can (and should) be stored in fridge, and will last a couple of days (the icing will start to dissolve away however). 


Ingredients for the Cake: 

250 g unsalted butter, softened

6 egg whites

2 tsp vanilla extract

2 cups caster sugar 

2 1/2 cups plain flour

1 cup buttermilk

2 tsp bicarb soda

2 tsp white vinegar

3 tsp pink food colouring


Ingredients for the Filling: 

185 g raspberries 

1 tbsp rosewater

300 ml thickened cream

1/4 cup icing sugar 


Ingredients for the Icing: 

3/4 cup caster sugar 

1 tbsp glucose syrup 

2 tbsp water 

3 tsp rosewater 

3 egg whites 

fresh raspberries, for decoration


Method: 

Pre-heat oven to 180 degrees Celsius and line two 20cm round baking tins three times. 

In the bowl of an electric mixer, beat the butter until smooth. Then add the buttermilk, egg whites, sugar, flour and vanilla extract. 

In a separate bowl combine the white vinegar and bicarb soda. This mixture should become foamy. Add the pink colouring to the vinegar mixture. Then add the vinegar mixture to the main cake mix. Beat on a low speed until everything has combined, then beat for a couple of minutes on medium speed until the mixture turns a paler colour. 

Divide the cake mix evenly between the two prepared tins, and bake for 45 minutes. Test cakes with a skewer to ensure they are cooked through. Allow the cakes to stand in their tins for a few minutes, then turn them onto baking paper lined cooling racks (top side of cake facing down). 

Once the cakes are cool, carefully cut them in half. Place one of the layers on a serving plate, cake stand or board. Set aside.

To make the filling, lightly squash the raspberries in a small bowl with the rosewater. In a separate bowl beat the cream and icing sugar until the cream forms stiff peaks. Fold the raspberries into the cream. Spread one-third of the cream onto the base layer of the cake, and top with the next layer. Repeat with the remaining layers, finishing with a final layer of cake. 

To make the icing, place the egg whites in the bowl of an electric mixture. Then place 2/3 cup of the sugar, water, glucose and rosewater in a saucepan and stir over medium heat until the sugar has dissolved. Bring mixture to the boil, and allow to boil for 3 minutes, or until a small amount can be rolled into a soft ball once dropped in cold water. If you have a sugar thermometer, the syrup should be 115 degrees Celsius at this stage. Once the syrup is boiling, start beating the egg whites until soft peaks form. Then beat in the remaining sugar. 

Remove the syrup from the heat and allow the bubbles to settle. With the mixer running, add the syrup to the egg whites in a thin stream. Beat on high speed for about five minutes, by which time the icing should have thickened and cooled.

Use icing immediately, trying to ice the top and sides of the cake evenly. Decorate with fresh raspberries. 


Recipe originally from, The Australian Women’s Weekly ‘Indulgent Cakes’  (2014, Bauer Media Books), pp.140-145.

All baking, styling & photography for this post by Kathryn Vincent of Kulinary Adventures of Kath. 

In Cakes & Slices Tags cake, birthdays, Australian Women's Weekly, Raspberry, Rosewater, Afternoon Tea, Baking
Comment

A Passionfruit Sponge & One Year of Blogging

Kath January 8, 2015

With the holiday season over, I was preparing to take a short break from baking and get some blog planning and other bits and pieces done. The weekend after New Years however, I suddenly realised - one year since I began this blog was coming up in four days! This mini milestone completely took me by surprise. I had nothing planned, but knew a cake at least, was 100% necessary.  

I decided to make a classic passionfruit sponge. I had looked through a few cookbooks and food magazines, trying to come up with something that was totally new and different. But I then thought, it was probably better to celebrate one year of my blog, with something that better represented what I have been doing for the past year. I don't tend to make cakes that have ingredient lists that span 3 pages, and need to be started two days in advance. As much as I appreciate eating things that have that much effort put into them, I am not always that keen to be the one putting the effort into making them! 

I have made a couple of passionfruit sponges before, but neither have made it onto the blog. I was never completely happy with the texture and knew that the search for the best recipe wasn't over. I found this recipe in a issue of Country Style magazine, in a section of the magazine that focuses on heirloom recipes. This recipe was sent in by someone whose father discovered a love and talent for baking in his retirement, and now in his 90's is his families go-to baker. 

The recipe was quite different to the others I had tried, and it turned out exactly how I wanted! The result was light and fluffy. And the bonus was, it wasn't difficult to make and took less than half an hour to cook. It will now be my go to sponge cake recipe! 

Thanks to all of you who read this blog, follow and support me. I appreciate it very much! Here's to another year of blogging, taking photos and eating! 


Ingredients: 

Butter and plain flour, for greasing cake tins 

4 eggs 

1/2 cup caster sugar

1 cup cornflour 

1 tbsp custard powder 

1 tsp cream of tartar 

1/2 tsp bicarbonate of soda 


Ingredients for Icing and Filling: 

1 1/2 cups icing sugar 

3-4 passionfruit

1 cup of thickened cream 


Method: 

Pre-heat oven to 200 degrees Celsius. Use a little butter to grease two (20 cm) sandwich tins, then dust them with some flour. Line the base of each tin with baking paper. 

Separate the eggs, and set the yolks aside. Place the whites into the bowl of an electric mixer and beat until they form stiff peaks. Add the sugar and beat until the mixture has become stiff and glossy. Add the yolks and beat until just combined. Sift in the dry ingredients, and gently fold into the egg mixture using a large metal spoon.

Divide the mixture between the two tins, and bake for 20 minutes. The cakes will be ready when they are golden in colour and spring back when touched lightly. 

Line two cooling racks with baking paper. Remove cakes from their tins, and allow to cool on the prepared racks. Allow to cool completely before icing or filling the cake. 

Sift the icing sugar into a bowl, and gradually mix in the passionfruit pulp until the icing is smooth. I used three small passionfruit. Let the icing stand for a few minutes to allow it to thicken. 

Meanwhile, whip the cream and spread over one of the cakes (top side down). It is easiest to ice and fill the cake on the plate you will serve it on. Use the pulp of one passionfruit to drizzle over the cream. Top with the remaining sponge cake, and ice the cake with the icing. 

This cake is best served immediately after it is assembled, however, it will keep in the fridge for a couple of days. 

Original Recipe found in Country Style Magazine, November 2014 Issue, pp.76-77 (article: ’never too late’, recipe originally by Bill Bevan).

All baking, styling and photography for this post by Kathryn Vincent of Kulinary Adventures of Kath.

In Cakes & Slices Tags Cake, Passionfruit, Sponge, The Blog Turns One, Country Style Magazine
Comment
Nice's Date Slice - Kulinary Adventures of Kath

Nice’s* Date Slice

Kath October 13, 2014

This recipe is one of the most popular things I have ever made. And it only contains 5 ingredients. It is so easy to make, and comes from the original Monday Morning Cooking Club book. A book which is a favourite of mine among my ever growing cookbook collection. 


I have talked about the Monday Morning Cooking Club before, and my fascination with their story and their books just keeps growing. I have owned their first book for quite a while now, and every time I open it I see a recipe I hadn’t noticed before, or a story or photo I hadn’t looked at properly. My three favourite things from this book (so far anyway!) are this slice, the Custard Chiffon Cake I made a little while ago, and Talia’s Raspberry Tart (p.93). All are things I hadn’t made before, or in the case of a chiffon cake, had never heard of before. 


I have learnt a lot by reading and cooking out of the Monday Morning Cooking Club’s books. I’m sure I will continue to discover more dishes and foods I have never cooked before from their collections of recipes. 


Ingredients: 

125 g unsalted butter

250 g brown sugar 

1 egg

150 g self raising flour 

250 g pitted dates, chopped 


Method: 

Pre-heat oven to 180 degrees Celsius and line a lamington tin (approx. 25 x 18 cm). 

In a small saucepan, melt the butter and brown sugar together on medium heat. Stir constantly until the sugar has dissolved and the butter has melted. 

Remove from the heat, and transfer to a large bowl. Allow to cool a little. 

Once the butter mixture has cooled slightly, add the egg and mix until well combined. Then add the flour, then the dates. Ensure that everything is mixed well. 

Place mixture into the prepared tin, and spread to the edges of the tin and smooth the top. Bake for 15-20 minutes. 

Allow the slice to cool in the tin for a while, then transfer to a wire rack. Cut in to slices once completely cooled. 


Nice's Date Slice 2 - Kulinary Adventures of Kath


*pronounced ‘Neecey’s’


Original Recipe from ‘The Monday Morning Cooking Club: The Food, The Stories, The Sisterhood’ by Merelyn Frank Chalmers, Natanya Eskin, Lauren Fink, Lisa Goldberg, Paula Horwitz and Jacqui Israel, (2011, Hardie Grant Publishing (now published by Harper Collins)), p. 55.


Originally Posted October 1, 2014.

All baking, styling and photography for this post by Kathryn Vincent of Kulinary Adventures of Kath.

In Cakes & Slices Tags Slices, Dates, Monday Morning Cooking Club
Comment
Raspberry & Rose Cupcakes - Kulinary Adventures of Kath.jpg

New Beginnings & Raspberry and Rose Cupcakes

Kath October 11, 2014

Many apologies for my six week or so absence from here. Though I do doubt that anyone is sitting at their computer waiting for me to post a new recipe! I have had an exciting few weeks full of new experiences and new beginnings. All of which meant time spent updating my blog were few and far between. 


In summary, during the last few weeks I have taken part in a food photography and styling workshop with Billy Law and Luisa Brimble, baked forty cupcakes and 20 biscuits for a bridal shower, baked 60 biscuits, made 250 mini quiches and 330 finger sandwiches for a wedding afternoon tea, quit my job, bought a new camera and attended a wonderful weekend ‘Slow Living Workshop’ with Beth Kirby, Rebekka Searle and Lusia Brimble (photos of the weekend to come!). 


Hopefully you will notice an improvement in my photography and styling skills soon, and fingers crossed I will be able to dedicate more of my time to this blog from now on! 

Below are some photos I took at the workshop with Billy and Luisa. 

Edited Pics from Photography Workshop (1 of 12).jpg
Edited Pics from Photography Workshop (2 of 12).jpg
Edited Pics from Photography Workshop (7 of 12).jpg

 . . . . 

 The recipe I have decided to post today is something I created a month or so ago. I had been reminiscing about the cakes and teas Mum and I enjoyed while we were in Paris back in February. At Ladurée in Paris we tried a creation called the rose réligieuse. It was a round two layered choux pastry with crème pâtissière and raspberries, decorated with a rose icing on the outside. The flavour combinations were simply wonderful. And of course the presentation was impeccable. 

Tea & a Rose Réligieuse at Ladurée, Paris.

Tea & a Rose Réligieuse at Ladurée, Paris.

I decided to create something using this as an inspiration, and came up with a raspberry and rose cupcake. I am very pleased with how they have turned out, and seem to have become an instant crowd pleaser. 

Raspberry & Rose Cupcakes

Ingredients: 

125 g margarine (flavourless such as canola oil based)

3/4 cup caster sugar 

1 tsp vanilla extract 

2 eggs 

1/2 cup milk, preferably low fat

1 1/2 cups self-raising flour, sifted

185 g raspberries, roughly chopped (approx. one and a half punnets if using fresh)

Ingredients for Icing: 

2 - 2 1/2 cups icing sugar, confectioners 

3 tsp rosewater

2 tbsp hot water 

pink food colouring 

dried rose buds, for decoration

Method:

Pre-heat oven to 160 degrees Celsius and line two cupcake trays with cupcakes cases. The mixture will only make about 15-16 cupcakes, so you won’t need to line all of the second tray. 

In a large bowl, cream the margarine, vanilla and sugar until it has combined, and is fluffy and light. Add the eggs one at a time, beating after each addition. Then add the flour and the milk, half of each at a time, beating in between to combine. 

Once all the ingredients are combined, add the raspberries to the mixture, gently folding them in with a spoon or spatula (not an electric mixer) until evenly distributed. 

Evenly fill each cupcake case with the mixture, approximately 3/4 full. 

Cook for 20-25 minutes or until the cakes are lightly golden and spring back when touched. 

Allow to cool on a wire rack. 

Once the cakes have cooled make the icing. Sift the icing sugar into a bowl, then add the water and rosewater and mix to combine. The icing should be smooth and slightly thick so it doesn’t run down the sides of the cakes. Add the pink food colouring, keeping the colour light. If the icing is too runny, add more sifted icing sugar a little at a time. If the icing is too thick, add more hot water a little at a time.

Spread the icing over each cupcake and place a rose bud in the centre. Allow the icing to dry before storing in a airtight container, or eat straight away! 

Raspberry & Rose Cupcakes - Kulinary Adventures of Kath.jpg

Original cupcake recipe from The Australian Women’s Weekly Cakes & Slices Cookbook, p.89.

 Originally Posted September 8, 2014.

For more recipes showcasing the best of rose, check out my Baking with Rose eBook by clicking the link below!

get your ebook!
In Cakes & Slices, Travel Tags Cupcakes, Raspberry, Rose, Rosewater, Events, New Beginnings, Ladurée, Paris, France, Travel, Photography, Food Photography, Styling, Billy Law, A Table for Two, Luisa Brimble, Workshops
2 Comments
Custard Chiffon Cake

Custard Chiffon Cake

The Monday Morning Cooking Club @ BakeClub and a Custard Chiffon Cake

Kath October 11, 2014

fressing [Yiddish], eating for the pure joy, obsession and love of it. 

Custard Chiffon Cake

Custard Chiffon Cake

When I think about the meaning of fressing, I feel I have been practising this concept for much of my life. I believe food is something that should always be enjoyed. Food and the recipes that accompany it play a large role in our lives. Apart from being sustenance, food can bring people together, be the centre of a celebration, be a comfort, and become an heirloom.

The concept of fressing and the importance of food is strikingly clear when one looks at the two books produced by The Monday Morning Cooking Club. Both books provide wonderful recipes and focus on the people behind the food and the recipes. It is obvious that food and cooking has and continues to play an important role in the lives of all who have been involved in these books. Through the act of sharing these recipes we are shown how food has brought joy, been loved and fuelled obsessions.

The six women who make up The Monday Morning Cooking Club have focused on the idea of recipes being heirlooms, and have a strong desire to preserve recipes that would otherwise be lost if not written down. Through the act of sharing these many recipes, we have been allowed into the lives and kitchens of the curators and contributors of these books. This in turn, preserves these family recipes, and places these cherished family memories into a collective heirloom in which anyone can share. 

At a recent BakeClub event, I was able to see three of The Monday Morning Cooking Club in action. Baking recipes from their books, but also speaking about The Monday Morning Cooking Club process, evolution and the idea of ‘heirloom baking’. Despite the original book idea being around fundraising for charity, the project had delved into preserving recipes from their community. The concept of recipes as heirlooms is firmly entrenched in The Monday Morning Cooking Club collective and one can only feel privileged that so many families personal food memories and heirlooms, have been shared. 

Cakes & Baked Goods from the Monday Morning Cooking Club event at BakeClub

Cakes & Baked Goods from the Monday Morning Cooking Club event at BakeClub

Cakes & Baked Goods prepared by the Monday Morning Cooking Club. BakeClub event held at the Flash in the Pan Studio. 

Cakes & Baked Goods prepared by the Monday Morning Cooking Club. BakeClub event held at the Flash in the Pan Studio. 

After attending the Monday Morning Cooking Club event at Bake Club, and tasting their amazing food, I decided to attempt the Custard Chiffon. When I first tasted it, it was so light, spongey and sweet. It was pure joy. To me, it also exemplified the notions of fressing and heirloom baking and I hope they don’t mind me sharing this wonderful recipe here.

For this recipe you will need an angel cake tin with a removable base. It is also a great idea to find a bottle whose neck will fit into the centre of the tin. You will need this to invert the cake on after it has finished baking. The whole process might seem a bit strange and involved, however the effort put into this cake really pays off.

Custard Chiffon Cake

Custard Chiffon Cake

Ingredients: 

175 g self-raising flour

35 g custard powder

1 tsp cream of tartar

6 eggs (large), separated

345 g caster sugar

1/2 tsp vanilla extract

170 ml warm water

80 ml vegetable oil 


Method:

Pre-heat oven to 180 degrees Celsius. Have your angel cake tin ready and nearby but do not grease it. The tin should not be a non-stick tin as the cake needs to cling to the sides of the tin as it cooks. 

In a small-medium bowl, sift the flour, custard powder and cream of tartar three times. 

Using an electric mixer, beat the egg yolks with 1 cup of the total sugar, until pale and creamy. If you have a free standing mixer with a paddle attachment, use this attachment for the egg yolks and save the whisk for later. Once pale and creamy, add the vanilla. Place the oil and water in a jug and along with the sifted flour mixture, add to the yolk mixture while the mixer is beating on a low speed. Beat only until just combined. 

Using a separate bowl, whisk the egg whites using an electric mixer until soft peaks have formed. Add the remaining sugar, and whisk until the peaks are stiff (but not dry). 

Gently fold the egg yolk mixture into the egg whites with a metal spoon. Continue to gently fold until the mixtures are just combined. Do not over mix. 

Transfer the mixture to the cake tin and bake for 1 hour, or until a skewer inserted comes out clean. 

Immediately upon removing the cake from the oven you must invert the cake (stand it upside down). Using the hollow centre of the cake tin, place the cake upside down on the neck of a bottle and leave to cool. This process will stop the cake collapsing. This is also the reason for not greasing the tin, as you don’t want the cake to slide out at this stage. If the cake is under baked, it may also slide out at this stage! So be sure it is fully cooked before removing from the oven. 

Once the cake is completely cool, use a small serrated knife to cut the cake out of the tin. Start with the outer sides then lift the cake out using the bottom of the pan. Then carefully cut the cake off the base of the tin. 

To serve, sprinkle with icing sugar if desired.  

Custard Chiffon Cake with Swiss Meringue Buttercream & Dried Edible Flowers

Custard Chiffon Cake with Swiss Meringue Buttercream & Dried Edible Flowers

Original Recipe from ‘The Monday Morning Cooking Club’ by Merelyn Frank Chalmers, Natanya Eskin, Lauren Fink, Lisa Goldberg, Paula Horwitz and Jacqui Israel, p.35 (2011).


Originally Posted July 5, 2014.

In Cakes & Slices, Events Tags Monday Morning Cooking Club, BakeClub, fressing, heirloom baking, Custard Chiffon, Chiffon, Cake
2 Comments
P4050549.jpg

Nigella Lawson's Brownies

Kath October 11, 2014

As promised, order is restored after the first savoury post, with another lovely baking recipe! And you can't get much more sweet and decadent than a chocolate brownie! Definitely makes up for eating vegetables. Even if they were pureed in soup with bacon! Its a tough life, haha. 

Considering I don’t really eat chocolate, I have made a surprising amount of chocolate things this year. I guess when your baking for other people, chocolate is hard to go past. 

After making the brownies by Bill Granger back in March, I was interested to see what another recipe would turn out like. I of course, could not go past a Nigella Lawson recipe. 

When I first made these I think I cooked them a little longer than Nigella stipulated. The brownies were more cake-y, than fudgy, however it was commented that they tasted exactly like Sara Lee chocolate cake, which was considered a good thing!


Ingredients: 

150g unsalted butter 

300g light muscovado sugar

75g cocoa powder

150g plain flour

1 tsp bicarb soda

4 eggs

1 tsp vanilla extract

150g milk chocolate, roughly chopped into chunks 


Method: 

Preheat oven to 190 degrees Celsius. Line a baking tin/tray measuring approx. 25cm/5cm.  

Melt butter over a low heat in a medium saucepan. Once melted, add sugar and stir to combine. 

Sift the cocoa powder, flour and bicarb and stir into the pan. Once it is mixed in, remove from heat. The mixture will be quite dry at this point. 

In a jug, whisk the eggs with the vanilla extract and then add to the brownie mixture. 

Stir in the chopped chocolate and immediately pour mixture into prepared pan. Cook for 20-25 minutes. The idea is to have the brownies still a bit wobbly when they come out of the oven, and a skewer inserted into the centre of the brownies would not come out clean. 

Place the tin on a cooling rack, and allow to cool a little before cutting the brownies. 


Original Recipe from ‘Kitchen: Recipes from the Heart of the Home’ by Nigella Lawson, p.217 (2010). 

Originally Posted May 19, 2014.

In Cakes & Slices Tags Brownies, Chocolate, Nigella Lawson
Comment
  • The Blog
  • Older
  • Newer

recipes

  • Biscuits/Cookies 39
  • Breads Etc. 9
  • Breakfast 7
  • Cakes & Slices 68
  • Confectionary 5
  • Drinks 6
  • Events 14
  • Food Photography Tips 3
  • From The Mailing List 24
  • Heirloom Recipes 12
  • Holidays 44
  • Ice Cream 9
  • Jams Preserves & Spreads 9
  • Muffins 4
  • Off the Shelf 50
  • Other Desserts 25
  • Savoury Dishes/Meals 15
  • Scones 4
  • Tarts & Pastry 9
  • Travel 13

Sign up to Friday Food Chat with Kath, a weekly newsletter for more food, baking, cookbook chat and more!

Sign Up Here!
instagram-unauth pinterest facebook url

Website Accessibility: To enable text to speech function on the blog, click the sound button to the right of each blog post.

All images & content are the property of Kathryn Vincent, unless stated otherwise. Please do not use without permission.

Kulinary Adventures of Kath

Food Photography, Recipes & Baking

instagram-unauth pinterest facebook url