Kulinary Adventures of Kath

Food Photography, Recipes & Baking
  • home
  • About
  • Work with Kath
  • Shop
  • Blog
    • The Blog
    • Recipe Archive
  • Newsletter
  • Contact
  • home
  • About
  • Work with Kath
  • Shop
    • The Blog
    • Recipe Archive
  • Newsletter
  • Contact
Raspberry Pistachio Rose Cake (23 of 25).jpg

The Blog

Recipes and Food Photography by Kath Vincent.

  • The Blog
  • Recipe Archive
  • All
  • Biscuits/Cookies
  • Breads Etc.
  • Breakfast
  • Cakes & Slices
  • Confectionary
  • Drinks
  • Events
  • Food Photography Tips
  • From The Mailing List
  • Heirloom Recipes
  • Holidays
  • Ice Cream
  • Jams Preserves & Spreads
  • Muffins
  • Off the Shelf
  • Other Desserts
  • Savoury Dishes/Meals
  • Scones
  • Tarts & Pastry
  • Travel
Pink layer cake with edible flowers and gold

Let Them Eat Cake - A Marie Antoinette Inspired Layer Cake

Kath October 11, 2022

Let them eat cake, is a phrase we all associate with Marie Antoinette, despite the fact that she probably never actually said it.

The phrase and the opulence that can also be associated with the French Royal family which Marie Antoinette married into, has inspired many an artist, film maker and cake decorator over the years. 

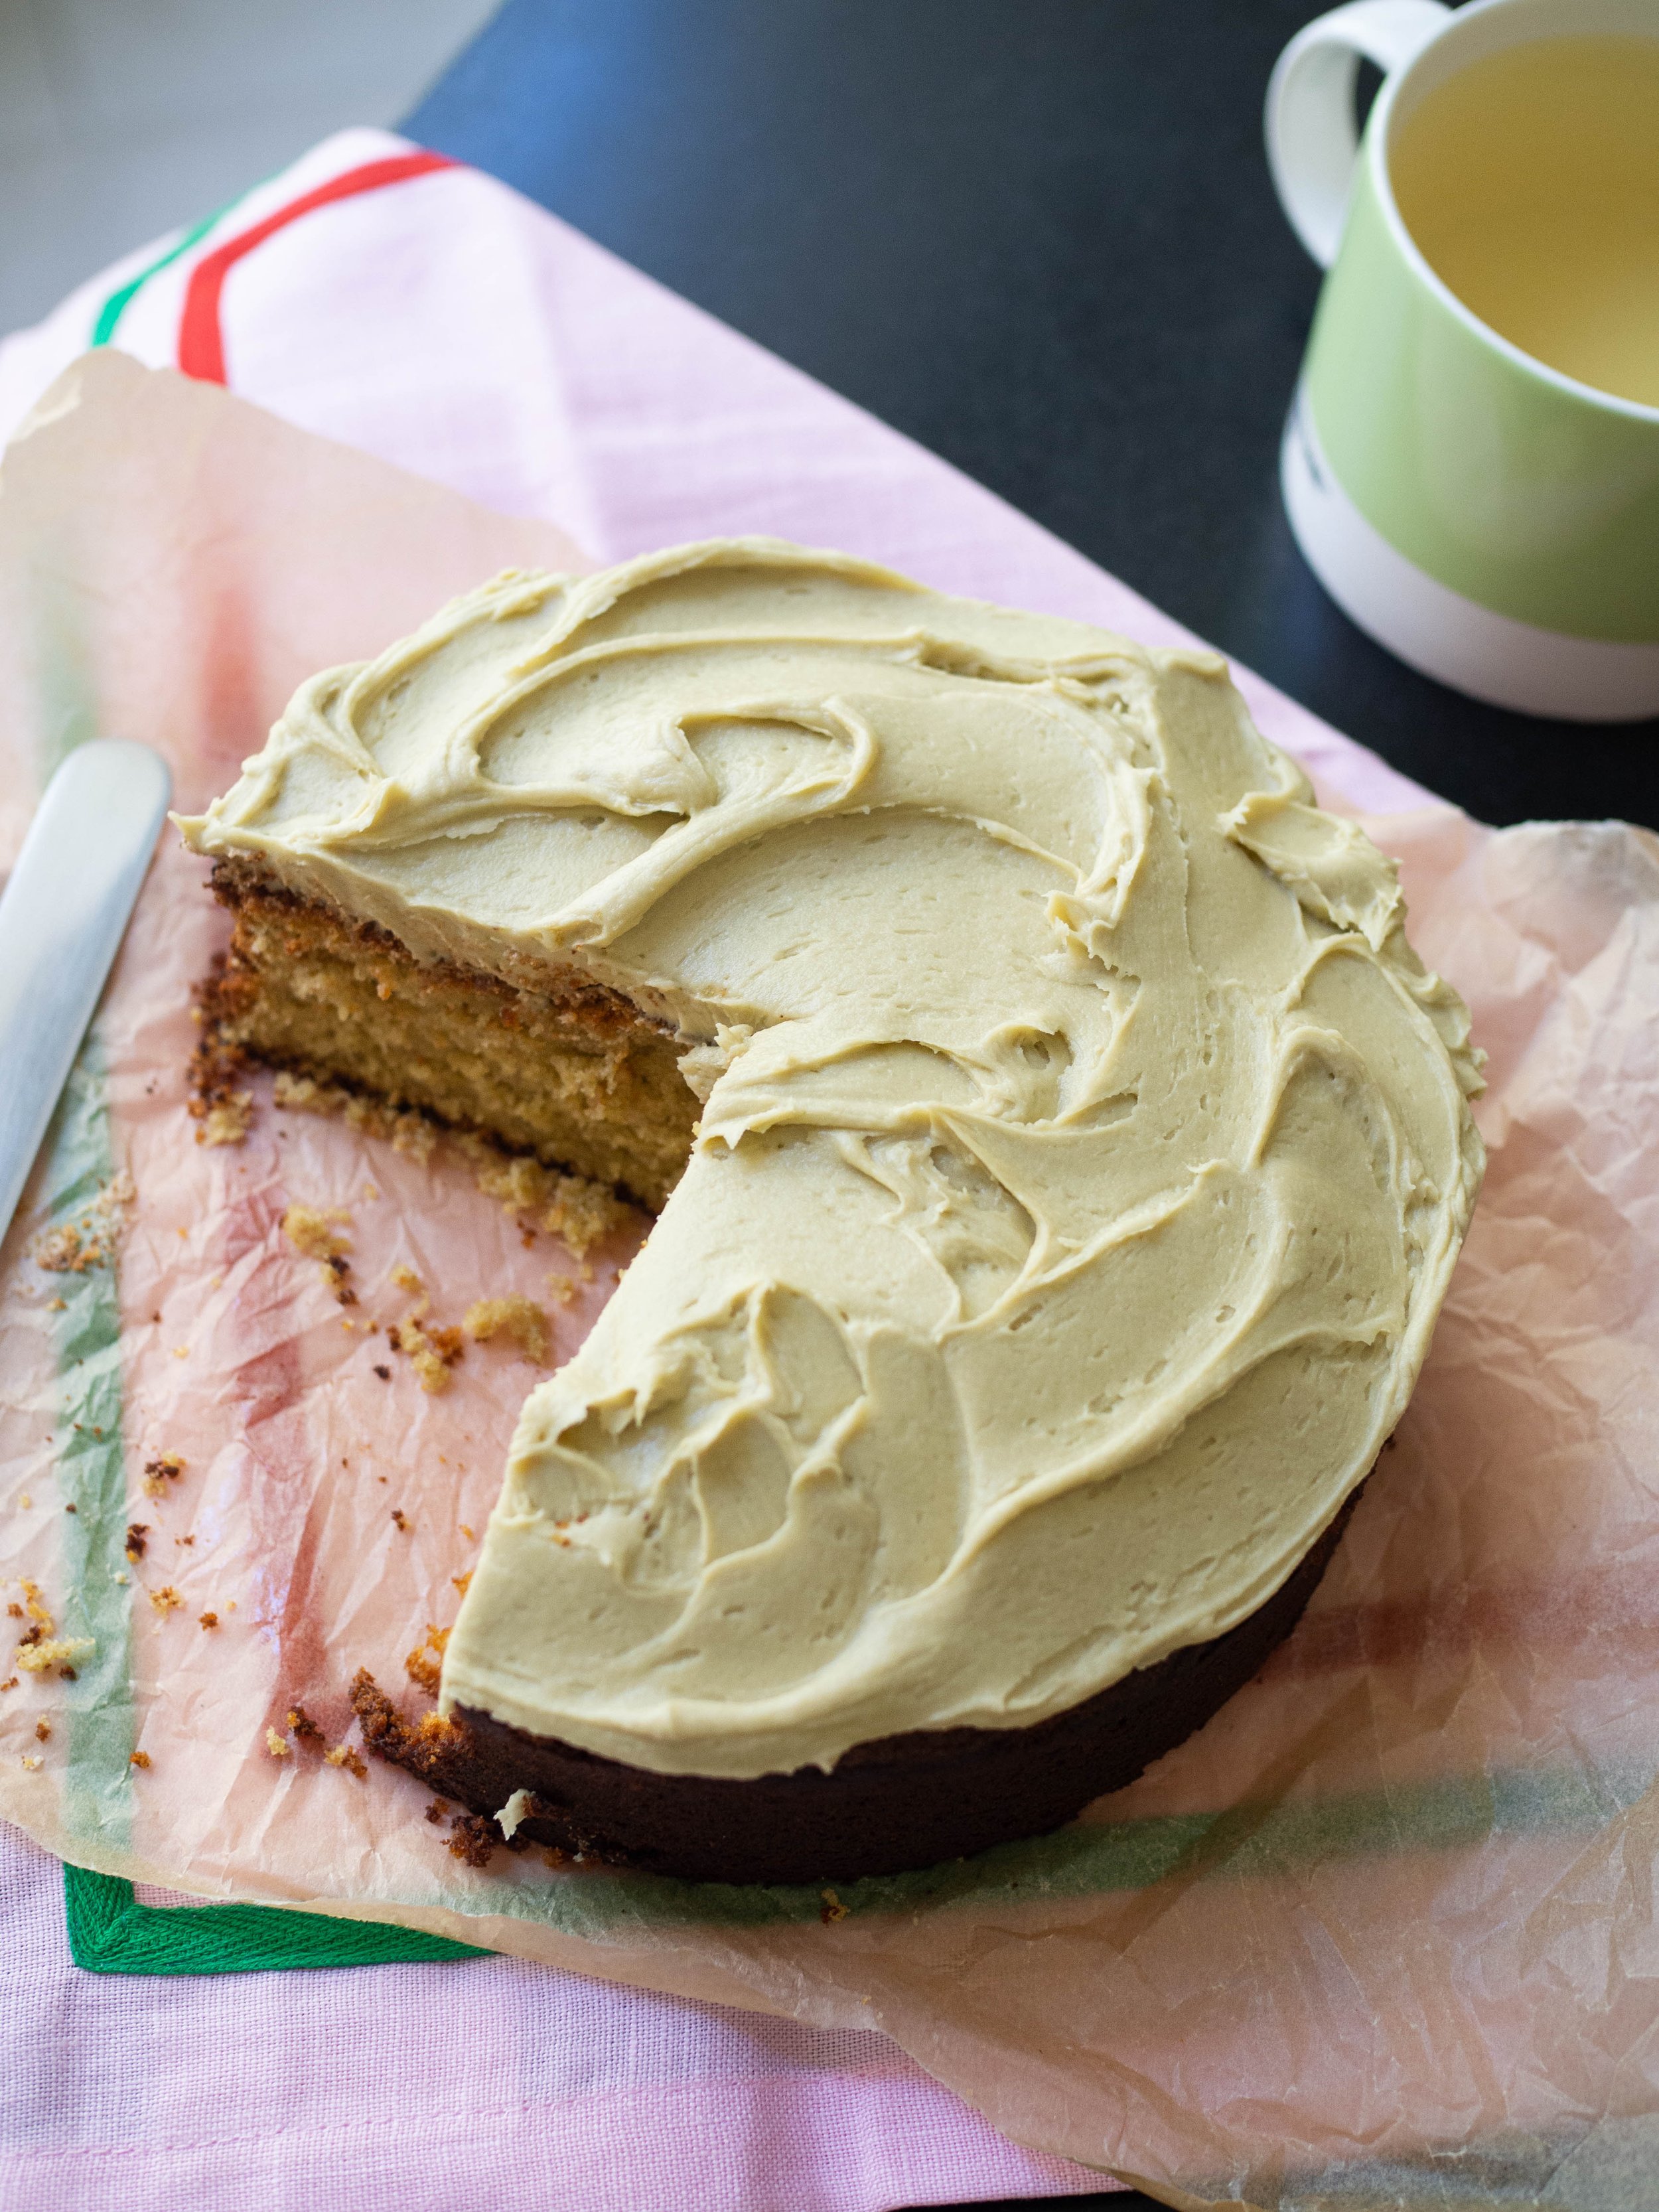
This history and opulence was in part the inspiration for this cake, which I recently developed for The Healthy Baker. The brief was that the cake must have pink icing, and use flowers to decorate. 

While maybe not as opulent as some ‘let them eat cake’ inspired cakes, I think this cake presents well but is also quite easy to achieve. 

You will see that the buttercream icing is not perfectly smooth, this is not only as I felt it unnecessary as the whole cake will be covered with decoration, but it also avoided the cake having too thick a layer of buttercream. Since the cake is filled with passionfruit curd, that is where the cake is getting a lot of its flavour, and too much buttercream may detract from that. 

Too make the cake even easier I used bought passionfruit curd, and in terms of the decoration I can assure you that very little skill is involved when it comes to placing the flowers (both fresh and freeze dried) all over the cake! I also used some edible gold leaf which was easy to buy online from Woolworths.

You can find the recipe via The Healthy Baker’s website - it would make a great celebration cake or just a fun weekend baking project!

Recipe here

Recipe development projects like this one, are my favourite part of my job. Creating a recipe with businesses products means I get to think of new ideas, be creative and also try new things. I also get to eat the cake after, which is a pretty good job perk if you ask me!

If you have a product you’d love me to create some recipes with, just contact me and we can chat about what your business needs. Recipes for your website or blog are great ways to show your customers how to use your products, and the images are great for social media and other marketing content too!

Click here to find out a little bit more about working with me.

close up of pink layer cake decorated with edible flowers and gold leaf
Pink layer cake decorated with gold leaf and edible flowers
In Cakes & Slices, From The Mailing List Tags Marie Antoinette Inspired Cake, Edible Flowers, Gold Leaf, Passionfruit Curd, The Healthy Baker, Recipe Development, cake
Comment
round cake with pink icing and decorated with rose petals

Another Pistachio and Rose Cake

Kath June 8, 2022

Another pistachio and rose cake. I promise this one is a bit different to the rest. 

Pistachio and rose is a flavour combination I will never tire of, and since I am still enjoying my new found like of buttercream, I decided a rose buttercream would be worth a try. 

I have used freeze dried raspberry powder to colour my icing, however any pink food colouring will also work well. I find the rose flavour comes through really well the day after this cake is made, so if you wanted to make it in advance you definitely could, I would just leave the final decorations till the day you wished to serve it (if using any kind of edible flowers). 

Unlike the last few pistachio cake recipes I have posted here, this cake only needs raw pistachios blitzed to a crumb/meal, rather than a ready made pistachio spread. Which I hope makes this cake a bit easier to make and more accessible ingredient wise too. 

round cake with pink icing decorated with rose petals

Another Pistachio and Rose Cake a.k.a Pistachio Cake with Rose Buttercream

Ingredients: 

150g pistachios

175g unsalted butter, softened

2 tsp rosewater

100g light brown sugar

75g caster sugar

3 eggs

150g self raising flour

Ingredients for the Icing: 

150g unsalted butter, at room temp 

1.5 tbsp rosewater

190g icing sugar, sifted

Pink food colouring/2-2.5 tsp freeze dried raspberry powder, optional

Edible flowers fresh or dried, to decorate (optional)

1 tbsp slivered or roughly chopped pistachios, to decorate

Method: 

Pre-heat oven to 160 degrees Celsius and grease and line a 20cm round springform cake tin.

While the oven is heating up, place the pistachios on a lined baking tray to gently toast. Remove the pistachios once the oven has pre-heated or after 3 minutes or so. 

Allow the pistachios to cool down a bit, then place in a food processor and blitz until a fine crumb/meal forms.

In the bowl of a stand mixer beat the butter, rosewater and sugars using the paddle attachment. Beat until light and fluffy. 

Then add the eggs one at a time, beating well after each. Gently mix in the blitzed pistachios until combined.

Add the self raising flour and gently fold by hand using a spatula in until combined.

Transfer the cake batter into the tin and smooth the top. 

Bake for about 50 minutes or until the cake is springy to the touch and a skewer comes out clean when inserted into the cake. 

Leave the cake to cool before removing from the tin. 

Once the cake has cooled, place it on a serving plate. 

Then make the icing by beating the butter and 1 tbsp of the rosewater in the bowl of a stand mixer with the paddle attachment. Beat for about 1-2 minutes, or until the butter is nice and fluffy. 

Add the icing sugar and 2 tsp of the freeze dried raspberry powder (if using), and beat again until the icing is soft and fluffy, about 1 minute. 

If using food colouring, add that in now, starting with a small amount and adding more as needed. You can also add in the extra 1/2 tbsp of rosewater if you would like a stronger rose flavour, and if using the freeze dried raspberry powder, add in the additional 1/2 tsp to deepen the colour of the icing if you wish. 

Evenly spread the icing over the top of the cake, then decorate with any edible flowers you may have, and some slivered or roughly chopped pistachios. 

Serves 8-10. Will keep for a few days at room temperature in an airtight container.

slice of cake side on, cake is light green in colour with layer of pink icing on top
In Cakes & Slices Tags Pistachio, Rose, Buttercream, cake
2 Comments
carrot cake with spiced buttercream on baking parchment and pink flowers in background

Carrot Cake with Quince Syrup and Spiced Buttercream

Kath April 4, 2022

I love a good carrot cake. The recipe is always easy, no need for a mixer, and can be adapted quite a lot too. 

This most recent adaptation came about when it suddenly occurred to me that quince syrup could be substituted for the usual honey/golden syrup often used in carrot cakes. I buy sticky quince syrup from Singing Magpie Produce, and I’m not sure if there is anyone else who produces a similar product. 

While I highly recommend buying from Singing Magpie Produce, if you are outside Australia or wish for another alternative, date syrup/molasses can be used instead. In fact I’m sure many other fruit based syrups/molasses could be trailed in a recipe like this. I just wouldn’t try pomegranate molasses, as it would be too tart. 

Using a product such as quince syrup rather than honey or something similar, allows the cake to be less sweet - though the buttercream here makes up for that! However the combination is quite nice as they compliment each other. This is also a nice cake without icing too if you want to keep it as it is. 

You could make this cake an Easter carrot cake by decorating with small Easter eggs or similar. 

carrot cake with spiced buttercream pictured with pink windflowersflowers

Carrot Cake with Quince Syrup and Spiced Buttercream

Ingredients: 

75g panela or brown sugar

125ml canola or vegetable oil

125ml quince syrup (I use this one)

3 eggs

1 tsp vanilla bean paste

225g plain flour

2 tsp baking powder

1 tsp bicarb soda

2 tsp ground cinnamon

2 tsp ground cardamom 

3 medium carrots, grated

For the icing:

150g unsalted butter, at room temp 

1 tsp vanilla bean paste

190g icing sugar, sifted

1 tsp ground cinnamon

1 tsp ground cardamom 


Method: 

Preheat oven to 160 degrees Celsius and grease and line a 20cm round springform cake tin.

In a large bowl whisk together the sugar, oil, quince syrup, eggs and vanilla.

Then add the flour, baking powder and spices. Sift in the bicarb soda and whisk together until combined.

Then add the grated carrots to the cake mixture and mix to combine. 

Pour the batter into the prepared tin and smooth the top with a spatula. 

Bake for 40-45 minutes, or until the cake is golden, springy to the touch and a skewer comes out clean.

Remove the outer edge of the cake tin and allow the cake to cool on a wire rack.

To make the icing, beat the butter and vanilla in a stand mixer with the paddle attachment for at least 1 minute, or until the butter is light and fluffy. 

Add the icing sugar and spices and beat for a further minute or two, or until the icing sugar is well combined and the icing is light and fluffy. 

Spread the icing over the cake.

Serves 8-10. 

carrot cake slice
carrot cake with slice cut out
In Cakes & Slices Tags carrot cake, carrot, Quince, sticky quince syrup, Singing Magpie Produce, Cake, Mixer Free Recipes
Comment
Raspberry and Vanilla Snacking Cake

Raspberry and Vanilla Snacking Cake

Kath January 16, 2022

This cake came about because I bought 12 punnets of raspberries for $12 and then had a freezer full of raspberries. Not a bad problem to have, but amongst all the bread we also had in the freezer it felt like something needed to be used up! 

I liked the idea of just adding some of the raspberries to a nice plain vanilla cake and being able to snack on it whenever it felt necessary. This cake is fairly decent in size so you could definitely snack on it with a few other people as well.

The cake could have a few more raspberries in it than I have suggested in the recipe, maybe 200g or 2 cups if you would like it more filled with fruit. 

The cake could be iced with a simple glaze icing if you like, but I liked the simplicity and ease of a dusting of icing sugar. Plus I love the crisp top and sides of a plain cake like this one on the first day it is baked, which will get a bit lost if there is icing. It also means you don’t have to wait for the cake to be completely cool to eat it if you aren’t waiting to ice it - a win win in my books!

Raspberry and Vanilla Snacking Cake

Raspberry and Vanilla Snacking Cake

Ingredients:

225g unsalted butter, softened

340g caster sugar  

1 tsp vanilla bean paste

1 tsp vanilla extract

3 eggs

375g self raising flour 

220ml milk 

150g (1.5 cups) frozen raspberries

1-2 tsp icing sugar, for dusting

Method: 

Preheat oven to 160 degrees Celsius and line a 23cm square cake tin with baking paper.

In the bowl of a stand mixer cream the butter, sugar and vanillas until pale and fluffy.

Add the eggs one at a time, mixing well after each. 

Then add half the flour mix to combine. Add the milk and mix (you might want to cover your mixer with a tea towel for the first few seconds while the milk begins to incorporate). Then add the remaining flour and gently mix on low speed until it is incorporated and there are no lumps.

Pour half the batter into the prepared cake tin, then top with half the raspberries and push them into the batter a little. Then cover with the remaining batter and top with the remaining raspberries (no need to push the raspberries into the batter, the batter will swallow them up as it cooks and rises).

Bake for about 1 hour or until the cake is nicely golden and a skewer comes out clean. 

Allow to cool in it’s tin for a few minutes before turning out onto a wire rack to cool further. 

Once the cake has cooled down a bit, but is still a little warm dust over the icing sugar and serve (with nice cream if you have it). 

Serves 12 (at least), store in an airtight container, will keep for a few days. 

Every cup of tea requires a piece of cake
View fullsize Rasp Cake and Flowers (8 of 11).jpg
View fullsize Rasp Cake and Flowers (9 of 11).jpg
In Cakes & Slices Tags Raspberries, Vanilla, Easy Baking, cake, Mixer Free Recipes
2 Comments
pistachio cake

Crema di Pistacchio Cake

Kath January 3, 2022

I wasn’t planning on sharing this recipe on the blog since it is quite similar to a few other pistachio cakes already on here. But when I shared this cake on my Instagram stories on the weekend, a few people asked for the recipe/expressed interest in making it so I thought it would be easiest to put it all here.

Both the cake and the icing are based on recipes that are already on my blog. The cake is based on this recipe (which in turn is based on one by Skye McApline which is referenced below). The only real change to the recipe is using the crema di pistacchio spread in place of the pistachio butter and melted white chocolate.

The icing is loosely based on this one I made last Easter with Biscoff spread, and I can highly recommend it as the pistachio flavour comes through really well in the buttercream.

The flavour in the cake is more subtle compared to using homemade or bought pure pistachio butter, as is the colour. If you don’t have a lot of crema di pistacchio, or can’t find it at all, I would recommend using the original recipe. Crema di pistacchio is still difficult to buy here in Australia, plus it can be quite a pricey thing to buy, so if you only have a small jar of it I wouldn’t recommend using the whole thing in a cake.

I have tried three brands of crema di pistacchio (or crema al pistacchio), and all have been very tasty. The colours vary a little, and sometimes the percentage of pistachio as well (I compare this based on whether pistachio is the first ingredient on the ingredients list).

I have pictured below the ones I have bought before, plus the original picture from Skye McAlpine’s Instagram stories back in late 2019 that initially set off my search for a jar of my own. That along with her original recipe for this type of cake, have set me on a real pistachio adventure the last couple of years - it has been tasty and expensive and I’ve loved every minute of it (despite the expensive part!).

IMG_0105.jpg
IMG_9497.jpg
IMG_9312.jpg

I recently found where I could buy crema di pistacchio online here in Australia via La Dispensa. Which has been great since the importation of goods from overseas has been inconsistent and sometimes non-existent since the pandemic began, and the shops I know that usually stock it haven’t always had any as a result.

I was excited to find that La Dispensa sold 1kg tubs of crema di pistacchio which probably made my year to be honest. I got one, and decided that armed with so much crema di pistacchio I could use some to make this cake and try out a pistachio buttercream. Usually to make this cake, it would use a whole jar of the spread which makes it quite an expensive cake. I also didn’t think it was worth using a jar on just one thing since the flavour was subtle once baked, and there is so much joy in eating this spread on toast, crumpets etc etc.

The amount of the spread needed for the icing is much less, so you can always combine the original version of the cake with the pistachio buttercream and you will still have a very delicious cake.

View fullsize Crema di Pistacchio Cake (13 of 14).jpg
View fullsize Crema di Pistacchio Cake (14 of 14).jpg
pistachio cake

Crema di Pistacchio Cake

Ingredients: 

200g unsalted butter, softened

200g caster sugar

1 tsp vanilla extract

180g crema di pistacchio

3 eggs

120ml buttermilk / 120g yoghurt

200g self raising flour

Ingredients for the Buttercream: 

150g unsalted butter, at room temp

190g icing mixture/icing sugar* 

80g crema di pistacchio

Method: 

Preheat oven to 170 degrees Celsius and line a 20cm round cake tin (I find using a springform one is easiest). 

In the bowl of a stand mixer beat the butter, sugar and vanilla until pale and creamy. Add the crema di pistacchio and mix until combined. 

Add in the eggs one at a time, then add half the flour and mix on low speed until combined. Then add the buttermilk/yoghurt and mix until well combined. Add the remaining flour and mix on low speed until combined and the batter is smooth.

Transfer the batter to the prepared cake tin and bake for 50 minutes. Then cover the cake with foil (the cake will be quite browned by now) and bake for a further 20-25 minutes, or until the cake is cooked through. A skewer will come out clean when the cake is cooked through. 

Allow the cake to cool in its tin for a few minutes, then turn out on a wire rack to cool further.

To make the icing, beat the butter using a stand mixer and the paddle attachment for 1-2 minutes, or until it is pale and creamy. Add in the icing sugar, and beat for another 1-2 minutes or until the icing is fluffy. 

Add the crema di pistacchio and mix until combined.

Spread the buttercream over the top of the cake and enjoy!

Serves 10.  

*I always use the CSR Soft Icing Mixture (the one in the pink packet) as it won’t need sifting before it is used. If you are using pure icing sugar it will need to be sifted first. 

Recipe note 15/07/2024 - you can also bake this cake in a square cake tin (20-23cm) and it will not need as long in the oven. It should take 40-50 minutes and you won’t need to cook for the further 20-25 mins with the cake covered in foil.

pistachio cake

Reference: ‘A Table for Friends’ by Skye McAlpine (Bloomsbury Publishing, 2020) p.232.

pistachio cake
In Cakes & Slices Tags Crema di Pistacchio, Pistachio, Italian Pistachio Spread
3 Comments
Christmas Fruit Slice with Festive Sprinkles

Easy Christmas Fruit Slice

Kath December 16, 2021

I created this slice because I had wanted to try and make a fruit cake this year, but every time I thought about it just seemed like sooooo much effort. 

So I made a slice instead and it was considerably quicker and easier to make, and still has some of the Christmas fruit cake elements. I used my favourite dried fruit from Singing Magpie Produce, and a decent amount of vanilla extract as the ‘alcohol’ element. You could add a little more dried fruit and nuts to this recipe if you wanted it a bit more fruit heavy (say 300g fruit, and 2 tbsp each of the nuts). You could also add some festive spices to the mix as well if you felt like it.

You don’t have to decorate the slice with any festive sprinkles, I just had some so I thought I would use them. Otherwise it’s a nice, slightly crumbly slice, perfect with a cup of tea and none of the end of year fuss I imagine making a traditional fruit cake comes with. This slice is also a great one to make a day or so in advance as the flavour gets even better after the day of baking.

Christmas Fruit Slice with Festive Sprinkles

Easy Christmas Fruit Slice

Ingredients:

120g unsalted butter

250g brown sugar 

1 tbsp vanilla extract

2 eggs, beaten

340g self raising flour 

240g mixed dried fruit, chopped if in large pieces

1 tbsp slivered almonds

1 tbsp slivered pistachios 

Icing: 

50g icing mixture/sugar

2 tsp lemon juice 

Festive sprinkles, optional

Method: 

Preheat oven to 160 degrees Celsius, and line a 30 x 20 cm slice/lamington tin.

In a small saucepan add the butter, brown sugar and vanilla. Heat over low/medium heat and stir until the butter and sugar have melted together. 

Tip the butter mixture into a large bowl, and allow to cool down if it’s quite hot. Mix in the egg and make sure it is well combined. Then add the flour and mix until almost combined. Then the dried fruit and nuts and mix until everything is combined and there are no lumps of flour.

Tip the mixture into the prepared tin and using a spatula evenly spread the mixture out. Bake for 35 minutes or until the slice is a nice golden colour and the centre of the slice doesn’t wobble.

Allow the slice to cool in it’s tin for a few minutes, then remove from the tin and place on a wire rack to cool completely. 

Once cooled make the icing by mixing the icing mixture/sugar together with the lemon juice, and using a spoon drizzle evenly over the slice. Before the icing dries, decorate with some festive sprinkles, sticking them where the icing is (optional). 

Once the icing has had a little time to set, cut the slice in to about 15 pieces.

Serves 15, store in an airtight container, will keep for about 5 days. 

Christmas Fruit Slice with Festive Sprinkles
White and Gold Gingerbread Man Plate
In Holidays, Cakes & Slices Tags Dried Fruit, Christmas, Easy Baking, Mixer Free Recipes, Holiday Baking
Comment
  • The Blog
  • Older
  • Newer

recipes

  • Biscuits/Cookies 39
  • Breads Etc. 9
  • Breakfast 7
  • Cakes & Slices 67
  • Confectionary 5
  • Drinks 6
  • Events 14
  • Food Photography Tips 3
  • From The Mailing List 24
  • Heirloom Recipes 12
  • Holidays 44
  • Ice Cream 9
  • Jams Preserves & Spreads 9
  • Muffins 4
  • Off the Shelf 48
  • Other Desserts 25
  • Savoury Dishes/Meals 15
  • Scones 4
  • Tarts & Pastry 9
  • Travel 13

Sign up to Friday Food Chat with Kath, a weekly newsletter for more food, baking, cookbook chat and more!

Sign Up Here!
instagram-unauth pinterest facebook url

Website Accessibility: To enable text to speech function on the blog, click the sound button to the right of each blog post.

All images & content are the property of Kathryn Vincent, unless stated otherwise. Please do not use without permission.

Kulinary Adventures of Kath

Food Photography, Recipes & Baking

instagram-unauth pinterest facebook url