Kulinary Adventures of Kath

Food Photography, Recipes & Baking
  • home
  • About
  • Work with Kath
  • Shop
  • Blog
    • The Blog
    • Recipe Archive
  • Newsletter
  • Contact
  • home
  • About
  • Work with Kath
  • Shop
    • The Blog
    • Recipe Archive
  • Newsletter
  • Contact
Raspberry Pistachio Rose Cake (23 of 25).jpg

The Blog

Recipes and Food Photography by Kath Vincent.

  • The Blog
  • Recipe Archive
  • All
  • Biscuits/Cookies
  • Breads Etc.
  • Breakfast
  • Cakes & Slices
  • Confectionary
  • Drinks
  • Events
  • Food Photography Tips
  • From The Mailing List
  • Heirloom Recipes
  • Holidays
  • Ice Cream
  • Jams Preserves & Spreads
  • Muffins
  • Off the Shelf
  • Other Desserts
  • Savoury Dishes/Meals
  • Scones
  • Tarts & Pastry
  • Travel
Homemade Rocky Road Easter Eggs

Rose Rocky Road Easter Eggs

Kath April 8, 2020

The idea for this recipe came to me quite late in the piece. With only two weeks to go until Easter at the time I knew I would be lucky to get everything I needed in time. But with my ability to buy Easter treats severely limited this year, I felt I really needed to make something. And preferably something I would enjoy eating (which means no milk or dark chocolate!). 

I really liked the rocky road I made last year, and felt making it into a more Easter themed shape would be just perfect. I finally found some half Easter egg moulds online, they took ages to arrive hence why this post is only ready two days before Easter! 

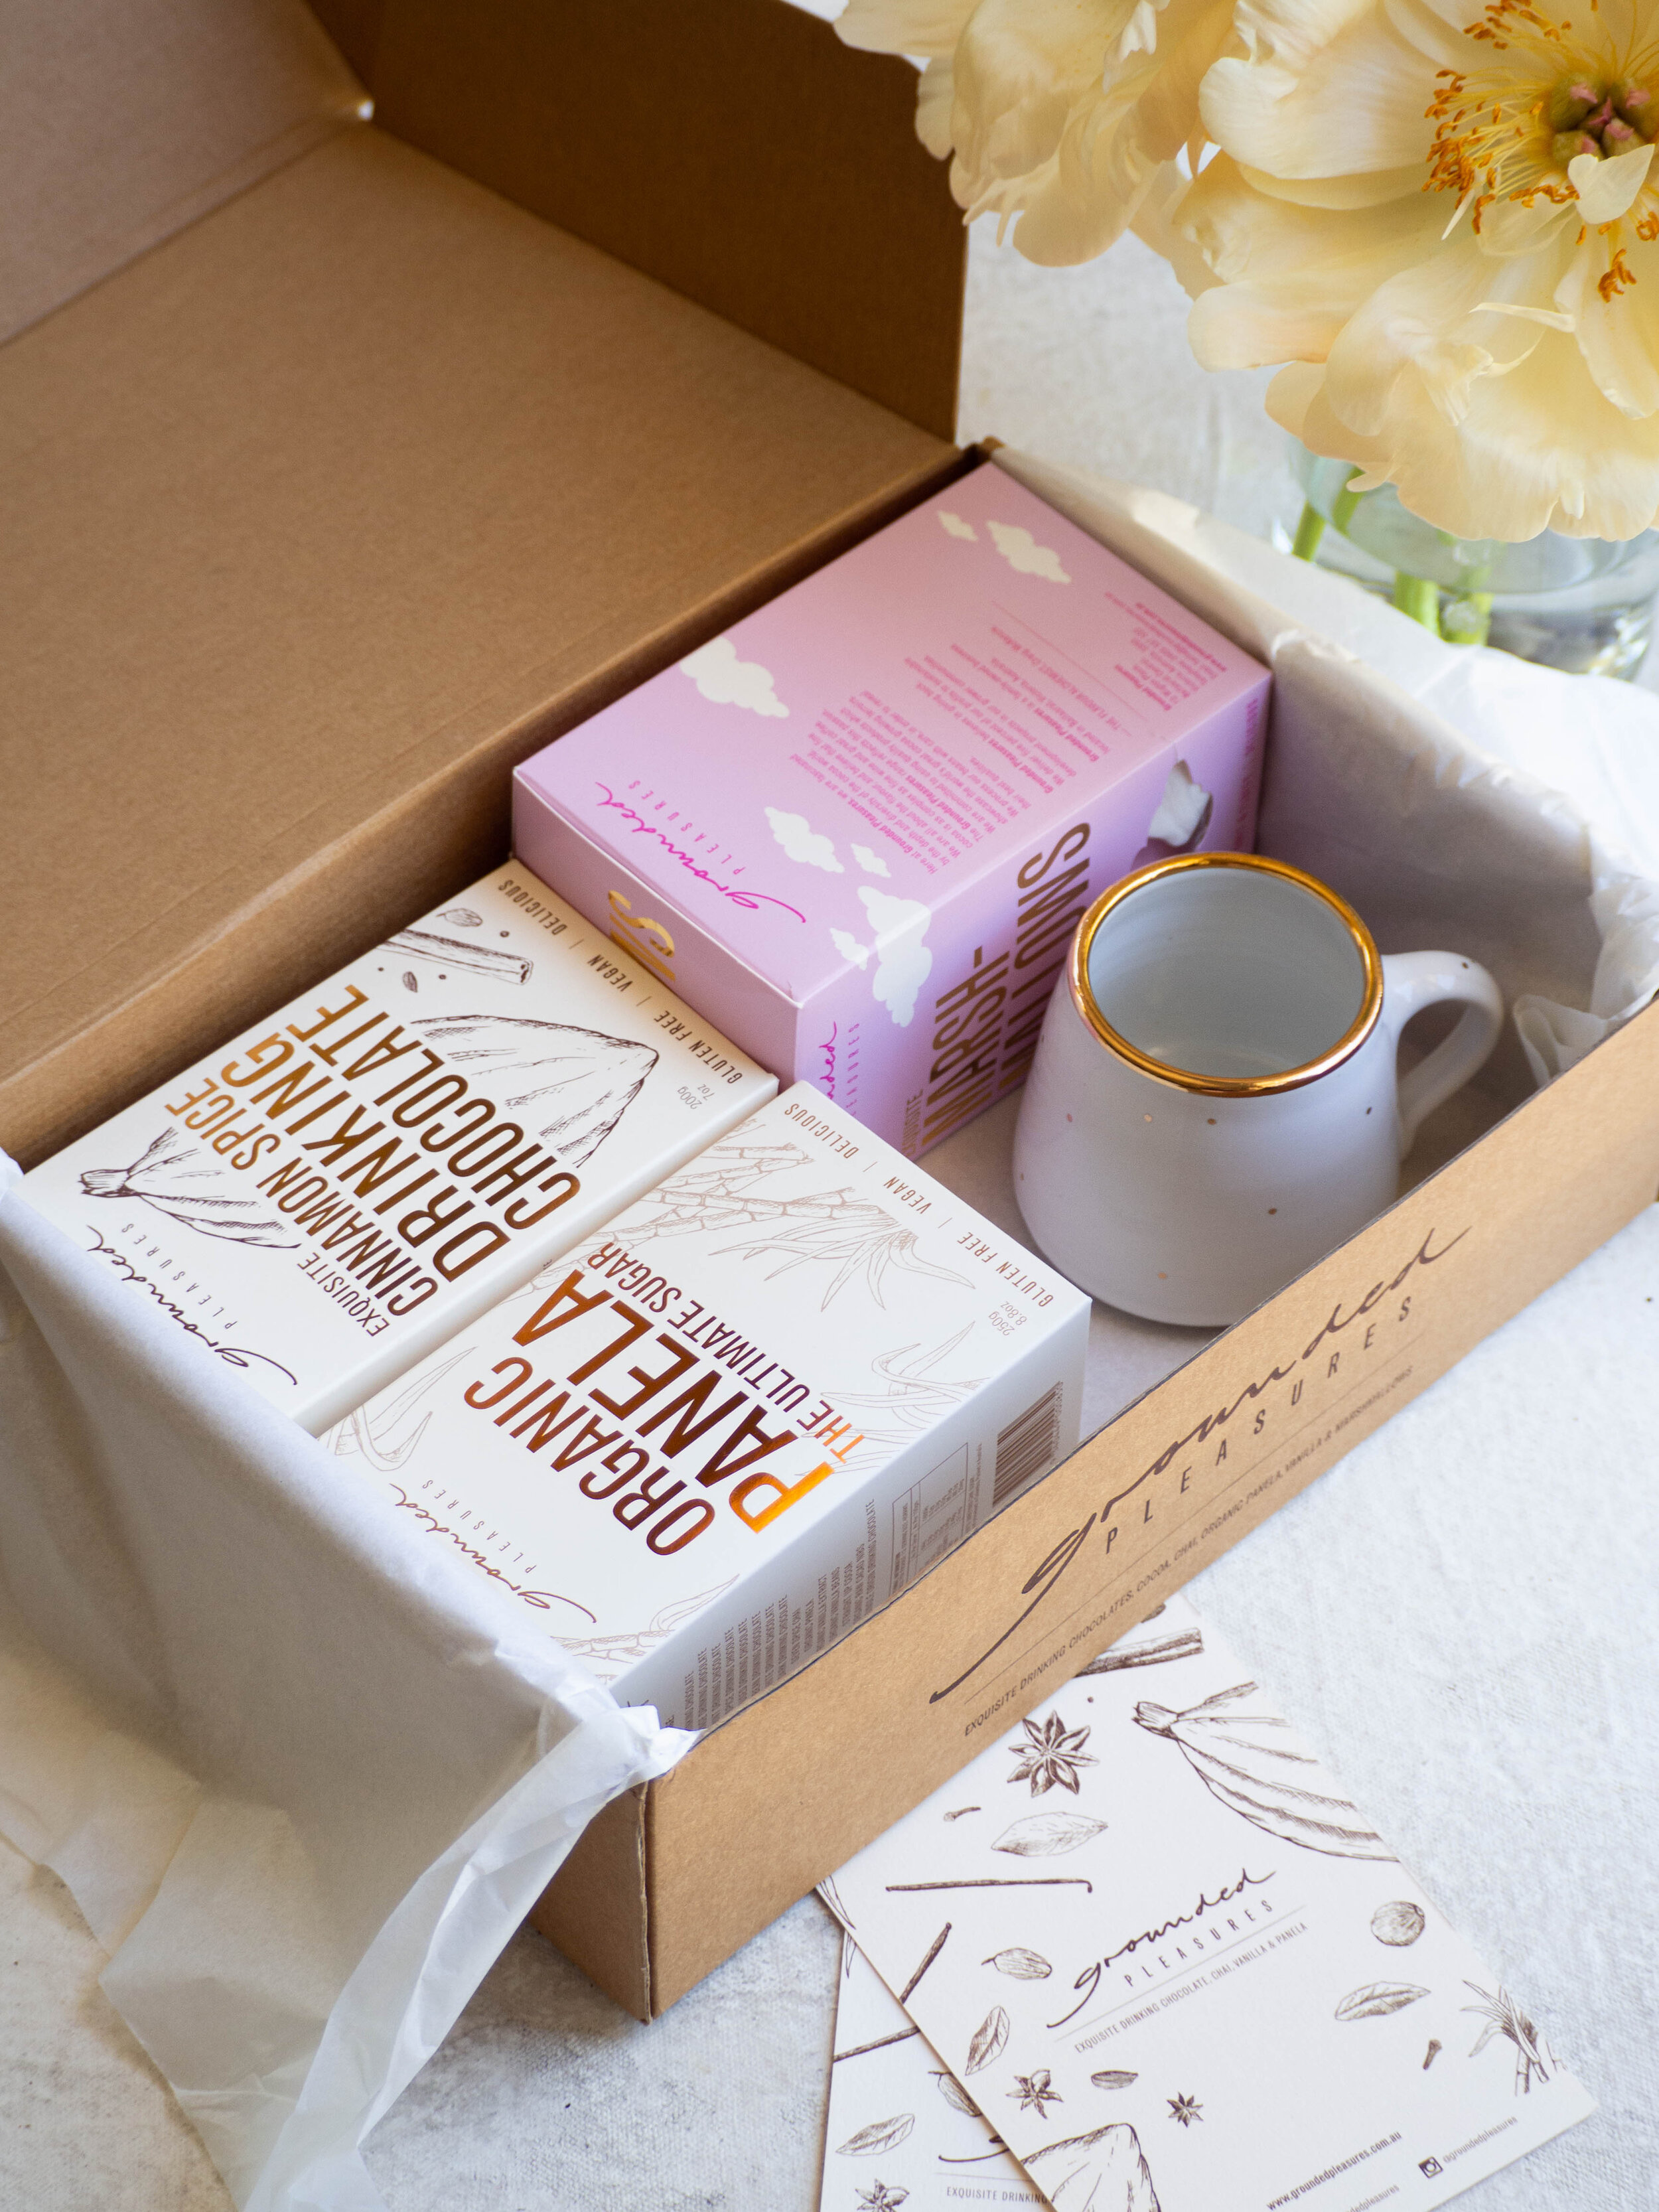
I also decided to buy marshmallows rather than make my own. I thought making marshmallows right now just felt a little wasteful in terms of ingredients and since one batch makes so many, and I couldn’t really share them as I usually would, I thought buying some would be best. My favourite bought marshmallows are from Grounded Pleasures, so I bought their massive 700g box which will also hopefully get us through a few Wintery isolation hot chocolates too! 

Grounded Pleasures Marshmallows

Grounded Pleasures Marshmallows

This recipe is mostly an assembly job, and an even easier version of my Rose Rocky Road I posted last year. You can of course use other types of chocolate, and other moulds or cake tins to shape your rocky road. I made a Rocky Road Wreath for Grounded Pleasures at Christmas last year, so there is another idea for how to shape your rocky road.  

I prefer to use good quality chocolate, which is why the recipe is long as it needs to be properly tempered. You can use baking chocolate, just follow the instructions on the packet to melt and you shouldn’t need to temper as below. 

Tempering chocolate can be tricky, and I would definitely recommend a chocolate thermometer if using good quality chocolate. Don’t worry if it doesn’t turn out perfectly, if your chocolate blooms (if using milk or dark chocolate) it will still taste great and if it has trouble setting just store it in the fridge. I am definitely no expert when it comes to properly tempering chocolate, but it always tastes good regardless! Plus there are plenty of resources available online if you want to know more.

I hope everyone has a clam and quiet Easter/long weekend. Let me know in the comments if you have a go at making some rocky road or what other baking adventures you have been up too. 

Rocky Road Ingredients
Rocky Road Easter Basket

Rose Rocky Road Easter Eggs

Ingredients: 

500g good quality white chocolate

pink colouring (suitable for use with chocolate)

rose flavouring (suitable for use with chocolate)

30g slivered almonds, roasted

160-170g marshmallows

dried edible flowers, for decoration (optional)

1 tsp freeze dried raspberry, for decoration (optional)

cooking spray

Method: 

Very lightly spray 6 medium half Easter eggs moulds (approx. 120ml capacity) with the cooking spray. Arrange the moulds on a tray with sides so the moulds aren’t about to move about too much. 

Have all the rocky road elements ready to go next to your prepared moulds.  

Place a small pot with a little water on the stove and allow to very gently simmer. Using another pot or bowl that will comfortably sit over the top of the water pot, measure out 300g of the white chocolate. 

Place this pot over the gently simmering water (ensuring the water does not touch the base of the pot above) and melt the chocolate. Ensure the chocolate is constantly stirred. Once the chocolate reaches 45 degrees Celsius on chocolate thermometer, remove from the heat and continue stirring while gradually adding the remaining 200g of white chocolate. Add a little at a time and allow to melt before adding more. 

Continue to check the temperature of the chocolate, once it has fallen to 34 degrees Celsius, the remaining chocolate should have all been added. Continue stirring to allow the chocolate to cool further to 32 degrees Celsius. Sometimes I find not all my chocolate has melted at this point, it can depend on the room temperature and the temperature of the chocolate to start with. I place my chocolate back over the warm water in the pot I used previously, and turn the heat on to very low. I keep stirring the chocolate and check that the temperature doesn’t rise about 34 degrees Celsius again. Once the chocolate has almost completely melted, remove from the heat again and continue to stir and allow the chocolate to return to 32 degrees Celsius. 

Add a little pink colouring at this point, and a few drops of the rose flavouring. Start small with both and add more if you think it’s necessary. 

Once the chocolate has reached 32 degrees Celsius, it is ready to use. 

Spoon in about a tablespoon of the melted chocolate into each mould. and spread it around so the inside of each mould. Place a few marshmallows into each mould (I found I could fit four marshmallows into each mould), and cover with more chocolate (try to distribute the chocolate evenly amongst each mould). I didn’t fill each mould to the brim, leave a gap at the top as this will help you remove the chocolate later. Tap each mould onto the bench gently to encourage the chocolate to evenly distribute and remove any air bubbles. 

Sprinkle some almonds over the top of each, and follow with the dried petals and freeze dried raspberries if using. 

Leave to set at room temperature if you are in a cool environment, otherwise place in the fridge for about 30 minutes to set. 

Once set remove from the moulds and store in an airtight container.

I prefer to keep the rocky road in the fridge. Keeps for about 2-3 weeks. 

Makes 6 medium half Easter eggs. 

Homemade Rocky Road Easter Eggs

Reference: ‘Bourke Street Bakery All Things Sweet’ by Paul Allam and David McGuinness (Murdoch Books, 2017), pp.104-105 + 119.

Rose Flavoured Chocolate Rocky Road
In Confectionary, Holidays Tags Rose, Rocky Road, Grounded Pleasures, Easter, Chocolate, Rose Chocolate, Holiday Baking
Comment
Challah Hot Cross Buns

Vanilla Scented Challah Hot Cross Buns

Kath March 28, 2020

Yes, I know what you are thinking. Again with the challah? I made a babka with challah dough not that long ago, and as I said then, I believe challah is the best type of bread so it could only ever improve a recipe. 

I am also aware that this recipe is in no way ‘kosher’. Challah is a Jewish bread most commonly eaten at Friday night Shabbat, and hot cross buns are made to celebrate the Christian holiday of Easter. I am also quite aware that the Jewish holiday of Passover often falls at the same time as Easter (as it does this year), and that leavened foods such as challah are not eaten during this time. So, definitely not ‘kosher’. 

Despite this, I maintain that challah is the best kind of bread, so trying to make hot cross buns with it was always going to happen for me. And if the religious contradictions are just too much, call them (challah) spiced fruit buns (great for any time of year) and leave it at that.

I often find when making hot cross buns, that I can never get them to look identical, and that using the same recipe doesn’t always yield a batch that looks the same as last time. I have found this occurs for a few reasons. Firstly, I never weigh the dough so I never get my individual buns exactly the same weight/size. I may try this next time I make them (which should be soon since we are socially isolating right not and not going to the shops to specifically buy hot cross buns so homemade is it for now!), and if I do I will update the recipe below. 

Secondly, I find it depends how my dough proofs. When making bread dough in warmer conditions I don’t have any issues with my dough rising. Now the weather has cooled down a bit, I am finding my bread doughs are not rising the same amount in the same time frame. To combat this, the last time I made these, I proofed the dough in our plate warming drawer under our oven, at 30 degrees Celsius (which is it’s lowest temperature) leaving the drawer open as the ideal temperature for proofing dough is about 25-28 degrees Celsius. 

First Attempt
First Attempt
Second Attempt
Second Attempt

This batch of challah hot cross buns turned out larger than the previous batch, which had been proofed closer to room temperature. This first batch were smaller, and had cracks in the dough on the top, which I later found out was a sign that a dough is under proofed. For some more tips on proofing bread dough check out this blog post from BakeClub I found quite helpful. 

Thirdly, I always do the final proof and bake of my hot cross buns on a flat baking tray. This means the dough can spread in away way it wants. Using a baking tray with sides may help get a more even look to my hot cross buns as the dough will not be able to rise and spread in any which way. Again, if I try it this way next time I will update the recipe below. 

On a final note, you don’t have to soak the sultanas in anything but I prefer them to be a little plumped up. The addition of the vanilla when soaking the sultanas is lovely, and the more fragrant the vanilla extract you use the better - I have found using the vanilla extract from Grounded Pleasures yields the best flavour. Just make sure the sultanas are well drained before adding to the dough. And for reference the quantity of spices I use for the dough adds up to approximately 12-13g, so if you wish to alter the quantities of individual spices or types of spices just keep it to that total weight (or add in more plain flour to make up the difference). 

Challah Hot Cross Buns

Vanilla Scented Challah Hot Cross Buns

Ingredients for the Dough: 

200g golden sultanas or raisins (cut in half if very large)

2 tbsp vanilla extract

2 tbsp hot water

490g plain flour, plus extra

250ml warm water

9g dried yeast

85g golden caster sugar

3/4 tsp salt

1 egg, beaten

63ml canola or vegetable oil, plus extra

1 tsp vanilla bean paste

2 tsp ground cinnamon

1 tsp ground ginger

1 tsp ground cardamom

1/2 tsp ground nutmeg

1/2 tsp mixed spice

Ingredients for the Glaze: 

100ml water

50g caster sugar

50g vanilla sugar (see here for how to make your own vanilla sugar)

Ingredients for the Cross (if using): 

90g plain flour

8g icing sugar (confectioners)

pinch of salt

15ml canola or vegetable oil

75ml water (room temperature/tepid is best)

Method:

Place the sultanas in a small bowl, and cover with the hot water and vanilla. Set aside. 

Place the flour into a large bowl (one that fits your stand mixer if you have one). Make a well in the centre of the flour, then pour in the warm water. Add the yeast and 60g of the golden caster sugar and stir (don’t mix in the flour at this stage). Leave for 10-15 minutes, or until the yeast has become foamy. 

Then add the salt and remaining sugar, stir again (don’t mix in the flour at this stage), and wait 5-10 minutes for the yeast to become foamy again. 

Once the yeast is foamy, add the egg, oil and vanilla to the yeast mixture and combine. Then start to gradually incorporate the flour into the wet mixture. Once everything is combined, attach your bowl to your stand mixer fitted with the dough hook, add the spices, and knead on a medium speed for about five minutes. The dough will be smooth and a little sticky once done. If the dough is too sticky, add a little more flour (1-2 tbsp). 

While the dough is kneading, lightly oil a large bowl and drain the raisins well. 

Dust your work surface with flour and tip the dough out. Add the raisins and knead by hand to combine into the dough. Add small amounts of flour if necessary to counterbalance any moisture the sultanas have added and to make the dough a bit less sticky. There is no need to knead the dough for too long, as your stand mixer has done most of the work already. 

Once the sultanas are incorporated into the dough, place into the oiled bowl and cover. Leave in a warm spot for about 1.5 hours, or until the dough has risen and doubled in size. 

While the dough is proofing, make the glaze. Place all ingredients into a small saucepan and place over medium/high heat. Bring to the boil, and allow to bubble for 30 seconds. Remove from the heat and set aside to cool. 

Line a baking tray with baking paper.

Once the dough has risen, flour your work surface and tip the dough out. Lightly flour the top of the dough if necessary. Cut the dough into 12 equal pieces - I do this by shaping the dough into a fat log shape, then cutting it in half, then dividing the two halves into six pieces each. 

Roll each piece of dough into a bun shape by folding the sides of each piece to the centre and pinch to close. This will now be the underside of your bun. Place the pinched side down, and cover your hand over the ball of dough like a loose claw. Rotate the ball of dough under your hand using the claw shape, to gently smooth the dough and form into a nice ball shape.

Place each ball of dough on the prepared tray, in a 4 x 3 formation. I usually leave a little space in between each to allow for more rising during the final proof and during baking. 

Cover the dough again and leave in a warm spot for about 30 minutes, or until the dough has risen. 

While the dough is rising, preheat oven to 180 degrees Celsius.

If using, make the cross paste by whisking together all the ingredients in a medium bowl until it is a smooth yet paste like consistency. The warmer the water is in this the runnier it will be, I often use warm water rather than room temperature, which is why my crosses are thicker and fat as the paste is a little runnier.

Place a piping bag or zip lock bag inside a large glass and turn the edges of the bag over the outside of the glass. Fill the piping bag with the cross mixture, and twist the top to close (I like use a peg to seal the top a bit more). 

Once the dough has risen, cut a small amount of the piping bag tip off and pipe the cross over each bun. Do this by piping one long line over each row of buns, then finish it off doing the same in the other direction. 

Bake for 20-25 minutes, rotating the tray in the oven about half way to help the buns cook and brown more evenly. The buns will be ready when they are golden on top and sound hollow when tapped. 

Remove from the oven, and place the tray on a wire rack. Using a pastry brush, paint the tops of each hot cross bun with the glaze. You will not need all of the glaze - if you think you will make another batch soon, store it in a jar in the fridge and it can be used again (just bring it to room temperature before glazing).  

These challah hot cross buns are delicious served warm from the oven, or toasted under a grill the next day. They also freeze well, and I recommend you do so if they won’t all be eaten soon after baking. 

Recipe Notes (12/04/2020):

  • The next couple of times I made these I have weighed the dough and each bun needed to weigh between 97-100g. I found this did help make them look even more uniform. So I would definitely recommend weighing your dough after the first proofing and dividing that number by 12 to get exactly the weight of each bun based on your dough at the time.

  • I have found that one batch of the sugar syrup is enough for 4 separate batches of hot cross buns.

  • The amount of mixture you need for the cross seems very dependent on how big or small you cut into your piping bag. Sometimes I feel a barely have enough for all the buns as I have cut a larger slit into the bag, other times there are leftovers as I have cut a much smaller slit!

Vanilla Hot Cross Buns

References: ‘Monday Morning Cooking Club - The Food, The Stories, The Sisterhood’ by Merelyn Frank Chalmers, Natanya Eskin, Lauren Fink, Lisa Goldberg, Paula Horwitz and Jacqui Israel (HarperCollins, 2013), p.263; ‘Beatrix Bakes’ by Natalie Paull (Hardie Grant Books, 2020), pp.176 & 192-3.

Vanilla Hot Cross Buns
In Breads Etc., Holidays Tags Hot Cross Buns, challah, Passover, Vanilla, Easter, Breads, Holiday Baking
2 Comments
Passover Charoset Bliss Balls

Passover Charoset Inspired Fig Date and Pistachio Balls

Kath March 17, 2020

I find exploring other cultures through food an endlessly fascinating experience. And mostly, it can be done at home. Through cookbooks, blogs, social media and having a few ingredients at home. 

As I mentioned in a previous post, I received Leah Koenig’s book ‘The Jewish Cookbook’ for Christmas last year (the irony of that statement is still not lost on me I promise!), and it has remained one of the books I have been reading through most since then.

Towards the back of the book, in the chapter ‘Condiments, Spices & Drinks, there are quite a number of recipes for charoset. Charoset is part of the Passover seder, it’s a mixture made of fruits with much symbolic meaning for that particular religious holiday. Like many recipes within the Jewish diaspora, the ingredients change depending on what part of the world the recipe and Jewish community live or have come from. There are six different recipes for charoset in Leah’s book, and she mentions there would be many other variations. 

All of the recipes use fruit, often dried fruit with some fresh apple, some spices and some sweet red wine. Some charoset is chopped, some pureed into a smoother paste and others rolled into balls. This got me thinking - taking a bit of inspiration from each of these recipes, I could make some really nice dried fruit and nut balls. Not like those weird protein (or ‘bliss’) balls, but something really tasty made with great quality dried fruits, and spices like those used in many of these recipes. 

The Kurdish Charoset recipe was rolled into balls, many of the recipes used dates and the Yemenite Charset recipe used dried figs and a great selection of spices (including ground coriander which I never would have thought of using otherwise). I was starting to create a version of my own, taking what I liked from all of these very diverse charoset recipes. I used slivered almonds as the nut inside the balls, as we always seem to have a good supply of them, and the pistachios on the outside just look so good. I substituted vanilla extract for sweet red wine, but if you are making these for Passover, you can still use the wine instead.

Often the best recipes are heavily influenced by the work of others and the foods of other cultures (and what you have in your pantry!). So these are my Passover Charoset Inspired Fig Date and Pistachio balls, that could equally be just Fig Date and Pistachio Balls ready for a nice healthy snack. 

Fig and Date Bliss Balls

Passover Charoset Inspired Fig Date and Pistachio Balls

Ingredients: 

200g black and white dried figs

110g pitted medjool dates

50g golden sultanas

50g slivered almonds, lightly toasted

1 tsp vanilla extract

1/2 tsp ground ginger

1/2 tsp ground cinnamon

1/2 tsp ground coriander

1/2 tsp ground cardamom 

25g blanched or raw pistachios, finely chopped

Method: 

Add all the ingredients, except the pistachios, to the bowl of a food processor. Blitz until all the ingredients are combined and it clumps together. The mixture does not need to be smooth. Some of the almonds will remain in chunks. 

Roll into balls, then roll into the finely chopped pistachios to cover. Place on a tray and leave in the fridge for at least 30 minutes to firm up. The balls can then be stored in an airtight container in the fridge. 

Makes 18-20 balls. 

Passover Charoset Balls

Reference: ‘The Jewish Cookbook’ by Leah Koenig (Phaidon Press Limited, 2019), pp.406-409.

Charoset Balls for Passover
In Holidays, Other Desserts Tags Passover, Charoset, Dried Fruit, Bliss Balls, The Jewish Cookbook, Gluten Free, Dairy Free, Holiday Baking
Comment
Traditional Yeast Hamantaschen with Quince Lekvar

Traditional Yeast Hamantaschen with Quince Lekvar

Yeasted Hamantaschen with Quince Lekvar

Kath February 25, 2020

This year I was determined to make hamantaschen again, but this time with the more traditional yeasted dough. I loved my Pistachio Hamantaschen I made last year, but I really wanted to have a comparison with a more traditional hamantaschen. 

For those who have never heard of hamantaschen before, they are made to celebrate the Jewish holiday of Purim (see links at the end of this post to find out more). They are kind of like a cross between a biscuit and a pastry with a sweet tasty filling, and the triangular shape has great symbolism for the holiday. Check out my post from last year to find out a little more.

I tried to stay as traditional as I could with this, but me being me, and not being bound by any Purim traditions of my own, I altered a prune filling (or Lekvar) recipe to include dried quince and dried pears. Mostly because quince is my third favourite flavour (coming in close after rose and pistachio which alternate between spots one and two), and I have access to amazing dried quince from Singing Magpie Produce, which I knew would taste amazing cooked into a lekvar. 

I heavily leaned on Leah Koenig’s new book ‘The Jewish Cookbook’ to produce this hamantaschen recipe. Leah’s book is my new ultimate resource on Jewish cooking, spanning all diasporas and nationalities and all types of meals and holidays. If you just want one book to show you the ways of Jewish cooking and baking, this is it. I (somewhat ironically I admit) received this book as a gift for Christmas, and it has maintained its spot as my most looked at cookbook since then. 

View fullsize Folding Hamantaschen
Folding Hamantaschen
View fullsize The Jewish Cookbook by Leah Koenig
The Jewish Cookbook by Leah Koenig

I was delighted to find a yeasted hamantaschen dough in Leah’s book, as I had already decided I wanted to try this type of dough for my next hamantaschen attempt! And out of the many cookbooks I own, it is the only one to contain such a recipe. Leah also provides many hamantaschen filling options, and I was particularly intrigued by the fruit lekvar traditional to Central and Eastern Europe. Lekvar is a thick jammy paste made using dried fruits and juice. I adapted Leah’s Prune Lekvar recipe to create my Quince Lekvar, but you could stick to prunes if you can’t find any dried quince. If you can get your hands on fresh quince, a quince butter would also make a great substitute for the lekvar (see my Cosy Winter Bakes eBook for a Quince Butter recipe). 

A yeasted hamantaschen definitely takes a bit more time and effort than a more shortbread pastry hamantaschen (see my recipe last year for a good one), but it is worth the effort. I found my first dough attempt didn’t work, I think because I am baking in a more humid climate and my dough just became unbelievably sticky and wet and barely rose at all. I have slightly altered the quantities of flour in the recipe, and continue to generously add more flour as I knead the dough. This is quite an intuitive recipe (which is why I suggest kneading by hand rather than using a stand mixer), and depending on your climate, you may not need nearly as much flour as I did. For reference the original recipe says to start with 350g, and up to 70g more if needed. On my second attempt I added that total amount (420g), then I added more when I was kneading and my dough worked out much better. 

Quince Lekvar (or thick jam)

Quince Lekvar (or thick jam)

Quince Lekvar

Ingredients:

200g dried quince

100g dried pears (or dried apple)

120ml cloudy apple juice 

175ml water

4 tbsp panela sugar

1 tbsp honey

1/2 tsp ground cinnamon

1/2 tsp ground cardamom

1 tsp vanilla extract

Method: 

Place the quince, pears, apple juice, water and panela sugar in a small saucepan. Over low-medium heat bring to a gentle boil, then reduce the heat to low and cover the saucepan with its lid. Cook the fruit, stirring every now and then, for about 25-35 minutes or until the fruit has softened and most of the liquid has been absorbed. 

Take the pan off the heat, and puree the fruit with a stick blender. Stir in the honey, cinnamon, cardamon and vanilla then allow to cool completely before storing covered or in an airtight container in the fridge. 

Makes approx. 580g.

Yeasted Hamantaschen with Quince

Yeasted Hamantaschen

Ingredients: 

7g dried yeast

150g + 1 tsp caster sugar 

120ml warm water

420g plain flour, plus extra

pinch of salt

60ml canola oil, plus extra

3 eggs

1 tsp vanilla extract 

360g (approx.) Quince Lekvar

Method: 

In a large bowl stir together the yeast, warm water and the 1tsp caster sugar. Leave for 5-10 minutes until it has become frothy.

In a smaller bowl, whisk together the remaining 150g caster sugar, flour and salt.

Add two of the eggs, oil and vanilla extract to the activated yeast and whisk to combine.

Add the flour, and mix. 

Generously dust your work surface with more flour, and tip the dough out. Dust the dough with flour, and begin to knead. This dough can be quite sticky, so continue to knead and add flour until the dough becomes more manageable and elastic. Knead for about 10 minutes, the dough will still be a little sticky, but once it becomes smoother and more elastic it will be ready to prove. 

Lightly oil a large bowl with a little more of the canola oil, and place the dough in. Cover with cling film and leave in a warm spot for 1.5-2 hours or until the dough has doubled in size. This dough won’t rise as dramatically as a traditional bread dough, but if the size has at least doubled during the proofing time, then it will be ready for the next step. 

Once the dough as proofed, line two to three trays with baking paper, and preheat oven to 180 degrees/170 degrees Celsius fan. 

Lightly dust your work surface with more flour, and roll out half the dough (leave the other half covered in the bowl). Using a 7-8cm round cutter, cut out rounds of the dough and place in the prepared trays. Keep the scraps of dough and place to the side for now. Roll out the remaining dough and cut out with the cutter. Re-roll all the scraps, and cut out as before. The dough will become harder to work with now as it is becoming overworked. Discard any remaining scraps now, especially if you have cut out close to 30 rounds, and your trays are filled. 

Place a teaspoon of the quince lekvar in the centre of each round. Shape the rounds of dough into the characteristic triangle shape by pinching one side into a corner, then folding the other side up to form two more corners. Ensure the corners are well sealed and stuck together. If you need some more tips on how to fold hamantashen take a look at this graphic made by The Nosher.

Loosely place some cling over the trays and leave to rest for 30 minutes.

Crack the remaining egg into a glass and beat with a fork. Brush the tops of the hamantaschen with the egg, then place in the oven for about 18 minutes to cook. Rotate the trays in the oven about half way through to ensure the hamantaschen cook more evenly. The hamantaschen will be ready when they have puffed up a little and are golden. 

These are best eaten the day they are made, but will keep in an airtight container for a few days.

Makes about 30 hamantaschen.

Yeasted Hamantaschen

Reference: ‘The Jewish Cookbook’ by Leah Koenig (Phaidon Press Limited, 2019), pp.342 & 410. For more info on yeasted hamantaschen check out this post on the blog Poppy & Prune and this recipe on kosher.com. 

Quince Hamantaschen
In Holidays, Tarts & Pastry, Jams Preserves & Spreads Tags Purim, Hamantaschen, Yeasted Hamantaschen, Quince, Quince Lekvar, Quince Jam, Dried Quince, The Jewish Cookbook, Leah Koenig, Jewish Baking, Holiday Baking
Comment
Christmas Gift Guide for Foodies

Christmas Gift Guide for Foodies 2019

Kath December 3, 2019

After putting one of these gift guides together last year, I thought I would make it a yearly thing where I seek out all the great food related gifts for the food lovers in your life (or for yourself!). 

This year I have also included some homemade (mostly edible) gift ideas too. I love gifting people food at this time of the year. It’s thoughtful and also can be a more cost effective gift option if you have many people to buy for.

Merry Christmas!

NB: If buying online from these great small businesses, please note their Christmas delivery cut off dates so you aren’t disappointed. 

BOOKS

Just Desserts by Charlotte Ree
Screen Shot 2019-11-19 at 4.40.31 pm.png
Christmas Gift Guide 2019 (10 of 34).jpg
Christmas Gift Guide 2019 (9 of 34).jpg
Christmas Gift Guide 2019 (11 of 34).jpg
Screen Shot 2019-11-19 at 4.40.11 pm.png
  1. Just Desserts by Charlotte Ree, $21.35 - This newly released title is super fun and colourful and contains the perfect baking recipes for those who are new to the game. 

  2. Bake Australia Great by Katherine Sabbath, $29.95 - This book looks like it is full of fun and amazingly creative recipes. Possibly the replacement for the 1980s Women’s Weekly Birthday Cake book we all looked at as kid - but even more fun!

  3. Taverna by Georgina Hayden, $40.75 - This is one of my favourite releases of 2019. Georgina takes the reader through her Greek Cypriot family history through food. The recipes are delicious and it’s a book you will come back to again and again. 

  4. Farmer Cookbook, $29.95 - I recommended this book last year when it was still on a fundraising platform, but now the book is available from most bookstores. It is filled with great recipes from such a variety of people, and is still raising money for farmers in need. 

  5. Blushing Confetti x Nectar and Stone Dessert Journal, $39.95 - For those who love pretty things and the written word. The cloth bound notebook is a super sweet addition to any bakers collection, which over time can be filled with all your own recipes. 

  6. Fortnum & Mason: Christmas and Other Winter Feasts, $63.75 - This one has been on my list for quite a while. I love Fortnum and Mason, and there is something about an English Christmas that just seems so appealing. 

Christmas Gift Guide for Foodies

FOOD GIFTS

Christmas Gift Guide 2019 (29 of 34).jpg
Screen Shot 2019-11-19 at 4.55.20 pm.png
IMG_6426.jpeg
Christmas Gift Guide 2019 (19 of 34).jpg
Christmas Gift Guide 2019 (14 of 34).jpg
Christmas Gift Guide 2019 (21 of 34).jpg
  1. Grounded Pleasures Christmas Gift Box, $69 - These boxes are the sweetest gift. There are four to choose from, all with a handmade mug from a local Ballarat ceramicist. I bought the Dreaming of a White Christmas one as a gift to myself, and I am absolutely loving it.

  2. Sprinkle Spices Sweet Gift Hamper, $99 - This would make a great present for that person (or family) in your life with a sweet tooth. Filled with three of the best sweet spices from Sprinkle, plus a few other goodies (including a couple of things from Grounded Pleasures), this hamper is sure to please. 

  3. Flour and Stone Gingerbread Trees Gift Box, $35 - For those that love baked goods but hate being in the kitchen! These gingerbread are the best you can buy in Sydney, and are always perfectly decorated. 

  4. Gewurzhaus Christmas Advent Tea, $18 - I love a good festive tea, and particularly those like this one, that are great made warm or cold. This tea has a warming Christmas flavour, and is a very festive red colour once brewed.

  5. Hey Tiger Oh Crumbs! Chocolate Bar, $15 - This chocolate bar is the bomb. Caramelised white chocolate (my all time fave), with gingerbread crumbs. As Hey Tiger say, is it even the holidays without gingerbread? No, is definitely the answer to that one for me. 

  6. Frank Green Reusable Cup (Regular Size), $34.95 - This the gift that keeps on giving. I have been using mine for about a year now and I love it as much as I did when I first bought it. Dishwasher safe, and spill proof, these reusable cups are worth the small investment. They are also bright and fun, and I find having a colourful cup means the barista always remembers my order!

Grounded Pleasures Dreaming of a White Christmas Gift Box

Grounded Pleasures Dreaming of a White Christmas Gift Box

HOMEMADE GIFTS

Homemade Jam and Muesli

Homemade Jam and Muesli

If you have time, edible homemade gifts are super special and heartfelt. They can also be a more cost effective option which is great. Glass jars with a little ribbon and label or sticker are all you need to dress them up. Here are some ideas for what you could fill your jars with:

  1. Jam - see recipes for Strawberry Jam, Mixed Berry Jam and Peach & Passionfruit Jam.

  2. Muesli - see recipe for Honey Muesli here.

  3. Biscuits - shortbread, gingerbread, chewy macaroons, spiced Christmas Biscuits.

  4. Rocky Road - see Pink Rocky Road Recipe here and recipe for a Rocky Road Wreath I developed for Grounded Pleasures here.

  5. Marshmallows - see recipe for Blackberry Marshmallows here, Bergamot Marshmallows here, plus more marshmallow recipes in my Cosy Winter Bakes eBook.

  6. Nougat - see recipe for Rose and Pistachio Nougat in my Baking with Rose eBook.

In Holidays Tags Christmas Gift Guide for Foodies, Christmas
Comment
Gingerbread Trifle with Red Currant and Cranberry Jelly

Gingerbread Trifle with Red Currant and Cranberry Jelly

Christmas Gingerbread Trifle with Red Currant & Cranberry Jelly

Kath November 25, 2019

I had this idea for a Gingerbread Trifle at least a year ago, around Christmas. I didn’t have time to make it, but I was determined to try it the following year. 

So this year was the year to make trifle, and while I almost didn’t make it (it’s lovely, but yes a bit of effort is required), I am so glad I did. I am loving the distinct layers and being able to use some of the currants I had frozen from last Christmas (plus we’ve owned this gorgeous glass trifle dish for years and never used it, so I’m glad I’ve finally put it to good use!).

I’ve actually never made a trifle until now, to be honest I don’t really like traditional ones. I absolutely hate that the cake used is soaked in some kind of alcohol, to me that just ruins the whole thing.

So I have made this trifle alcohol free, and the gingerbread cake used really doesn’t need to be soaked in anything. You can of course add some alcohol if you wish.

I have used red currants for the jelly, and decoration. I love them and the tart flavour they add. They come into season just before Christmas here in Australia, and I always buy a couple of punnets and freeze some too. I have used my freezer stash of currants for this trifle, but raspberries could also be used for the jelly and decoration. I think pomegranate juice could also be used instead of cranberry in the jelly as well, and then decorated with pomegranate arils. 

It is best to start this recipe the day before. I made the jelly and cakes the day before, then just whipped the creams and assembled before serving the next day.

Try to use a glass trifle dish with straight sides like the one pictured. If not, use one that is also 4L capacity, and keep in mind that you may have to trim your cakes more to get them to fit. 

A note on the jelly: Making jelly with red currants using the below method will create a slightly cloudy jelly. This is what happens when currants are pushed through a sieve to create a puree, rather than leaving them to gradually drip through muslin overnight on their own. I couldn’t think of anything worse than this recipe taking a whole day more just to wait for 55g of red currants to slowly strain overnight, so I opted for a slightly cloudy jelly instead. And in all honesty, once the trifle is all assembled, I can barely notice the difference. 

Gingerbread Trifle with Red Currant and Cranberry Jelly

Red Currant & Cranberry Jelly 

Ingredients:

800ml water

350g caster sugar

16g gelatine sheets (I used titanium strength)

120ml cranberry juice

55g + 60g red currants (fresh or frozen)

Method: 

You will need a 4L capacity (22-23cm in diameter) trifle dish for this recipe.

In a large saucepan add the water and sugar. Place on the stove over high heat and stir until the sugar has dissolved. Bring to the boil, then reduce the heat and allow to simmer for 10 minutes. 

Place 55g of the red currants in a food processor and blitz until a puree forms. Strain the puree into the cranberry juice, discarding the seeds etc. 

After 10 minutes, remove the sugar syrup from the heat and set aside to cool a little. 

Place the gelatine sheets in a shallow bowl and cover with cold water. Leave to soak for 3 minutes, then remove from the water, squeezing out any excess water. 

Add to the sugar syrup, and whisk until the gelatine has dissolved. Then add the cranberry juice and red currant puree and whisk until combined. If the jelly has formed lots of foam from all that whisking, try to scoop as much of it off as possible. I find if it isn’t removed the jelly will set with most of this foam remaining on top. 

Pour about 750ml of the jelly into your trifle mould, and the remainder into a small plastic wrap lined container. 

Scatter in 60g red currants over the jelly in the trifle dish, then place both jellies into the fridge to set overnight. 

Makes about 1180ml jelly in total. 

Gingerbread Trifle with Red Currant and Cranberry Jelly

Gingerbread Cake 

Ingredients: 

375g unsalted butter, softened

300g brown sugar 

3 eggs

465g molasses 

345ml water

615g plain flour 

1.5 tsp baking powder

1.5 tsp bicarb soda

1.5 tsp ground ginger

1.5 tsp ground nutmeg

1 tsp ground all spice 

1 tsp ground cardamom 

canola oil spray, for greasing

Method: 

Grease and line two 22-23cm round cake tins (use round cake tins that are closest in diameter to your trifle dish). Preheat the oven to 160 degrees Celsius.

In a large bowl, whisk together the flour, spices and baking powder. Sift in the bicarb soda and whisk to combine.

In the bowl of a stand mixer, cream butter and brown sugar until light and fluffy using the paddle attachment. Beat in the eggs one at a time. Then beat in the water and molasses on a low speed (to avoid the water sloshing out of the mixing bowl!). 

Add the flour mixture and beat on a low speed until the flour begins to combine, then increase the speed a little and mix until combined (you can also do this by hand with a wooden spoon or spatula if you wish). 

Evenly divide the batter between the prepared tins, and bake for about 1 hour. The cakes probably won’t fit on the same oven shelf, so swap them over about half way through the cooking time to ensure they both cook evenly. The cakes will be ready when a skewer inserted in the centre of the cakes comes out clean. Cool for at least 20 minutes in their tins, before turning onto a cooling rack. 

Once the cakes are cooled, they can either be used immediately in the trifle if ready, or wrapped in plastic wrap and stored in an airtight container. 

Gingerbread Trifle with Red Currant and Cranberry Jelly

Christmas Gingerbread Trifle 

Ingredients: 

Red Currant & Cranberry Jelly, as above

Gingerbread Cake, as above

550ml pouring cream

1 tbsp pure maple syrup

1.5 tsp vanilla bean paste

red and white currants, to decorate (fresh or frozen)

Method: 

N.B. If you are making this on a fairly warm day, you may want to place the trifle back in the fridge in between some of the below steps to ensure all the layers keep their shape and remain cold. 

Just before serving, take one of the gingerbread cakes, and even out the top if necessary. Trim the sides to fit into the trifle dish if necessary. Place the layer of cake on top of the jelly layer. 

Whip 300ml of the cream with the maple syrup, and using a piping bag pipe a nice edge of the cream on the outer rim over the cake layer. Fill in the remaining layer with the cream, and smooth it out if necessary to ensure it is fairly even. 

Take the second gingerbread cake and even out the top if necessary. Trim the sides of the cake to to fit into the trifle dish if necessary. This cake layer should sit right up to the top edge of the trifle dish. Place the cake on top of the layer of maple cream.

Whip the remaining 250ml of cream with the vanilla, then using a piping bag (just cut a small opening at the bottom of the bag, you don’t need to use a piping tip if you don’t have one), decorate the top of the trifle. 

Remove the remaining jelly from its container, and cut into squares. Don’t worry if some of it breaks, I didn’t find I wanted to use all the jelly to decorate the top of the trifle anyway. Decorate the top of the trifle with some of the cut up jelly (any excess jelly can be placed back into the container and stored in the fridge, or added to each serve of trifle separately on each plate), and finish with some extra red and white currants. 

Serve immediately, and store any leftovers in the fridge.

Serves about 12.

Vintage embossed spoons from The Coastal Marketplace

Vintage embossed spoons from The Coastal Marketplace

Gingerbread Trifle with Red Currant and Cranberry Jelly
Unfortunately Trifle doesn’t look so great once served!

Unfortunately Trifle doesn’t look so great once served!

In Holidays, Other Desserts Tags Christmas, Gingerbread, Trifle, Gingerbread Trifle, Red Currants, Cranberry, Red Currant and Cranberry Jelly, Holiday Baking, Dessert
Comment
  • The Blog
  • Older
  • Newer

recipes

  • Biscuits/Cookies 39
  • Breads Etc. 9
  • Breakfast 7
  • Cakes & Slices 68
  • Confectionary 5
  • Drinks 6
  • Events 14
  • Food Photography Tips 3
  • From The Mailing List 24
  • Heirloom Recipes 12
  • Holidays 44
  • Ice Cream 9
  • Jams Preserves & Spreads 9
  • Muffins 4
  • Off the Shelf 49
  • Other Desserts 25
  • Savoury Dishes/Meals 15
  • Scones 4
  • Tarts & Pastry 9
  • Travel 13

Sign up to Friday Food Chat with Kath, a weekly newsletter for more food, baking, cookbook chat and more!

Sign Up Here!
instagram-unauth pinterest facebook url

Website Accessibility: To enable text to speech function on the blog, click the sound button to the right of each blog post.

All images & content are the property of Kathryn Vincent, unless stated otherwise. Please do not use without permission.

Kulinary Adventures of Kath

Food Photography, Recipes & Baking

instagram-unauth pinterest facebook url