Kulinary Adventures of Kath

Food Photography, Recipes & Baking
  • home
  • About
  • Work with Kath
  • Shop
  • Blog
    • The Blog
    • Recipe Archive
  • Newsletter
  • Contact
  • home
  • About
  • Work with Kath
  • Shop
    • The Blog
    • Recipe Archive
  • Newsletter
  • Contact
Raspberry Pistachio Rose Cake (23 of 25).jpg

The Blog

Recipes and Food Photography by Kath Vincent.

  • The Blog
  • Recipe Archive
  • All
  • Biscuits/Cookies
  • Breads Etc.
  • Breakfast
  • Cakes & Slices
  • Confectionary
  • Drinks
  • Events
  • Food Photography Tips
  • From The Mailing List
  • Heirloom Recipes
  • Holidays
  • Ice Cream
  • Jams Preserves & Spreads
  • Muffins
  • Off the Shelf
  • Other Desserts
  • Savoury Dishes/Meals
  • Scones
  • Tarts & Pastry
  • Travel

How to Bake with Panela Sugar - Plum & Panela Cake with Vanilla & Panela Ice Cream

Kath March 27, 2017

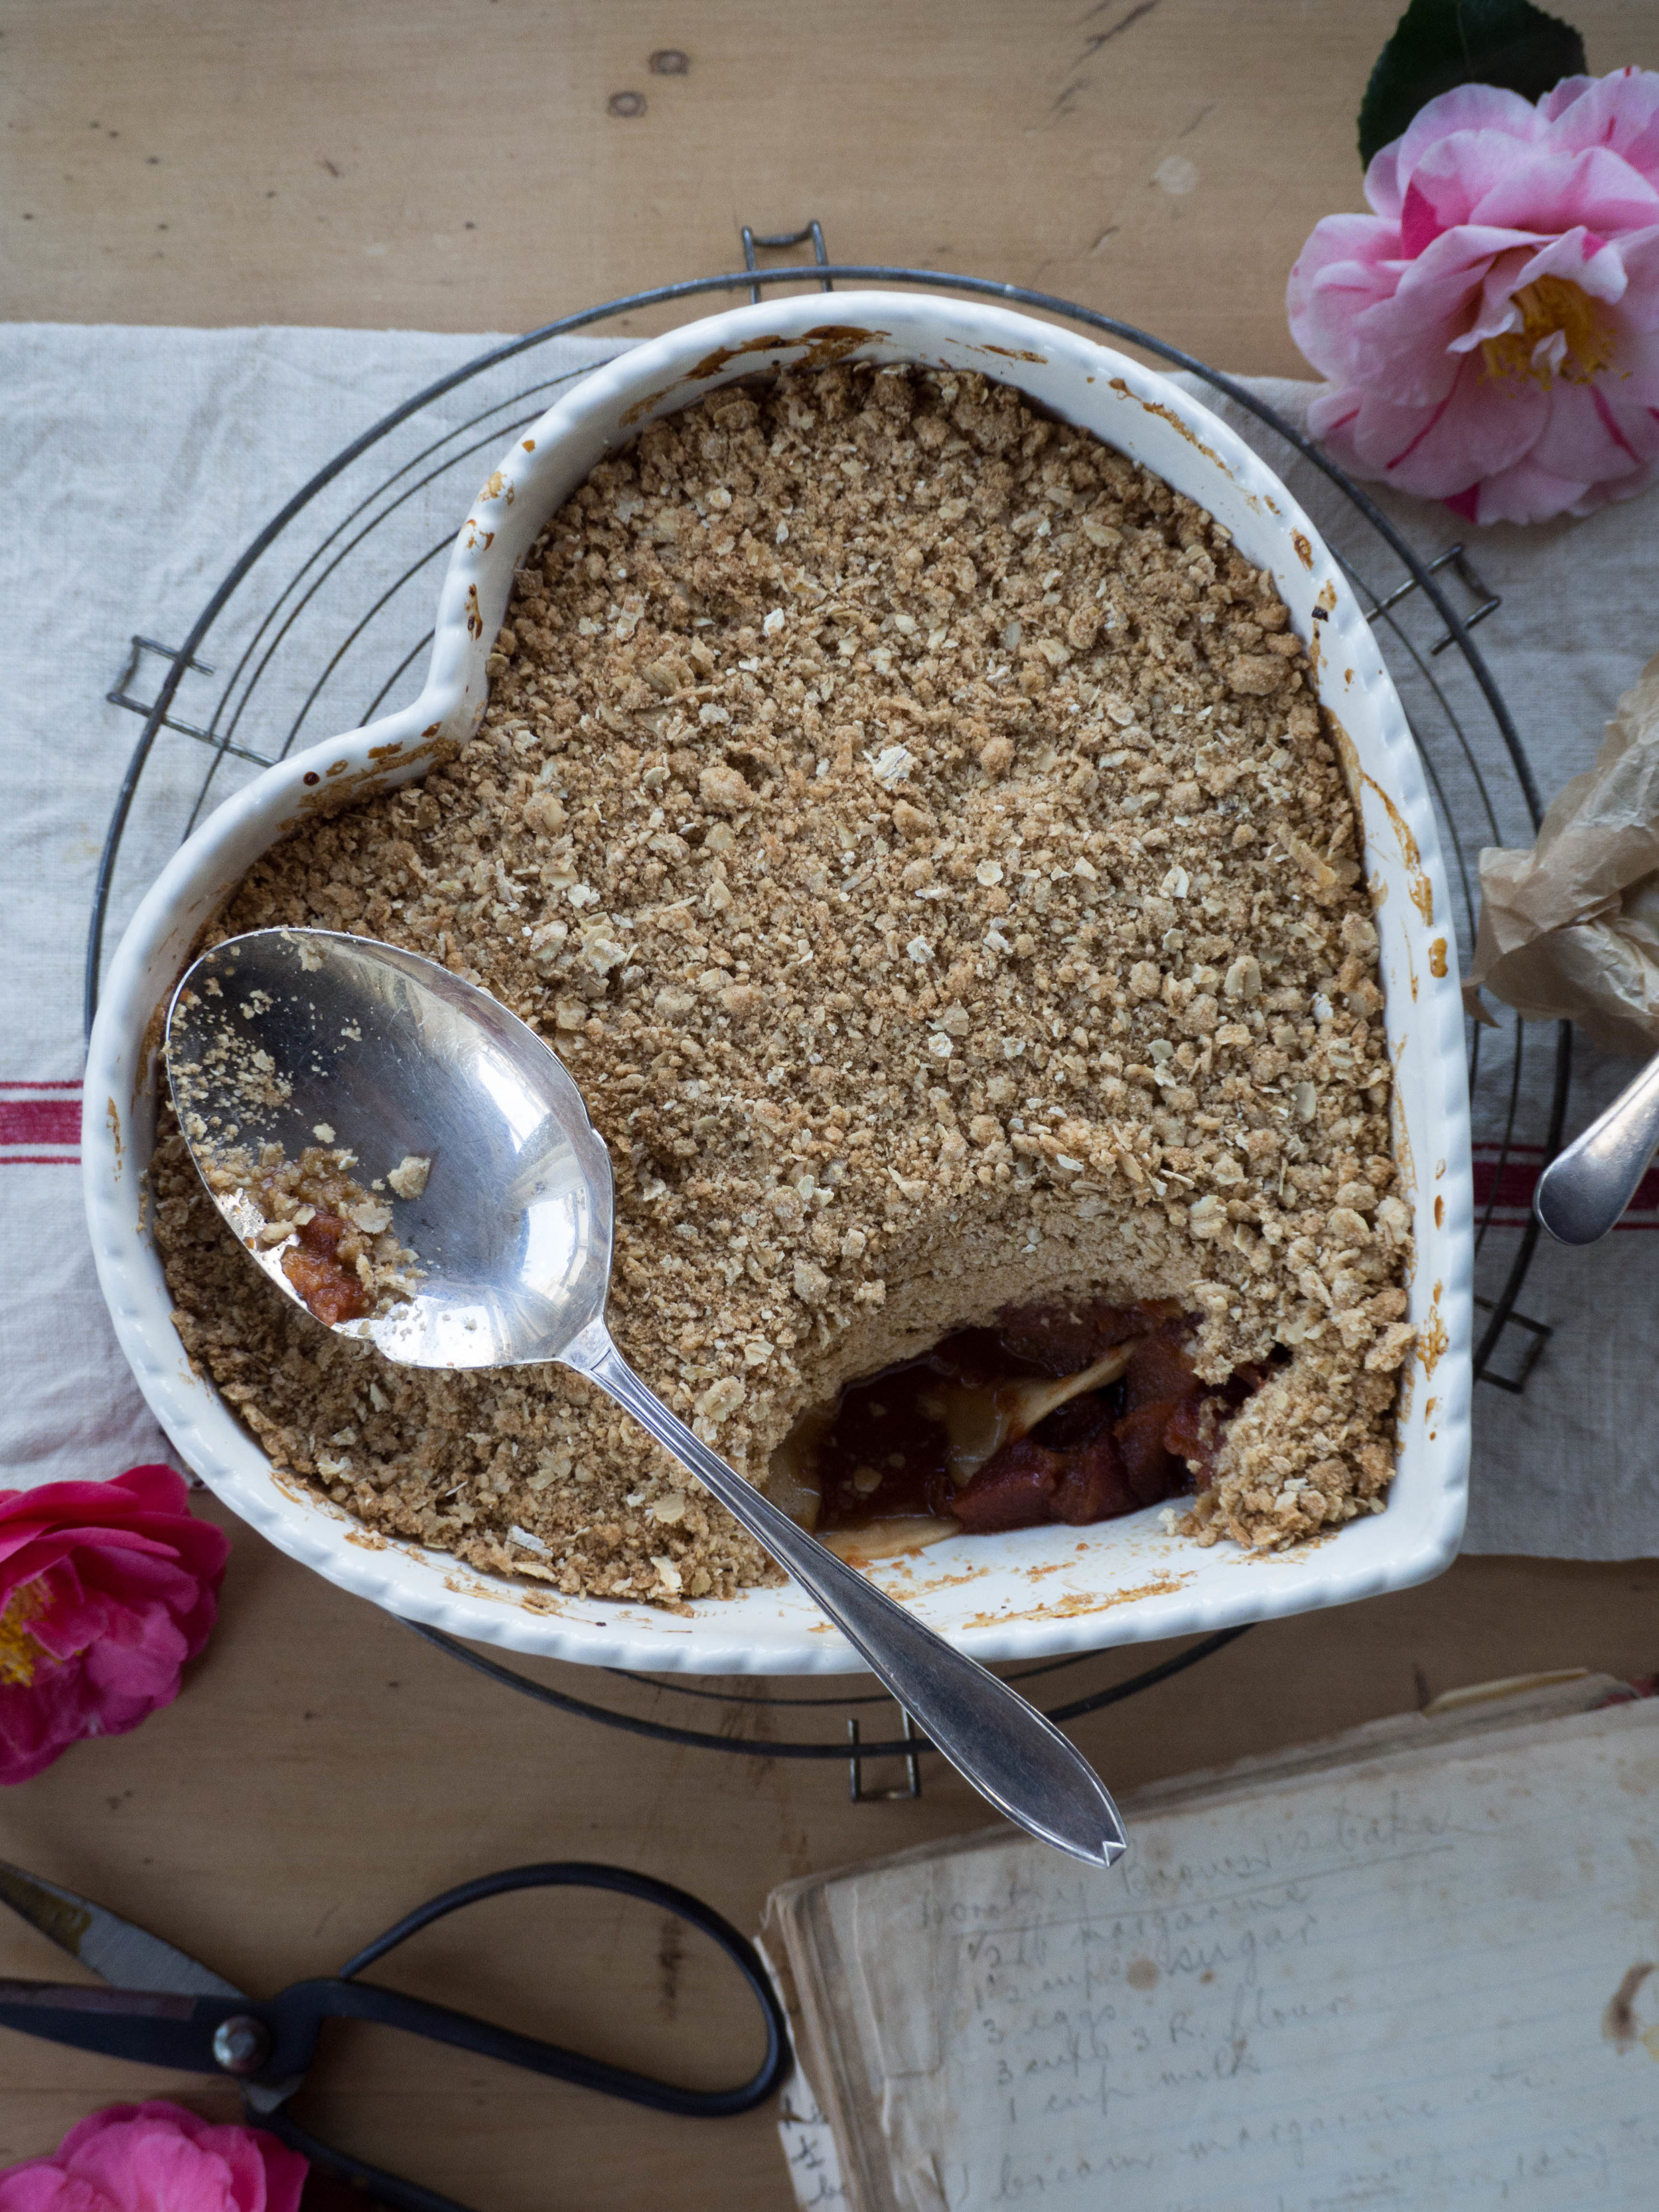
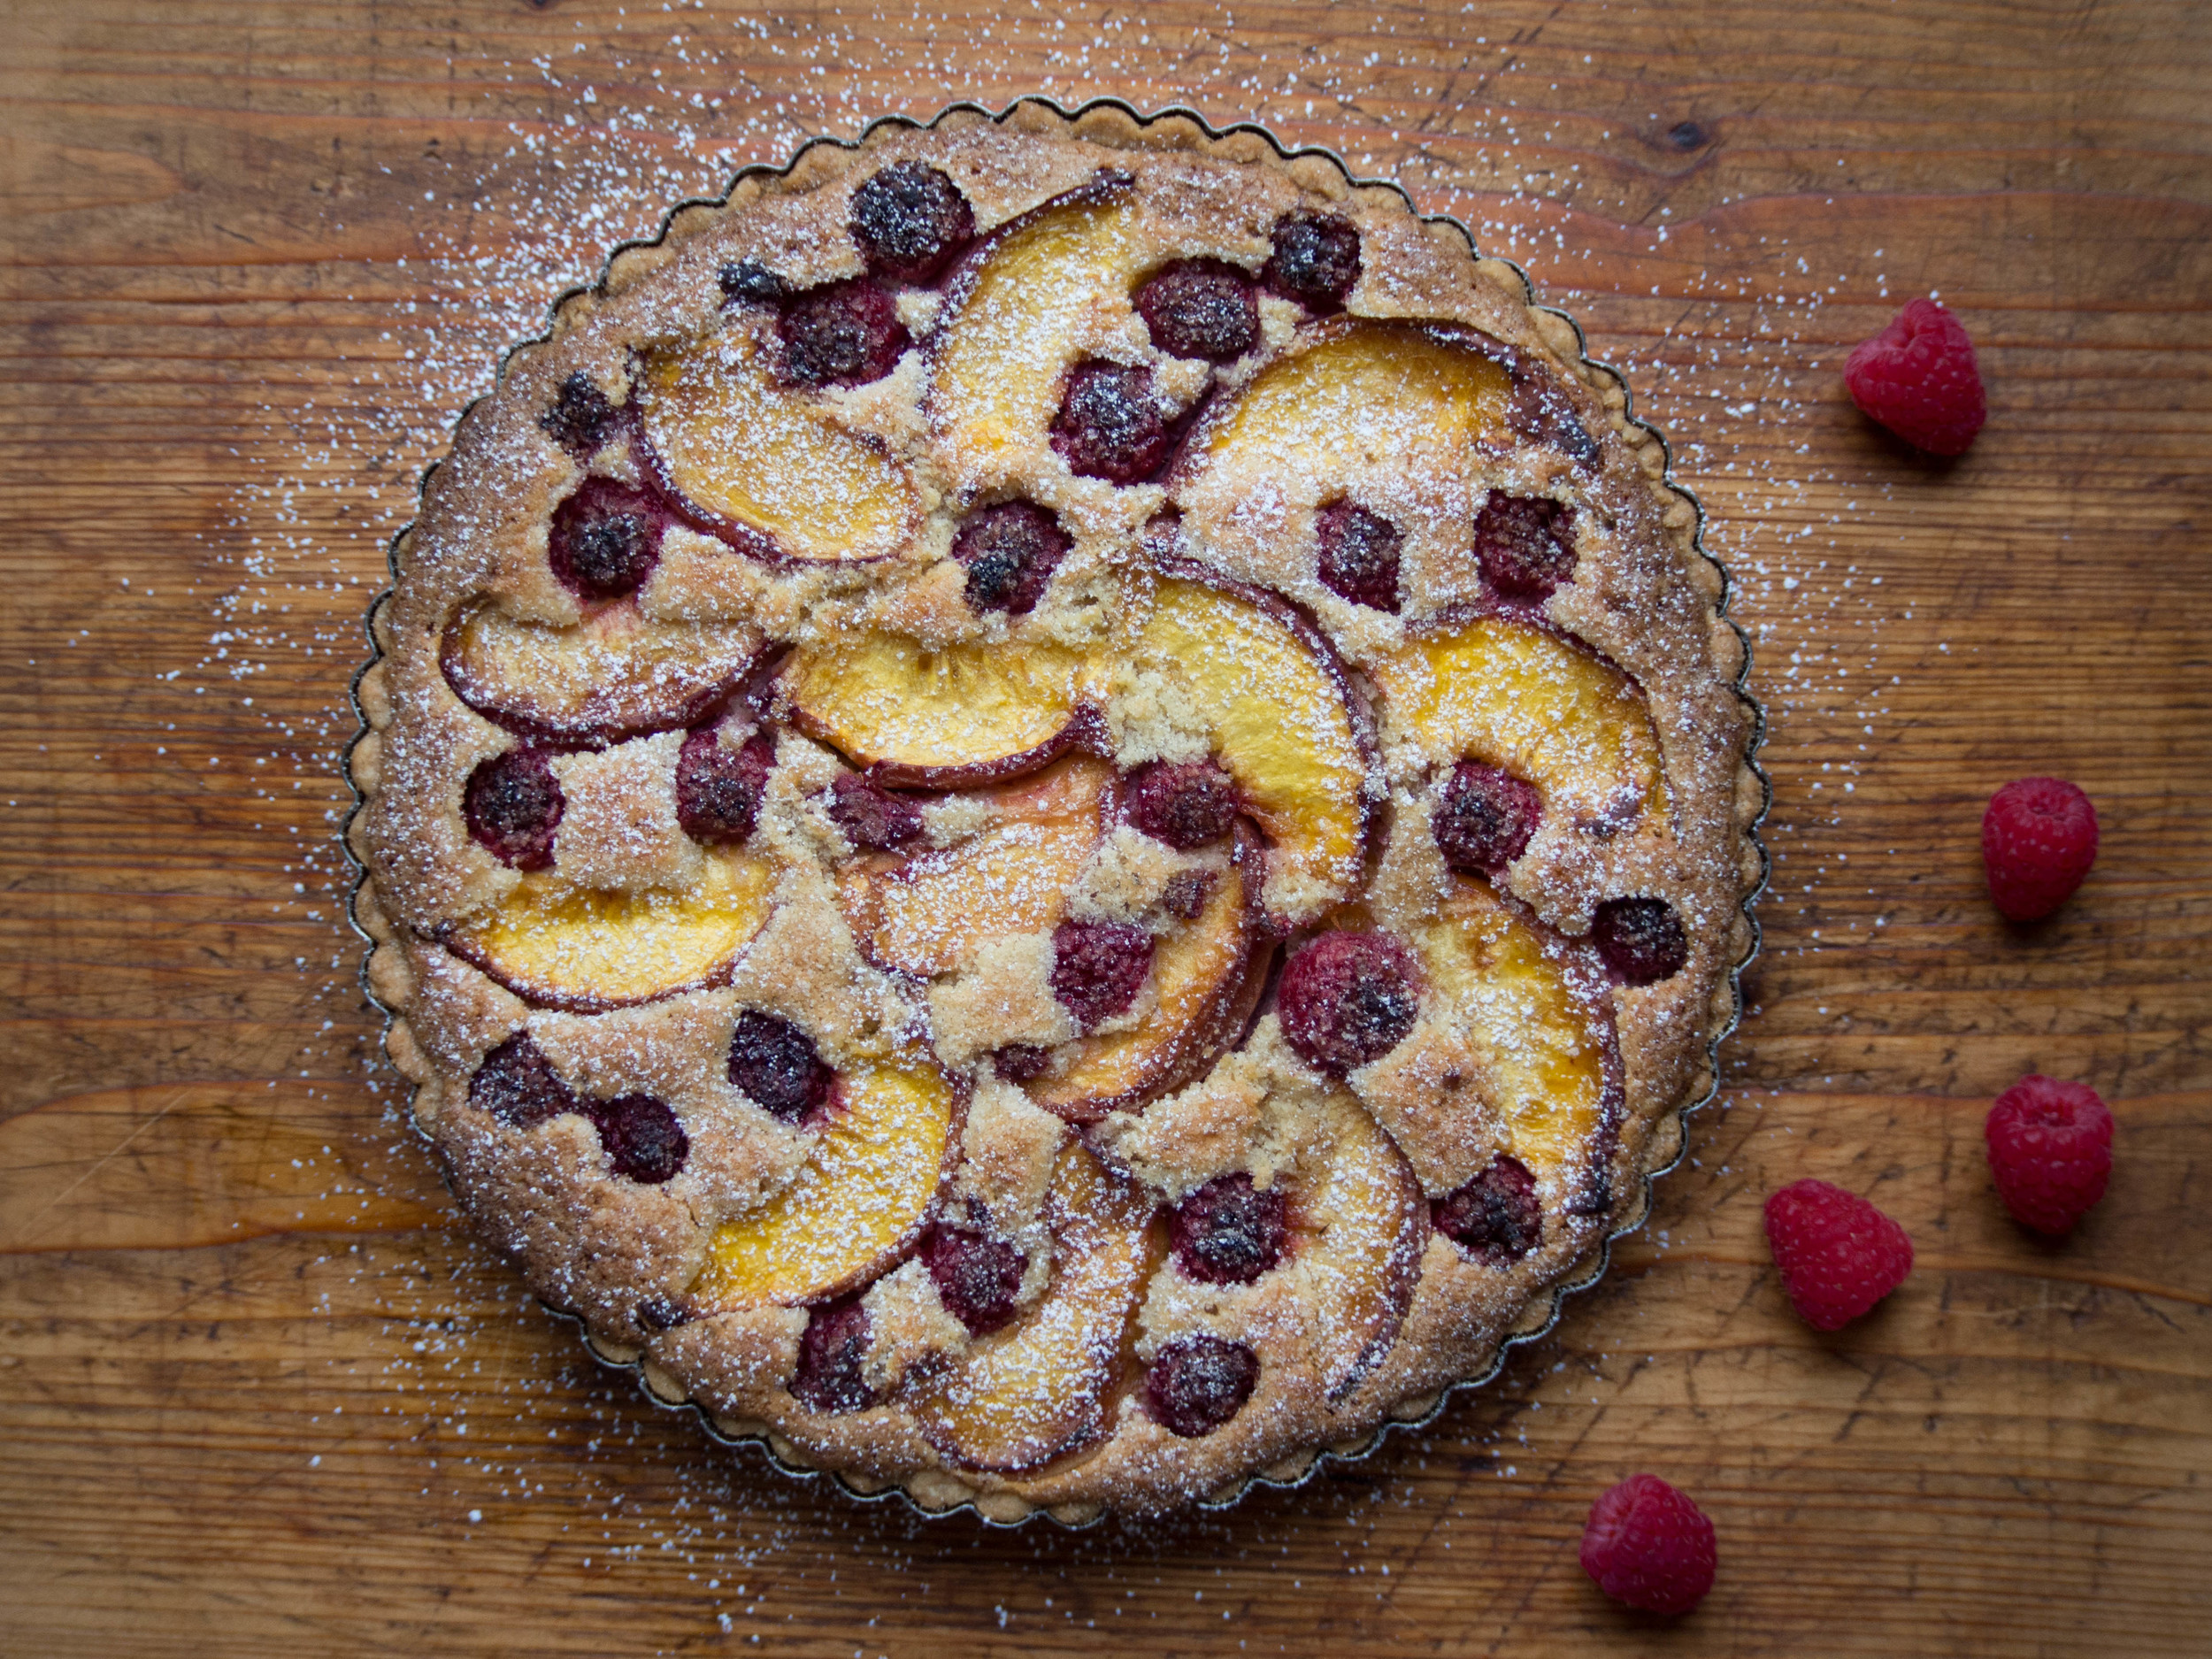
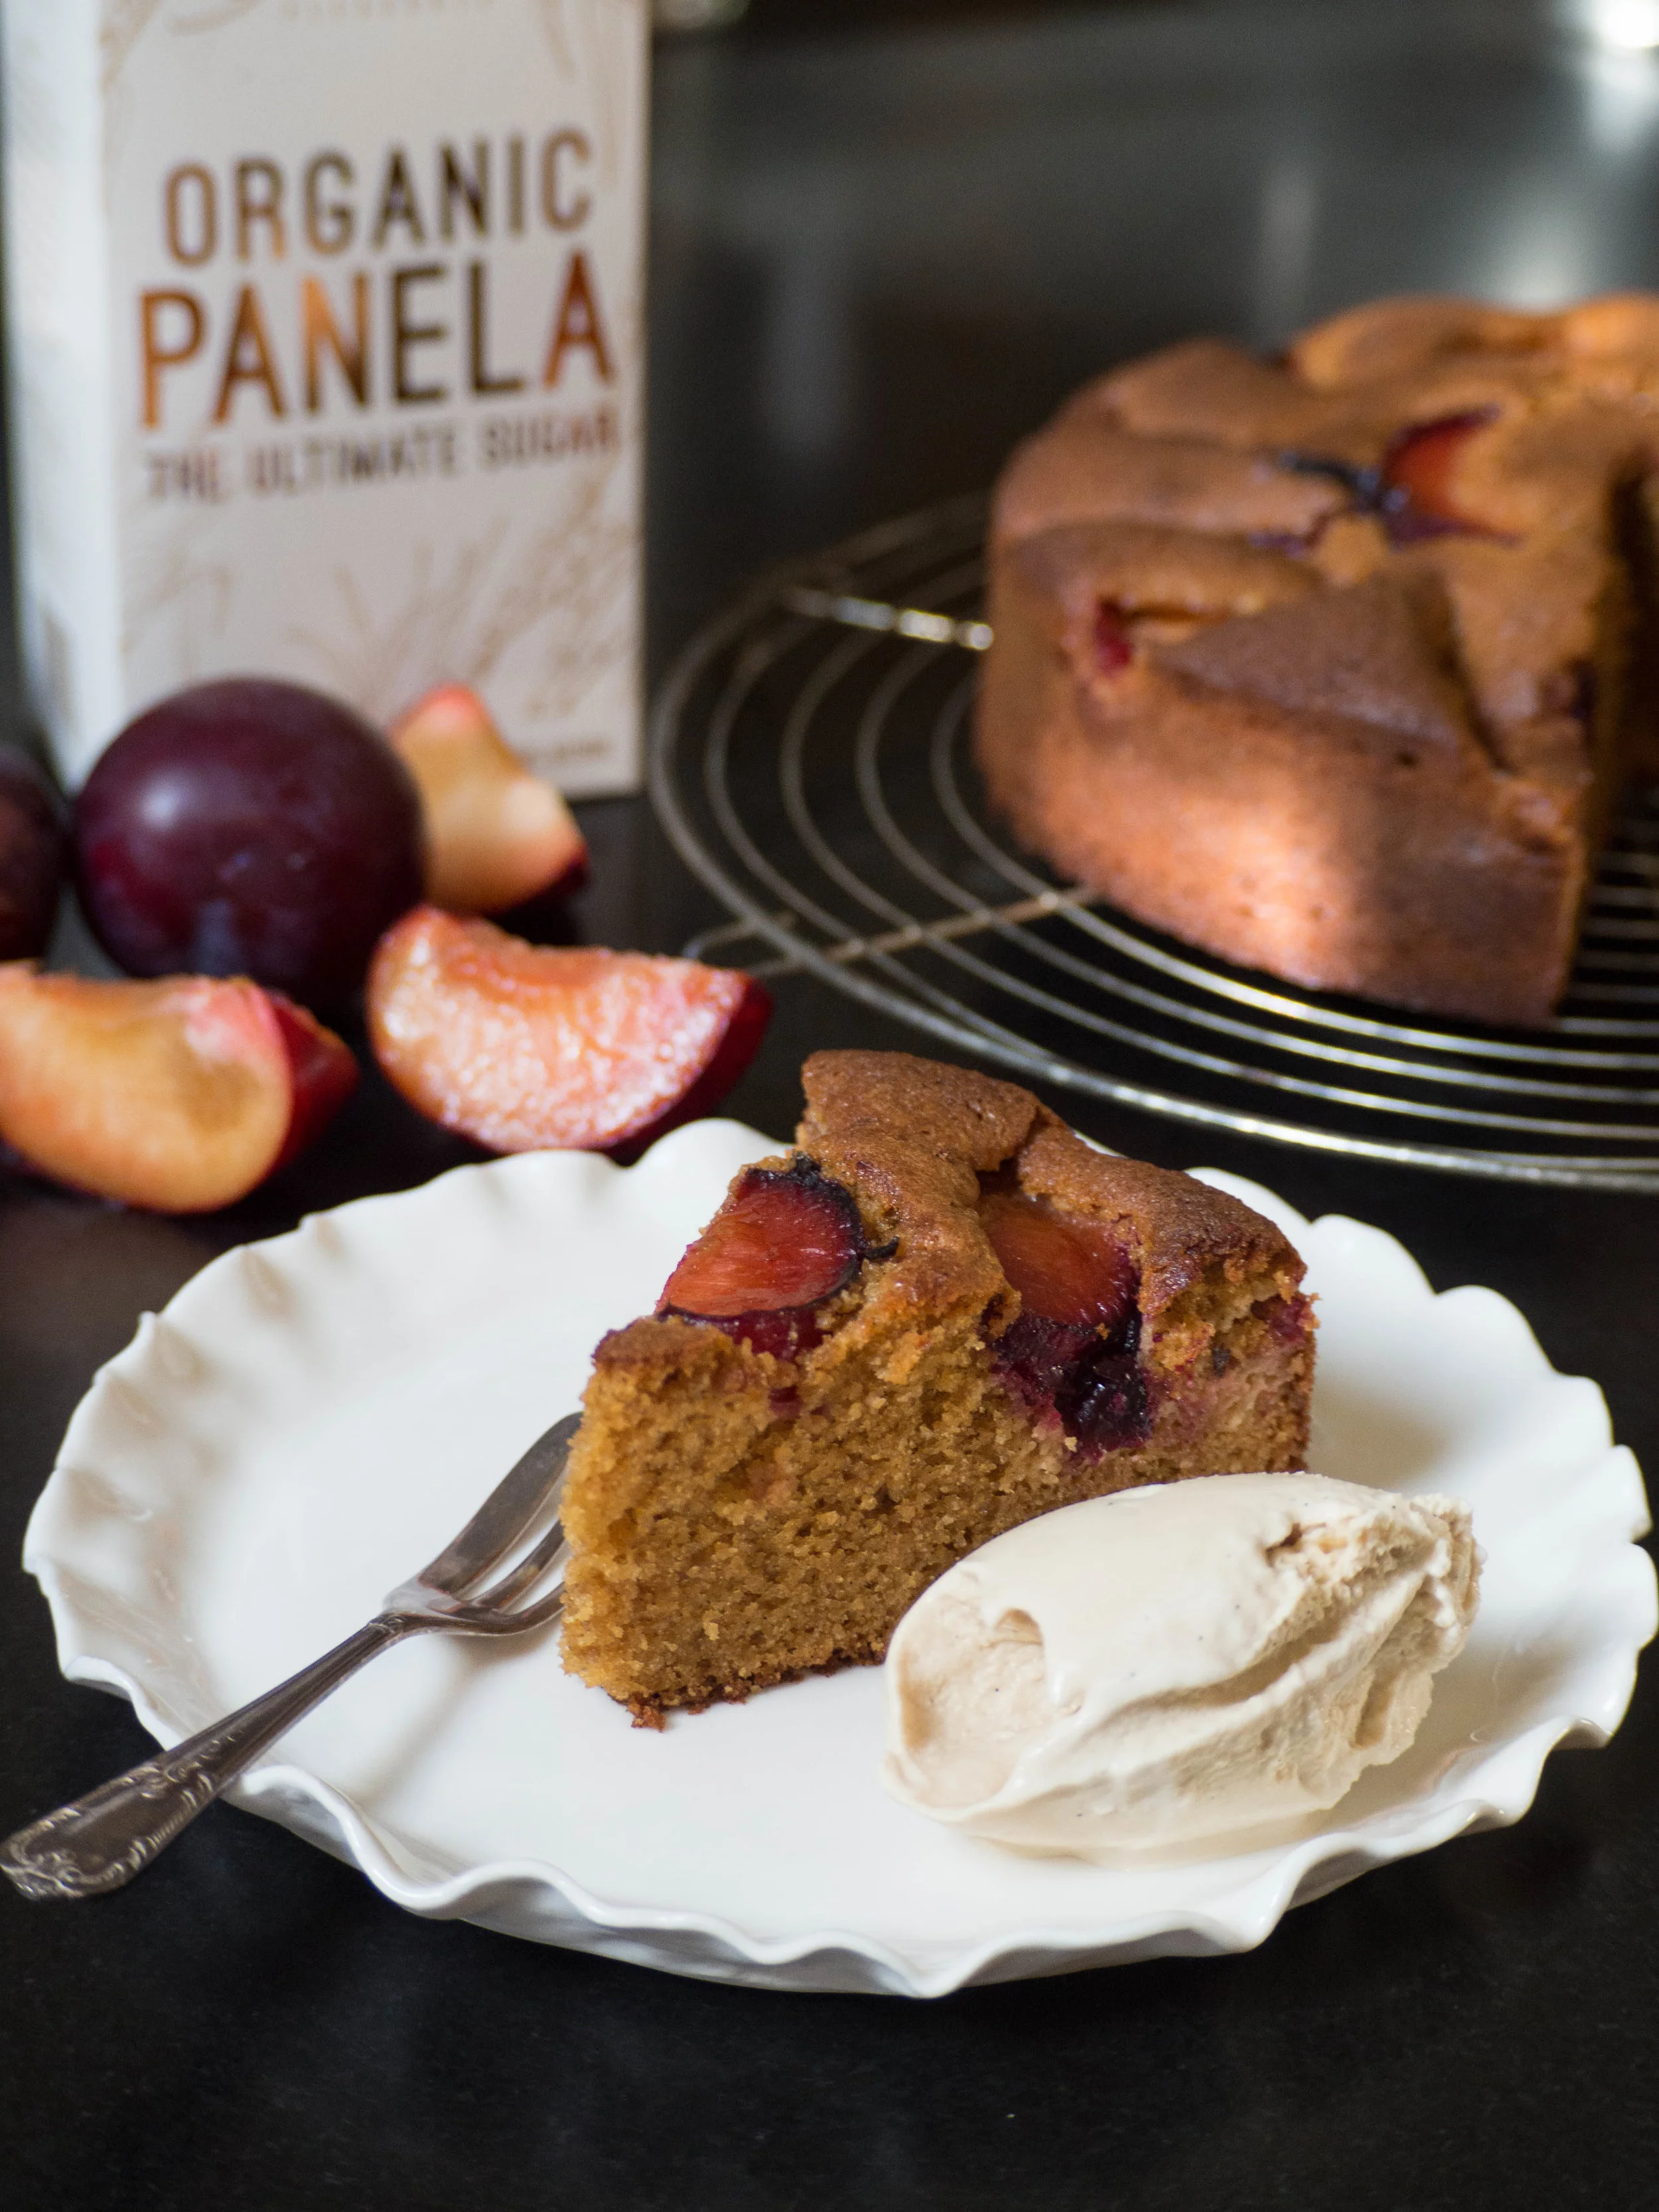
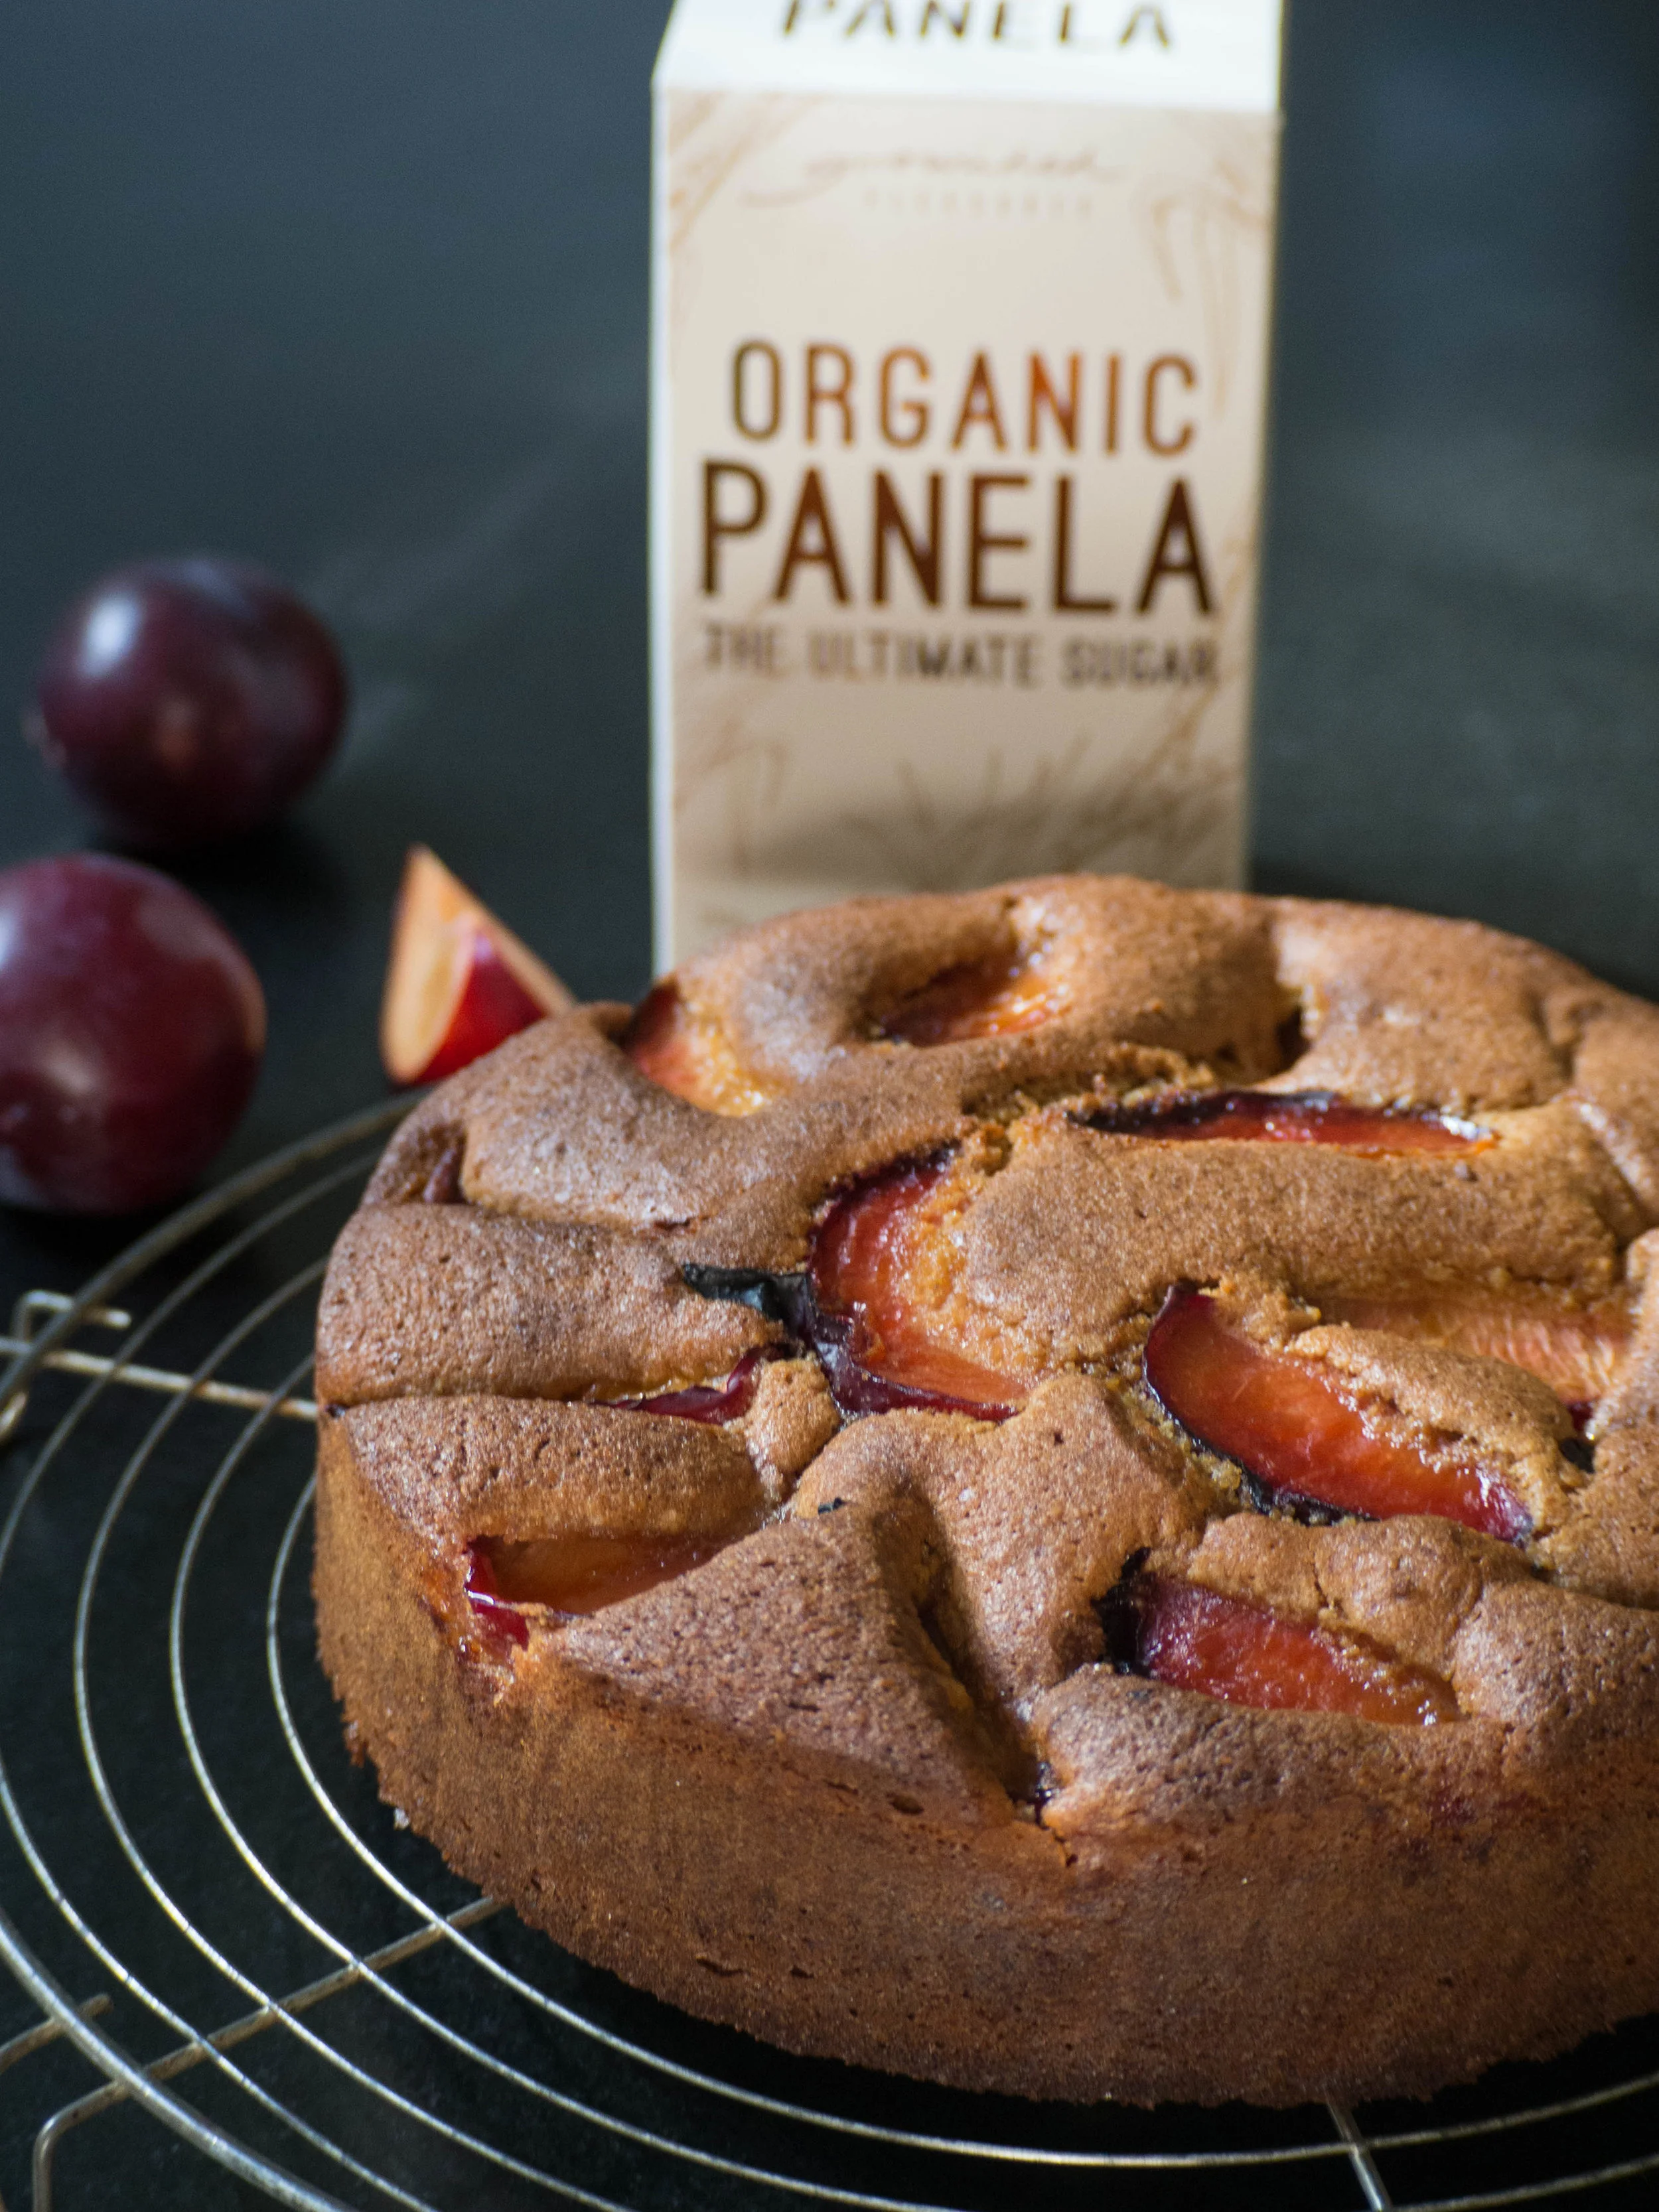
This recipe not only celebrates our lovely in season plums, but also a fantastic organic and unrefined sugar called Panela. Panela sugar is a product of dried sugar cane juice. It retains the beneficial nutrients and minerals (so that makes this cake healthy, no?) and has a caramel like flavour. I found it worked so well with the slightly tart flavour of the plums, and gave the cake a rich golden colour. 

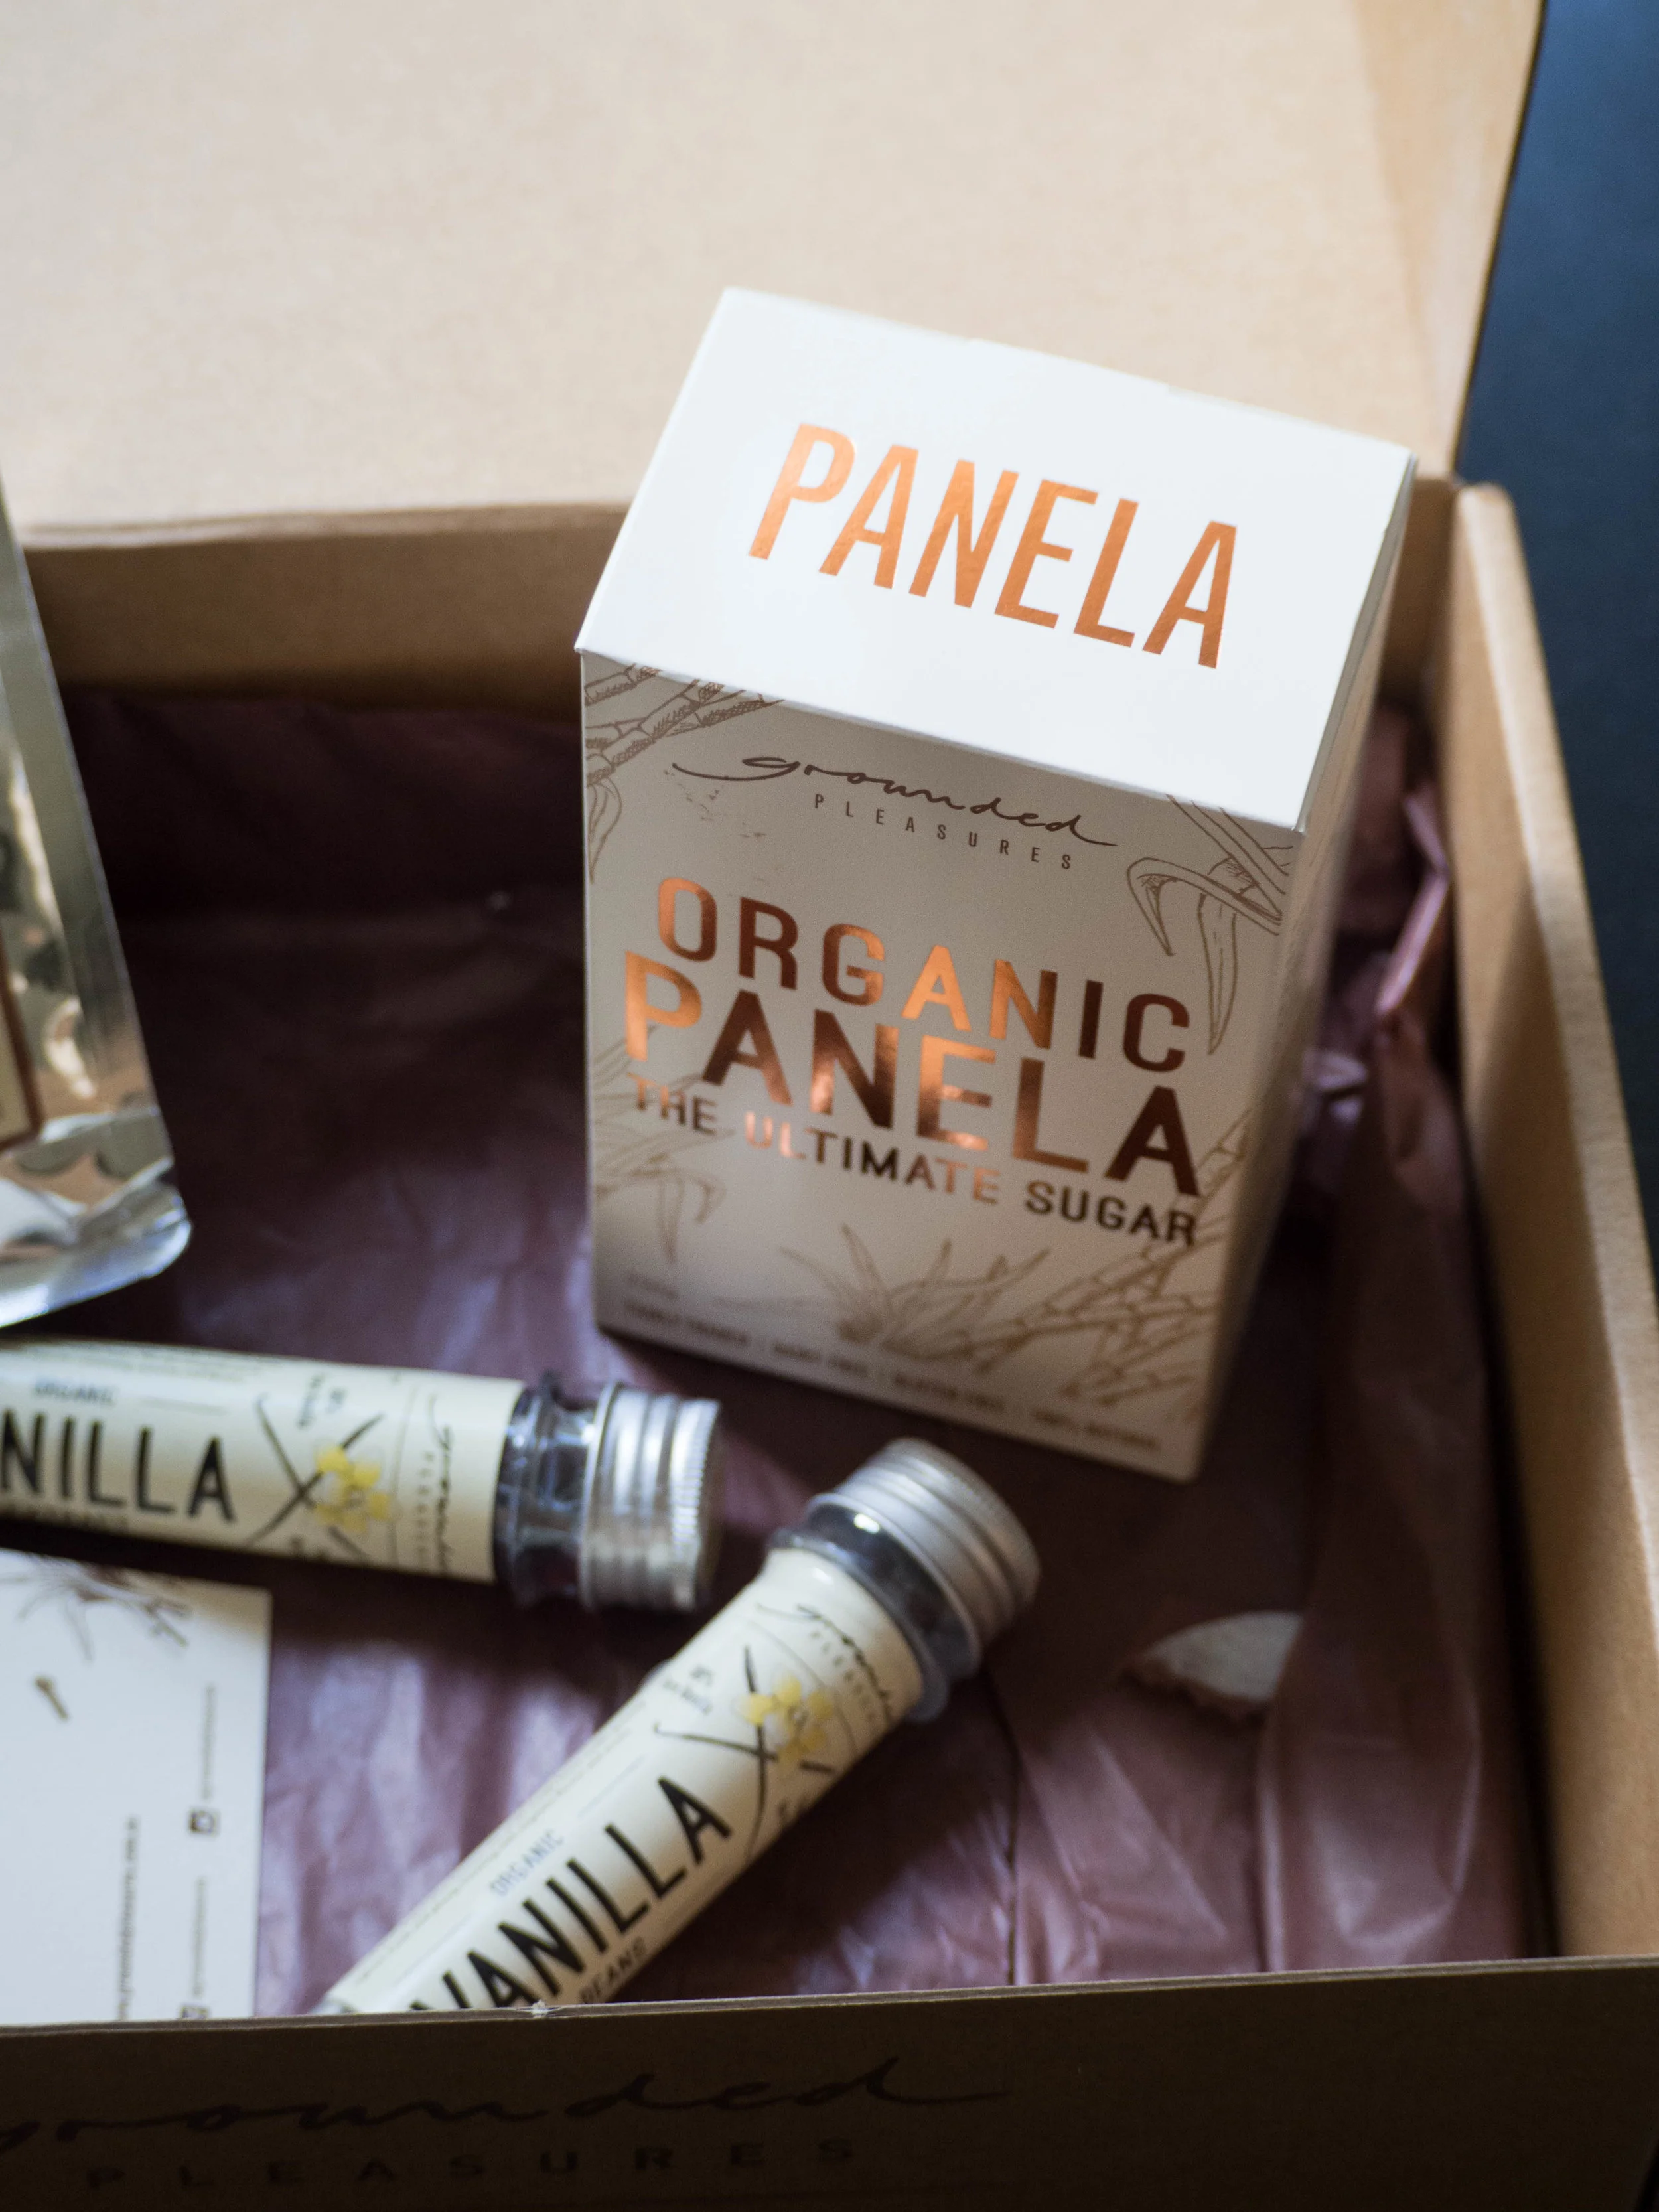
I was introduced to Panela sugar by Sophie, one half of the Ballarat based business Grounded Pleasures. Sophie and I met last year at a Local is Lovely Workshop, at which she brought along some of the Grounded Pleasures products which mostly consist of exquisite hot chocolates. We made hot chocolates the old fashioned way over the gas stove in the shed in which our workshop was hosted in. And since it was a very chilly Winters day, they were much welcomed by everyone. 

Sophie told us about some of the other products they sell at Grounded Pleasures, which included the Panela Sugar, vanilla (beans & extract) and a Real White Drinking Chocolate. I was quite interested in the latter, since I am unable to eat (or drink) chocolate for health reasons and thus always miss out on a warming cup of hot chocolate in Winter. 

Soon after the workshop, I got some of the Panela Sugar and the White Hot Chocolate and instantly loved cooking and eating/drinking both. The Panela Sugar is easily substituted in many recipes where caster sugar is called for, and I found it added a lovely depth of flavour to muffins in particular. 

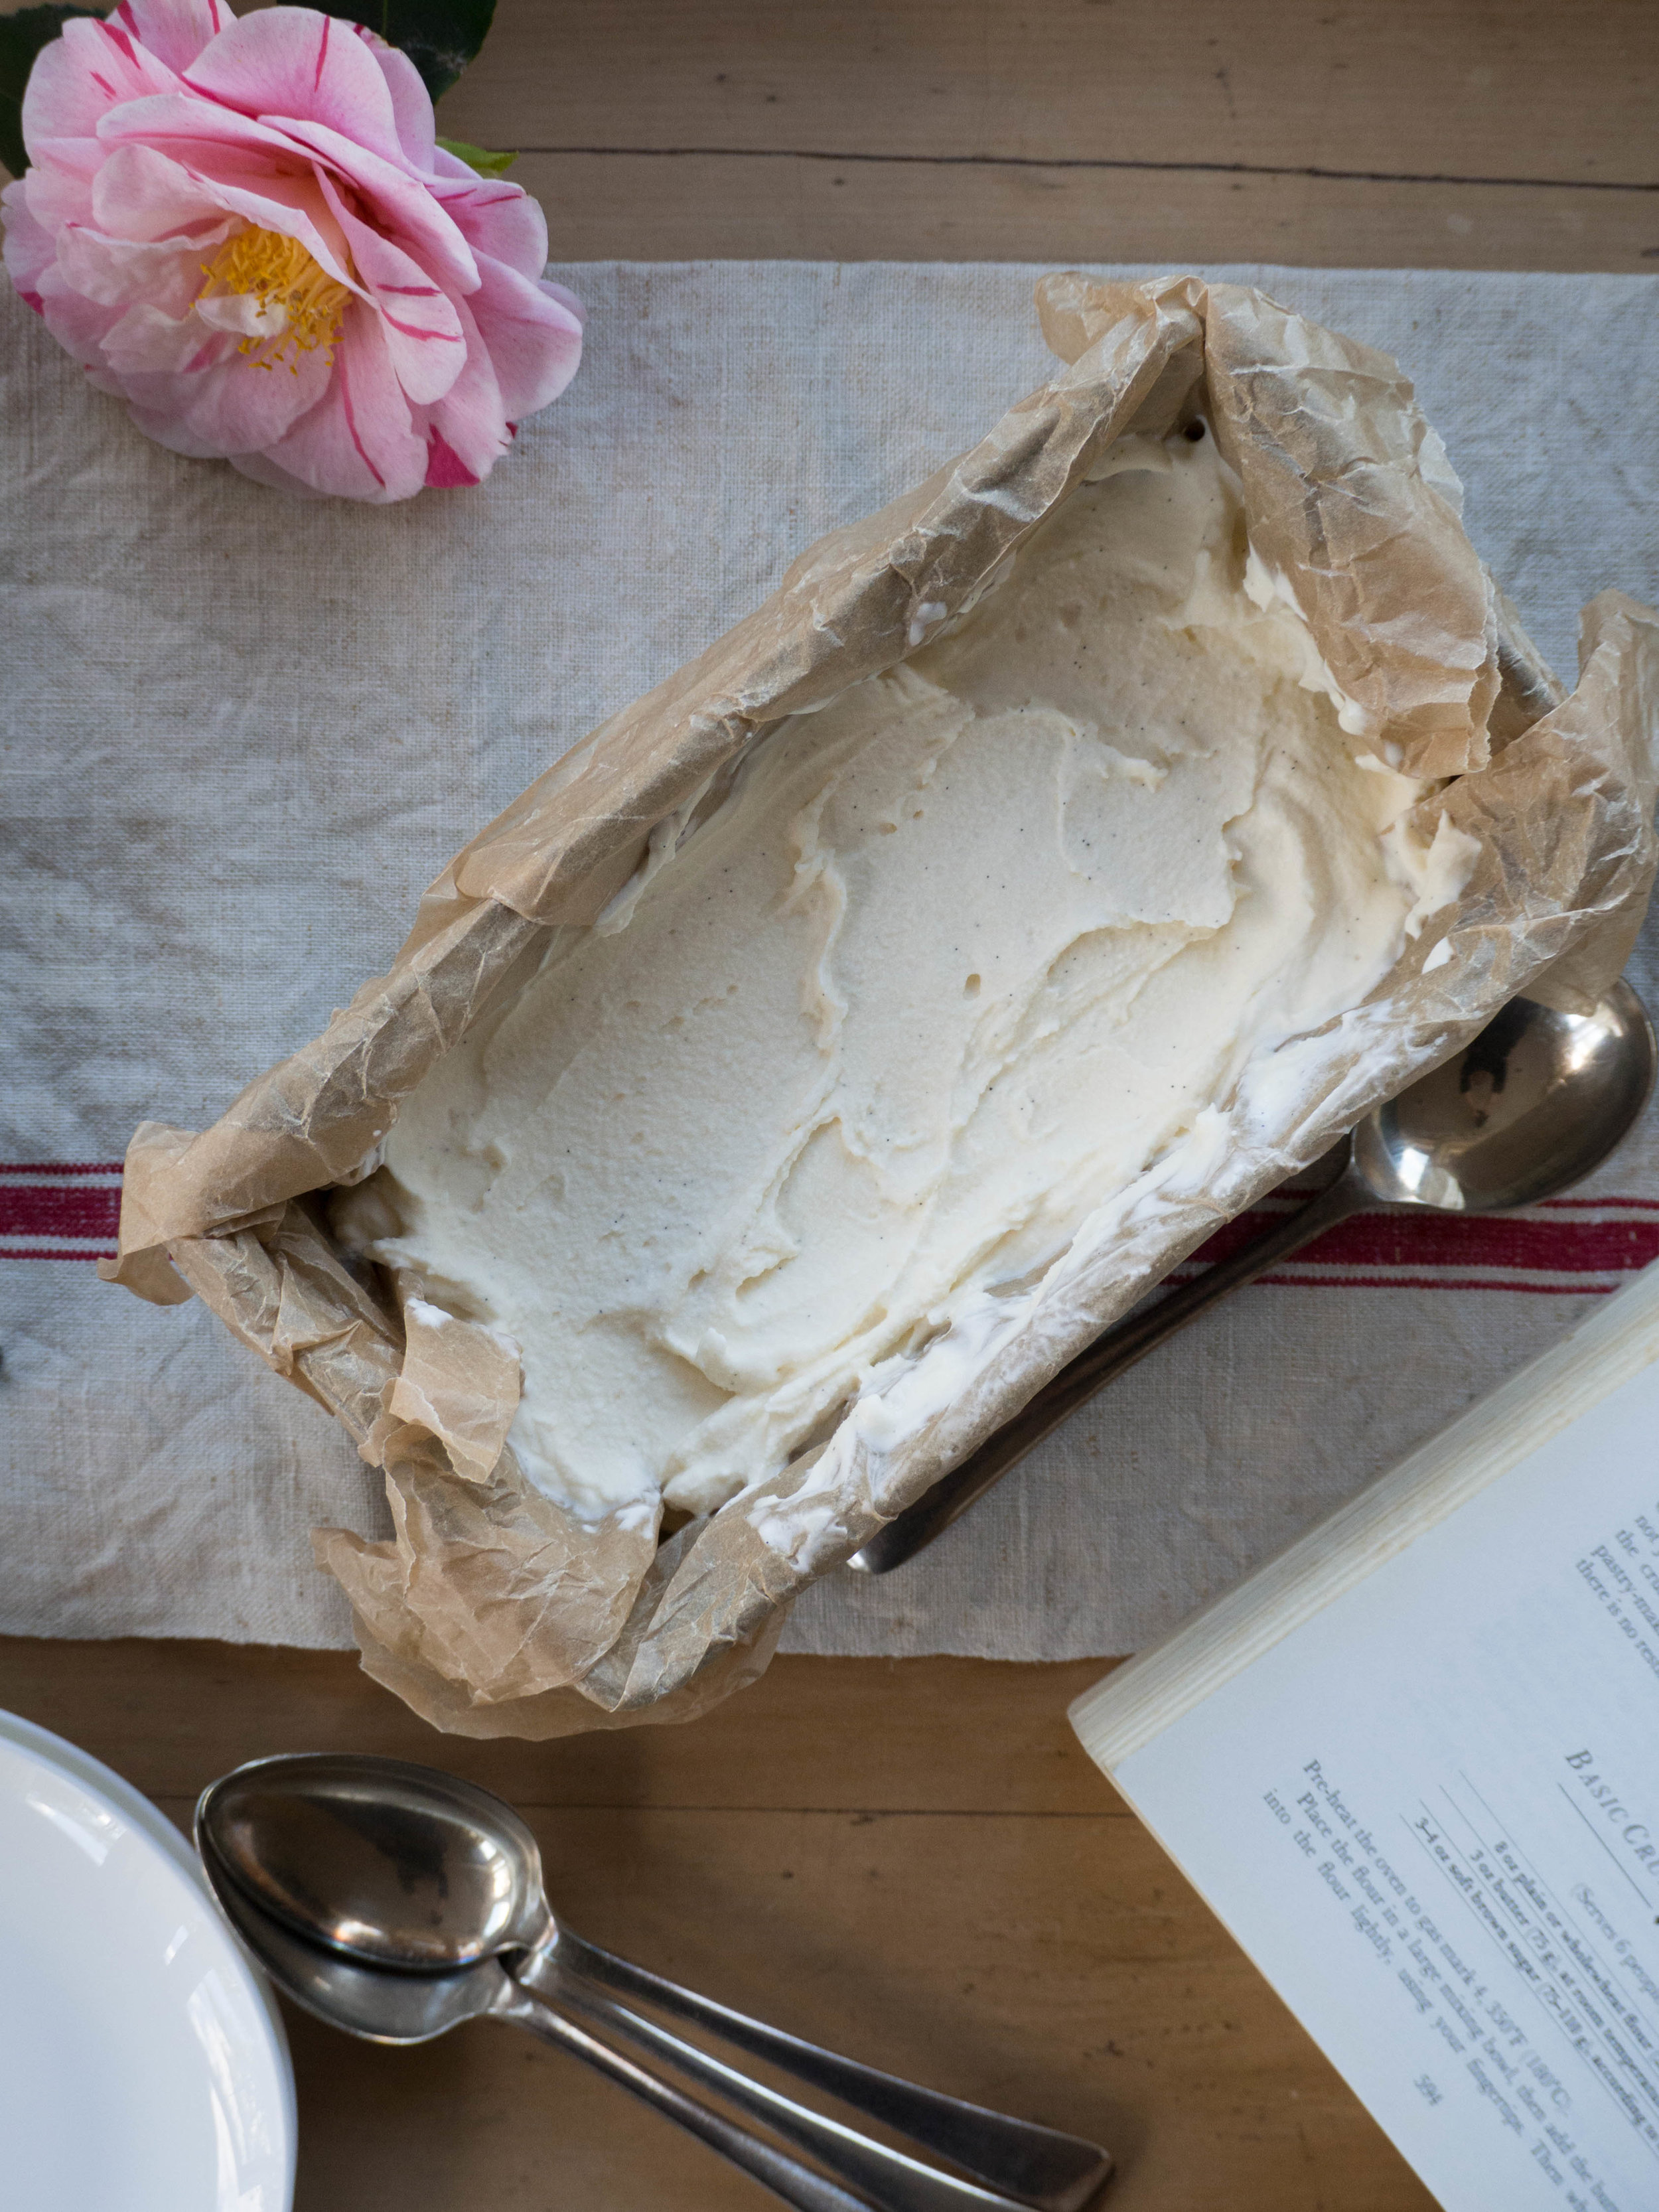
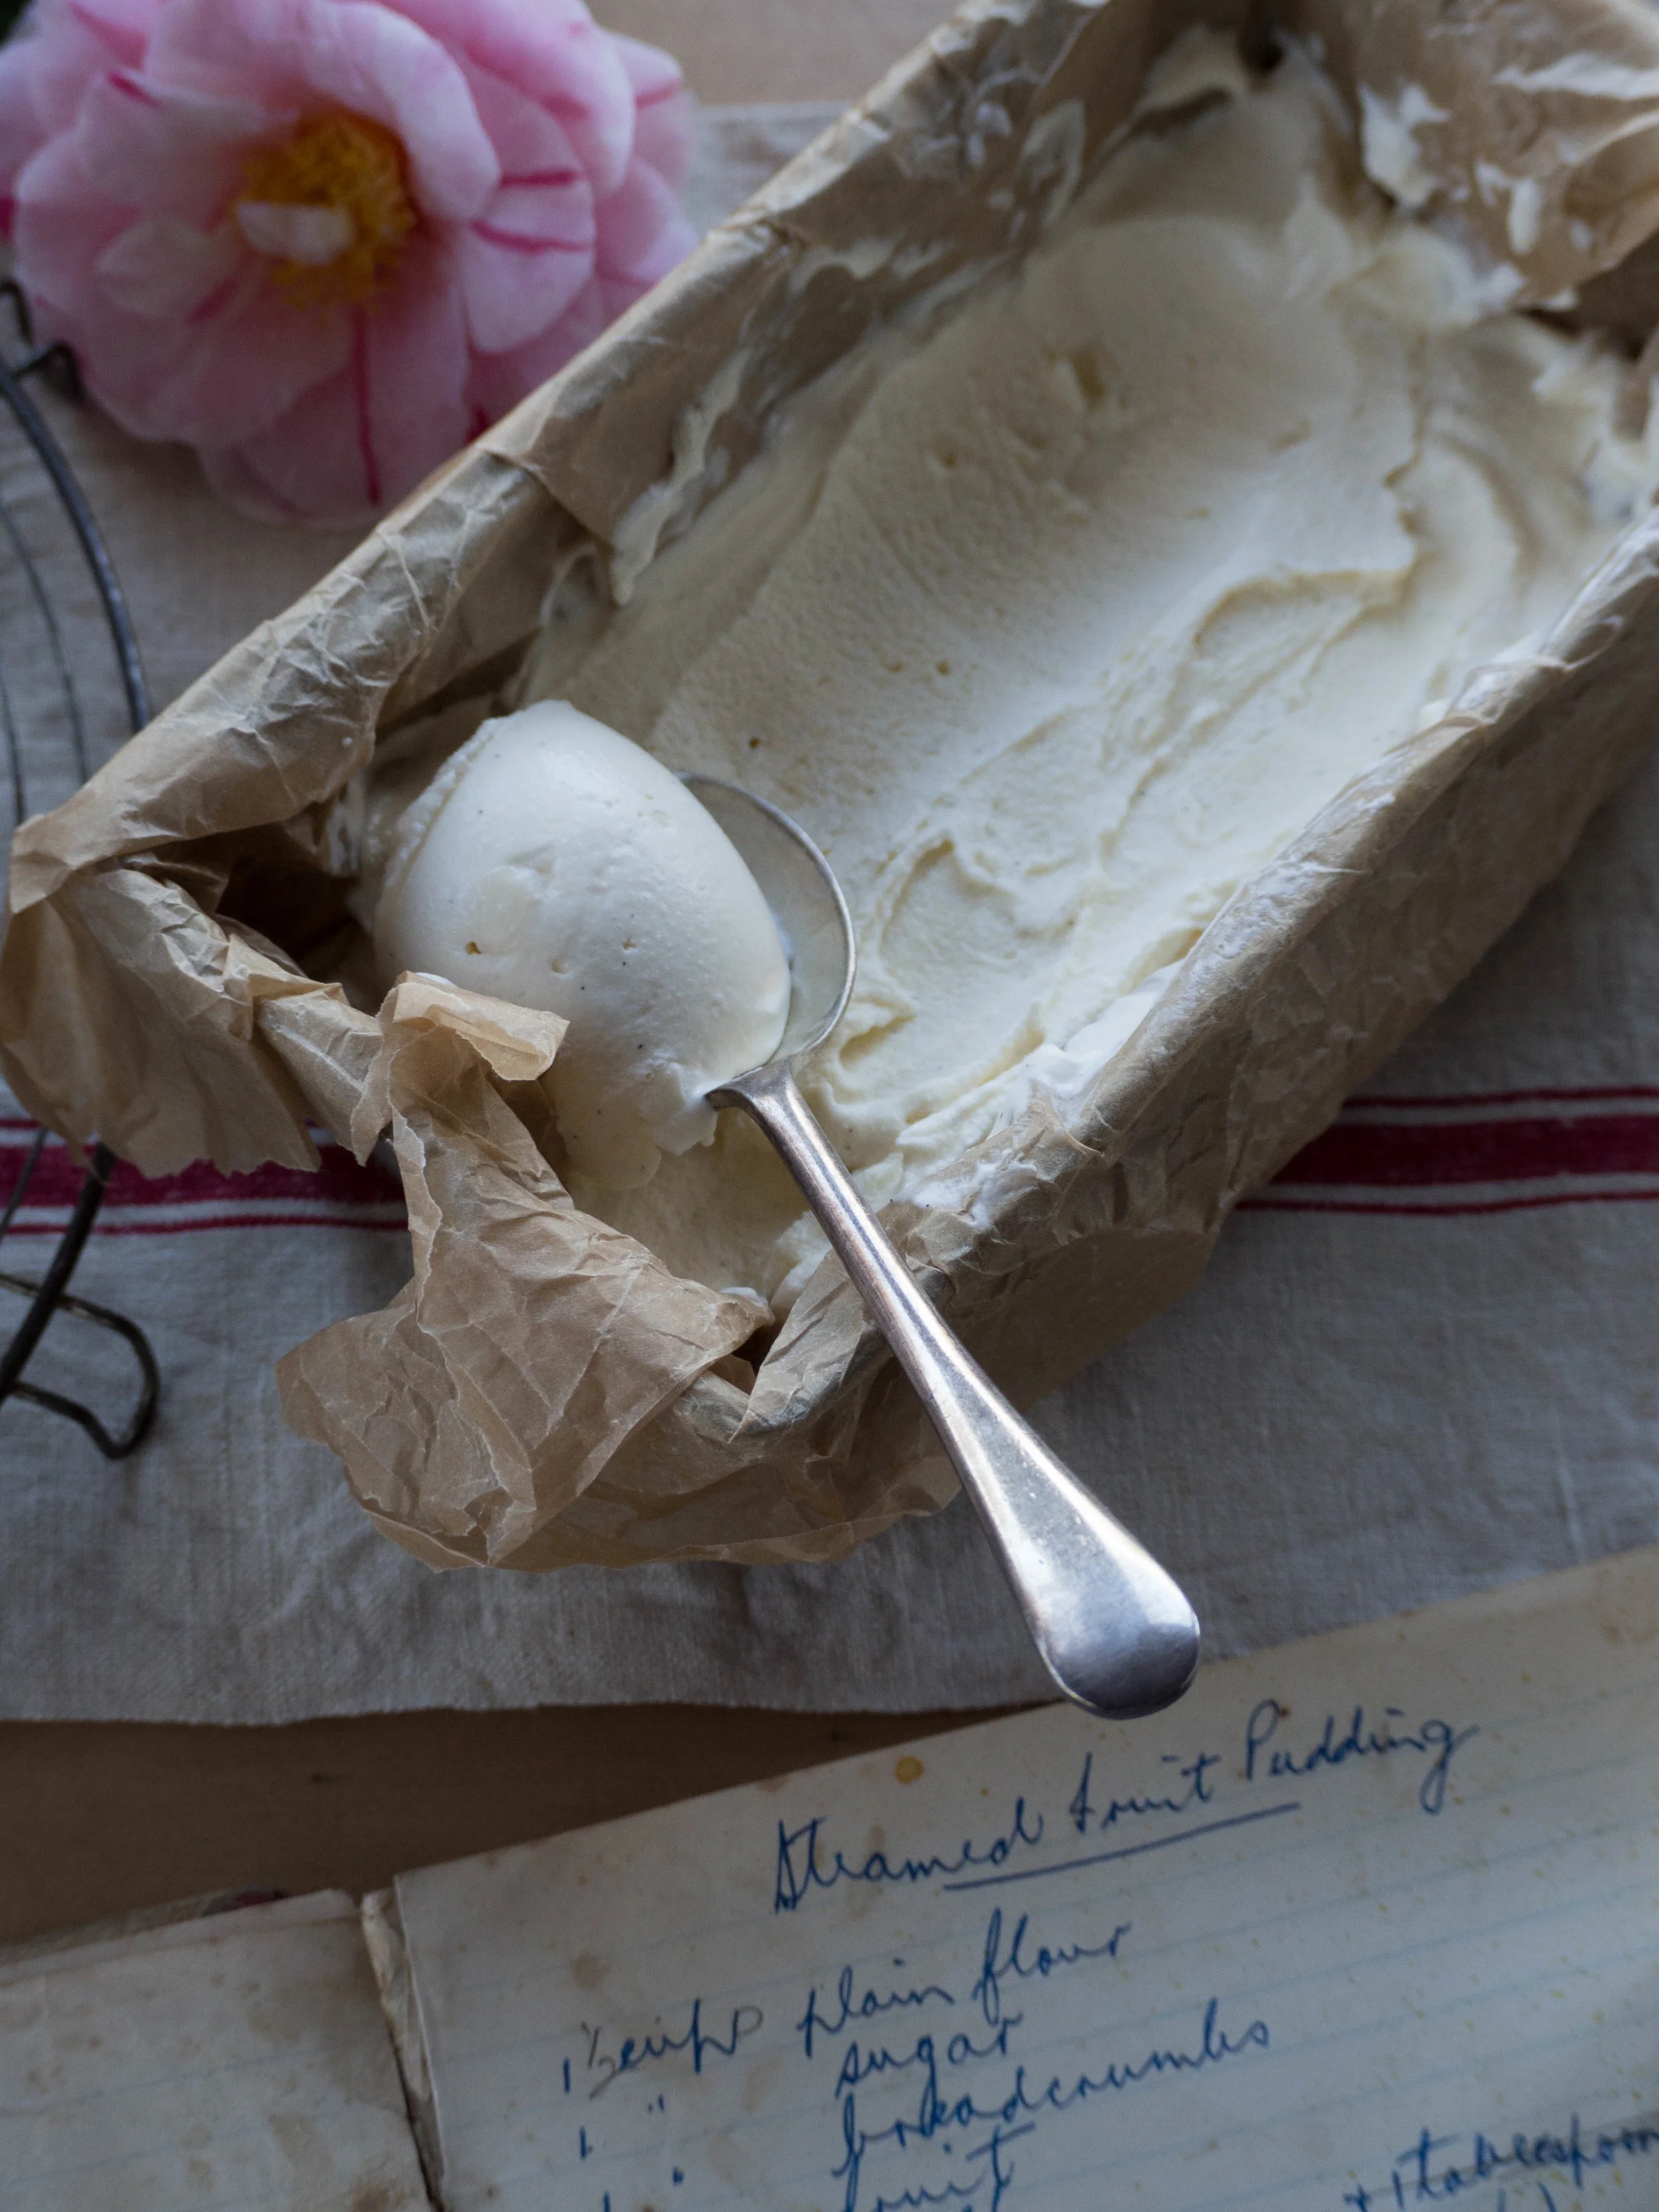
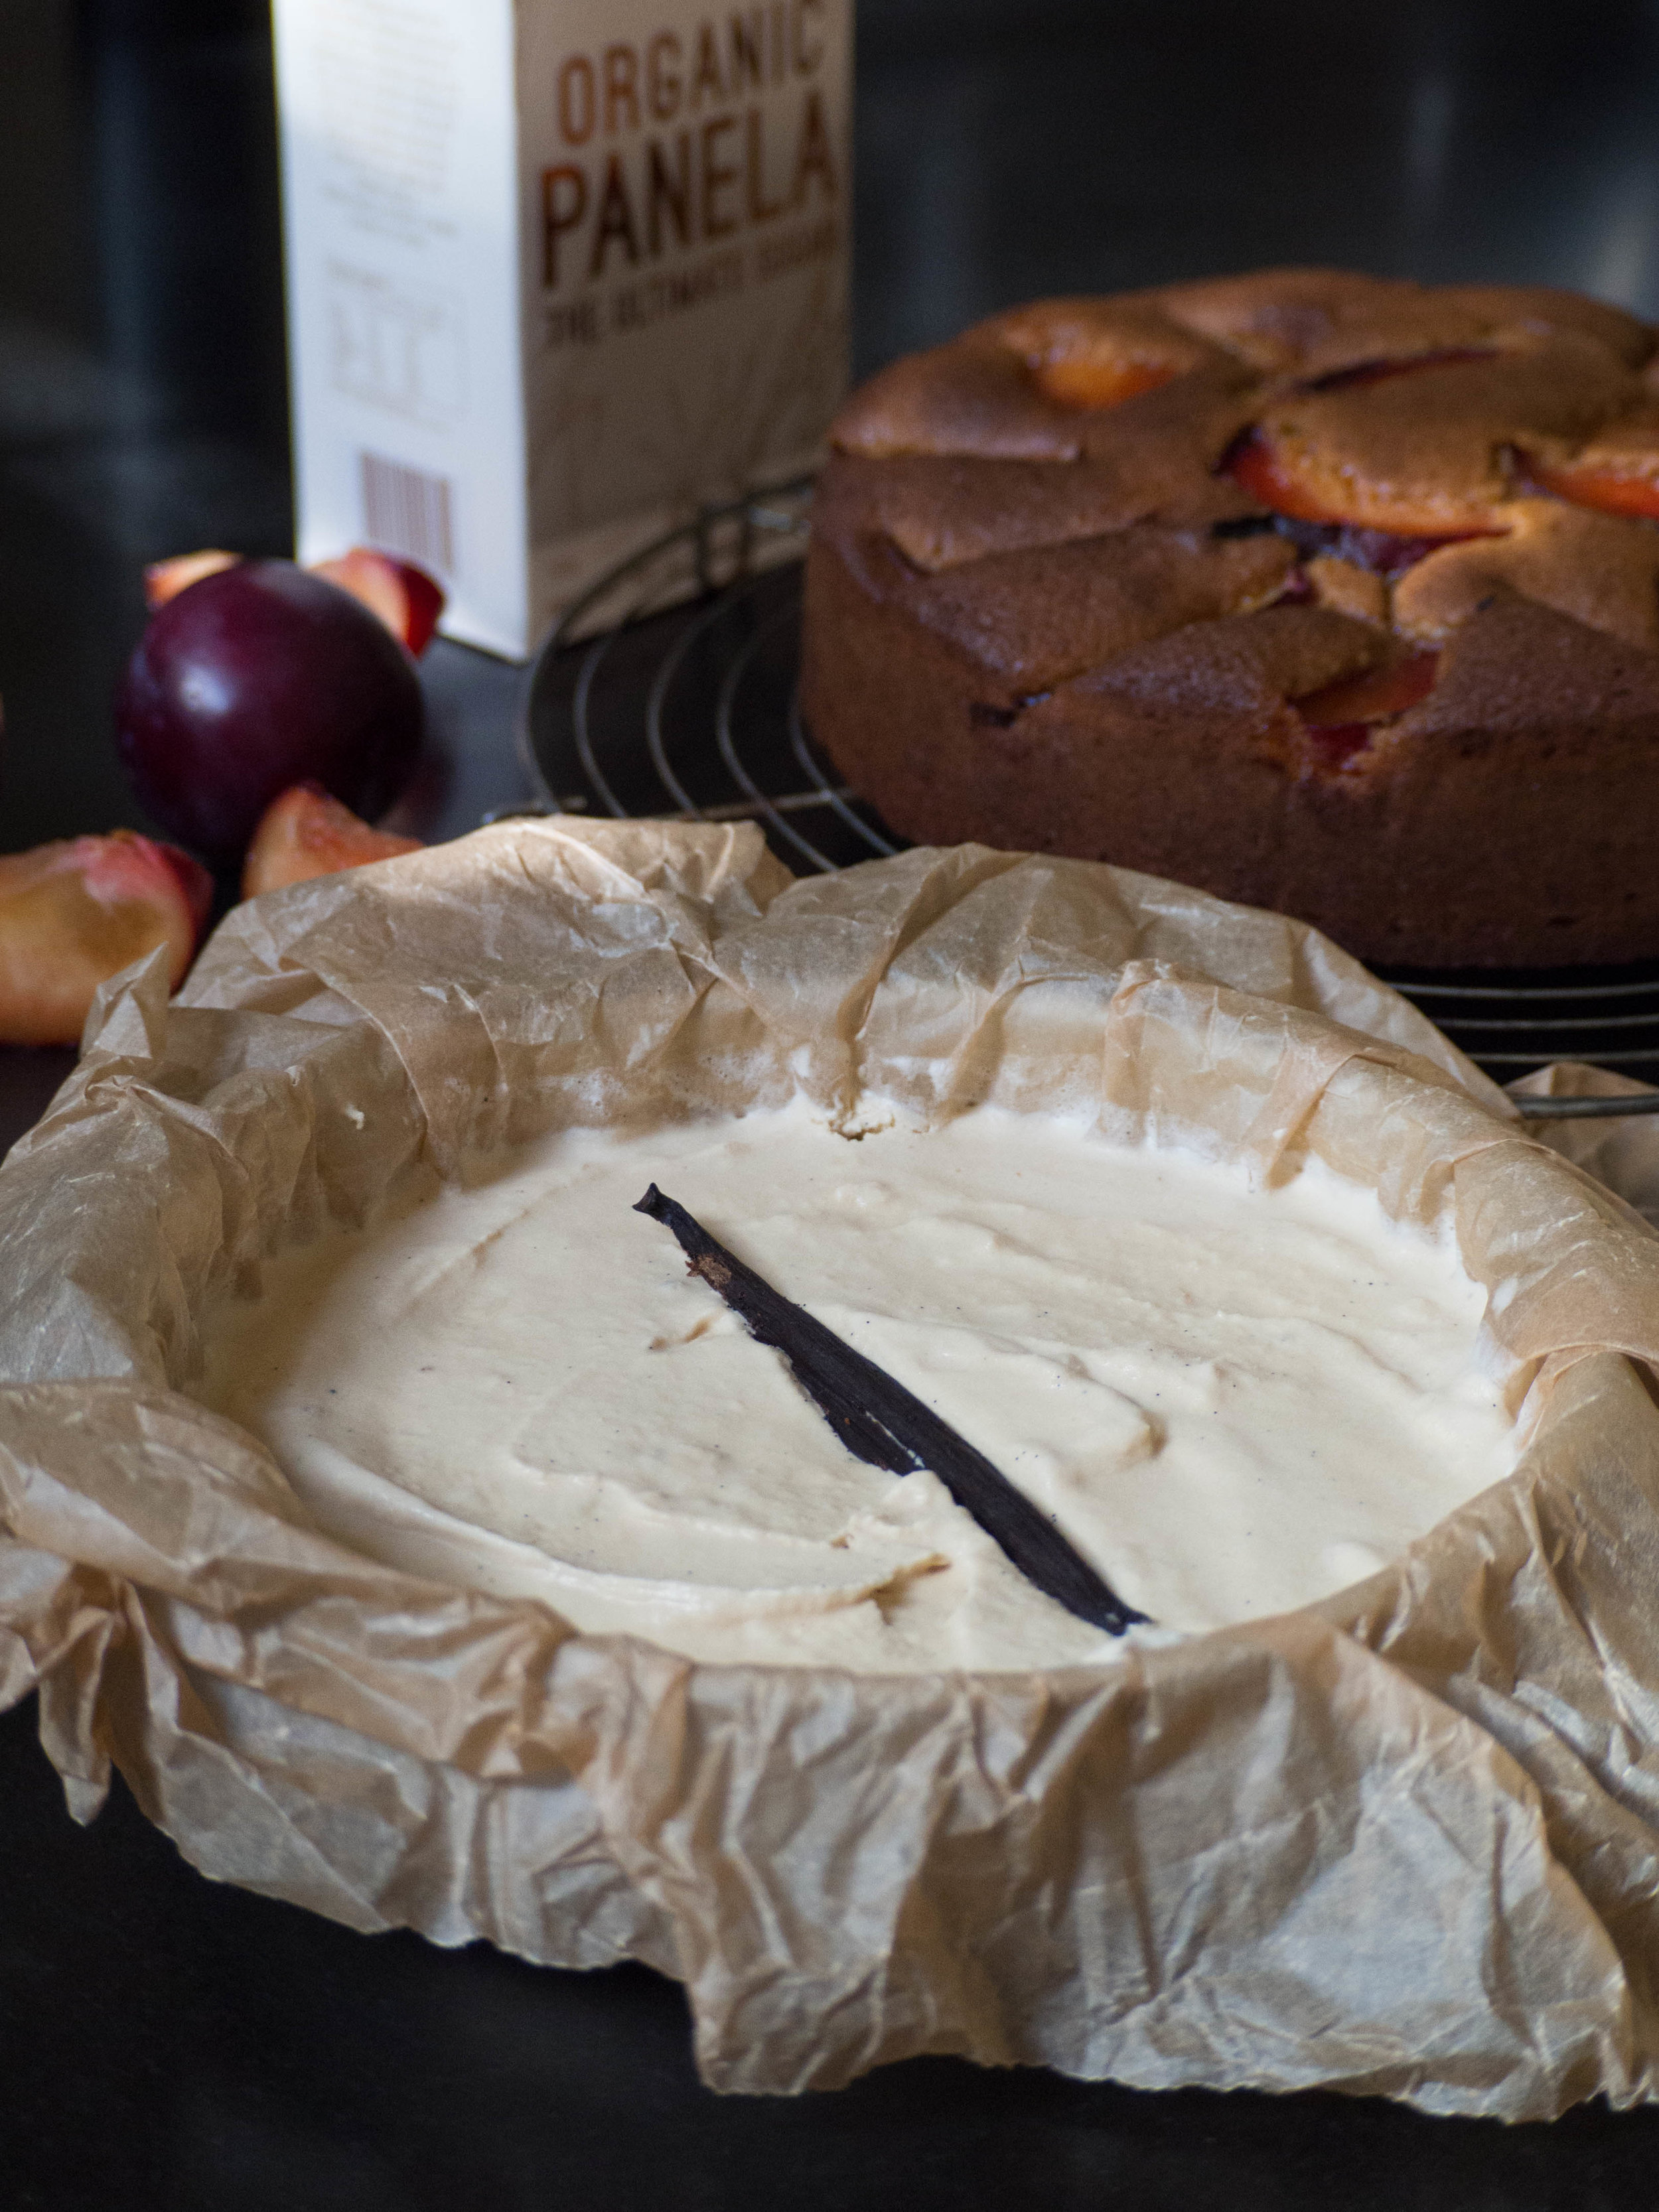
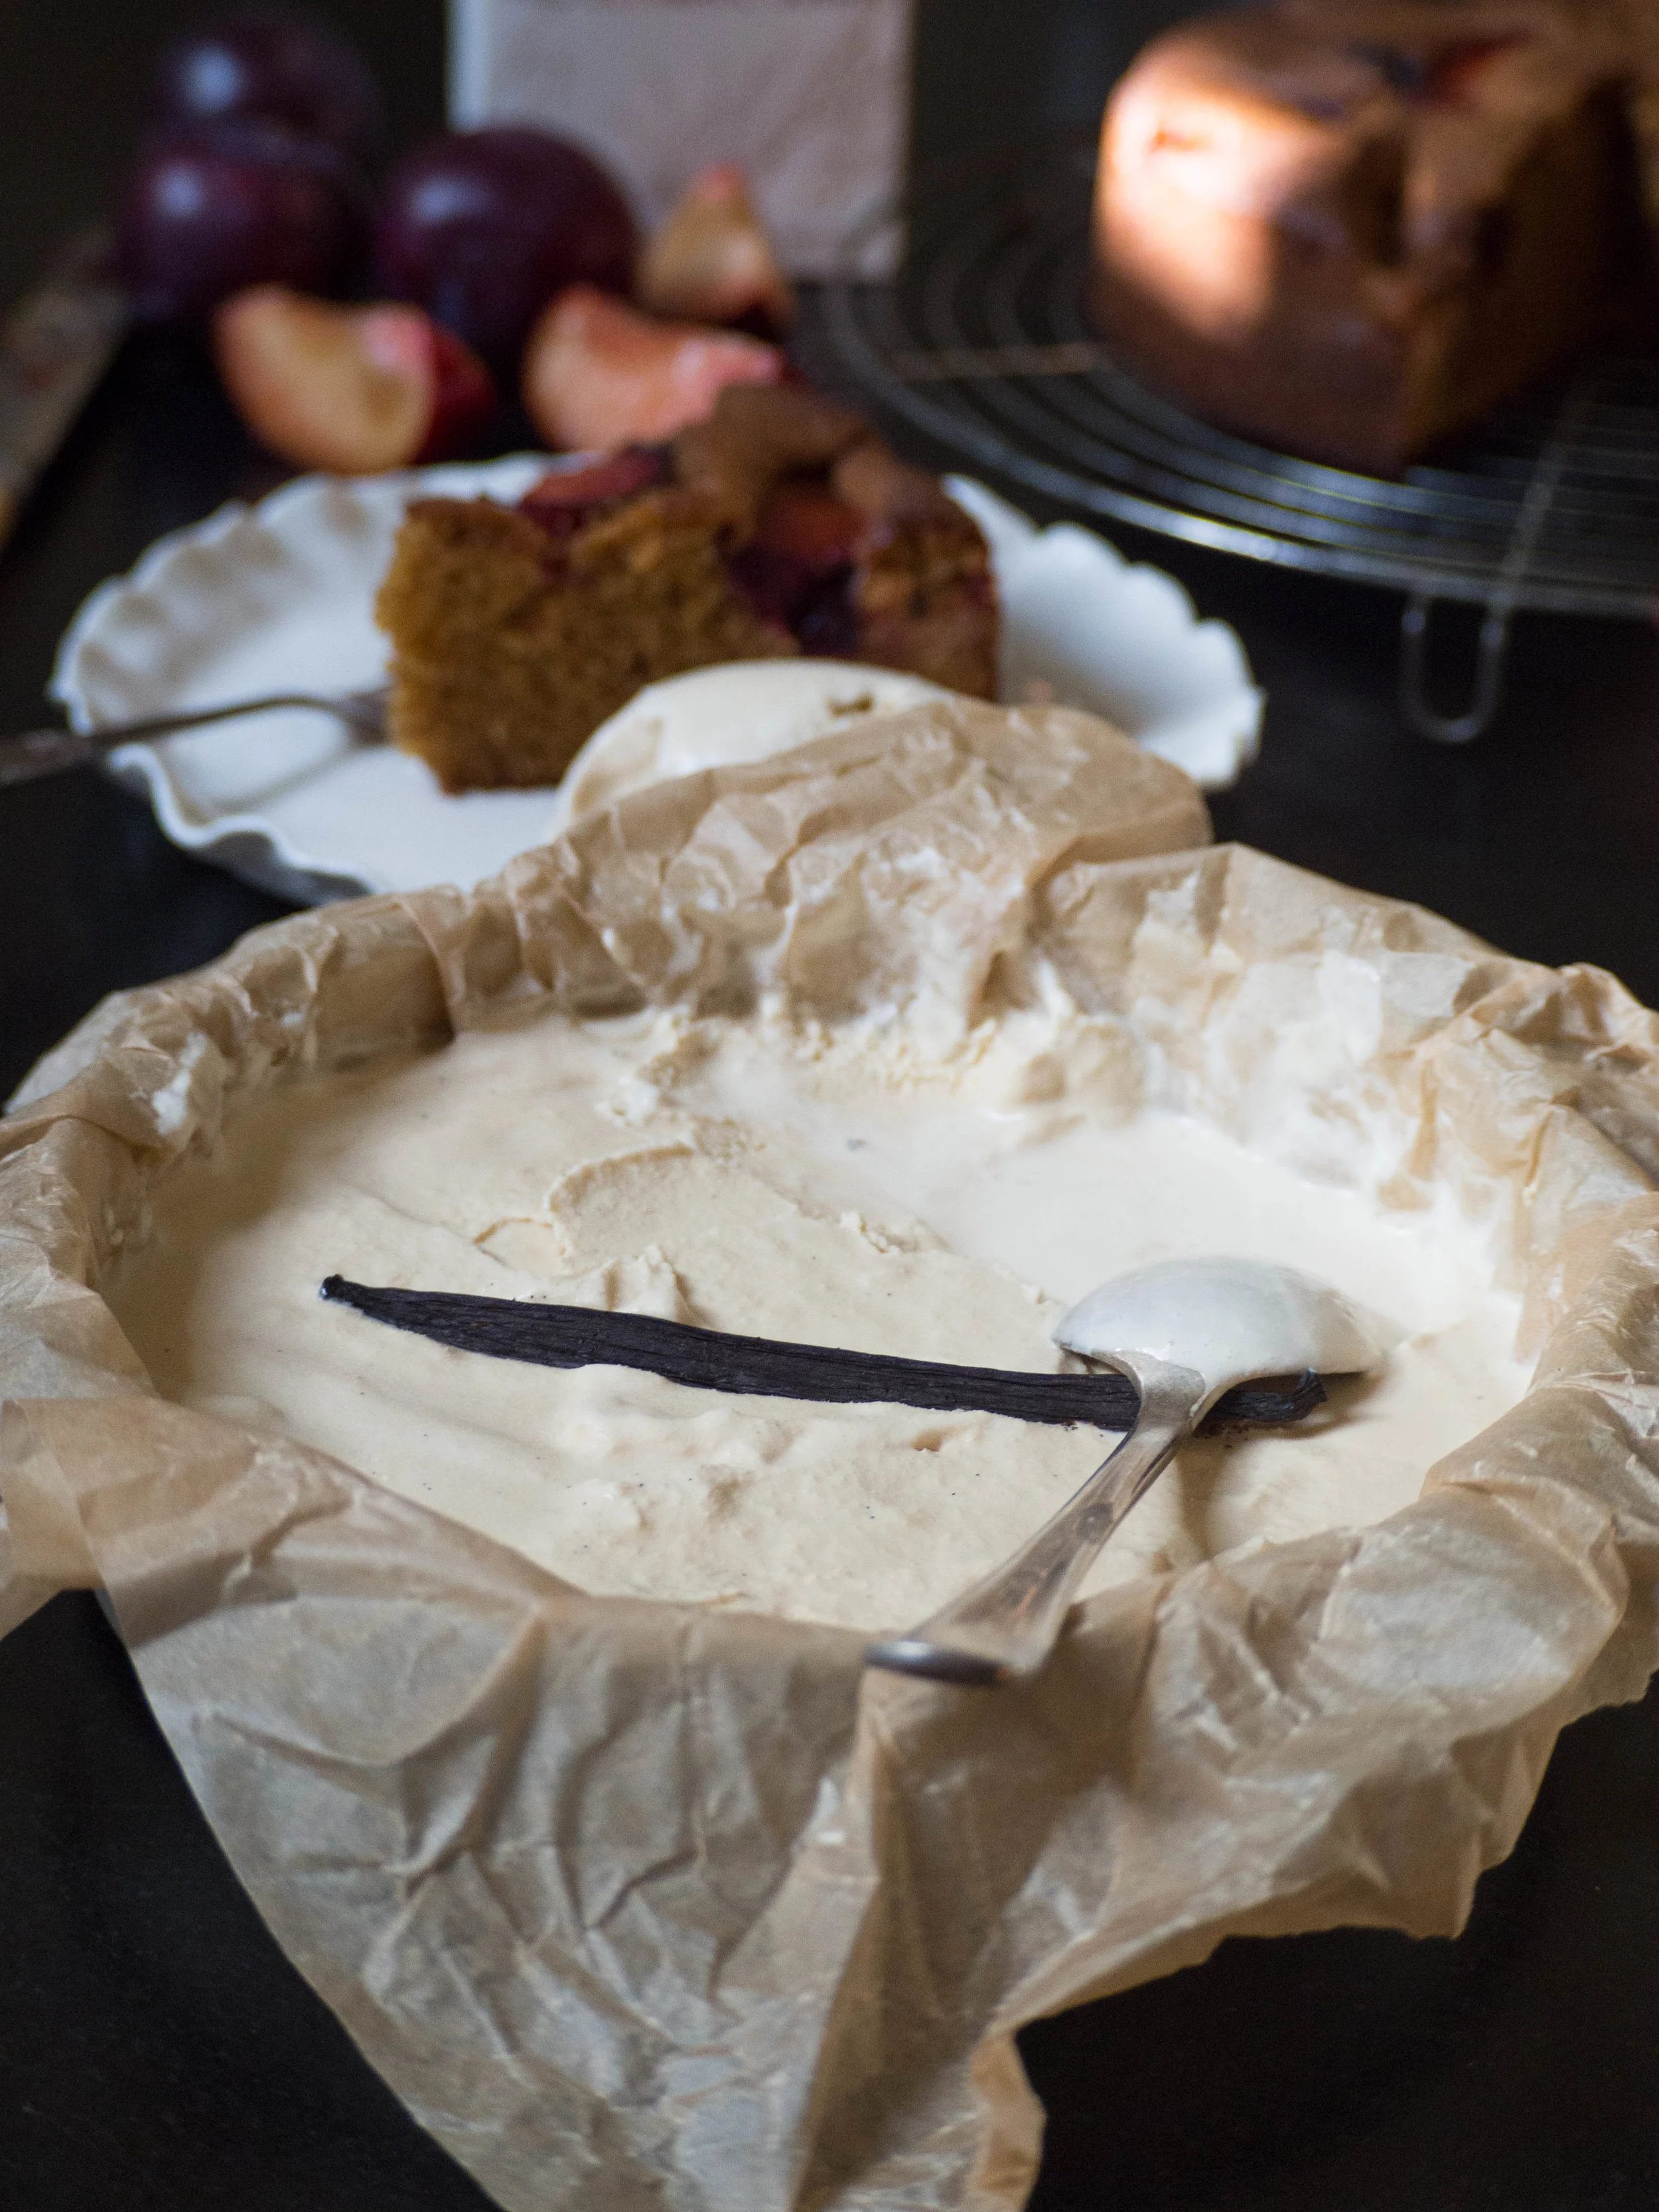
Since then Sophie has sent me some more of their delicious products, which has lead to much recipe inspiration. I found the Panela Sugar and vanilla products not only worked really well in this cake, but also made a really nice simple homemade ice cream. The Panela Sugar gave a rich caramel flavour and colour to the simple vanilla ice cream, which paired well with the cake, but also tasted so good on its own as a simple mid-week dessert. 

A note on using vanilla beans in baking - don’t throw away the vanilla pods after the seeds have been used in the cake/ice cream. Keep them to make vanilla sugar or homemade vanilla extract, even without the seeds the pods retain a lot of flavour. 

Plum & Panela Cake

Ingredients: 

125g flavourless margarine, or softened unsalted butter

150g Grounded Pleasures Organic Panela Sugar, plus extra

1 Grounded Pleasures Organic Vanilla Bean, seeds scraped

1/2 tsp Grounded Pleasures Organic Vanilla Extract

75g plain flour

2 tsp baking powder

150g almond meal

3 eggs

2 plums (any variety)


Method:

Preheat oven to 170 degrees Celsius. Line a 20cm round loose bottomed (or springform) cake tin with baking paper.

Beat the margarine/butter with the Panela sugar, seeds of the vanilla pod and the vanilla extract, until fluffy and creamy. In a separate bowl, gently whisk together the flour and baking powder.

Add the eggs one at a time to the creamed mixture, beating well after each addition. Then fold in the plain flour and baking powder, along with the almond meal. 

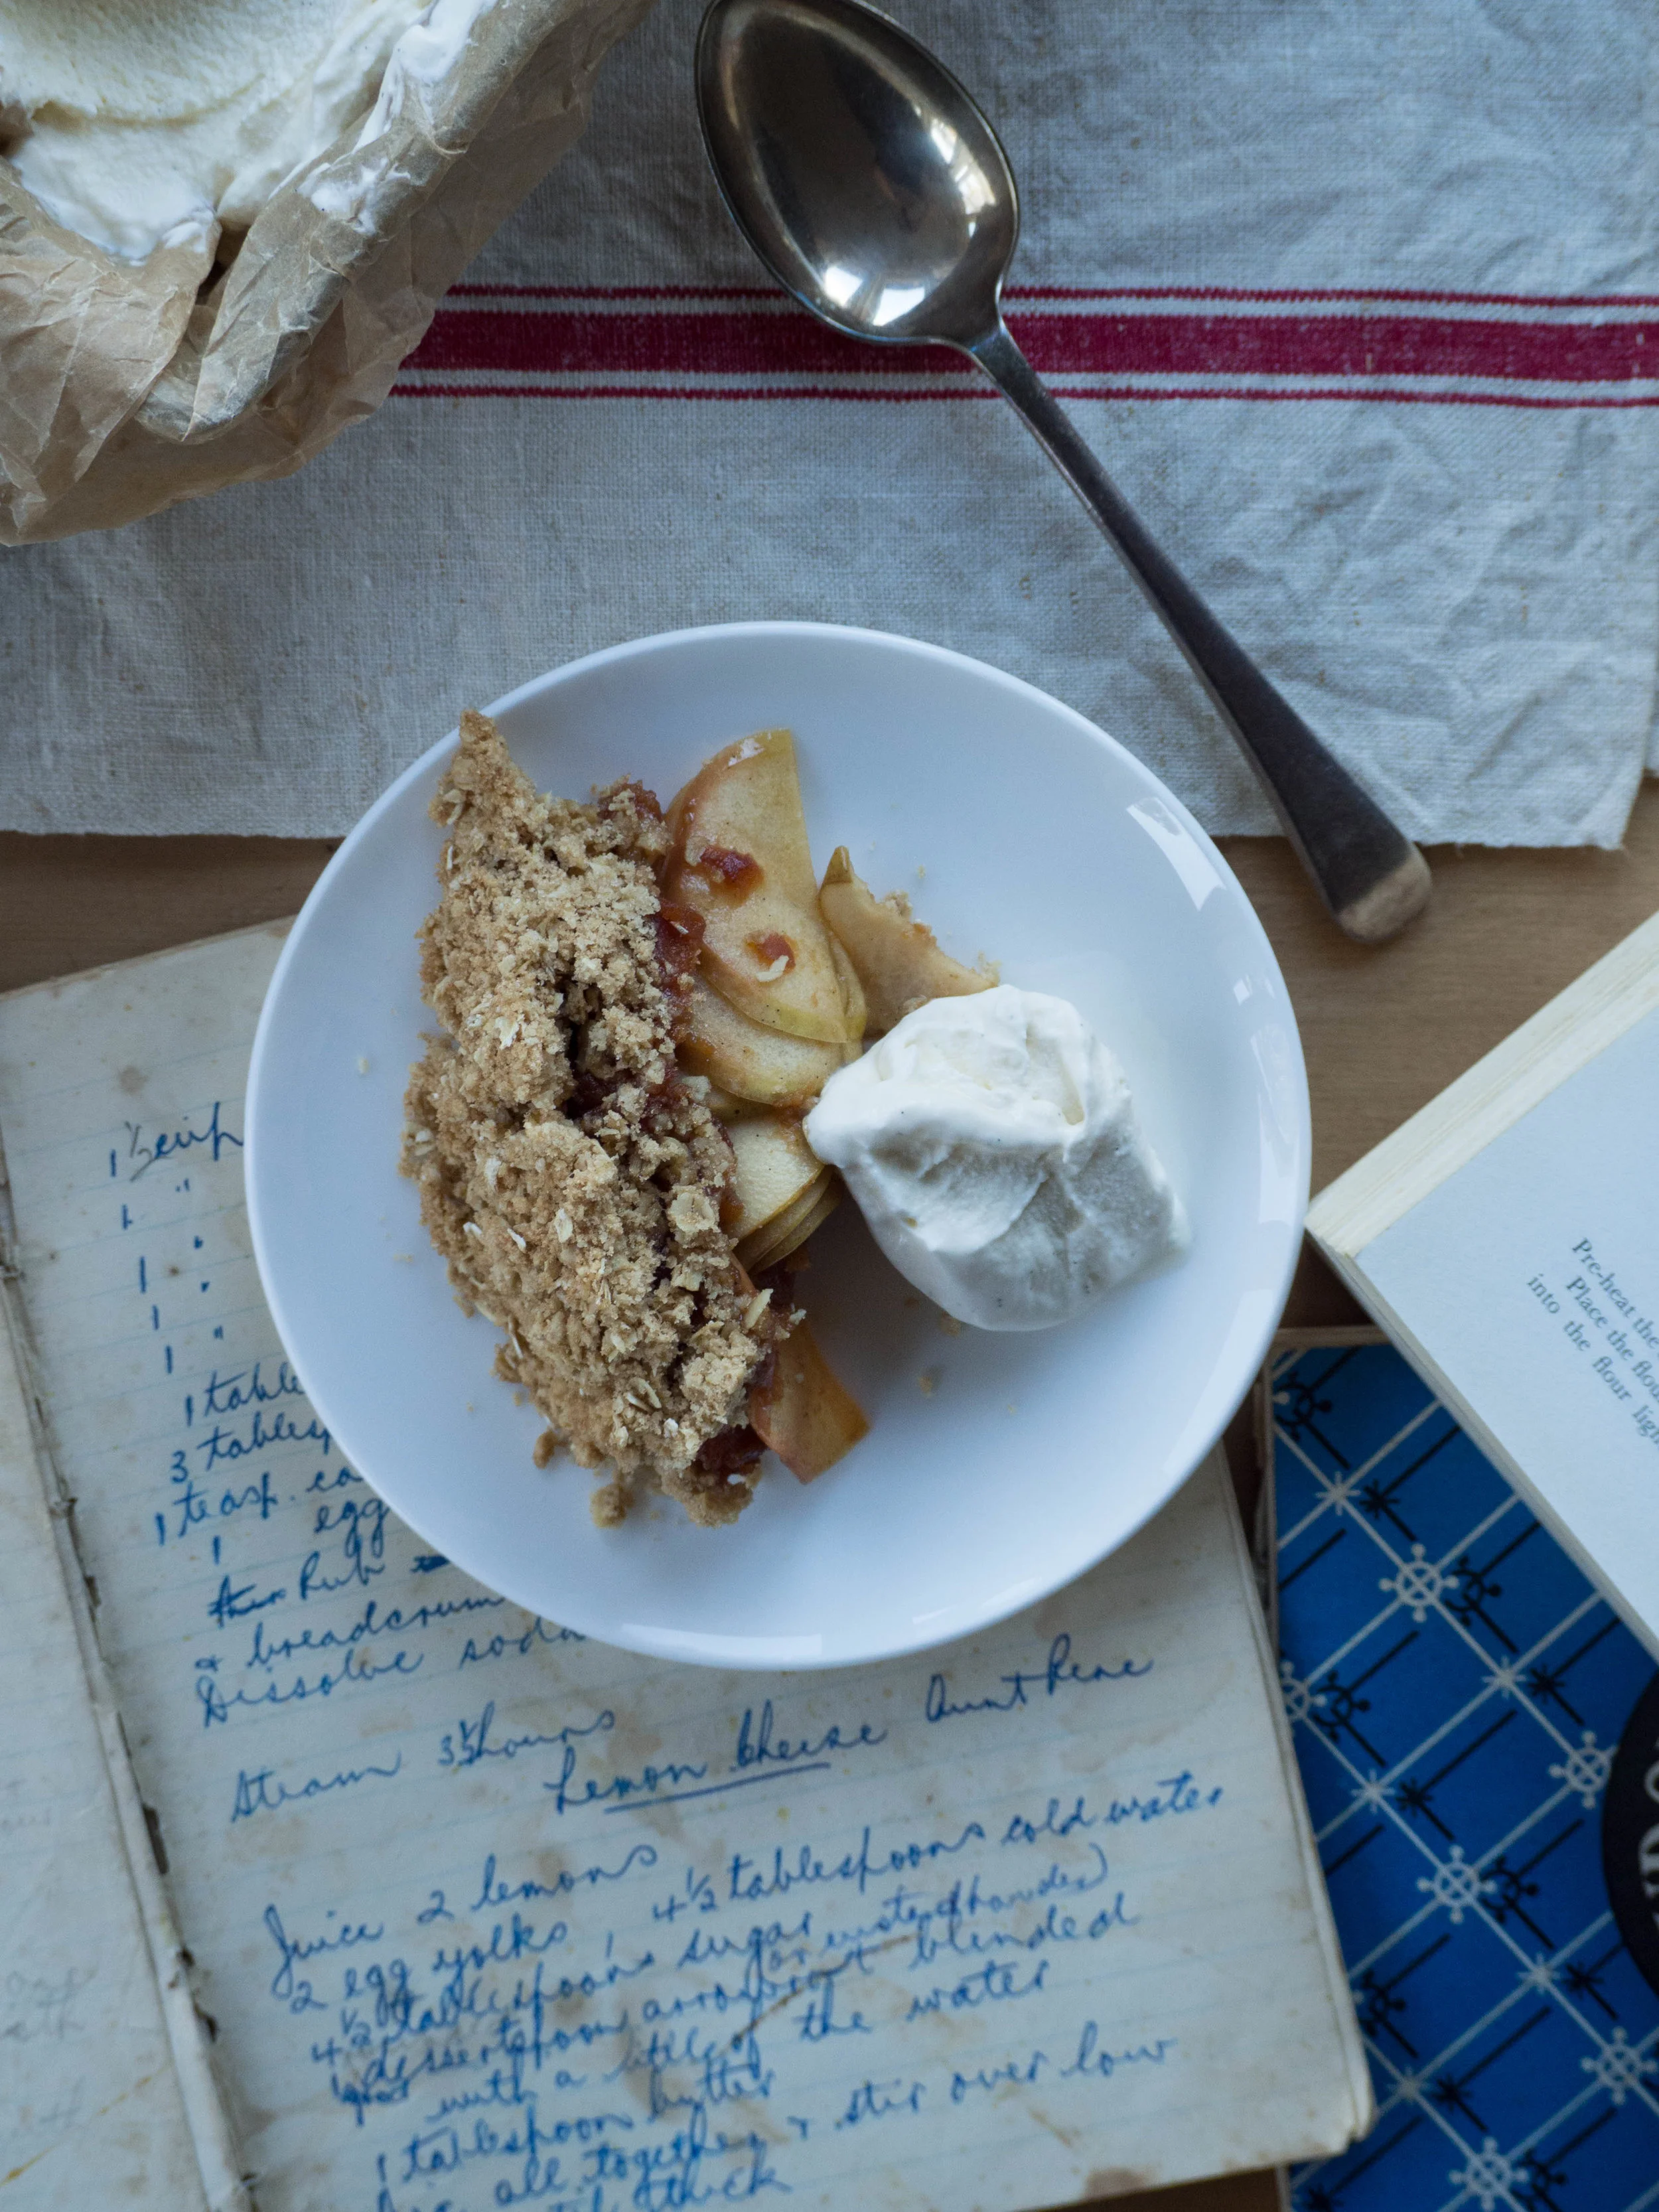
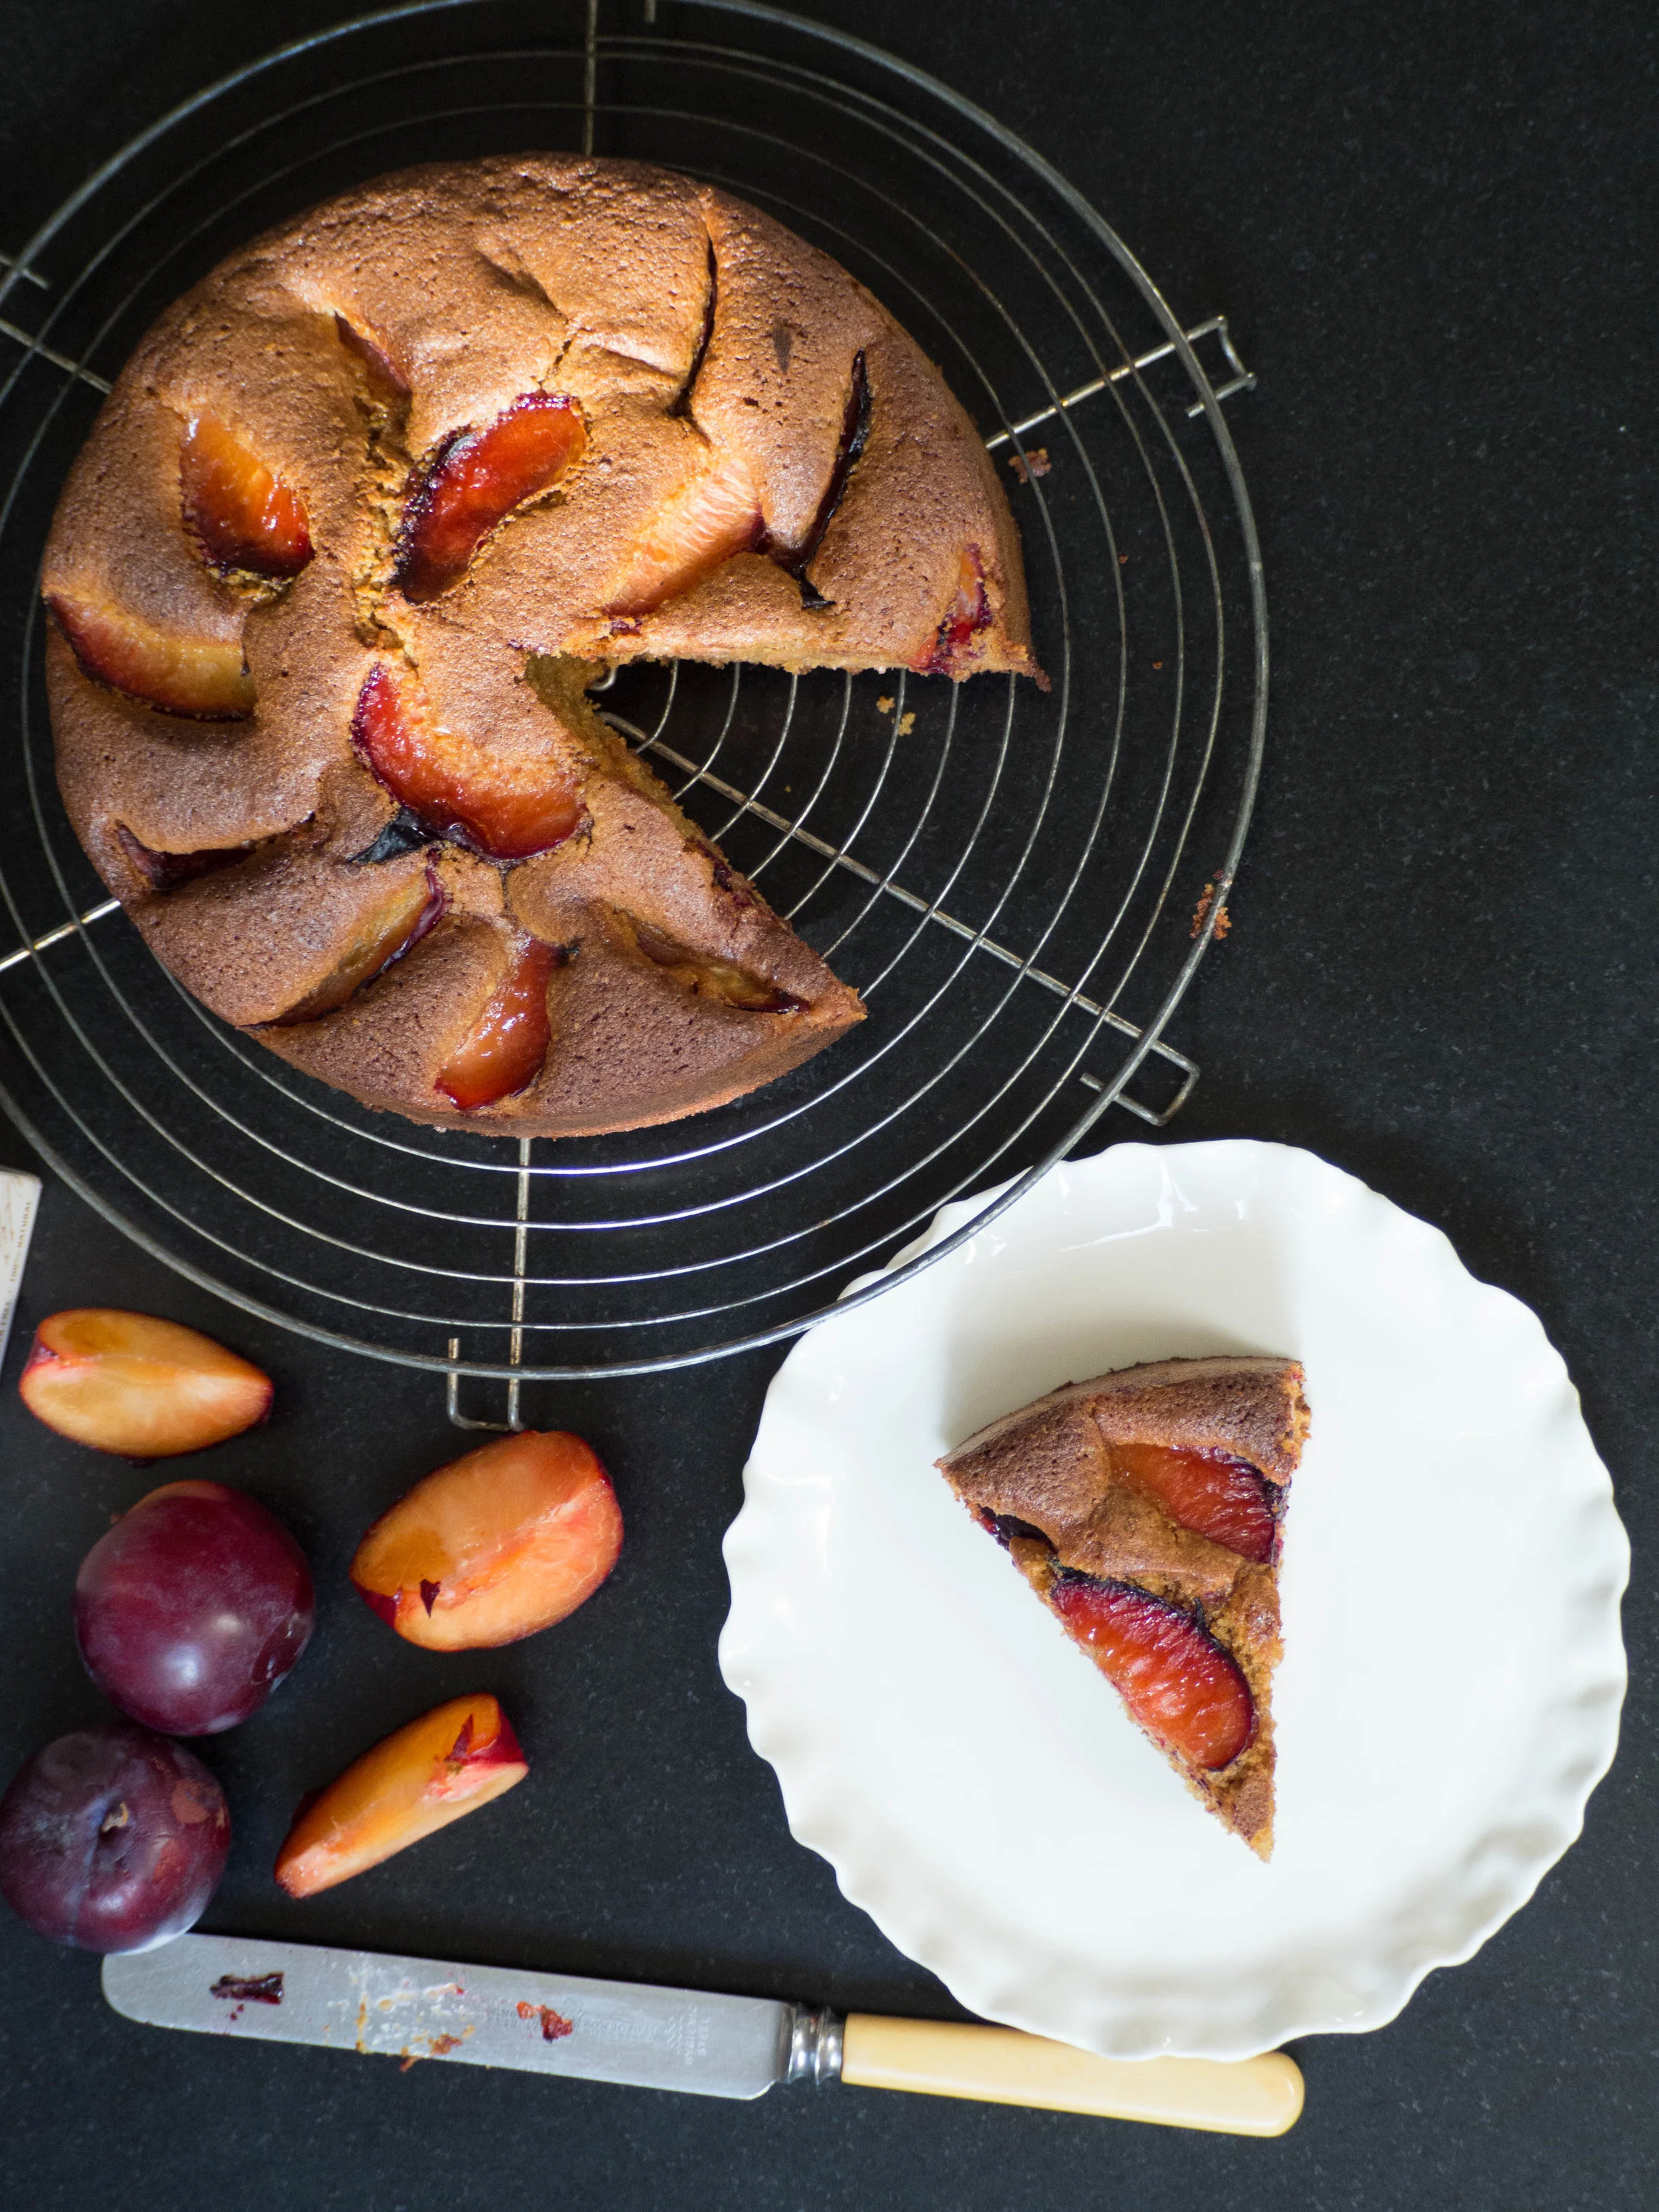
Pour the mixture into the prepared tin and smooth the top. Cut the plums in half, then in half again. Then slice up each plum quarter into 3 or 4 slices. Place the plum slices onto the top of the cake, working your way around the outside of the cake then moving into the middle (you might not need all of the two plums, it will depend on their size). Keep the slices of plum fairly close together as they will separate a little when the cake rises. Sprinkle the plums with some more Panela sugar. 

Bake for 40 minutes, or until the cake is golden in colour and a skewer comes out clean. The cake will be a deep golden colour due to the Panela sugar. 

Leave the cake in the tin for 10 minutes, before transferring to a wire rack to cool - alternatively serve warm as a dessert with the Vanilla and Panela Ice Cream. 

Vanilla & Panela Ice Cream

Ingredients: 

165ml full cream milk 

6 tbsp Grounded Pleasures Organic Panela Sugar

250ml pouring cream 

1 tsp Grounded Pleasures Organic Vanilla extract

1 Grounded Pleasures Organic Vanilla bean, seeds scraped


Method: 

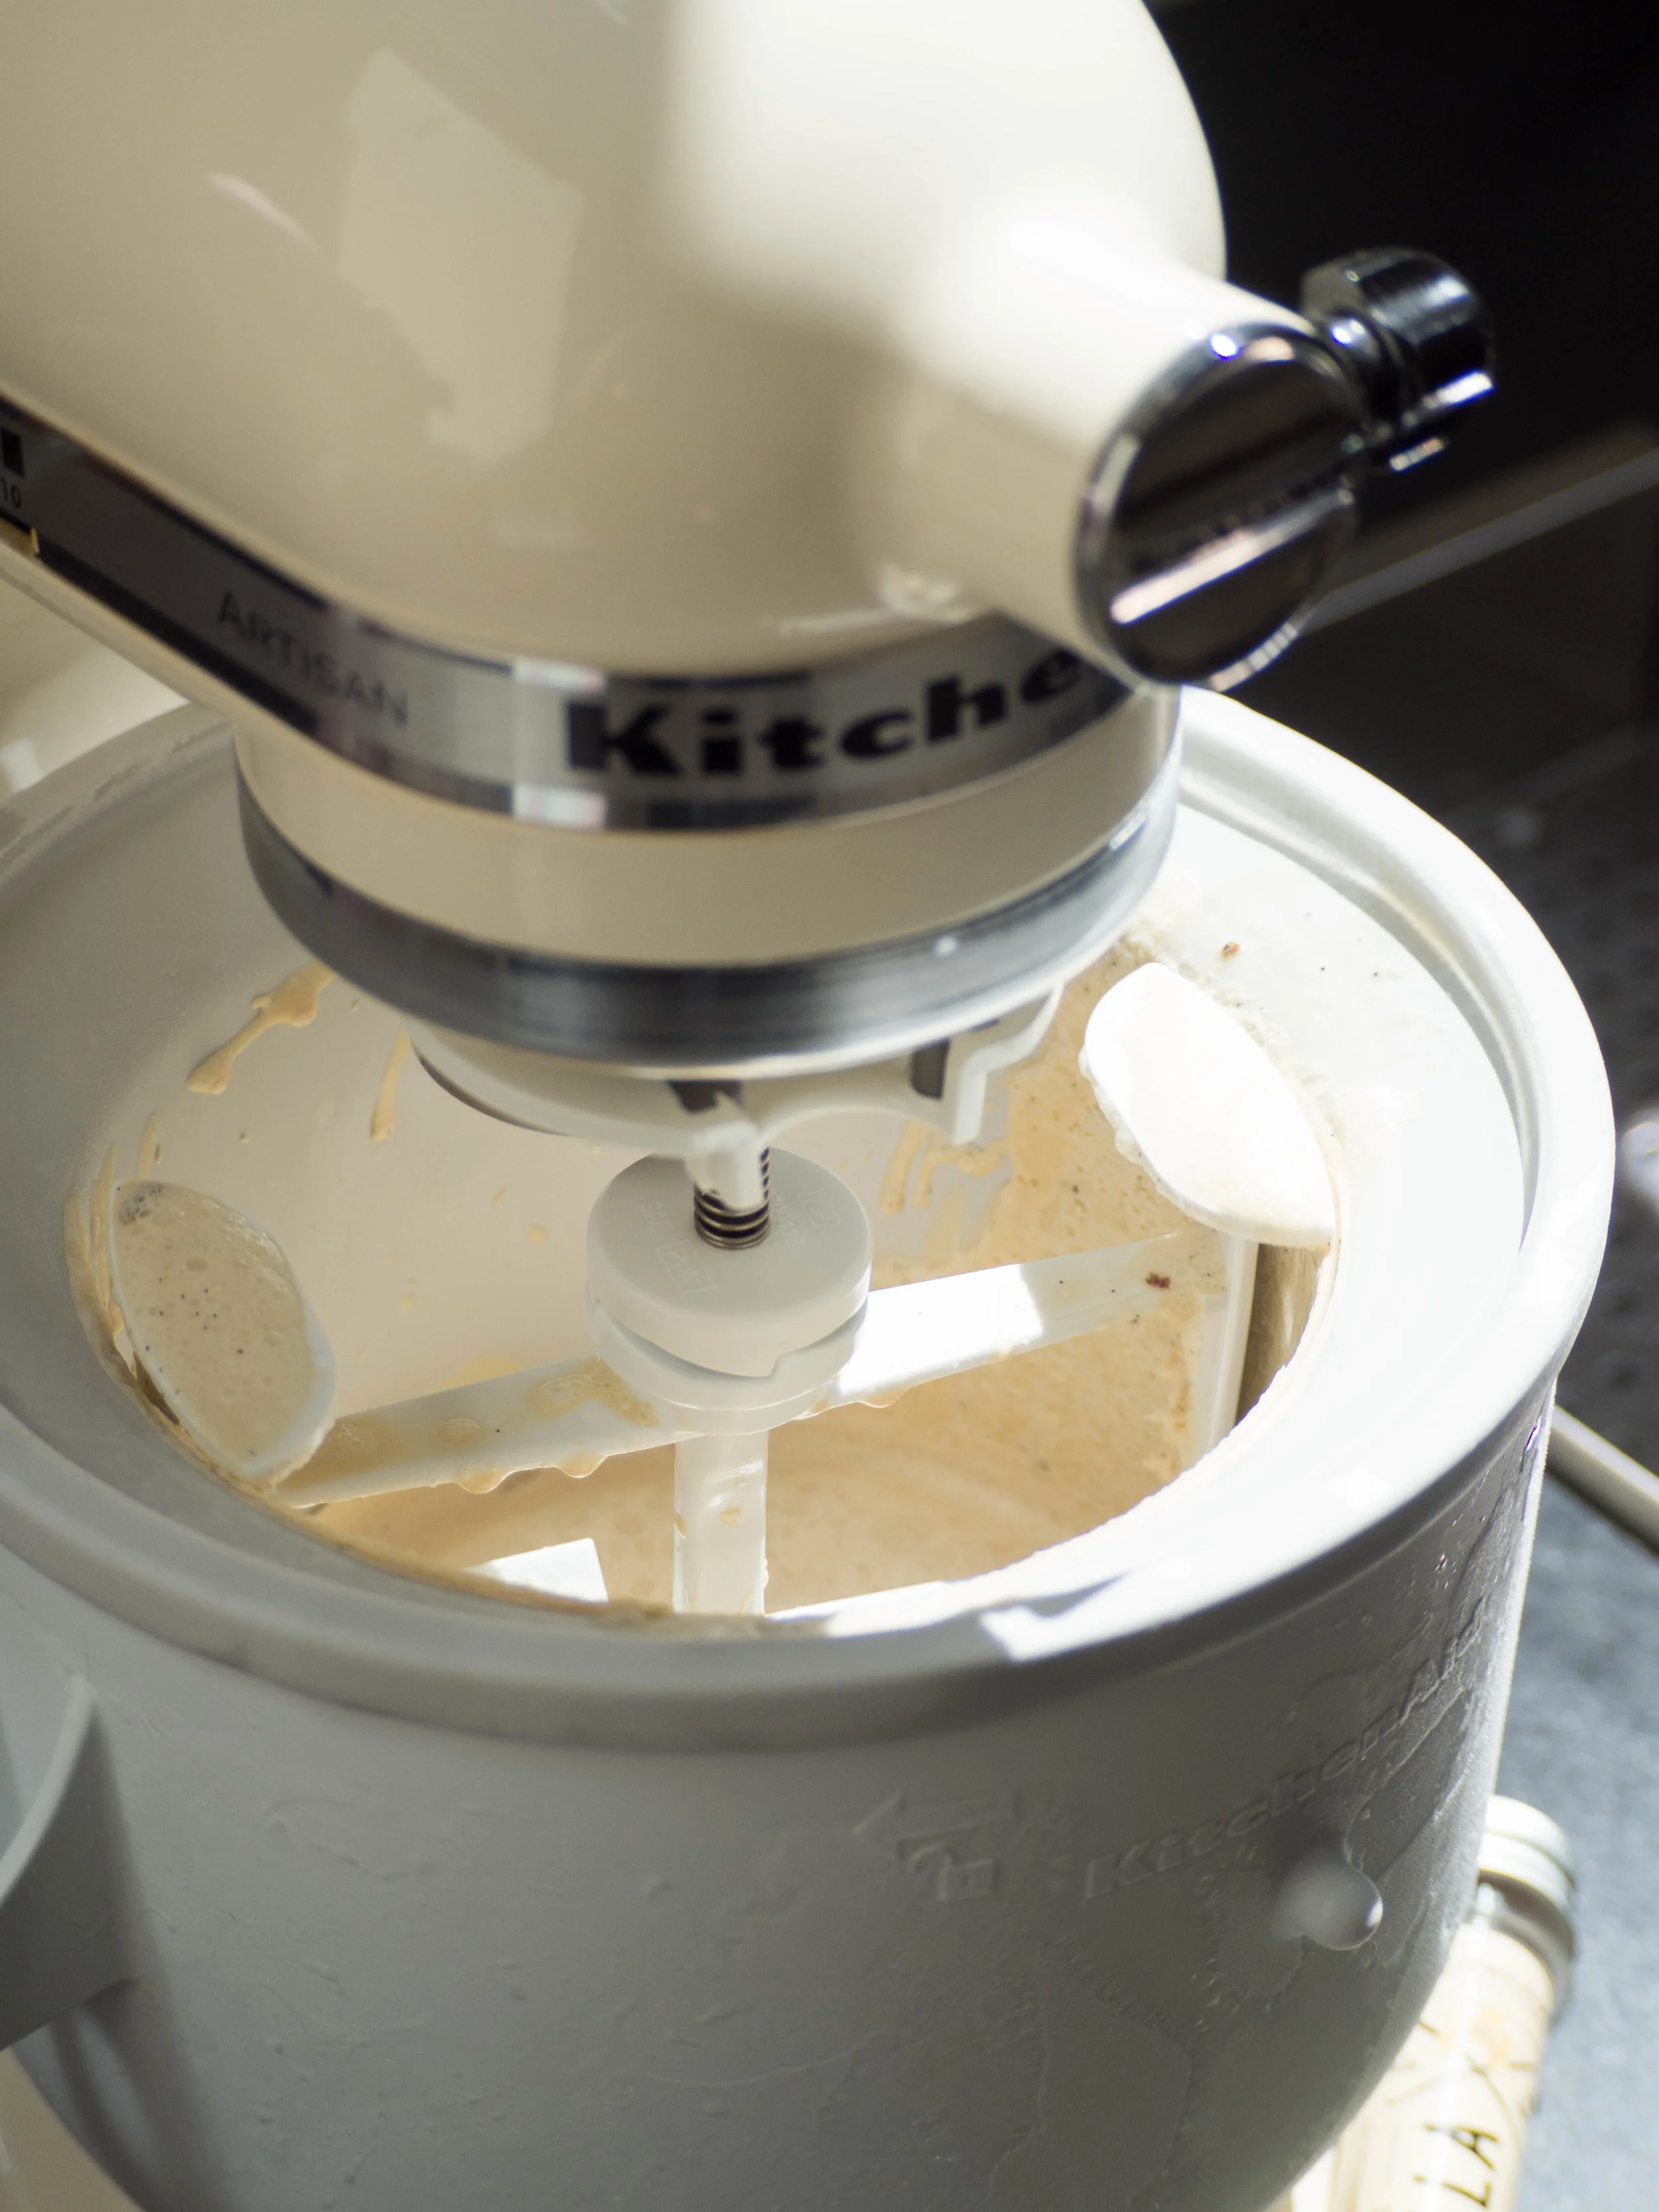
Whisk the milk and Panela Sugar together until the sugar has dissolved and the milk has become frothy. Then add the cream, the vanilla extract and the seeds of the vanilla bean and whisk until combined. 

Transfer mixture into the bowl of an ice cream machine, and process according to machine instructions. Once ready, transfer ice cream into a freezer safe container and freeze for at least 4 hours (overnight is best). 

References: ‘Holiday’ by Bill Granger (Murdoch Books, 2007), p.124; ‘Lomelino’s Ice Cream’ by Linda Lomelino (Roost Books, 2015), p.13.

Thanks to Grounded Pleasures for sponsoring this post and providing the Panela Sugar, Vanilla Beans & Extract!

In Cakes & Slices, Other Desserts, Ice Cream Tags Plums, Cake, Grounded Pleasures, Panela Sugar, Vanilla, Ice Cream, Sponsored Posts
2 Comments
Gingerbread Pavlova

Gingerbread Pavlova

Festive Gingerbread Pavlova (Gluten Free)

Kath December 21, 2016

Up until about a week ago, I wasn't feeling festive at all. Christmas not only felt a while away, but the previous one still felt so recent. So recent, I wasn't feeling in any way inspired to create or bake something new for Christmas. All I could think of was the gingerbread cake I made last year, which I really liked and the many pavlovas I made made in the years previous to that (the most recent Christmas Pav being this one). So, after mulling this over for a little bit, and starting to slightly freak out that Christmas would come and go without me posting any Christmas related recipe here, it suddenly dawned on me that the perfect Christmas dessert this year would be a combination of my favourites from previous years. And thus this Gingerbread Pavlova was born. 

I am so happy with it, and have almost single handedly eaten most of it myself (calories don’t count at Christmas, right?). I know I have a few Pavlova recipes floating around on the blog, but the base of this recipe (my Grandma’s) is very special to me, and I seem to never cease to come up with new adaptations of it. Pavlova was something my Grandma often made at Christmas, and was her go to Summer time dessert. For me, despite not having too many family Christmas traditions, Pavlova is definitely a dessert that must be on the table for it to be actually Christmas for me. 

My only other Christmas food traditions (or requirements) are a ham, some gingerbread biscuits and a rather large quantity of white cherries. The only other traditions we have that I can think of are that whether the presents are from Santa or not, and whether we are actually adults now or not, the ‘Santa’ presents can only go under the tree after we go to bed on Christmas Eve. None of this being very organised and putting them out early. Like the time, a decade ago Mum and I were away for Christmas and Dad put the presents out a day early. My brother was extraordinarily unimpressed and still to this day mentions how Dad did it all wrong. It’s funny how the things we grow up with still mean so much later in life and have become a family tradition, whether it makes sense or not!

I really enjoyed hearing about the Christmas traditions of others on the most recent My Open Kitchen podcast (series 2 episode 2). I listened whilst baking and it definitely got me thinking about my family’s traditions and got me feeling much more festive. If you have some time before the big day, I definitely recommend giving it a listen. I also really enjoyed Nigella Lawson’s ‘Seasonal Sound Bites’ Christmas podcast series. I never tire of listening or watching Nigella talk about food, and her eloquent musings on Christmas were definitely no exception. 

I hope you have a wonderful holiday season, and a great new year! Thanks for following along with my kulinary adventures this year, see you in 2017 - happy baking!

Gingerbread Pavlova

Ingredients: 

4 egg whites

250g golden caster sugar (or caster sugar)

1 tsp white vinegar 

1/2 tsp vanilla bean paste 

1 tsp ground ginger

1tsp ground cinnamon

1 tsp ground cloves

1/2 tsp all spice 

1/4 tsp maple essence

20g cornflour 


To decorate: 

300 ml pouring cream 

1 tsp ground cinnamon 

1 punnet red currants 

4 small star shaped gingerbread biscuits, optional. I used this recipe, which will make about 70-80 small star shaped biscuits.


Method: 

Pre-heat oven to 200 degrees Celsius. Line a large baking tray with baking paper, and trace a circle approx. 26 cm in diameter (I used a dinner plate). 

In a clean dry bowl, beat the egg whites for 5-6 minutes, whilst gradually adding the sugar. Add the vinegar, vanilla and maple essence and beat until the mixture is stiff and glossy. 

Sift cornflour and spices over the mixture, and gently fold to combine. 

Place mixture onto the tray in the middle of the drawn circle. Push the mixture around to form a circle, leaving a small border around the edges. Try to keep the edges a little higher than the middle so any filling can sit comfortably in the middle later. 

Turn the oven down to 125 degrees Celsius, and cook undisturbed for 1.5 hours. 

After 1.5 hours, turn the oven off and leave the pavlova to cool completely in the oven (or overnight). 

If decorating as pictured you will need to create a gingerbread man stencil. Do so by tracing a medium/large gingerbread man biscuit cutter on to a piece of baking paper (big enough to cover the surface of the pavlova). Cut out the inside of the gingerbread man, so you are left with the piece of baking paper with a gingerbread man shaped hole in the middle. 

Just before you are ready to serve the pavlova, whisk the cream until soft peaks form. Fill the centre of the pavlova with the cream, and smooth the middle a little. Place the gingerbread stencil over the cream, with the gingerbread man centred in the middle of the pavlova. Carefully sift the cinnamon over the cut out, then carefully remove the stencil. Use three red currants to give the gingerbread man some buttons, then use the remaining red currants to decorate the rim on the pavlova (where the edge of the cream and pavlova meet). Add the gingerbread biscuits and serve.

In Heirloom Recipes, Holidays, Other Desserts Tags Pavlova, Gingerbread, Christmas
Comment
Quince & Apple Crumble

Quince & Apple Crumble

Quince & Apple Crumble + How to Make Homemade Vanilla Ice Cream (Egg Free)

Kath September 25, 2016

This recipe is highly inspired by my Grandma’s cooking. Although I don’t think she ever poached quince or made her own ice cream, crumbles were definitely a staple dessert in her house. Rhubarb was the filling I remember most and as I have alluded to before, I would not try the Rhubarb Crumble’s my Grandma made. This was in protest of the fact that the dessert wasn’t Pavlova, which was, to me the only obvious choice for dessert at any time of year. 

My Grandma’s Pavlova was my absolute favourite (still evidenced by how many times it has appeared in some form on this blog!), and I remember feeling such bitter disappointment when I noticed it had not been my Grandma’s chosen dessert that evening. While the pink hue of the rhubarb should have drawn my interest as a child, I was firmly opposed to the idea of eating a vegetable in a dessert, even if it was served with ice cream. I would then moodily sit eating my plain vanilla ice cream, hoping our next visit would include my favourite Pavlova. 

Now being older and having made much more of an effort to try new foods, I have come around the to humble crumble. I could not however find amongst my Grandma’s hand written recipes, a recipe for any type of crumble. It is likely it was something she started making later in life, maybe seeing it made on one of the cooking shows on TV she liked watching, or amongst the recipes found in the newspaper. I did however stumble across a little section in her copy of ‘Delia Smith’s Complete Cookery Course’ on crumbles and I guess it is also possible the recipe she used or was inspired by came from there. The book is ‘a new edition for the 1990s’, which would fit in well with my thought that she made many more crumbles later in life. It also fits in rather perfectly with my childhood memory of boycotting her rhubarb crumble. 

My Grandma’s copy of Delia’s book, looks somewhat used, maybe just a little less so than her handwritten notebooks and recipe books from the 1950s. A few pages are marked with scraps of paper with handwritten recipes on them (including a lemon sponge and oatmeal cookies), and a couple of cut outs from the food section of a newspaper (one recipe and one reader cooking tip). There is also a bookmark from the Stroke Foundation holding the place between Spanish Pork with Olives and Ossobuco in the ‘Meat: Casseroles and Braised Dishes’ section. Such a find is slightly bittersweet considering how my Grandma’s life came to an end, but also a reminder of her understanding of her vulnerabilities and attention to preventing them.

Finding little notes, recipes and newspaper cut outs in my Grandma’s cookbooks give me little snapshots and reminders of her every time, and maybe one day in another book I’ll find a scrap of paper with a recipe for her crumble. 

For my crumble recipe I have used a combination of fruit which is slightly more Winter-y, however I thought equally as delicious and satisfying during any season. If you have some poached quinces definitely use them, they work so well with the crumble topping. If you wish to substitute the quinces for something else, I would suggest rhubarb (of course!), either sliced finely with a mandolin or lightly softened on the stove first - just keep the quantity of rhubarb about the same as the quinces or so it fits nicely into the dish you are using. If making, the ice cream should be made earlier in the day or the night before so it has ample time to freeze. It is quite a simple ice cream recipe, requiring no eggs just some sugar, milk, cream and vanilla. I would suggest doubling the ice cream recipe if you wish to feed more than 5 or so people. 

Homemade (Easy) Vanilla Ice Cream

Homemade (Easy) Vanilla Ice Cream

Homemade Vanilla Ice Cream (Egg Free)

Ingredients: 

165ml full cream milk 

6 tbsp white sugar

250ml pouring cream 

1 tsp vanilla extract 

2 tbsp vanilla bean paste 


Method: 

Whisk the milk and sugar together until the sugar has dissolved and the milk has become frothy. Then add the cream and both vanillas and whisk until combined. 

Transfer mixture into the bowl of an ice cream machine, and process according to machine instructions. I found the churning process took about 10-15 minutes. Once ready, transfer ice cream into a freezer safe container and freeze for at least 2 or 3 hours. 

Quince and Apple Crumble

Ingredients: 

6 poached quince, approx. 930g 

2 Pink Lady Apples, approx. 250g

2 very small pears, approx. 140g 

2 tbsp quince poaching liquid

2 tsp vanilla bean paste

75g unsalted butter, softened and cubed

110g plain flour 

110g oats (not instant) 

110g brown sugar 

1/2 tsp ground cinnamon 


Method: 

Pre-heat oven to 180 degrees Celsius. 

Remove the poached quinces from their poaching liquid, reserving the liquid. Roughly chop the quinces and place into a large mixing bowl. 

Very finely slice the apples and pears (I used a mandolin), discarding the cores. Place in the bowl with the quince and gently mix together. Add the vanilla bean paste and the quince poaching liquid and mix again. Then tip the mixture into a 2-2.5L capacity pie/gratin/baking dish. Spread the mixture out so it sits in the dish evenly. 

To make the crumble topping place the flour, oats and cinnamon into a mixing bowl then add the butter. Rub the butter into the flour and oats until the mixture starts to look crumbly. Add the sugar and mix well. 

Spoon the crumble mixture over the fruit ensuring it is evenly dispersed. The thickness of your crumble topping will depend on the size and depth of your dish. I used a fairly deep dish so I ended up with a nice thick crumble topping. 

Cook crumble for 30-40 minutes, or until the top has turned lightly golden brown. 

Serve warm with the vanilla ice cream. 

References: ‘Lomelino’s Ice Cream’ by Linda Lomelino (Roost Books, 2015), p.13: ‘Delia Smith’s Complete Cookery Course’ by Delia Smith (BBC Books, 1998), pp. 594-5.

In Other Desserts, Heirloom Recipes, Ice Cream Tags Crumble, Quince, Apple, Grandma, Ice Cream, Vanilla, Delia Smith, heirloom baking, Dessert
Comment
Winter Pavlova with Poached Quinces

Winter Pavlova with Poached Quince

A Winter Pavlova + How to Poach Quince

Kath July 25, 2016

After 17 weeks, many frustrating meal times and far too many toasted sandwiches, our new kitchen is done! At the 17 week mark we were able to put most things back in the kitchen and use it (finally!), and after a few more weeks the last finishing touches and changes were done. Now all we need is another coat of paint and the longest kitchen renovation will be officially complete! I have been immensely enjoying being back in the kitchen. Not being able to bake for 4 months was almost like torture for me! Now I am trying to spend every spare moment in there, baking all the things I have been thinking about since late February, and making the most of seasonal produce I have been so desperately wanting to cook with. 

Such seasonal produce, includes quince. Since finding some good poaching recipes last year, my enthusiasm for cooking (and eating) homemade poached quince has only increased. When June arrived, and our kitchen was still in renovation mode, I did begin to panic that I may miss quince season all together and have to wait another whole year to enjoy them. Luckily the renovation finished just in time and I have poached three lots of quince (on a new gas stove none the less!). 

Grandma's Pavlova

Grandma's Pavlova

I have some stored in the fridge, with extra poaching liquid to use for whatever takes my fancy. Though served with ice cream and a drizzle of poaching syrup makes a nice simple dessert, and topping pancakes with them turn lazy weekend breakfasts into thoroughly gourmet affairs. 

After the publication of Country Style’s Heirloom Recipe Cookbook, in which my Grandma’s pavlova recipe was featured, I decided to go back to this favourite family recipe and give it a Winter twist. I also was keen to see how a familiar recipe fared in our new oven! Every oven seems to be different and it takes a little while to adjust. I am finding I’m needing to turn the recommended temperatures down at least 10 degrees in our new oven, and for this recipe I ended up baking the pavlova at 110 degrees Celsius (after the initial pre-heating). I have left the oven temperature in the recipe the same as my Grandma’s original recipe, however if you can smell the pavlova cooking too quickly (it will start to smell like the beginning stages of caramel/burning sugar), turn the temperature down accordingly. 

Country Style's Heirloom Recipes cookbook

Country Style's Heirloom Recipes cookbook

Note: Both the poached quince and the pavlova base can be made in advance. The pavlova can be cooked the night before and left in the oven overnight to cool. 

Poached Quinces

Poached Quince

Poached Quince

Ingredients: 

6 Quince 

900g white sugar

1.2L water

1 tsp vanilla bean paste

2 cinnamon quills 


Method: 

Peel the quince and cut into quarters, removing the cores. Wrap the peel and cores in muslin. In a large pot place the quince and the muslin containing the cores and peel. Add the sugar and water, and cook covered over low heat, allowing the water to simmer, for 1 hour. 

After one hour check the quince by pricking a couple with a fork to check how tender they have become. The quince should become quite tender and soft, however remain whole and not break up. If the quince are not tender enough keep them on the heat, checking again after twenty minutes or so. This process should take between 1-2 hours total. 

Once the quince have become tender, add the vanilla bean paste and cinnamon quills to the pot. Gently stir everything together, then turn off the heat and leave to cool with the lid on. 

Once the quince have begun to cool, sterilise a couple of medium/large jars, by washing them in hot soapy water then placing in the oven for 20 minutes on a low temperature. Transfer the quince into each jar, then cover with as much poaching liquid as will fit. You may want an additional jar to store any remaining poaching liquid. Store in the fridge for up to a month. 

Mascarpone Cream

Mascarpone Cream

Winter Pavlova

Ingredients: 

4 egg whites

125g caster sugar

125g golden caster sugar 

1 tsp white vinegar 

1 tsp vanilla bean paste 

20g cornflour 


To decorate: 

200g mascarpone (I used Pepe Saya) 

150ml thickened cream

1 tsp vanilla extract 

35g icing sugar

8 quarters of poached quince, approx. 

Poaching liquid, to serve


Method: 

Pre-heat oven to 200 degrees Celsius. Line a large baking tray with baking paper, and trace a circle approx. 26 cm in diameter (I used a dinner plate). 

In a clean dry bowl, beat the egg whites for 5-6 minutes, whilst gradually adding the sugar. Add the vinegar and vanilla and beat until the mixture is stiff and glossy. 

Sift cornflour over the mixture, and gently fold to combine. 

Place mixture onto the tray in the middle of the drawn circle. Push the mixture around to form a circle, leaving a small border around the edges. Try to keep the edges a little higher than the middle so any filling can sit comfortably in the middle later. 

Turn the oven down to 125 degrees Celsius, and cook undisturbed for 1.5 hours. 

After 1.5 hours, turn the oven off and leave the pavlova to cool completely in the oven (or overnight). 

Just before you are ready to serve the pavlova, place the mascarpone in a medium sized bowl and whip until it has thickened and soft peaks form. Gradually add the cream, vanilla and icing sugar until all ingredients have combined and stiff peaks form. 

Spread the mascarpone cream into the centre of the pavlova. Drain the quince of syrup and sit them on top of the cream. 

Serve with the quince poaching liquid. 

Winter Pavlova with Poached Quinces

Winter Pavlova with Poached Quince

Reference:  Jamie Magazine, Issue 63 November 2015 p.31. 

In Other Desserts, Heirloom Recipes Tags Quince, Poached Quinces, Pavlova, Country Style Magazine, Heirloom Recipes, Winter, Dessert, Kitchen renovation, Grandma
Comment

Raspberry & Rose Pavlova (Gluten Free) + Christmas 2014

Kath January 2, 2015

This year for Christmas I baked a lot! We don’t have a big family, so we decided to make food the focus for Christmas Day. While the heat and humidity of our Sydney Summer provided a few challenges to my baking efforts, I really enjoyed having the time to bake and cook whatever I wanted, with Christmas being the ‘excuse.’ 

I made four batches of gingerbread, using this recipe, which remains my favourite. A made a gingerbread house, with varying levels of success. I was concerned about is structural soundness, however after just over a week of standing upright and remaining standing once a meat mallet was taken to it, I feel these concerns were slightly unfounded! Mostly, I would have liked it to look prettier, however for my first ever attempt, it’s probably not so bad. 

PC230455.jpg

A few tarts were made as well. All of them stemmed from using up lovely summer fruits that we had bought. Using the same case and filling recipe as the white cherry tart I made in my last post, I used raspberries and peaches, which was so good, then just plain raspberry, then I used up the last of the Christmas cherries to make a cherry tart for New Years Eve. I also just made a plum upside-down cake to use up the last of the plums. It’s safe to say that this holiday season has not been short of cake and sweet treats! 

Peach & Raspberry Tart

Peach & Raspberry Tart

Cherry Tart for New Years Eve

Cherry Tart for New Years Eve

On Christmas morning I had prepared some of Sophie Hansen’s Buttermilk Jam Scrolls, which we ate with tea and some lovely fresh fruits. For Christmas Day lunch my Mum made a glazed ham, turkey wellington and a pear and goats curd salad. I made my favourite Summer Iced Tea. For dessert I created an Epic Pavlova. I call it epic as it was just something I thought I would try and see if it worked. And it ended up being the best pavlova I have ever made! I changed some of the ingredients from my Grandma’s original recipe, after looking at lots of other pavlova recipes. I wanted it to look a little festive, so I decided to decorate it with mostly red berries, and was particularly excited when I found red currants in the green grocer (first time I had ever seen them!). 

Breakfast

Breakfast

Christmas Lunch

Christmas Lunch

Dessert!

Dessert!

Unfortunately, I didn’t get to take many photos of the pavlova, as when I was assembling it, the Christmas Day weather began to turn bad. Thus there was no good light to shoot in. The shots I got were taken at a doorway to the balcony, door open to get as much natural light in as possible, rain coming down just beyond where the pavlova sat! 

Here is the recipe for my pavlova. I used up some of the remaining egg yolks to make the frangipane fruit tarts (substitute one whole egg for two yolks), otherwise you could make some gingerbread or maybe some custard. The quantities for the fruit to decorate are just guides, as you can put as little or as much as you would like, there are no rules! Lots of different fruits are great for pavlova, however I would stick to things that complement rosewater for this recipe. 

I made the pavlova layers on Christmas Eve and left them to cool in the oven overnight, and assembled just before serving on Christmas Day. 

Raspberry & Rose Pavlova

Ingredients for the Pavlova: 

8 egg whites 

500 g caster sugar

2 tsp raspberry vinegar 

1 tsp rosewater 

40g cornflour


To Decorate: 

450 ml cream 

1 tbsp rosewater 

1-2 punnet raspberries

1 punnet blueberries

seeds from 1-2 pomegranates

1 punnet red currants 


Method: 

Pre-heat oven to 200 degrees Celsius. Line two large baking trays with baking paper, and trace a circle on each, approx. 26 cm in diameter (I used a dinner plate). 

In a clean dry bowl, beat the egg whites for 5-6 minutes, whilst gradually adding the sugar. Add the raspberry vinegar and rosewater and beat until the mixture is stiff and glossy. 

Sift cornflour over the mixture, and gently fold to combine. 

Place half the mixture on one tray, using the circle as a guide. Push the mixture around to form a circle, leaving a small border around the edges. Repeat with the remaining mixture on the other tray. 

Turn the oven down to 125 degrees Celsius, and cook undisturbed for 1.5 hours. 

After 1.5 hours, turn the oven off and leave the pavlova layers to cool completely in the oven. 

When ready to assemble the pavlova, whip the cream and rosewater together. Spread half over one of the pavlovas and sprinkle with half the pomegranate seeds, half the raspberries and half the blueberries. Place the remaining pavlova shell on top. Fill the top layer with the remaining cream, and berries, using the red currants to form a border around the fruit on the top layer. 


What did you make during the festive season? Let me know in the comments below!


For more recipes showcasing the best of rose, check out my eBook Baking with Rose by clicking the link below!

get your ebook!
In Other Desserts, Heirloom Recipes, Holidays Tags Christmas, Baking, Tart, Pavlova, Gingerbread Biscuits, Gingerbread House, 2014
2 Comments
Date Torte - Kulinary Adventures of Kath

Chocolate & Date Torte (Gluten Free + Passover Friendly)

Kath October 13, 2014

Last month, one of my very good friends got married. It was very exciting! Especially as my friend very kindly asked me to help with the wedding favours and make a gluten-free dessert. I was quite surprised when she asked me. As much as I love baking, I sometimes don’t have the confidence that what I can do will be good enough, or will live up to what people want. My friend however, had complete confidence in me. This particular friend has been so very supportive of what I have been doing lately, and her support has meant so much to me. 

Working with my friend and her lovely mother on this order was lots of fun and really enjoyable. We tossed up a few ideas for the favours, and ended up landing on the rosewater and cardamom macaroons that I make. I liked this option as they are gluten and dairy free so all the wedding guests could enjoy them, and as almonds are a traditional bonbonniere gift I thought this was a nice link. My friend had a fantastic stamp made for her wedding, to use for the invitations and order of service, so we used this as the front of the label for the favours. I think the stamp was the best part of the favours! It looked fantastic and was a nice link to all the other elements of the wedding. 

Thanks so much again to my wonderful friend. I so appreciate your support and for giving me an opportunity to be part of your wedding. Congratulations to you and your husband! 

Congratulations!

Congratulations!

Wedding Favours - Kulinary Adventures of Kath
Wedding Favours 2 - Kulinary Adventures of Kath
Wedding Favours at Reception - Kulinary Adventures of Kath
Wedding Favours at Reception 2 - Kulinary Adventures of Kath
Date Torte 2 - Kulinary Adventures of Kath

Here is the recipe for the gluten free dessert I made for the wedding. It was a really nice torte to make and I am definitely looking forward to making it again soon. The original recipe used all dark chocolate. I changed it a little to include milk chocolate as well, as I often find dark chocolate too bitter. 

* this recipe needs to be started the day before serving.

Ingredients: 

250 g whole blanched almonds

150 g milk chocolate, broken into pieces 

100 g dark chocolate, broken into pieces

6 egg whites

115 g caster sugar

250 g pitted dates, finely chopped


To serve:

100 g milk chocolate

80 g dark chocolate 

250 ml whipped cream 


Method: 

Pre-heat oven to 180 degrees Celsius. Grease and line a 24 cm springform cake tin. 

Place the almonds and chocolate in a food processor and lightly blend. You still want small chunks of almonds and chocolate. 

In a separate bowl, whisk the egg whites until soft peaks form. Gradually add the sugar, and whisk until the whites are thick and glossy. 

Gently fold the almonds, chocolate and the chopped dates into the egg white mixture. Pour mixture into prepared tin, smooth the top if necessary. Bake for 45 minutes. 

Once the torte is cooked leave in the oven, turn the oven off, and leave the oven door propped open. Leave torte in the oven until completely cool. 

Once the torte has cooled, remove from the tin and place on a large plate or platter. Refrigerate overnight. 

The next day, melt the remaining chocolate in a heatproof bowl over a small amount of simmering water (the water should not touch the bottom of the bowl). 

Allow the melted chocolate to cool a little, then drizzle over the cake. 

Serve with whipped cream. 

Date Torte 3 - Kulinary Adventures of Kath

Original Recipe from ‘Monday Morning Cooking Club - The Feast Goes On’ by Lisa Goldberg, Merelyn Frank Chalmers, Natanya Eskin, Lauren Fink, Paula Horwitz and Jacqui Israel, p.187 (Harper Collins, 2014).

Originally Posted October 9, 2014. 

In Other Desserts, Holidays Tags Weddings, Wedding Favours, Gluten Free, Dates, Chocolate, Torte, Cardamom, Rosewater, Macaroons, Passover
Comment
  • The Blog
  • Older
  • Newer

recipes

  • Biscuits/Cookies 39
  • Breads Etc. 9
  • Breakfast 7
  • Cakes & Slices 68
  • Confectionary 5
  • Drinks 6
  • Events 14
  • Food Photography Tips 3
  • From The Mailing List 24
  • Heirloom Recipes 12
  • Holidays 44
  • Ice Cream 9
  • Jams Preserves & Spreads 9
  • Muffins 4
  • Off the Shelf 49
  • Other Desserts 25
  • Savoury Dishes/Meals 15
  • Scones 4
  • Tarts & Pastry 9
  • Travel 13

Sign up to Friday Food Chat with Kath, a weekly newsletter for more food, baking, cookbook chat and more!

Sign Up Here!
instagram-unauth pinterest facebook url

Website Accessibility: To enable text to speech function on the blog, click the sound button to the right of each blog post.

All images & content are the property of Kathryn Vincent, unless stated otherwise. Please do not use without permission.

Kulinary Adventures of Kath

Food Photography, Recipes & Baking

instagram-unauth pinterest facebook url