Kulinary Adventures of Kath

Food Photography, Recipes & Baking
  • home
  • About
  • Work with Kath
  • Shop
  • Blog
    • The Blog
    • Recipe Archive
  • Newsletter
  • Contact
  • home
  • About
  • Work with Kath
  • Shop
    • The Blog
    • Recipe Archive
  • Newsletter
  • Contact
Raspberry Pistachio Rose Cake (23 of 25).jpg

The Blog

Recipes and Food Photography by Kath Vincent.

  • The Blog
  • Recipe Archive
  • All
  • Biscuits/Cookies
  • Breads Etc.
  • Breakfast
  • Cakes & Slices
  • Confectionary
  • Drinks
  • Events
  • Food Photography Tips
  • From The Mailing List
  • Heirloom Recipes
  • Holidays
  • Ice Cream
  • Jams Preserves & Spreads
  • Muffins
  • Off the Shelf
  • Other Desserts
  • Savoury Dishes/Meals
  • Scones
  • Tarts & Pastry
  • Travel
IMG_5370.jpg

How to Make Traditional Australian ANZAC Biscuits

Kath October 11, 2014

Just a short post today, I’ve been trying to update the site and am finding my lack of IT knowledge very unhelpful! Luckily, these biscuits are easy to make, and don’t require any technical IT knowledge or technical baking knowledge for that matter. 


This is a recipe that my Grandma made often, and I copied down when I was about 11. They are a nice combination between chewy and crisp, and work well with either caster sugar, golden caster sugar, and I have also tried brown sugar as well. It doesn’t matter what type of coconut you use. Desiccated is more traditional, however shredded or flakes are really nice to use as well. 


This recipe is really easy to make and can be easily doubled if you need lots of biscuits for a event or party. I made them for the bake sale I did last year with Confessions of a Glutton and they were probably the easiest and least time consuming thing I made. 


So as ANZAC Day isn’t too far away, try making these instead of buying the packet ones and I think you’ll really notice the difference! 


Ingredients: 

1 cup rolled oats

1 cup plain flour

1 cup sugar (caster or golden caster)

3/4 cup coconut (desiccated, shredded or flakes)

1 tbsp golden syrup

100 g unsalted butter

1 tsp bi-carb soda

2 tbsp warm water 


Method:

Pre-heat the oven to 150 degrees Celsius and line two large baking trays with baking paper. 


Mix the oats, flour, sugar and coconut in a large bowl. Melt the golden syrup and butter on a medium-low heat, then mix the bi-carb soda and warm water together and add to the butter. The butter mixture should froth a little. 


Add the butter mixture to the dry ingredients and mix together. 


Place teaspoon sized balls of the mixture on the trays, leaving room for the biscuits to spread. Bake for 10 - 20 minutes, until golden. 


Makes approx. 32 biscuits.


Originally Posted April 6, 2014.


In Heirloom Recipes, Biscuits/Cookies Tags Biscuits, Grandma, Recipe, ANZAC, Australia
Comment
IMG_5062.jpg

Bill Granger's 'Mad' Chocolate Brownies

Kath October 11, 2014

In the past year I have purchased or been given almost all of Bill Granger’s cookbooks. I know he’s been around for a while, and I’m late to catch on, but ALL his recipes are good and work. It’s amazing. My Mum has had a copy of his ‘Feed Me Now’ book for a while, and for some reason I always ignored it. I had no idea what I was missing out on. I was steered in the right direction, in an odd and rather sad way by my Grandma. 

When she died we had to go through some of her things. In the sitting room, there was a lounge chair with a bookcase next to it. The bookcase was like a picture back in time. It had been left untouched since she had last used it almost a year previously. Even a couple of Christmas related magazines were on it, left from the last Christmas she spent at home. It was quite eery going through her things. I kept feeling like she was going to walk through the door and tell us to put her stuff away because she was still using it. On her bookshelf, were novels she had been reading and a small collection of books she had used or won at school in the 1940s. There was also a copy of Bill Granger’s book ‘Everyday’. On the inside cover was a message from one of my Grandma’s friends who had given it to her for Christmas a few years earlier. There were some pages marked, and the dust cover was slightly faded like it had been sitting in the sun for a while. 

I kept the book and when I looked through it, I noticed how many recipes looked good, and that I wanted to try. I have made Bill’s Portuguese Tarts many times and tried the Lamingtons for Australia Day this year. Every recipe works so well. And tastes so good! Even though they way I came across this book was sad, it was nice to know that even after death my Grandma could still influence the way I cook. It’s also comforting to have nice reminders of her, especially in the kitchen. I now have many more of Bill’s titles, all of which are great. So great, I don’t know how I coped in the kitchen without them. For Christmas a friend gave me ‘Bill’s Basics’, which is where this recipe comes from. Bill doesn’t call them ‘Mad’ chocolate brownies. This is my addition because when I made them for my brothers birthday and took them interstate to visit him, that was the word he used to describe them. 

The original recipe says to use all dark chocolate. I have used half dark chocolate and half milk chocolate because I dislike that bitter taste dark chocolate can have. I don’t think it would matter what proportions of which chocolate you use, the brownies will still be great!


Ingredients: 

350g caster sugar

80g cocoa powder

60g plain flour

1 tsp baking powder 

4 eggs, lightly beaten

200g melted unsalted butter

2 tsp vanilla extract

100g dark chocolate

100g milk chocolate


Method:

Preheat oven to 160 degrees Celsius and line a square 22cm baking tin. Chop chocolate roughly and set aside. 

In a large bowl, stir the sugar, cocoa, flour and baking powder together. Add the eggs, melted butter and vanilla and mix until combined. Then mix in the chopped chocolate. 

Pour batter into the prepared tin and bake for 40-50 minutes. 

Cool slightly in the tin before turning on to a wire rack. Cut into squares or small cubes. 

Yield of this recipe will depend on how you cut the brownie slab up. However, it should give at least 12 portions when cutting the brownie into squares. 


Original recipe from 'Bill's Basics' by Bill Granger (2010, HarperCollins), p. 42.

Originally Posted March 30, 2014.


In Cakes & Slices Tags Brownies, Bill Granger, Chocolate
4 Comments
IMG_5192.jpg

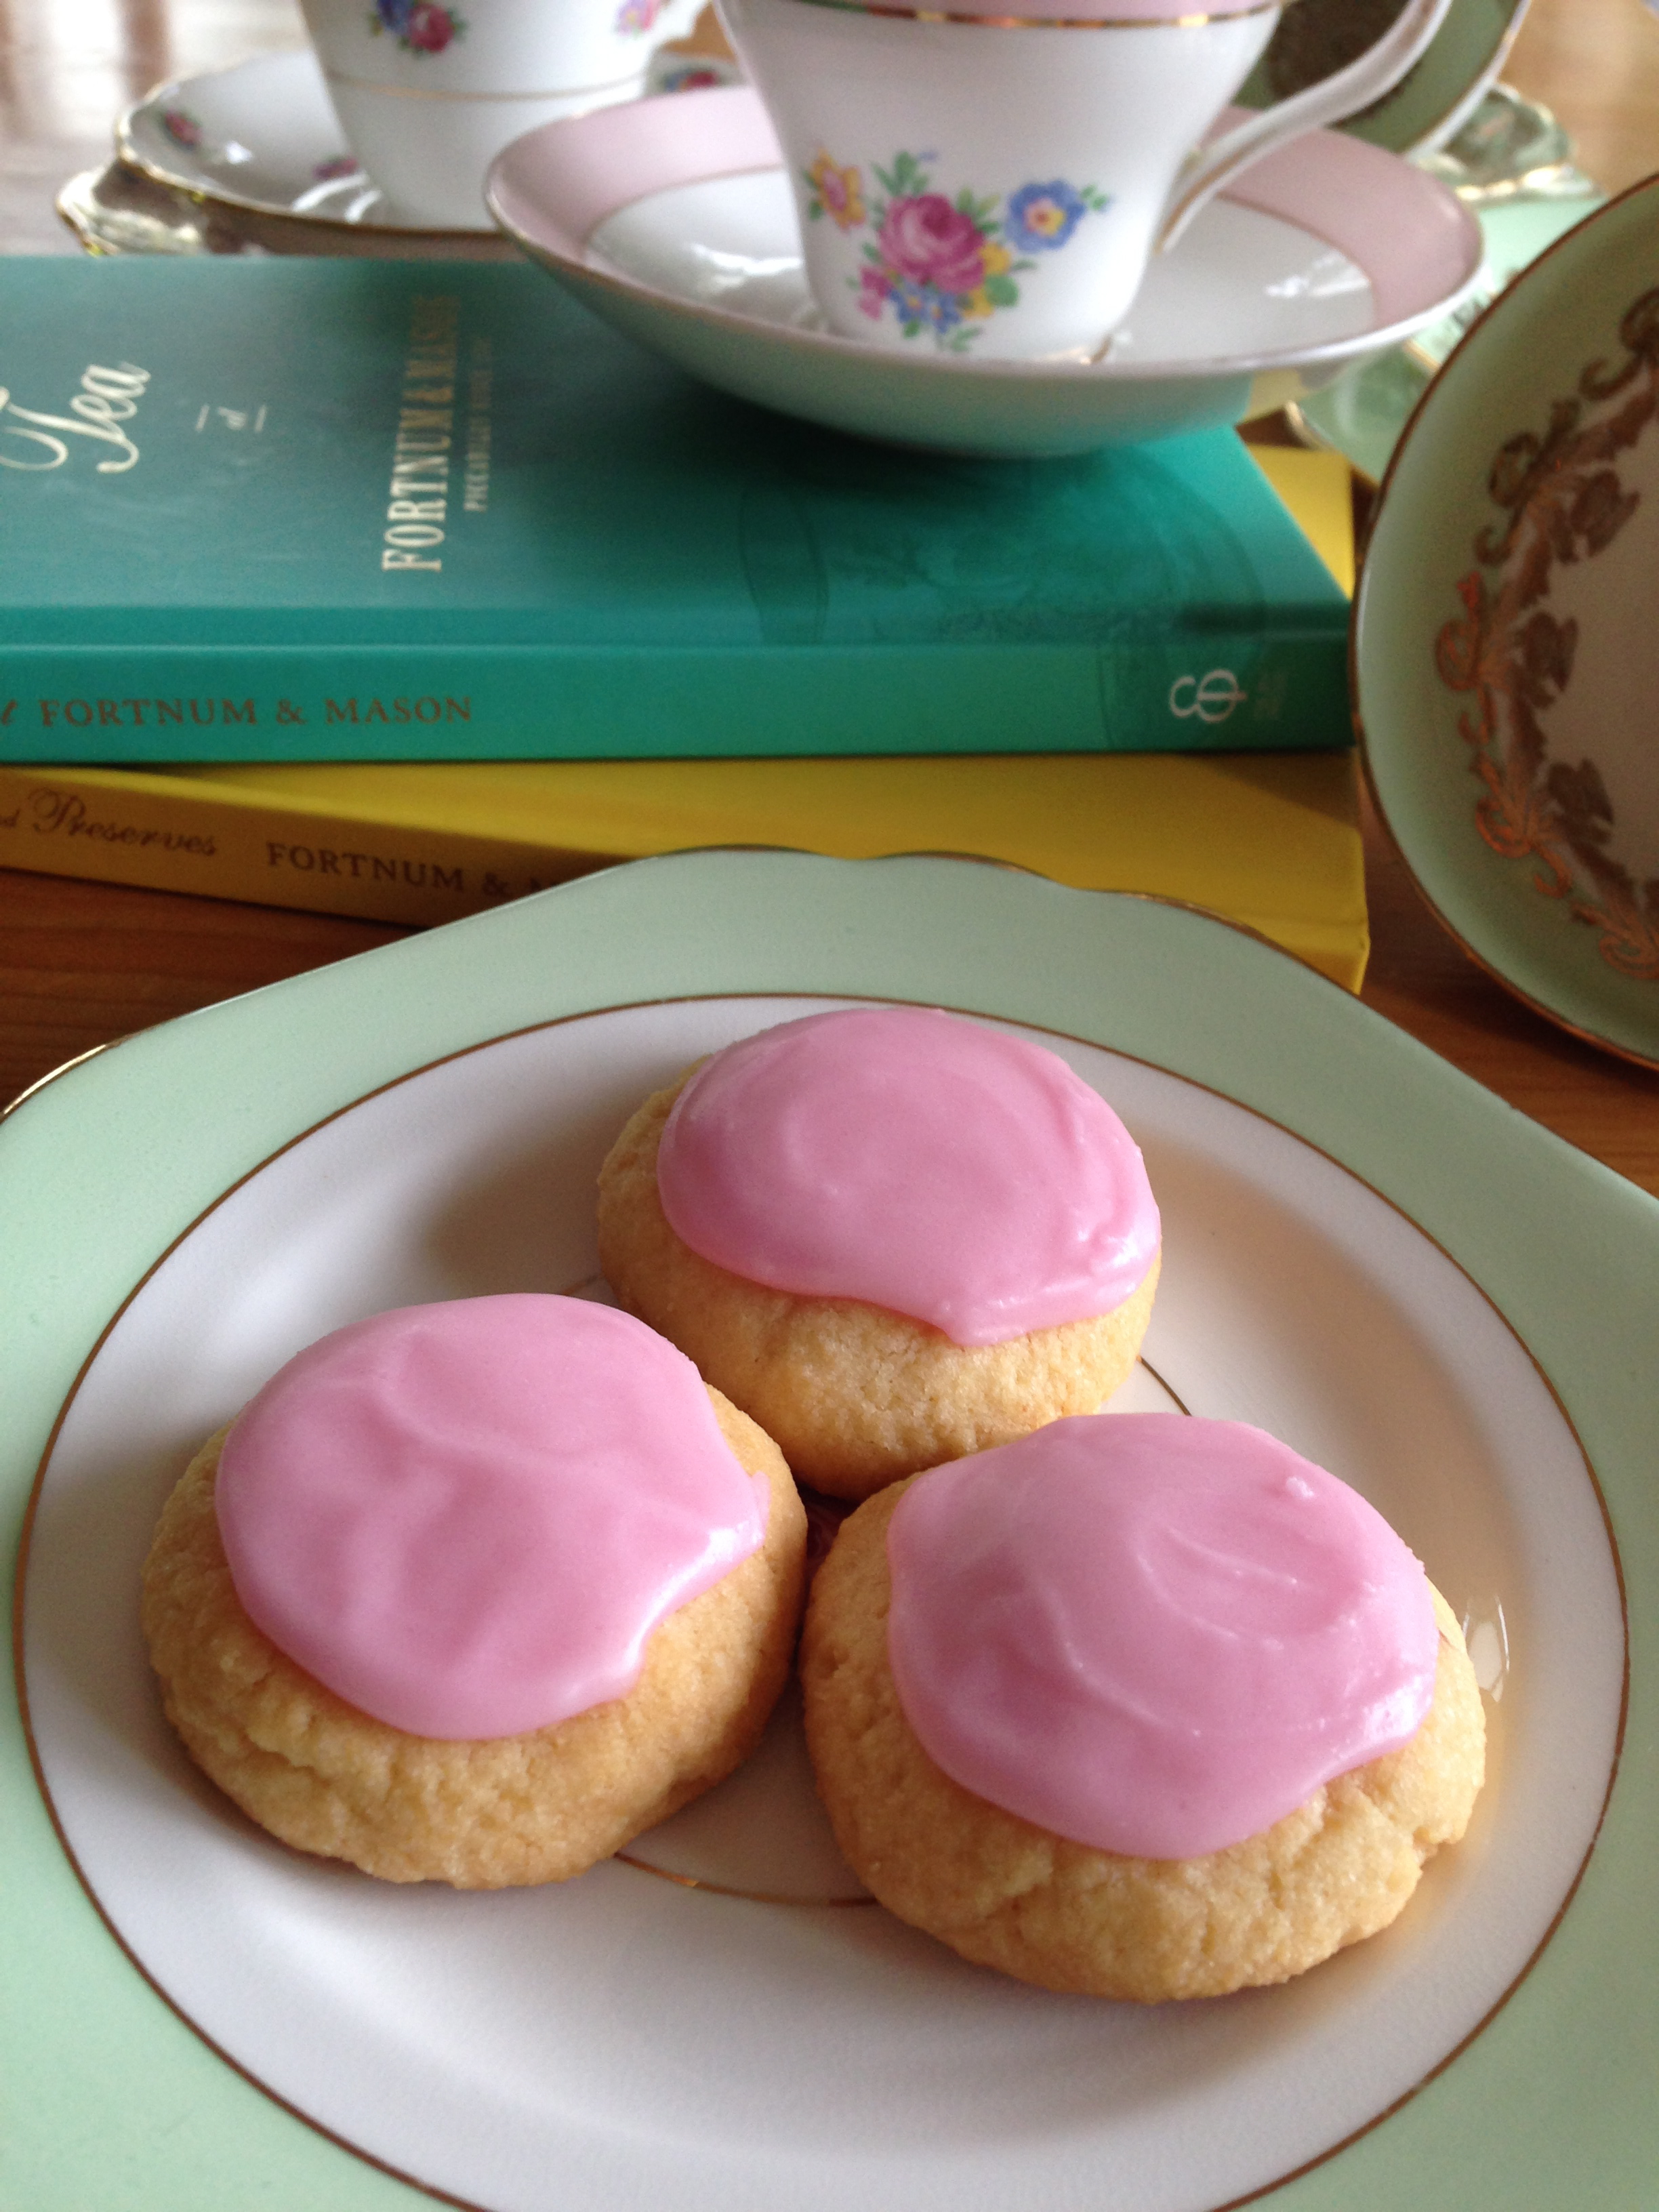
Fortnum and Mason and Rose Scented Biscuits 

Kath October 11, 2014

NOTE: Click here for a more recent post on Fortnum & Mason's Rose Biscuits + How to Make Crystallised Rose Petals. The recipe in this more recent post replicates these biscuits in a truer way than the version in this post - Kath, 25/4/16.

. . . 

The first time I went to Fortnum and Mason, I was 18, not into tea and really had no idea. What a shame. All I remember seeing is the bluey-green of the interior and thinking, ‘So the Royals buy their food here?’ Luckily things have changed. 

My next encounter with Fortnum and Mason was with their Rose Shortbread, in a lovely pink cylindrical tin. Of course, it was the tin that attracted my attention first. Anyone who knows me knows that I am drawn to pink. I can’t help it. The biscuits ended up being beautiful too, so it was a win win really. Later, I found a book by Fortnum and Mason about Tea which had a biscuit recipe for rose biscuits that, I hoped would be the same as the ones that came in the pretty pink tins. Unfortunately, I had the book for a few years and never tried it. Mostly because the recipe called for crystallised rose petals and golden caster sugar. The first seemed to be basically unheard of in Australia and I was just plain confused by the second. I gave up. 

Display of Fortnum & Mason's wonderful biscuits in their London shop.

Display of Fortnum & Mason's wonderful biscuits in their London shop.

When we decided we were going to London, I decided I was not going to miss out on Fortnum and Mason. And I certainly did not. Mum and I ended up going there three separate times! We had tea and scones in The Parlour, looked around the shop, including their great baking section, and admired the lovely tea sets for sale. On another visit I bought tea, and on the third I was so hungry I just had to try their macarons. I tried salted caramel, red velvet and Neapolitan. All were brilliant.

Tea & Scones at the Parlour in Fortnum & Mason London.

Tea & Scones at the Parlour in Fortnum & Mason London.

Salted Caramel, Red Velvet & Neapolitan Macarons from Fortnum & Mason, London.

Salted Caramel, Red Velvet & Neapolitan Macarons from Fortnum & Mason, London.

After a few weeks back at home, I re-opened the ‘Tea’ book from Fortnum and Mason. I decided that I was going to make these rose biscuits and unavailable and unheard of ingredients were not going to stop me. Unfortunately, crystallised rose petals still seem to be unheard of in Australia. Fortunately however, ‘golden caster sugar’ is now available in Australia, so after a little experimentation I have settled on this adaption of the original Fortnum and Mason recipe. I have iced them with a rose icing as the extra subtle hit of rose makes up for the crystallised rose petals.  


Ingredients: 

200g unsalted butter, softened

100g golden caster sugar* or caster sugar 

4 tsp rosewater

200g plain flour, sifted

100g almond meal


For Icing: 

2.5 cups sifted icing sugar (confectioners) 

2 tbsp boiling water

2.5-3 tsp rosewater 

pink food colouring


Method: 

Preheat oven to 180 degrees Celsius, and line two baking trays with baking paper. 

In a large bowl, cream butter, sugar and rosewater until all combined. Add the sifted flour and almond meal and mix until combined. 

Using a teaspoon, take spoonfuls of the mixture and roll into balls and place on the baking trays. Flatten the balls a little so they form fat round discs. 

Cook for 15-20 minutes, or until slightly golden. Cool biscuits on the trays or on a wire rack. 

Once the biscuits are cool, place the sifted icing sugar in a medium bowl. Add the boiling water, one tablespoon at a time, mixing well. Then add the rosewater. Add as much or as little as you like, but I found that 3 teaspoons had a nice scent of rose without being overpowering. 


Once all the liquids are added, check the consistency of the icing. It needs to be a smooth paste. If it is too runny it will run down the sides of the biscuits. Add more sifted icing sugar, in small increments, if the icing is too runny. If the icing is to thick, add more boiling water in small increments. 

Once you have the right consistency, add a small amount of pink food colouring. I use gel colours, and don’t have to use very much to achieve a nice light pink colour. If using traditional food colours that are more fluid, add tiny amounts until you have a nice light pink colour. It won’t take much colouring to get a light pink. Add a litttle more sifted icing sugar/boiling water if the food colour has changed the consistency of the icing. 

Once you have the desired colour and consistency for the icing, spread small amounts on the top of each biscuit. The icing will take at least a couple of hours to dry completely, but they are great to eat even if the icing hasn’t dried. 

Makes 36-38 biscuits. Store in a airtight container.


*‘golden caster sugar’ may be labelled as ‘raw caster sugar’ in Australian supermarkets. However, the UK sugar manufacturer ‘Billington’s’ is available in Thomas Dux stores, Essential Ingredient and Woolworths stores. Billington’s has a range of sugars including ‘golden caster sugar’ and ‘muscovado’ sugars. 

Recipe adapted from ‘Tea at Fortnum and Mason’ p.61 (Ebury Press).

Fortnum and Mason can be found at 181 Piccadilly, London.

Originally Posted March 25, 2014.

For more recipes showcasing the best of rose, check out my Baking with Rose eBook by clicking the link below!

Get your ebook here!
In Travel, Biscuits/Cookies Tags Biscuits, Fortnum & Mason, London, Rose, Rosewater, Travel
Comment
IMG_5013.jpg

Galette au Beurre and ‘À La Mère de Famille’ Paris

Kath October 11, 2014

Recently, I was lucky enough to travel to London and Paris. I’m not really sure what anyone else thinks of doing when they travel, but all I think about is the food. Once the travel plans were organised, I set out looking up where I wanted to eat. Which in the end, mostly meant I had looked up where the cake shops, bakeries, patisseries and tea salons were. The list I made for each city took us round to all the places we could get good food, cake, tea, kitchen and baking supplies and more cake. By the time we returned home I was really excited to bake something inspired by my travels.


This recipe is from a book I bought before I knew I would get to go overseas. The book, ‘À La Mère de Famille’, is the cookbook from a confectionary shop/chocolatier in Paris of the same name. The shop, which now has more than one location in the city, was established in 1761. The original shop, on the Rue du Faubourg-Montmartre, was on my absolute must do list. As in, I wasn’t leaving the city unless we went there. I even walked past one of the newer subsequent locations of the shop and refused to go in because I had my heart set on going to the original one. I’m not really sure why I was so insistent on only going to the original shop. Maybe there’s just something special about going into a shop that has been there for so long. In any case, I’m glad we waited because it was very quaint and sweet. The window displays were enticing and once you were inside, it was easy to imagine the shop selling more or less the same things for all those years. They even had a separate booth for the cashier. All the pâte de fruits, caramels, chocolates and cakes were beautifully presented and I had a hard time choosing what I wanted. I settled on some chocolates for gifts, some marshmallows and some passionfruit caramels. 


So, once we were home, the chocolates were gifted away and the marshmallows eaten (I am still rationing the caramels because they are so very good), I decided I just had to make something from À La Mère de Famille’s book. Confectionary was ruled out due to my jet lagged state, so I settled on these plain but very pleasing biscuits. They are quite easy to make, and they make a fairly large quantity too. Everyone who ate them agreed they were nicer than shortbread, as while they are a butter biscuit they are lighter than shortbread and less crumbly as well. I gave some to my Grandpa and he told me, that not only did he like them, but had gotten up in the night to eat them! 


Ingredients: 

270g softened unsalted butter

250g icing sugar

2 eggs

500g plain flour 

milk (for glazing) 


Method: 

Using an electric mixer, combine the butter and sugar. Add the eggs, then sift in the flour. Lay a sheet of baking paper onto a bench or flat surface and tip the dough onto it. Cover the dough with a second sheet of baking paper and roll the dough until it is 2-3mm thick. Chill in the refrigerator for one hour. 


Preheat oven to 170 degrees Celsius and line three large baking trays with baking paper. Remove dough from fridge and remove top layer of baking paper. Cut biscuits out using a fluted 48mm pastry or biscuit cutter. Place evenly on trays. Brush with milk and push down lightly on each biscuit with a fork to create a slight indentation. 


Bake for 20 minutes, or until golden. I found I needed an extra 10 minutes or so until the biscuits were golden, but it will depend on your oven. 


Best stored in an airtight container. Makes at least 50 biscuits. 


Recipe from ‘À La Mère de Famille Artisanal Recipes’ by Julien Merceron p.214.


The shop can be found at 35 Rue du Faubourg-Montmartre, Paris.

À La Mère de Famille - 35 Rue du Faubourg-Montmartre, Paris.

À La Mère de Famille - 35 Rue du Faubourg-Montmartre, Paris.

Originally Posted March 18, 2014.

In Travel, Biscuits/Cookies Tags Biscuits, France, Paris, Butter, À La Mère de Famille, Travel
Comment
IMG_4522.JPG

Chewy Cardamom & Rosewater Macaroons (Gluten + Dairy Free + Passover Friendly)

Kath October 11, 2014

This recipe is originally from Nigella Lawson’s book ‘Feast’ (p.186), however I have adapted it slightly to suit my tastes. I have made these many, many times, given them as gifts, and Cath (Confessions of a Glutton) and I sold some at our Bake Sale back in September last year. They are really easy to make and are great if you have egg whites left over from something else. The recipe is also really easy to double, and they just happen to be gluten free. 


Need any more reasons to make them or have I convinced you yet?! 


Don’t be put off by the flavours of cardamom and rosewater. They are quite subtle and very lovely. And in my opinion, anything that comes from a Nigella Lawson cookbook must be worth trying. Nigella has a great attitude and creativity towards food that is infectious and very admirable. 


Ingredients:

200g almond meal

200g caster sugar 

1/4 tsp finely ground cardamom

1/4 tsp rosewater

2 egg whites 

1-2 tsp rosewater, extra

25g blanched almonds (enough for each macaroon you make) 


Method: 

Preheat oven to 200 degrees Celsius. Line two large baking trays with baking paper. 

In a free standing mixer, mix the almond meal, sugar, cardamom and egg whites until it forms a coherent paste. This process can also be done by hand, but as Nigella suggests, and I agree, the mixer is best due to the thickness, and stickiness of the mixture. At this point you may add 1/4 tsp of rosewater to the mix. This is my addition because I love rosewater. 


Sprinkle rosewater onto your hands and roll the mixture into little balls (walnut sized). Place on to the baking trays and the squash down a little. Then place a blanched almond in the centre of each biscuit.  


Bake for 10-12 minutes. If they go golden too quickly turn the oven down to 180 degrees celsius. The aim is not to have golden biscuits, but to remove them from the oven before this happens. Inevitably, I find the edges of some biscuits will go a little golden, probably because each rack in the oven I use cooks at a different rate. 


Cool biscuits on a cooling rack.


Makes approx. 28


Originally Posted February 1, 2014.

In Holidays, Biscuits/Cookies Tags Biscuits, Cardamom, Rosewater, Nigella Lawson, Gluten Free, Passover
Comment
Passionfruit & Strawberry Iced Tea

Passionfruit & Strawberry Iced Tea for Summer

Kath October 11, 2014

Ok. I know my last post was based on passionfruit, but, it’s summer and they are so good at the moment! I also thought this recipe would be great considering how hot it has been in Sydney lately! 

This recipe was inspired by a drink I ordered at the T2 Tea House called ‘Summer Pash’. Technically the ingredients are the same, but my version comes out so different that it hardly ends up being the same thing. Which is good. Because now I can make it at home, and still enjoy their version at the Tea House! 

I found panama passionfruit during the week and used them here. I know I’ve said it before, but if you can get them, do. They are so good and the flavour is just so fantastic! 

This recipe makes about three litres. However, it is quite easy to halve the quantities and only make one and a half litres. 

Passionfruit & Strawberry Iced Tea
IMG_0355.jpg

Ingredients: 

2 litres of cloudy apple juice 

18-20 g green tea - I use ‘Green Rose’ from T2

800ml water, approx.

pulp from 3 panama passionfruit (or 5-6 ordinary passionfruit)

strawberries, to serve 


Method: 

Place tea in a three litre capacity jug (I use a jug that has a removable part for the tea). Heat the water to 80 degrees Celsius, or if using boiling water, allow to cool for a few minutes and add a little cold water to bring the temperature down. Green tea shouldn’t be brewed at 100 degrees Celsius. 

Pour the water over the tea, and allow to brew for 10-15 minutes. Once the tea has brewed, remove tea leaves from the jug. Using a fine strainer or sieve and extra bowl or jug, pour the tea through the sieve to remove any extra fine bits of tea. Rinse the original jug out and pour the tea back into the jug. You may want to pour the tea through the sieve again if there are still bits of tea left after the first time. Leave to cool for a while. 

Once the tea has cooled, add the apple juice and the passionfruit pulp to the jug. Stir everything in. Keep refrigerated. This iced tea tastes better when it has had time to infuse. I always make it the afternoon or evening before.  Add cut up strawberries and ice cubes to serve. You can add the strawberries to the whole jug of tea, I just find the tea won’t keep as long with the strawberries in. Without the strawberries, the tea should last in the fridge for 5-7 days. But really in Summer, how could it last that long?! 

IMG_0358.JPG

 Originally Posted January 21, 2014.

In Drinks Tags Summer, Iced Tea, T2, Drinks
Comment
  • The Blog
  • Older
  • Newer

recipes

  • Biscuits/Cookies 39
  • Breads Etc. 9
  • Breakfast 7
  • Cakes & Slices 68
  • Confectionary 5
  • Drinks 6
  • Events 14
  • Food Photography Tips 3
  • From The Mailing List 24
  • Heirloom Recipes 12
  • Holidays 44
  • Ice Cream 9
  • Jams Preserves & Spreads 9
  • Muffins 4
  • Off the Shelf 49
  • Other Desserts 25
  • Savoury Dishes/Meals 15
  • Scones 4
  • Tarts & Pastry 9
  • Travel 13

Sign up to Friday Food Chat with Kath, a weekly newsletter for more food, baking, cookbook chat and more!

Sign Up Here!
instagram-unauth pinterest facebook url

Website Accessibility: To enable text to speech function on the blog, click the sound button to the right of each blog post.

All images & content are the property of Kathryn Vincent, unless stated otherwise. Please do not use without permission.

Kulinary Adventures of Kath

Food Photography, Recipes & Baking

instagram-unauth pinterest facebook url