Kulinary Adventures of Kath

Food Photography, Recipes & Baking
  • home
  • About
  • Work with Kath
  • Shop
  • Blog
    • The Blog
    • Recipe Archive
  • Newsletter
  • Contact
  • home
  • About
  • Work with Kath
  • Shop
    • The Blog
    • Recipe Archive
  • Newsletter
  • Contact
Raspberry Pistachio Rose Cake (23 of 25).jpg

The Blog

Recipes and Food Photography by Kath Vincent.

  • The Blog
  • Recipe Archive
  • All
  • Biscuits/Cookies
  • Breads Etc.
  • Breakfast
  • Cakes & Slices
  • Confectionary
  • Drinks
  • Events
  • Food Photography Tips
  • From The Mailing List
  • Heirloom Recipes
  • Holidays
  • Ice Cream
  • Jams Preserves & Spreads
  • Muffins
  • Off the Shelf
  • Other Desserts
  • Savoury Dishes/Meals
  • Scones
  • Tarts & Pastry
  • Travel
Nice's Date Slice - Kulinary Adventures of Kath

Nice’s* Date Slice

Kath October 13, 2014

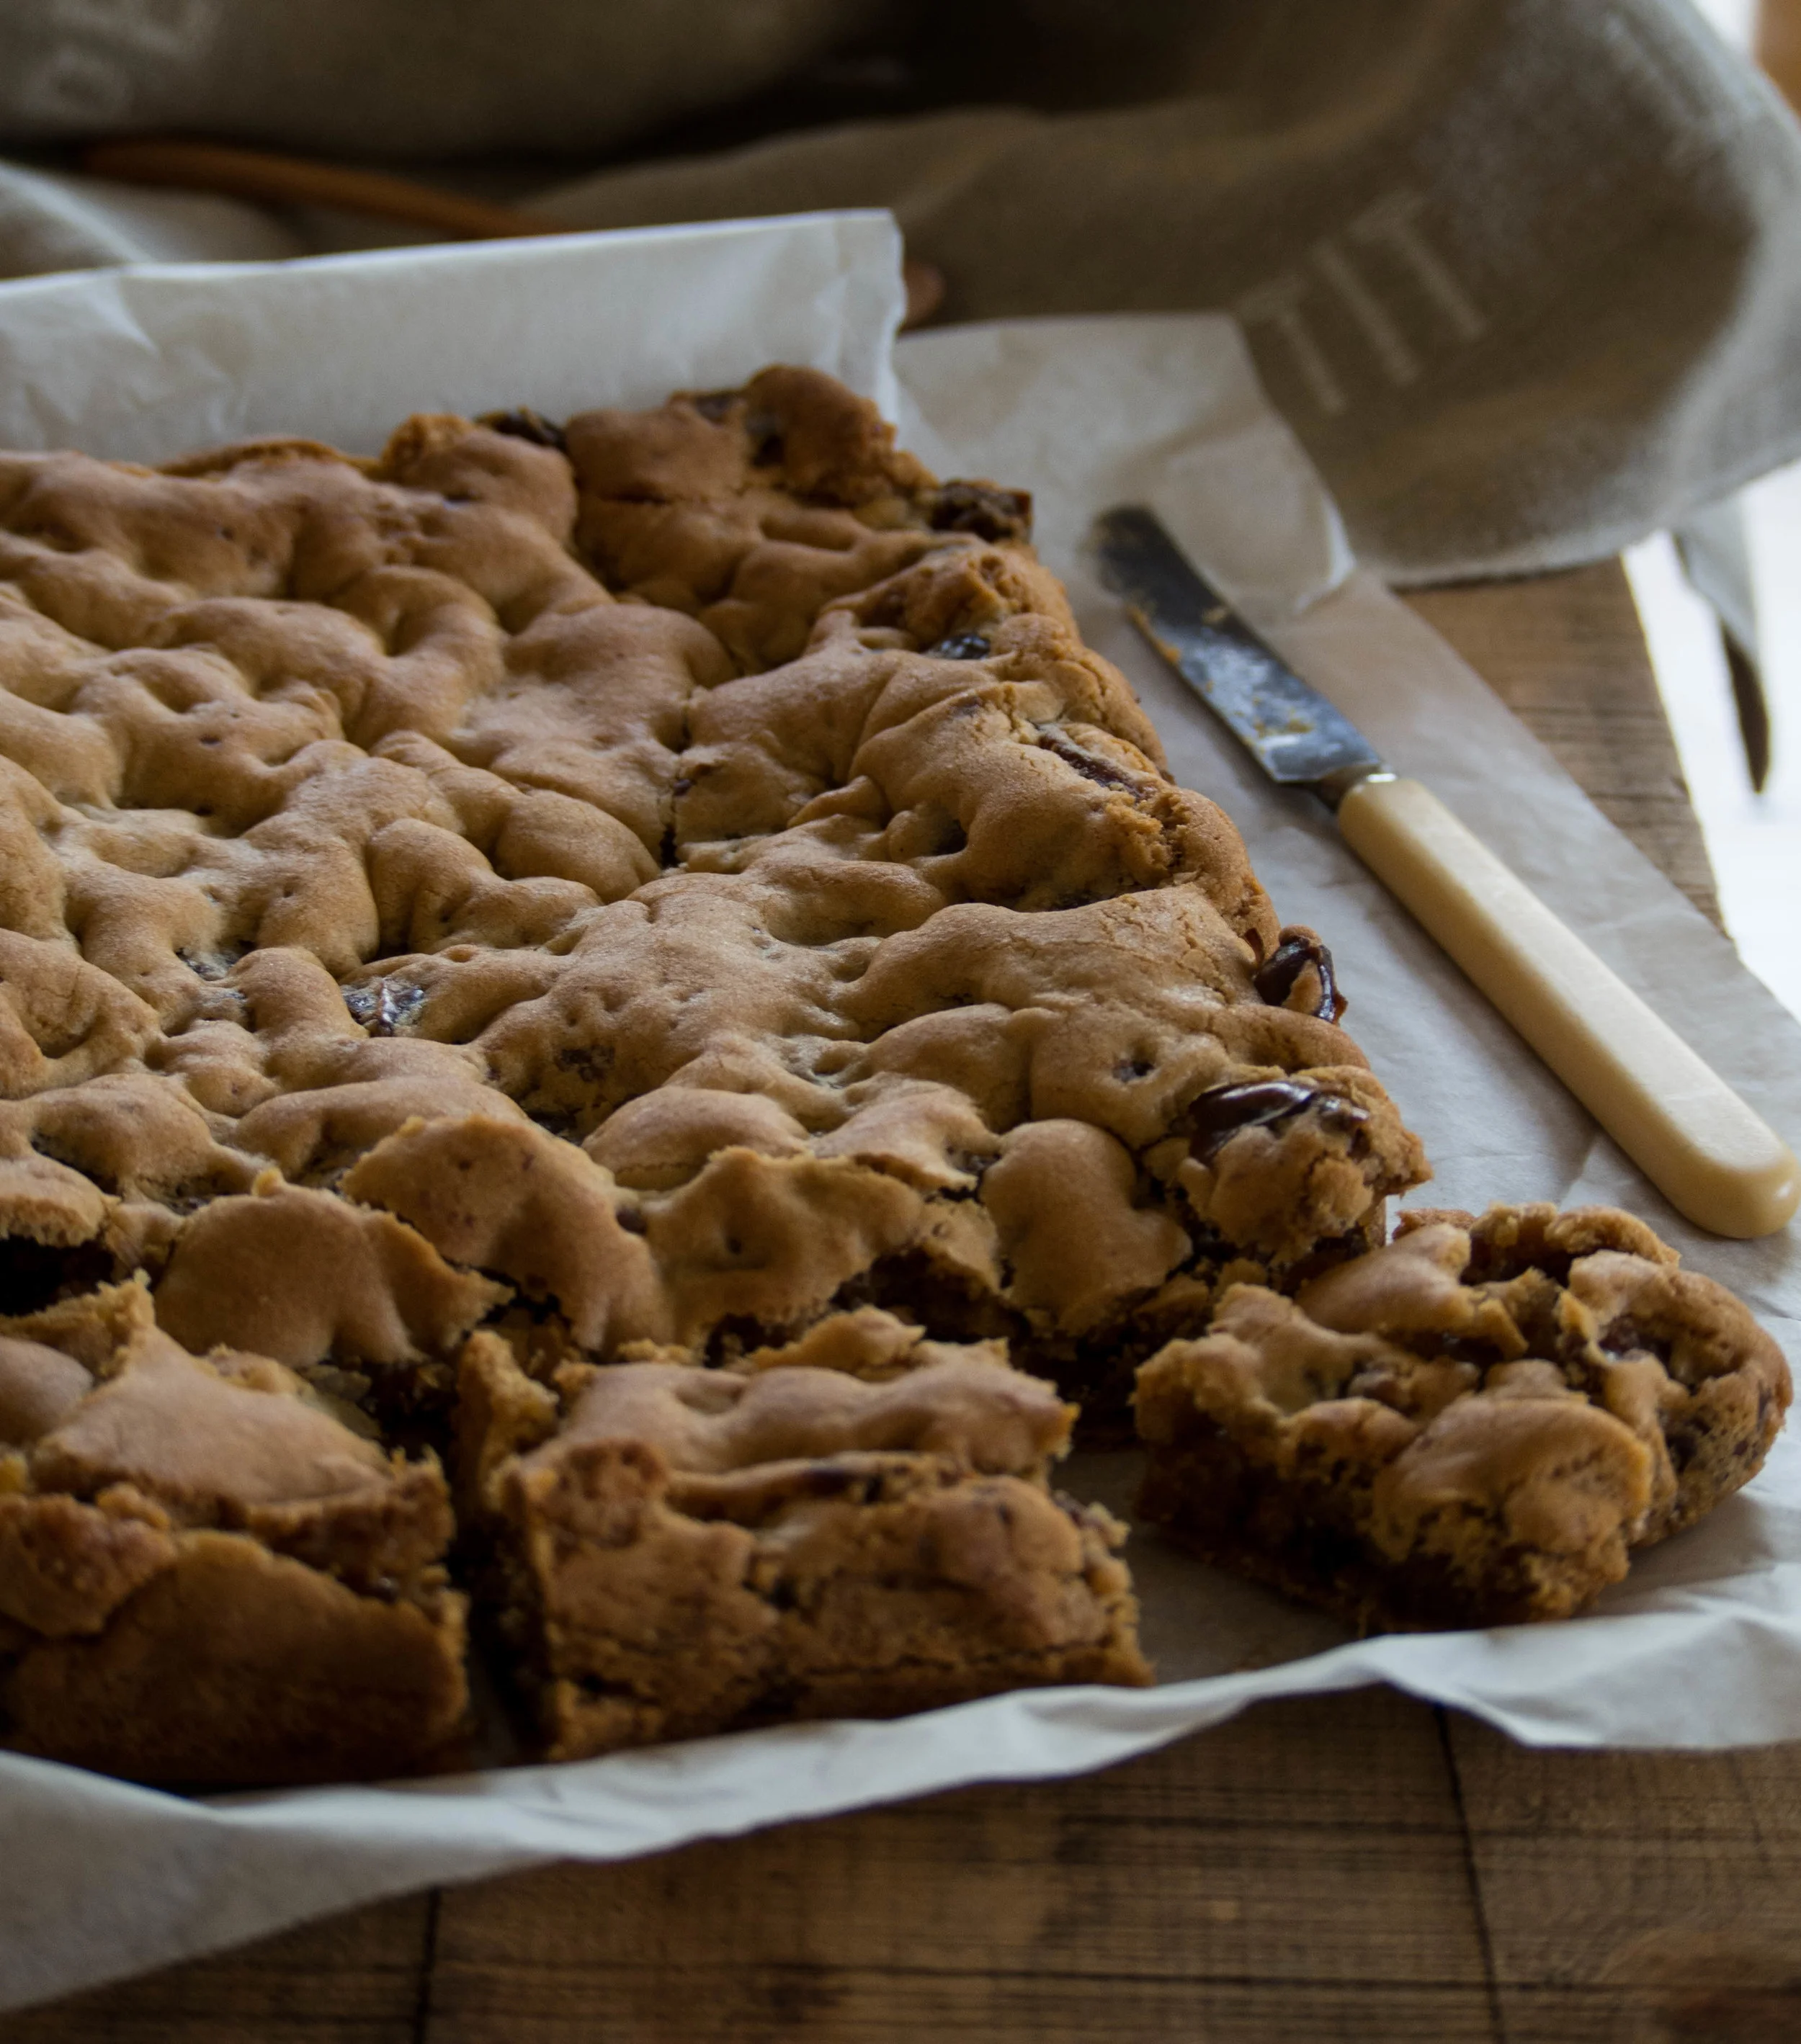
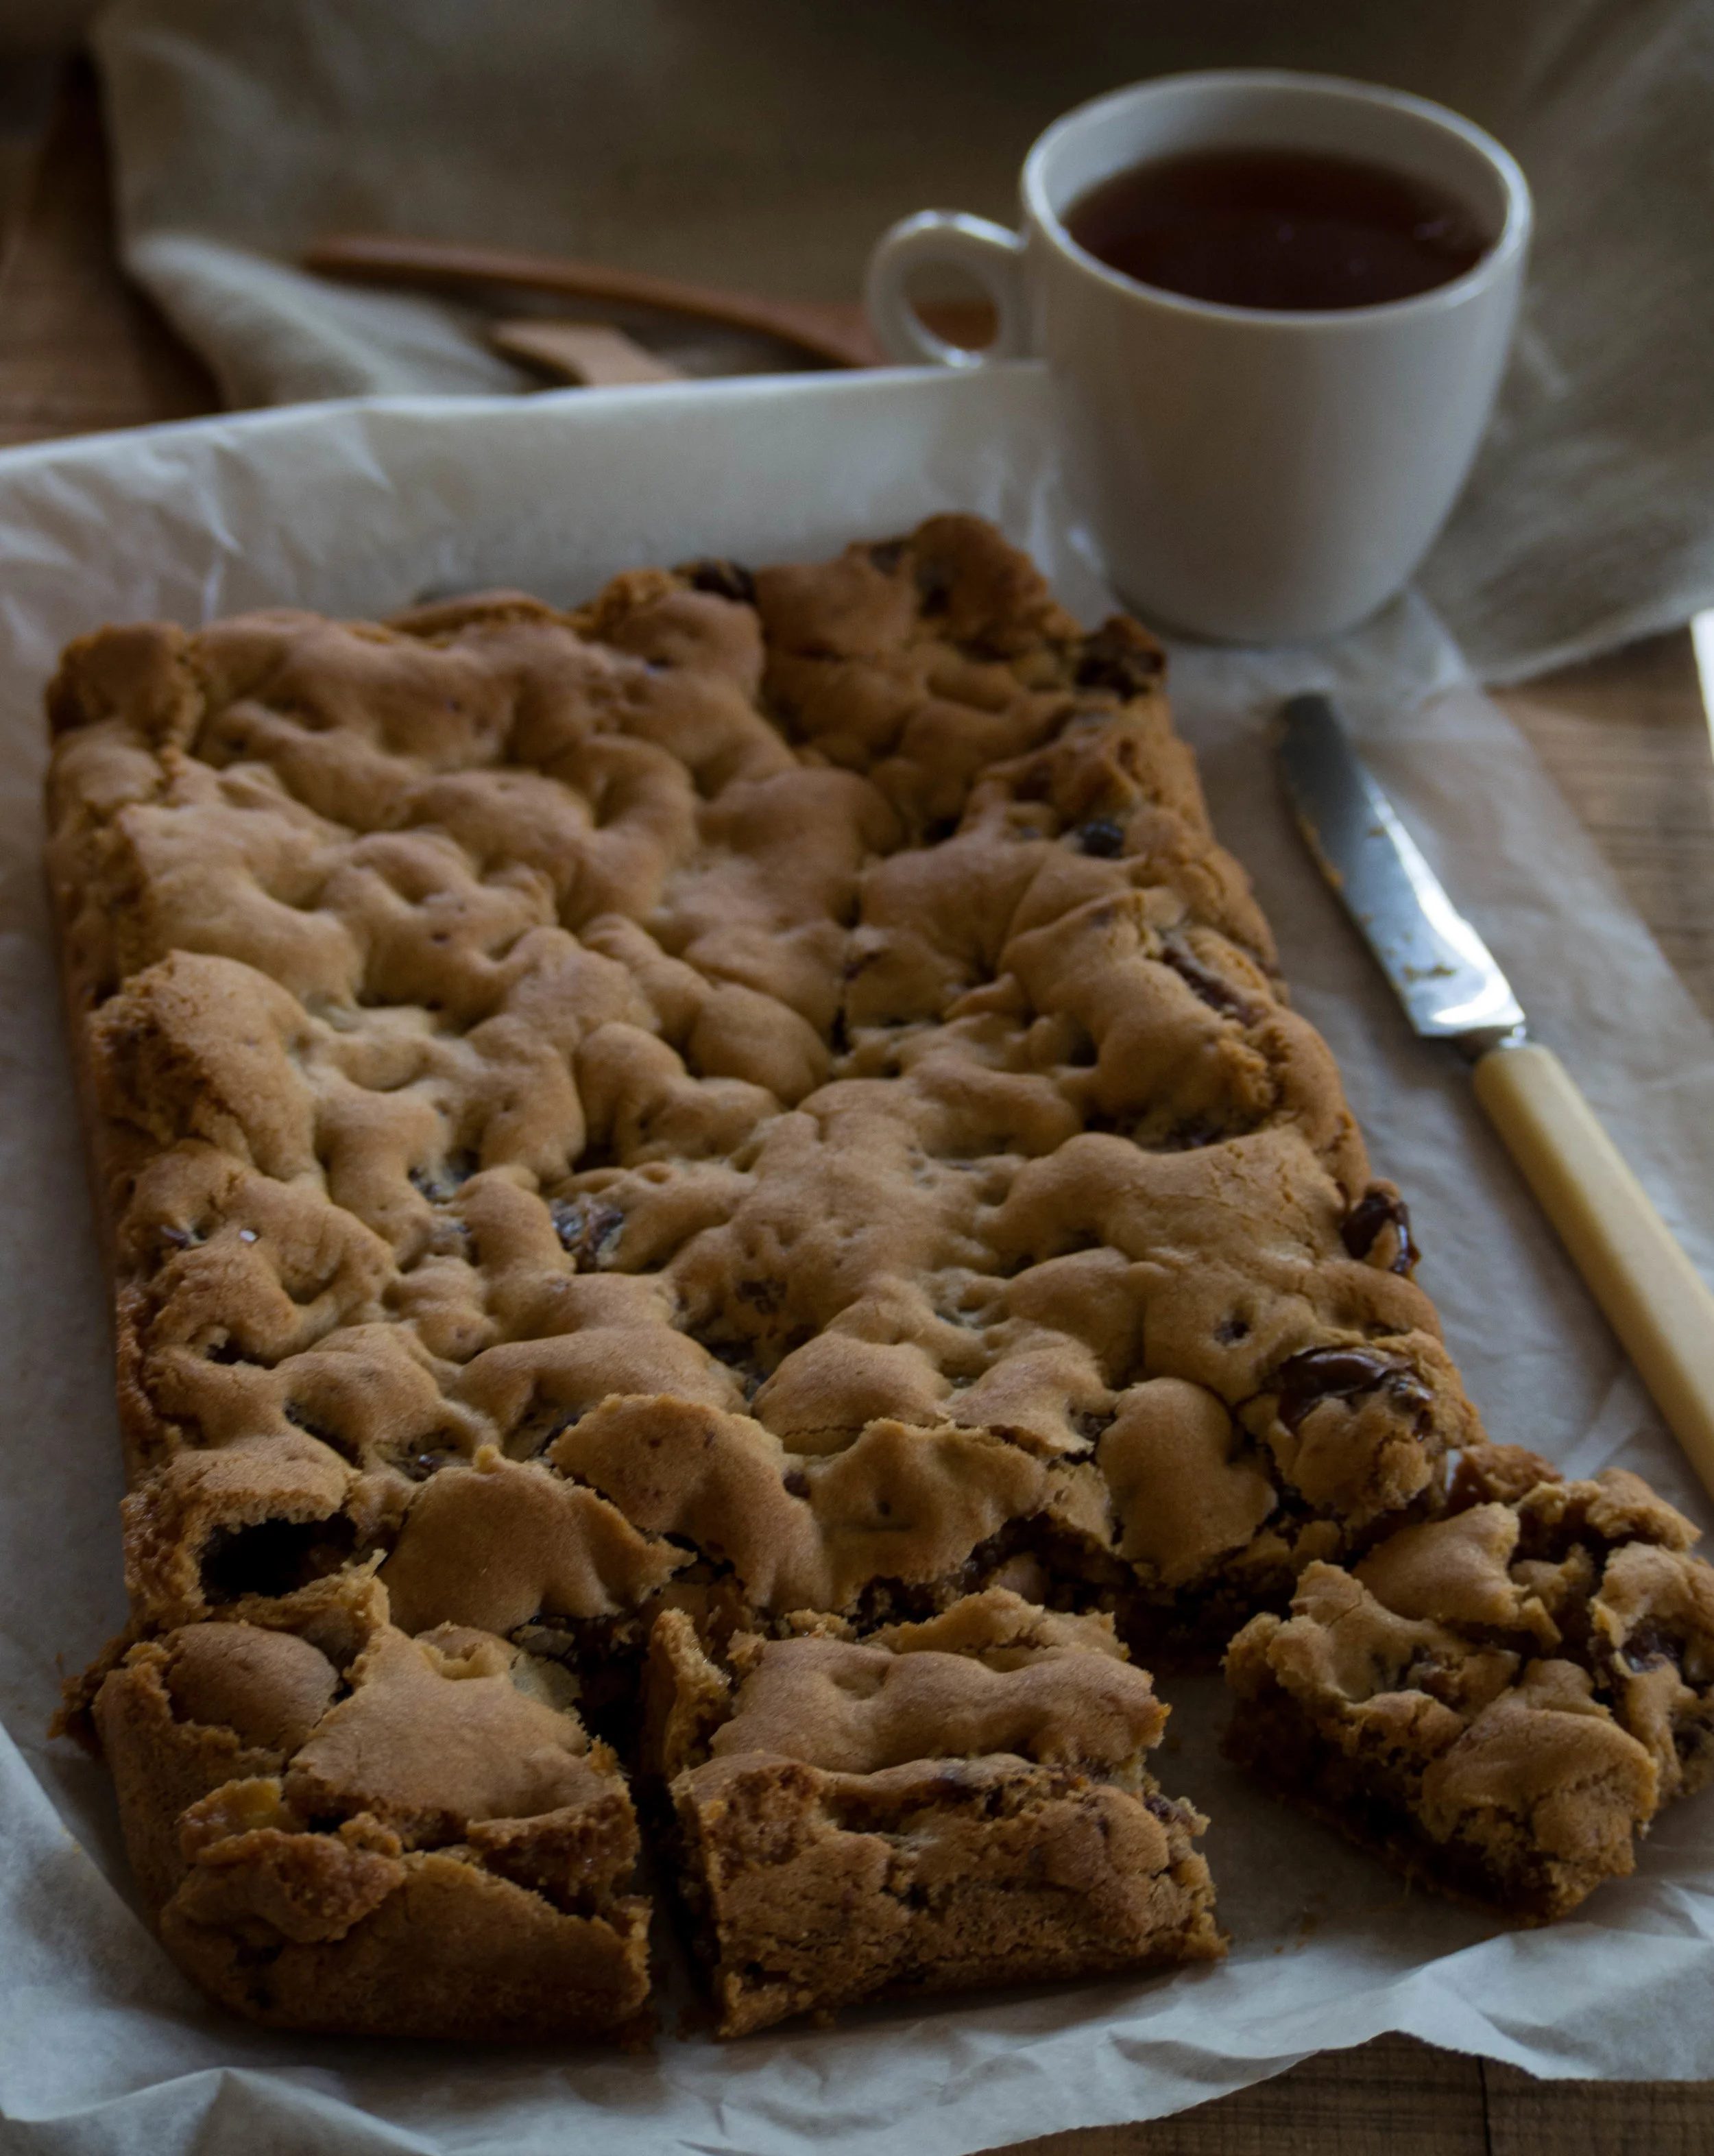
This recipe is one of the most popular things I have ever made. And it only contains 5 ingredients. It is so easy to make, and comes from the original Monday Morning Cooking Club book. A book which is a favourite of mine among my ever growing cookbook collection. 


I have talked about the Monday Morning Cooking Club before, and my fascination with their story and their books just keeps growing. I have owned their first book for quite a while now, and every time I open it I see a recipe I hadn’t noticed before, or a story or photo I hadn’t looked at properly. My three favourite things from this book (so far anyway!) are this slice, the Custard Chiffon Cake I made a little while ago, and Talia’s Raspberry Tart (p.93). All are things I hadn’t made before, or in the case of a chiffon cake, had never heard of before. 


I have learnt a lot by reading and cooking out of the Monday Morning Cooking Club’s books. I’m sure I will continue to discover more dishes and foods I have never cooked before from their collections of recipes. 


Ingredients: 

125 g unsalted butter

250 g brown sugar 

1 egg

150 g self raising flour 

250 g pitted dates, chopped 


Method: 

Pre-heat oven to 180 degrees Celsius and line a lamington tin (approx. 25 x 18 cm). 

In a small saucepan, melt the butter and brown sugar together on medium heat. Stir constantly until the sugar has dissolved and the butter has melted. 

Remove from the heat, and transfer to a large bowl. Allow to cool a little. 

Once the butter mixture has cooled slightly, add the egg and mix until well combined. Then add the flour, then the dates. Ensure that everything is mixed well. 

Place mixture into the prepared tin, and spread to the edges of the tin and smooth the top. Bake for 15-20 minutes. 

Allow the slice to cool in the tin for a while, then transfer to a wire rack. Cut in to slices once completely cooled. 


Nice's Date Slice 2 - Kulinary Adventures of Kath


*pronounced ‘Neecey’s’


Original Recipe from ‘The Monday Morning Cooking Club: The Food, The Stories, The Sisterhood’ by Merelyn Frank Chalmers, Natanya Eskin, Lauren Fink, Lisa Goldberg, Paula Horwitz and Jacqui Israel, (2011, Hardie Grant Publishing (now published by Harper Collins)), p. 55.


Originally Posted October 1, 2014.

All baking, styling and photography for this post by Kathryn Vincent of Kulinary Adventures of Kath.

In Cakes & Slices Tags Slices, Dates, Monday Morning Cooking Club
Comment
To Market - Kulinary Adventures of Kath

Market Day & A Rhubarb Galette

Kath October 13, 2014
To Market 2 - Kulinary Adventures of Kath

A couple of Friday’s ago I drove over to the Beaches Markets. Held in Warriewood every Friday morning, they are brimming with fresh produce. I had wanted to go there for two reasons. First I had placed an order with Silvia at the Lost & Found Department, and opted to collect my order at the markets. This was mostly so I could look at all of Silvia’s wonderful wares in person! I also wanted to get some fresh rhubarb so I could re-create the rhubarb galettes made by Beth Kirby at the Slow Living Workshop the previous weekend. 

I came away from my morning at the markets with my order from the Lost & Found Department, plus some of Silvia’s famous muesli, some bagels from Brooklyn Boy Bagels, some fresh rhubarb and mixed baby tomatoes. 

On the way home I stopped off at the Antique and General Store in North Narrabeen. I have been visiting this shop (sometimes unwillingly) for a good twenty years now. My Mum loves antiques and this is a favourite shop of hers. I remember going there when I was little, and sometimes making out that I hated it, when actually I had begun to quite like looking at the old wares and antiques.

I re-created Beth’s rhubarb galette once I got home, using this recipe from her website. I soaked the rhubarb in sugar and a little rosewater. I added rosewater, as I like how it adds a sweetness to the otherwise earthy taste of the rhubarb. It is nice served soon after removing from the oven with some double cream.

To Market 3 - Kulinary Adventures of Kath
To Market 4 - Kulinary Adventures of Kath
To Market 5 - Kulinary Adventures of Kath
To Market 6 - Kulinary Adventures of Kath
To Market 7 - Kulinary Adventures of Kath
Rhubarb Galette - Kulinary Adventures of Kath

Originally Posted September 23, 2014.

All baking, styling and photography for this post by Kathryn Vincent of Kulinary Adventures of Kath.

In Tarts & Pastry Tags Beth Kirby, Local Milk Blog, Markets, Northern Beaches, Sydney, Lost & Found Department, Antique & General Store, Rhubarb, Galette, Brooklyn Boy Bagels, Bagels
Comment
Slow Living Workshop-29 Kulinary Adventures of Kath.jpg

Slow Living - A Practical Workshop, September 6 & 7

Kath October 13, 2014
Slow Living Workshop-14 Kulinary Adventures of Kath.jpg
Slow Living Workshop-68 Kulinary Adventures of Kath.jpg

This is my first non-recipe related post. Apologies if you were hoping for a new recipe. However, I attended this amazing and inspiring workshop on the weekend of the 6th and 7th of this month, and can’t possibly not write about it! Oh, and there are photos! 


The workshop was hosted by Luisa Brimble, an amazing Australian photographer, Beth Kirby of Local Milk Blog and Rebekka Seale of Camellia Fiber Company. The calibre and expertise of these three women meant that an opportunity to spend two days with them just couldn’t be missed. 


The workshop was held at Glenmore House. A perfect location for such an event, as everywhere we turned there was a moment or object waiting to be shot. The workshop also involved a handful of other women, all talented, creative and inspirational in their own right - Stacey Clark a witty and talented stylist from Perth, the generous Sneh Roy of Cook Republic, and the tasty and photogenic food for the weekend was provided by Hetty McKinnon of Arthur Street Kitchen, Anna Simamora of The Floury Baker and Claire Dickson-Smith.


The workshop focused on photography, blogging, natural dyeing, food and styling. On the first day Rebekka showed us how to dye linen and cotton with natural dyes and served as our in house model for shoots (thank you!). On both days we got to watch styling master Beth in action, as well as gain invaluable advice and experience from Luisa on photography. I got so much out of these two days, and I certainly don’t look at photography or styling in the same way as I did before the workshop. I feel just a little more confident in my abilities, especially in my ability to be creative. Being creative isn't something I would have attributed to myself in the past. However, being around like minded people has had this wonderful way of being an inspiration and catalyst for all the things brewing in the back of my mind.


As I had only bought my camera a couple of days before the workshop, I still had a lot to learn about it. On the first day I used my 14-42mm lens, and felt slightly frustrated about how my photos were turning out. I kept thinking, oh I can figure something out when I’m editing them. Then on the morning of the second day, I used up my first memory card and when I was swapping it over for another, I thought, why not change the lens as well? As soon as I started using my 40-150mm lens, I was suddenly getting some great shots. So now I am kinda kicking myself for persevering with the 14-42mm lens for so long, but everything is a learning process I guess. 


Thanks again to everyone who organised and ran the weekend, particularly Luisa, Beth and Rebekka. It was an honour to spend a couple of days with you all, and I hope another chance to spend time taking photos and learn from all of you comes my way again soon.


- day one - 

Slow Living Workshop-3 Kulinary Adventures of Kath.jpg
Slow Living Workshop-13 Kulinary Adventures of Kath.jpg
Slow Living Workshop-12 Kulinary Adventures of Kath.jpg
Slow Living Workshop Kulinary Adventures of Kath.jpg
Slow Living Workshop-25.jpg
Slow Living Workshop-24 Kulinary Adventures of Kath.jpg
Slow Living Workshop-23 Kulinary Adventures of Kath.jpg


- day two - 


Slow Living Workshop-30 Kulinary Adventures of Kath.jpg
Slow Living Workshop Sydney - Kulinary Adventures of Kath
Slow Living Workshop Rhubarb Galette - Kulinary Adventures of Kath

Originally Posted September 19, 2014.

In Events Tags Slow Living, Workshops, Glenmore House, Beth Kirby, Local Milk Blog, Rebekka Seale, Camellia Fiber Company, Luisa Brimble, The Floury Baker, Photography, Food Photography, Styling, Events, Sydney
Comment
Raspberry & Rose Cupcakes - Kulinary Adventures of Kath.jpg

New Beginnings & Raspberry and Rose Cupcakes

Kath October 11, 2014

Many apologies for my six week or so absence from here. Though I do doubt that anyone is sitting at their computer waiting for me to post a new recipe! I have had an exciting few weeks full of new experiences and new beginnings. All of which meant time spent updating my blog were few and far between. 


In summary, during the last few weeks I have taken part in a food photography and styling workshop with Billy Law and Luisa Brimble, baked forty cupcakes and 20 biscuits for a bridal shower, baked 60 biscuits, made 250 mini quiches and 330 finger sandwiches for a wedding afternoon tea, quit my job, bought a new camera and attended a wonderful weekend ‘Slow Living Workshop’ with Beth Kirby, Rebekka Searle and Lusia Brimble (photos of the weekend to come!). 


Hopefully you will notice an improvement in my photography and styling skills soon, and fingers crossed I will be able to dedicate more of my time to this blog from now on! 

Below are some photos I took at the workshop with Billy and Luisa. 

Edited Pics from Photography Workshop (1 of 12).jpg
Edited Pics from Photography Workshop (2 of 12).jpg
Edited Pics from Photography Workshop (7 of 12).jpg

 . . . . 

 The recipe I have decided to post today is something I created a month or so ago. I had been reminiscing about the cakes and teas Mum and I enjoyed while we were in Paris back in February. At Ladurée in Paris we tried a creation called the rose réligieuse. It was a round two layered choux pastry with crème pâtissière and raspberries, decorated with a rose icing on the outside. The flavour combinations were simply wonderful. And of course the presentation was impeccable. 

Tea & a Rose Réligieuse at Ladurée, Paris.

Tea & a Rose Réligieuse at Ladurée, Paris.

I decided to create something using this as an inspiration, and came up with a raspberry and rose cupcake. I am very pleased with how they have turned out, and seem to have become an instant crowd pleaser. 

Raspberry & Rose Cupcakes

Ingredients: 

125 g margarine (flavourless such as canola oil based)

3/4 cup caster sugar 

1 tsp vanilla extract 

2 eggs 

1/2 cup milk, preferably low fat

1 1/2 cups self-raising flour, sifted

185 g raspberries, roughly chopped (approx. one and a half punnets if using fresh)

Ingredients for Icing: 

2 - 2 1/2 cups icing sugar, confectioners 

3 tsp rosewater

2 tbsp hot water 

pink food colouring 

dried rose buds, for decoration

Method:

Pre-heat oven to 160 degrees Celsius and line two cupcake trays with cupcakes cases. The mixture will only make about 15-16 cupcakes, so you won’t need to line all of the second tray. 

In a large bowl, cream the margarine, vanilla and sugar until it has combined, and is fluffy and light. Add the eggs one at a time, beating after each addition. Then add the flour and the milk, half of each at a time, beating in between to combine. 

Once all the ingredients are combined, add the raspberries to the mixture, gently folding them in with a spoon or spatula (not an electric mixer) until evenly distributed. 

Evenly fill each cupcake case with the mixture, approximately 3/4 full. 

Cook for 20-25 minutes or until the cakes are lightly golden and spring back when touched. 

Allow to cool on a wire rack. 

Once the cakes have cooled make the icing. Sift the icing sugar into a bowl, then add the water and rosewater and mix to combine. The icing should be smooth and slightly thick so it doesn’t run down the sides of the cakes. Add the pink food colouring, keeping the colour light. If the icing is too runny, add more sifted icing sugar a little at a time. If the icing is too thick, add more hot water a little at a time.

Spread the icing over each cupcake and place a rose bud in the centre. Allow the icing to dry before storing in a airtight container, or eat straight away! 

Raspberry & Rose Cupcakes - Kulinary Adventures of Kath.jpg

Original cupcake recipe from The Australian Women’s Weekly Cakes & Slices Cookbook, p.89.

 Originally Posted September 8, 2014.

For more recipes showcasing the best of rose, check out my Baking with Rose eBook by clicking the link below!

get your ebook!
In Cakes & Slices, Travel Tags Cupcakes, Raspberry, Rose, Rosewater, Events, New Beginnings, Ladurée, Paris, France, Travel, Photography, Food Photography, Styling, Billy Law, A Table for Two, Luisa Brimble, Workshops
2 Comments
P6240783_Fotor.jpg

Raspberry & White Chocolate Muffins

Kath October 11, 2014

While I was at uni, baking was almost the only thing that kept me sane. I find the process of baking quite relaxing and I always looked forward to baking, particularly after exams. This is one particular recipe that I made many times throughout the numerous semesters. I usually use fresh raspberries for this recipe. Mainly because when I see the lovely bright punnets of them, I just can’t resist. It also helps when they are on special at the shops! But if you prefer to use frozen raspberries, they work well also - they may turn your batter a little purple if they are defrosted however! 


I made a version of this recipe a while ago. The base of this recipe is very versatile and you can chop and change the raspberry element for whatever you feel like. I have done banana, passionfruit, date and blueberry versions. This however, is the original Julie Goodwin recipe, and when it comes down to it, it’s hard to pass up! 

 Raspberry and White Chocolate Muffins 

Ingredients: 

300 g (2 cups) self-raising flour

165g (3/4 cup) caster sugar

130g (3/4 cup) white chocolate melts, chopped

x 2 punnets raspberries (approx. 250g)

x 2 eggs

125ml (1/2 cup) milk

125ml (1/2 cup) vegetable or sunflower oil 


Method:

Pre-heat oven to 180 degrees Celsius (160 degrees Celsius Fan) and line a twelve hole muffin tray (1/3 cup capacity) with muffin cases. 

Place the flour, sugar, white chocolate in a large mixing bowl. Chop half of the raspberries roughly, and add all of the raspberries to the dry ingredients and mix. Make a well in the centre of the mixture.

In a small bowl or jug, whisk together the milk, oil and eggs. Add to the dry ingredients and gently mix. Only mix until the ingredients are just combined. Over mixing muffin batter will make your muffins tough. 

Divide batter into the prepared tray, fill the cases about 3/4 full. Bake for 20-25 minutes or until the tops of the muffins are golden and they spring back when touched.

Remove from tray and cool on a wire rack, although they are nicest warm, fresh from the oven! 


Original Recipe from ‘Our Family Table’ by Julie Goodwin p.4 (2010).

Originally Posted July 21, 2014.

In Muffins Tags Muffins, Raspberry, White Chocolate, Julie Goodwin, Uni
Comment
P6240806_Fotor.jpg

My Grandma's Pavlova (Gluten Free)

Kath October 11, 2014

In my last post I talked about the concepts of fressing and heirloom baking. This recipe is my ultimate recipe from my heirloom collection and I think fits very nicely into the idea of fressing as it is so enjoyable to eat. This was the dish I got excited about every time we went to my Grandparent’s for dinner. I would be desperately disappointed if it wasn’t the dessert of choice for that evening, and would ask my Grandma in a sad voice ‘but why didn’t you make a pavlova?’ as if the world had now come to an end. 

If I was in luck and pavlova was made for dessert, before (or sometimes during) dinner I would reach up onto the bench and pick off little bits of the meringue that had formed little peaks on the edges of the pavlova. I always remember being served my piece of pavlova on its own or only with ice cream. There probably was other fruit to go with it, I was just to picky to want it sitting on my piece. 

This recipe makes a crisp meringue and despite my childhood fussiness, does go well with cream and fruit. I have left this out of the recipe, purely because I wanted to make it as I remembered it. However, feel free to top the pavlova with some freshly whipped cream and fruit (such as passionfruit, raspberries, strawberries, banana, blueberries etc), just before serving. 

Ingredients: 

x4 egg whites 

250g caster sugar 

1 tsp vinegar

1/2 tsp vanilla extract 

20 g cornflour 


Method: 

Pre-heat oven to 200 degrees Celsius. Line a large baking tray with baking paper. 

Whisk the egg whites with a mixer on a medium to high speed, and gradually add the sugar. Whisk until the sugar has dissolved and the mixture is thick, glossy and holds its peak. This process should take around 5 minutes. Whisk in the vanilla and the vinegar once this process is almost complete. 

Once the mixture is holding its peak and the sugar has dissolved, sift in the cornflour and gently fold in with a metal spoon or a spatula. 

Gently spoon the mixture in to the centre the prepared baking tray and smooth out until you have a circular shape. Keep the edges of the circle high and don’t smooth out too far. The circle should be around 24-26cm in diameter. It isn’t necessary to be overly precise, you just don’t want a really flat pavlova! 

Turn the oven down to 125 degrees Celsius, and bake the pavlova for 1 hour 30 minutes, no longer. Once the cooking time has elapsed, turn the oven off and leave the pavlova in the oven to cool. You can remove the pavlova immediately but be prepared for it to crack and sink a little (this will also depend on the weather, Summer may be the ultimate time to eat a pavlova, however the humidity does not do baking it any favours!). 


Originally Posted July 16, 2014.


In Heirloom Recipes, Other Desserts Tags Pavlova, Grandma, Recipe, heirloom baking, fressing
Comment
  • The Blog
  • Older
  • Newer

recipes

  • Biscuits/Cookies 40
  • Breads Etc. 9
  • Breakfast 7
  • Cakes & Slices 68
  • Confectionary 5
  • Drinks 6
  • Events 14
  • Food Photography Tips 3
  • From The Mailing List 24
  • Heirloom Recipes 12
  • Holidays 45
  • Ice Cream 9
  • Jams Preserves & Spreads 9
  • Muffins 4
  • Off the Shelf 51
  • Other Desserts 25
  • Savoury Dishes/Meals 15
  • Scones 4
  • Tarts & Pastry 9
  • Travel 13

Sign up to Friday Food Chat with Kath, a weekly newsletter for more food, baking, cookbook chat and more!

Sign Up Here!
instagram-unauth pinterest facebook url

Website Accessibility: To enable text to speech function on the blog, click the sound button to the right of each blog post.

All images & content are the property of Kathryn Vincent, unless stated otherwise. Please do not use without permission.

Kulinary Adventures of Kath

Food Photography, Recipes & Baking

instagram-unauth pinterest facebook url