Kulinary Adventures of Kath

Food Photography, Recipes & Baking
  • home
  • About
  • Work with Kath
  • Shop
  • Blog
    • The Blog
    • Recipe Archive
  • Newsletter
  • Contact
  • home
  • About
  • Work with Kath
  • Shop
    • The Blog
    • Recipe Archive
  • Newsletter
  • Contact
Raspberry Pistachio Rose Cake (23 of 25).jpg

The Blog

Recipes and Food Photography by Kath Vincent.

  • The Blog
  • Recipe Archive
  • All
  • Biscuits/Cookies
  • Breads Etc.
  • Breakfast
  • Cakes & Slices
  • Confectionary
  • Drinks
  • Events
  • Food Photography Tips
  • From The Mailing List
  • Heirloom Recipes
  • Holidays
  • Ice Cream
  • Jams Preserves & Spreads
  • Muffins
  • Off the Shelf
  • Other Desserts
  • Savoury Dishes/Meals
  • Scones
  • Tarts & Pastry
  • Travel

Easy Passionfruit Loaf Cake

Kath February 16, 2015

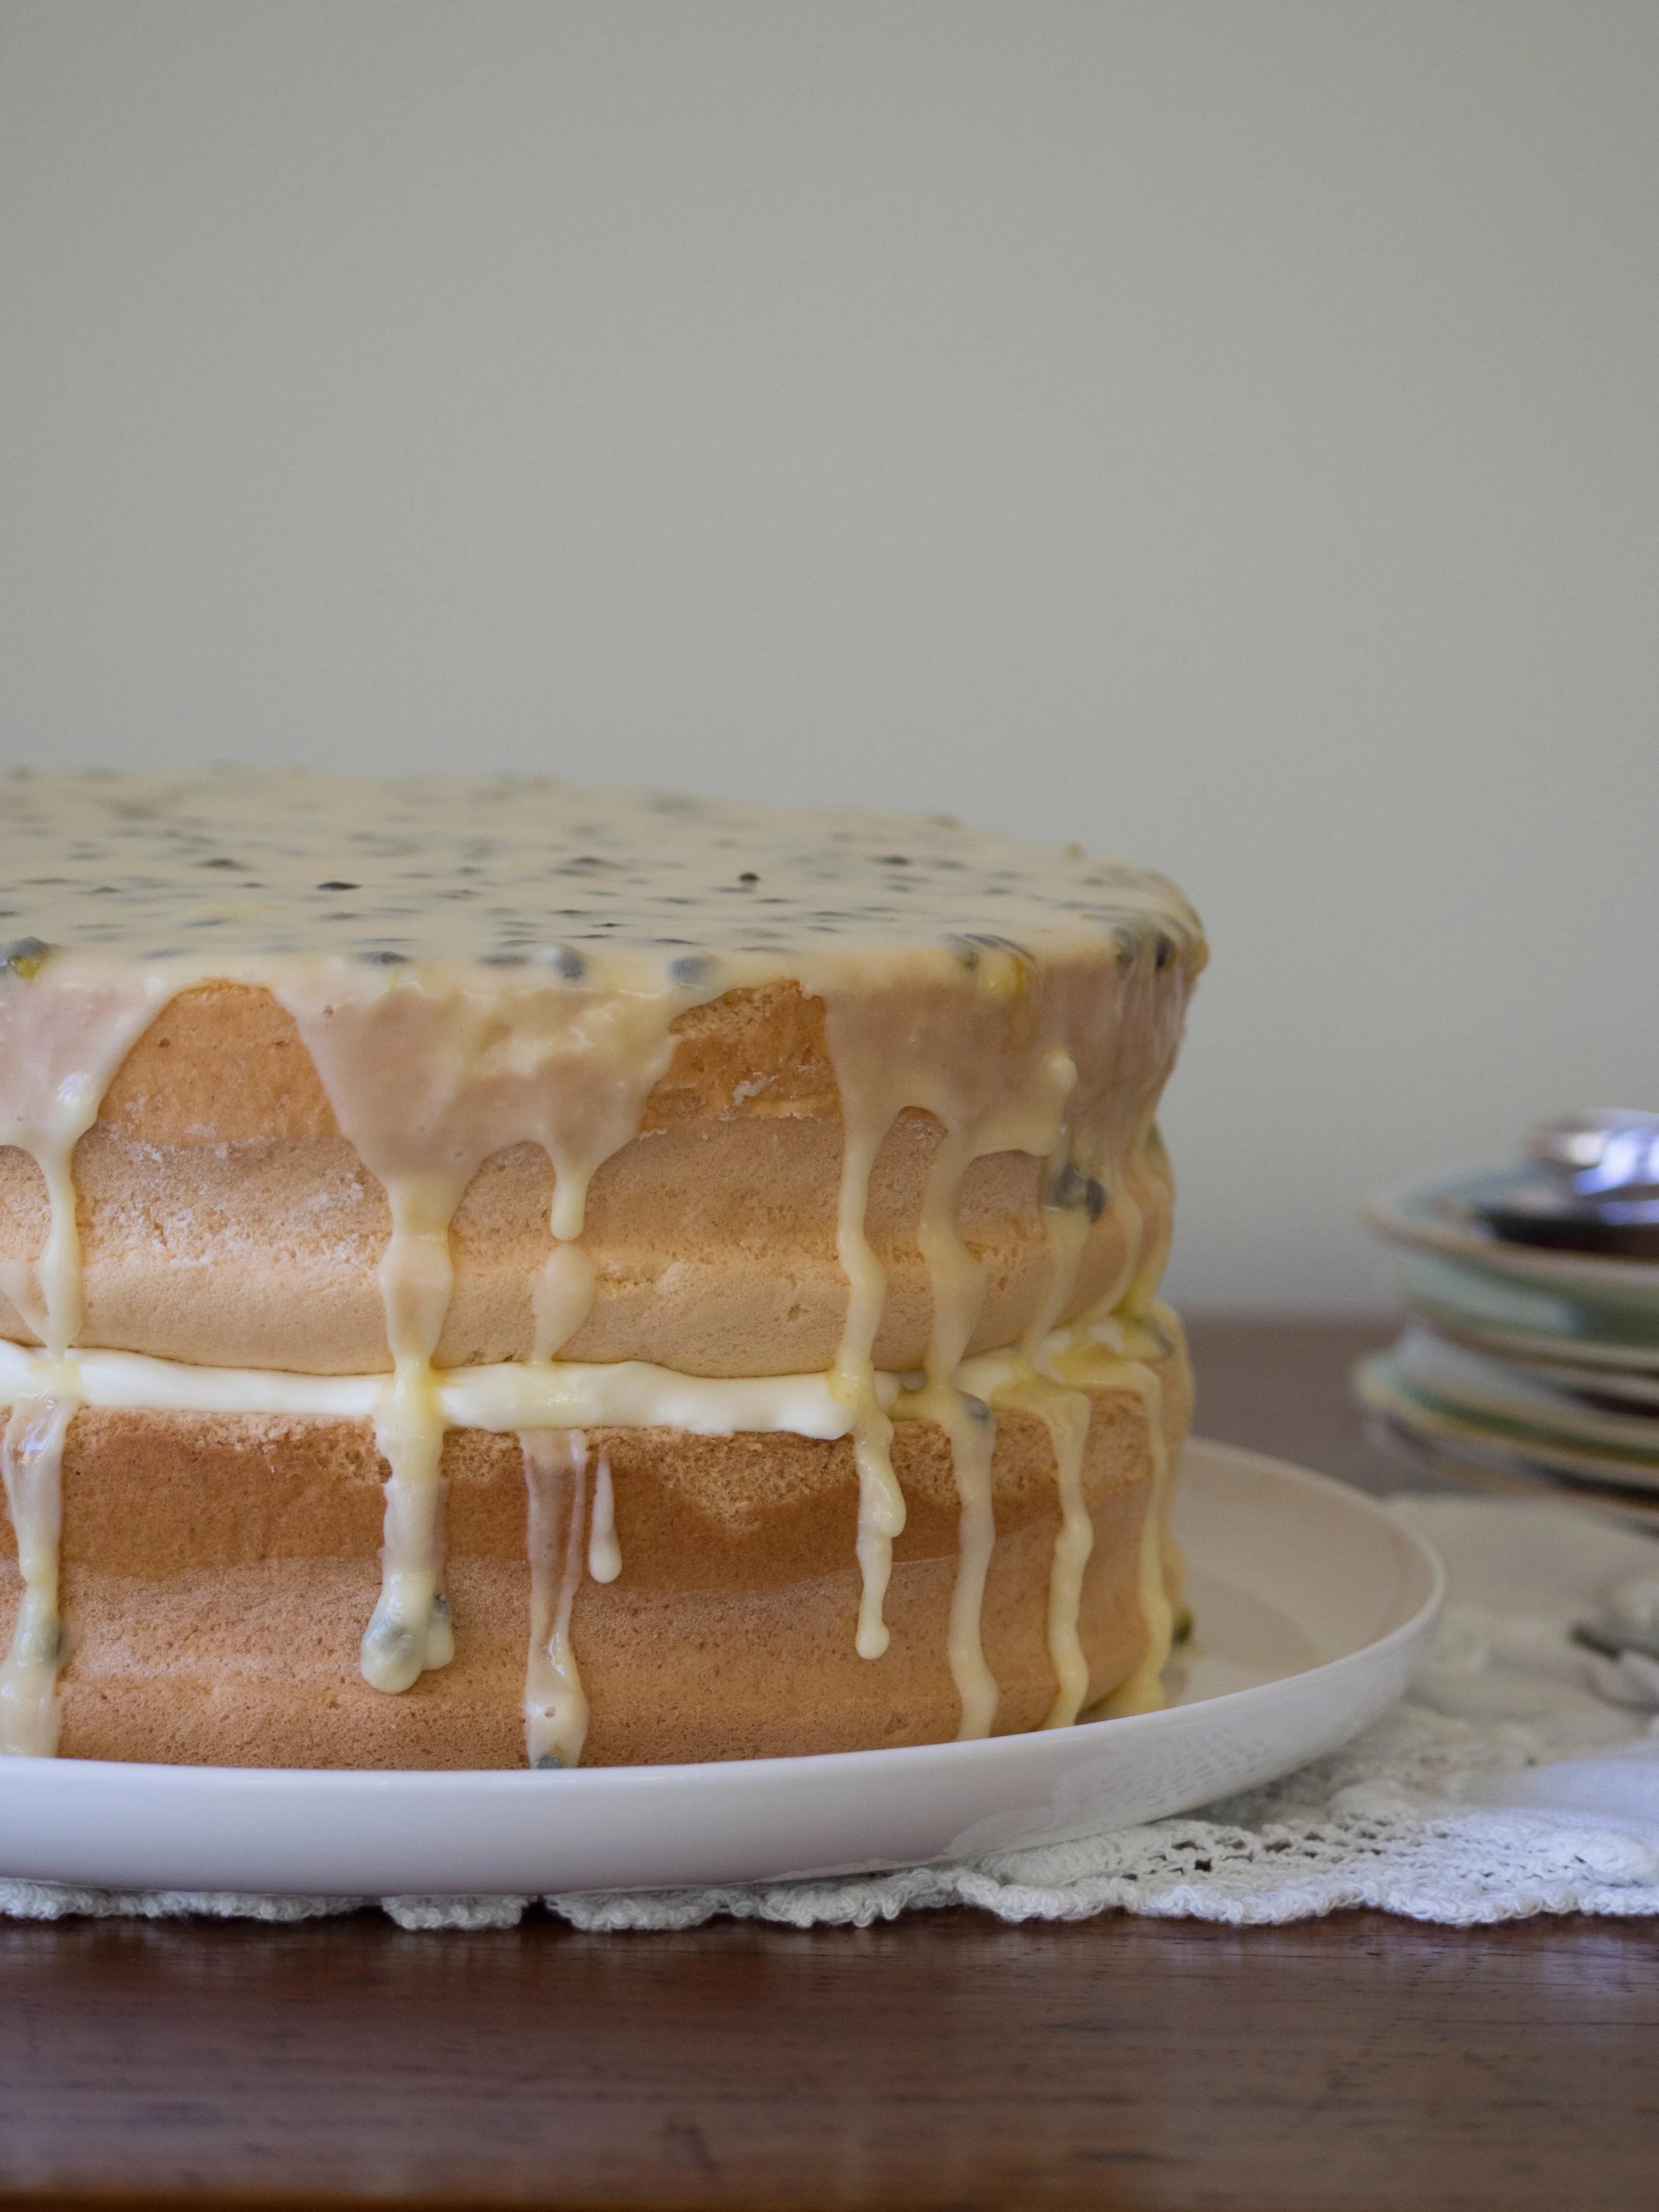
This recipe came about when I wanted to use up some passionfruit leftover from the sponge cake I made a little while ago. I do find it funny that whenever we have leftover or almost over ripe fruit in the house we use it to bake with! We’d probably be better off just eating it, rather than adding sugar and butter to it, but that wouldn’t be as much fun though would it? 

The base of this loaf cake is one I use often for cupcakes and whole cakes as well. It is quite versatile and has featured on the blog in the past in different forms. You can substitute the margarine for butter, the golden caster sugar for caster sugar, and the buttermilk for regular or skimmed milk. You can even use vanilla extract if you don’t have any vanilla bean paste. This loaf cake is that easy - you don’t even need to have all the right ingredients for it to be great! 

I apologise if anyone is throughly sick of seeing recipes for cake that involve passionfruit from me. Unfortunately, when there is something I like, I keep using it! And when I get an idea for a cake or recipe, I find it hard to think of anything else until the idea has been brought to life! So be prepared for a few more slightly repetitious cakes in the next little while! All of which however, can be altered to suit your tastes or what you have available. This loaf cake for example, would be just as good using lemon juice in the icing. 

On another note, the size of the loaf cake my look a little deceiving in the photos. This is because about half of it had already been eaten by the time I could take photos! 


Ingredients: 

125 g canola based margarine

3/4 cup golden caster sugar (raw caster sugar)

1 tsp vanilla bean paste

2 eggs 

1 1/2 cups self-raising flour

1/2 cup buttermilk 


For the Icing: 

1 1/2 cups icing sugar 

3-4 small passionfruit  


Method: 

Pre-heat oven to 160 degrees Celsius, and line a loaf tin with baking paper. 

In the bowl of an electric mixer, beat the margarine, sugar and vanilla until light and fluffy. 

Beat in the eggs one at a time, then add half the flour and half the buttermilk and mix. Add the remaining flour and buttermilk and mix on medium speed until well combined. 

Transfer the mixture into the loaf tin, smoothing the top. Bake for 1 hour, or until the cake springs back when touched lightly and a skewer comes out clean. 

Cool in the tin for a few minutes then transfer to a cooling rack, leaving the baking paper underneath the cake (this will prevent the cake from sticking to the rack, and catch any runaway icing later). 

Once the loaf has cooled completely, sift the icing sugar into a bowl. Add the pulp of 3-4 passionfruit gradually, mixing after each addition. Stop adding pulp when the icing is a nice smooth consistency. Drizzle the icing over the cake, allowing it to fall down the sides. Leave for 2-3 hours to allow the icing to dry before storing in an airtight container, or eat straight away!

All baking, styling and photography for this post by Kathryn Vincent of Kulinary Adventures of Kath.

In Cakes & Slices Tags cake, Passionfruit, Loaf Cake, Baking
Comment

Lamingtons

Kath January 23, 2015

For those who don’t live in Australia, a lamington is made using sponge cake and coating it in chocolate icing and coconut. I think they came about at some point to use up day old sponge. They are definitely worth a try! Sometimes they are sold with a layer of jam and/or cream in the middle as well. I like my lamingtons simple, with no cream or jam. Just made with good ingredients, and probably fresh sponge! Day old sponge is great to use, I just find fresh sponge easier to work with when coating them in the icing. 

This particular recipe comes from my favourite Aussie cook, Bill Granger. I have made them a couple of times before and they have been very popular. I have altered the quantities of chocolate in the icing recipe, as I like the combination of milk and dark chocolate together better than just dark chocolate on its own. You can use whatever you like or have at home, just keep the total chocolate quantity the same. 

Any type of coconut can be used to cover the lamingtons. I really like using coconut chips, however if you can’t find them just use shredded, desiccated or flaked coconut. Also, make sure you have more coconut ready than the recipe indicates. I always find I am grabbing more handfuls of it out the bag when I am decorating the lamingtons. It’s probably just because it’s quite messy and I end up with lots of coconut all over the bench! 

I try to work quite fast when decorating the lamingtons, as the chocolate will start to set before you have used it all up. You also need to get the coconut on each one straight after it has been coated in chocolate so it will stick. Keep stirring the icing to prevent it from setting, and if you need to thin it out a little to make it more liquid, you could a little more milk or some hot water (1 tsp at a time). The icing should be a little thick however, as it will coat the lamington better than a thin icing. 

 Ingredients for the Sponge Cake: 

6 eggs 

150 g caster sugar 

200 g self-raising flour 

30 g unsalted butter, melted

3 tbsp hot water

Ingredients for the Icing: 

500 g icing sugar

100 g dark chocolate melts 

100 g milk chocolate melts 

15 g unsalted butter

125 ml milk 

375 g coconut chips 


Method: 

Pre-heat oven to 180 degrees Celsius and grease and line a lamington tin (rectangle tin with dimensions approx. 18 x 28 cm and about 4 cm deep). 

Beat the eggs in the bowl of an electric mixer on medium speed for about 5 minutes. The eggs should become light and fluffy in this time. Gradually add the sugar and beat until the mixture is thick and the sugar has dissolved.

Sift in the flour and gently fold into the egg mixture with a metal spoon. Add the melted butter and hot water and gently stir to combine. 

Pour the mixture evenly into the prepared tin and bake for 30 mins, or until the sponge is golden and springs back when lightly touched. 

Once cooked, turn the sponge out onto a baking paper lined cooling rack, and allow to cool completely. 

Once the sponge has cooled, cut into squares (about 15-16). Place the coconut in a large shallow bowl, and have four forks ready. You will also need another baking paper lined cooling rack to place the freshly iced lamingtons on to dry. 

To make the icing, heat a sauce pan with a little water until it is simmering. Place all the icing ingredients (not the coconut), in to a heatproof bowl or saucepan that will fit on top of the saucepan of simmering water. Place the bowl with the ingredients over the simmering water and stir continuously until all the ingredients have melted and combined to form a smooth thick icing. Do not allow the simmering water below to touch the base of the bowl above, as the chocolate may burn. 

Remove the icing from the heat. Using two of the forks, dip one of the sponge squares into the icing. Using the remaining two forks, toss the chocolate coated sponge in the coconut, and place on the prepared rack to set. Continue with the remaining sponge squares, stirring the icing occasionally to stop it setting. 

Leave the lamingtons on the baking paper lined rack until the icing dries. They are best eaten the same day they have been made, however will store in an airtight container for a couple of days (in the fridge if the weather is particularly humid or hot). 

Recipe originally from Bill Granger ‘Everyday’  (Murdoch Books, 2006), p.192. 

In Cakes & Slices Tags Lamingtons, Cake, Chocolate, Coconut, Bill Granger
Comment

A Pink Tinged Birthday Cake

Kath January 15, 2015

This cake was made early last month for my birthday. Yes, I made my own birthday cake! I had seen this recipe in the Australian Women’s Weekly book ‘Indulgent Cakes’ a few months earlier, and never had a reason to make such a big cake. So when it came to deciding what to make for my birthday, I knew it was the perfect opportunity to make it. 

This cake combines two things that I really love - raspberry and rosewater. You may have noticed I use these two ingredients a lot, particularly together. I actually have to try and not use them so much now, so my blog isn’t just a how-to on using raspberries and rosewater! 

The icing of this cake is marshmallowy, and the cake itself is pink. Also two things I love. Marshmallows and anything pink. This cake was definitely the right choice for my birthday! 

I made the cakes the day before and stored them between baking paper in air-tight containers overnight. The icing needs to be made then used straight away. It is also best to assemble and ice the cake just before you want to serve it, as the icing is at its best straight away. 

This cake can (and should) be stored in fridge, and will last a couple of days (the icing will start to dissolve away however). 


Ingredients for the Cake: 

250 g unsalted butter, softened

6 egg whites

2 tsp vanilla extract

2 cups caster sugar 

2 1/2 cups plain flour

1 cup buttermilk

2 tsp bicarb soda

2 tsp white vinegar

3 tsp pink food colouring


Ingredients for the Filling: 

185 g raspberries 

1 tbsp rosewater

300 ml thickened cream

1/4 cup icing sugar 


Ingredients for the Icing: 

3/4 cup caster sugar 

1 tbsp glucose syrup 

2 tbsp water 

3 tsp rosewater 

3 egg whites 

fresh raspberries, for decoration


Method: 

Pre-heat oven to 180 degrees Celsius and line two 20cm round baking tins three times. 

In the bowl of an electric mixer, beat the butter until smooth. Then add the buttermilk, egg whites, sugar, flour and vanilla extract. 

In a separate bowl combine the white vinegar and bicarb soda. This mixture should become foamy. Add the pink colouring to the vinegar mixture. Then add the vinegar mixture to the main cake mix. Beat on a low speed until everything has combined, then beat for a couple of minutes on medium speed until the mixture turns a paler colour. 

Divide the cake mix evenly between the two prepared tins, and bake for 45 minutes. Test cakes with a skewer to ensure they are cooked through. Allow the cakes to stand in their tins for a few minutes, then turn them onto baking paper lined cooling racks (top side of cake facing down). 

Once the cakes are cool, carefully cut them in half. Place one of the layers on a serving plate, cake stand or board. Set aside.

To make the filling, lightly squash the raspberries in a small bowl with the rosewater. In a separate bowl beat the cream and icing sugar until the cream forms stiff peaks. Fold the raspberries into the cream. Spread one-third of the cream onto the base layer of the cake, and top with the next layer. Repeat with the remaining layers, finishing with a final layer of cake. 

To make the icing, place the egg whites in the bowl of an electric mixture. Then place 2/3 cup of the sugar, water, glucose and rosewater in a saucepan and stir over medium heat until the sugar has dissolved. Bring mixture to the boil, and allow to boil for 3 minutes, or until a small amount can be rolled into a soft ball once dropped in cold water. If you have a sugar thermometer, the syrup should be 115 degrees Celsius at this stage. Once the syrup is boiling, start beating the egg whites until soft peaks form. Then beat in the remaining sugar. 

Remove the syrup from the heat and allow the bubbles to settle. With the mixer running, add the syrup to the egg whites in a thin stream. Beat on high speed for about five minutes, by which time the icing should have thickened and cooled.

Use icing immediately, trying to ice the top and sides of the cake evenly. Decorate with fresh raspberries. 


Recipe originally from, The Australian Women’s Weekly ‘Indulgent Cakes’  (2014, Bauer Media Books), pp.140-145.

All baking, styling & photography for this post by Kathryn Vincent of Kulinary Adventures of Kath. 

In Cakes & Slices Tags cake, birthdays, Australian Women's Weekly, Raspberry, Rosewater, Afternoon Tea, Baking
Comment

Raspberries

Kath January 9, 2015

It’s no secret that I use these a lot when I bake. I have a stash of them stored in the freezer to pull out whenever I feel like making something with them. They are in season now, and the price of fresh raspberries has dropped as a result.

Freezing fresh raspberries works really well, and they hold up better in baking than the pre-frozen bought ones. The peach and raspberry tart I made over Christmas was made using fresh frozen raspberries.

There is no need to defrost them before using them in baking, they will hold their shape better and bleed less if they are used straight from the freezer.

Tags Raspberries, Frozen Raspberries, Cooking Tips
Comment

A Passionfruit Sponge & One Year of Blogging

Kath January 8, 2015

With the holiday season over, I was preparing to take a short break from baking and get some blog planning and other bits and pieces done. The weekend after New Years however, I suddenly realised - one year since I began this blog was coming up in four days! This mini milestone completely took me by surprise. I had nothing planned, but knew a cake at least, was 100% necessary.  

I decided to make a classic passionfruit sponge. I had looked through a few cookbooks and food magazines, trying to come up with something that was totally new and different. But I then thought, it was probably better to celebrate one year of my blog, with something that better represented what I have been doing for the past year. I don't tend to make cakes that have ingredient lists that span 3 pages, and need to be started two days in advance. As much as I appreciate eating things that have that much effort put into them, I am not always that keen to be the one putting the effort into making them! 

I have made a couple of passionfruit sponges before, but neither have made it onto the blog. I was never completely happy with the texture and knew that the search for the best recipe wasn't over. I found this recipe in a issue of Country Style magazine, in a section of the magazine that focuses on heirloom recipes. This recipe was sent in by someone whose father discovered a love and talent for baking in his retirement, and now in his 90's is his families go-to baker. 

The recipe was quite different to the others I had tried, and it turned out exactly how I wanted! The result was light and fluffy. And the bonus was, it wasn't difficult to make and took less than half an hour to cook. It will now be my go to sponge cake recipe! 

Thanks to all of you who read this blog, follow and support me. I appreciate it very much! Here's to another year of blogging, taking photos and eating! 


Ingredients: 

Butter and plain flour, for greasing cake tins 

4 eggs 

1/2 cup caster sugar

1 cup cornflour 

1 tbsp custard powder 

1 tsp cream of tartar 

1/2 tsp bicarbonate of soda 


Ingredients for Icing and Filling: 

1 1/2 cups icing sugar 

3-4 passionfruit

1 cup of thickened cream 


Method: 

Pre-heat oven to 200 degrees Celsius. Use a little butter to grease two (20 cm) sandwich tins, then dust them with some flour. Line the base of each tin with baking paper. 

Separate the eggs, and set the yolks aside. Place the whites into the bowl of an electric mixer and beat until they form stiff peaks. Add the sugar and beat until the mixture has become stiff and glossy. Add the yolks and beat until just combined. Sift in the dry ingredients, and gently fold into the egg mixture using a large metal spoon.

Divide the mixture between the two tins, and bake for 20 minutes. The cakes will be ready when they are golden in colour and spring back when touched lightly. 

Line two cooling racks with baking paper. Remove cakes from their tins, and allow to cool on the prepared racks. Allow to cool completely before icing or filling the cake. 

Sift the icing sugar into a bowl, and gradually mix in the passionfruit pulp until the icing is smooth. I used three small passionfruit. Let the icing stand for a few minutes to allow it to thicken. 

Meanwhile, whip the cream and spread over one of the cakes (top side down). It is easiest to ice and fill the cake on the plate you will serve it on. Use the pulp of one passionfruit to drizzle over the cream. Top with the remaining sponge cake, and ice the cake with the icing. 

This cake is best served immediately after it is assembled, however, it will keep in the fridge for a couple of days. 

Original Recipe found in Country Style Magazine, November 2014 Issue, pp.76-77 (article: ’never too late’, recipe originally by Bill Bevan).

All baking, styling and photography for this post by Kathryn Vincent of Kulinary Adventures of Kath.

In Cakes & Slices Tags Cake, Passionfruit, Sponge, The Blog Turns One, Country Style Magazine
Comment

Raspberry & Rose Pavlova (Gluten Free) + Christmas 2014

Kath January 2, 2015

This year for Christmas I baked a lot! We don’t have a big family, so we decided to make food the focus for Christmas Day. While the heat and humidity of our Sydney Summer provided a few challenges to my baking efforts, I really enjoyed having the time to bake and cook whatever I wanted, with Christmas being the ‘excuse.’ 

I made four batches of gingerbread, using this recipe, which remains my favourite. A made a gingerbread house, with varying levels of success. I was concerned about is structural soundness, however after just over a week of standing upright and remaining standing once a meat mallet was taken to it, I feel these concerns were slightly unfounded! Mostly, I would have liked it to look prettier, however for my first ever attempt, it’s probably not so bad. 

PC230455.jpg

A few tarts were made as well. All of them stemmed from using up lovely summer fruits that we had bought. Using the same case and filling recipe as the white cherry tart I made in my last post, I used raspberries and peaches, which was so good, then just plain raspberry, then I used up the last of the Christmas cherries to make a cherry tart for New Years Eve. I also just made a plum upside-down cake to use up the last of the plums. It’s safe to say that this holiday season has not been short of cake and sweet treats! 

Peach & Raspberry Tart

Peach & Raspberry Tart

Cherry Tart for New Years Eve

Cherry Tart for New Years Eve

On Christmas morning I had prepared some of Sophie Hansen’s Buttermilk Jam Scrolls, which we ate with tea and some lovely fresh fruits. For Christmas Day lunch my Mum made a glazed ham, turkey wellington and a pear and goats curd salad. I made my favourite Summer Iced Tea. For dessert I created an Epic Pavlova. I call it epic as it was just something I thought I would try and see if it worked. And it ended up being the best pavlova I have ever made! I changed some of the ingredients from my Grandma’s original recipe, after looking at lots of other pavlova recipes. I wanted it to look a little festive, so I decided to decorate it with mostly red berries, and was particularly excited when I found red currants in the green grocer (first time I had ever seen them!). 

Breakfast

Breakfast

Christmas Lunch

Christmas Lunch

Dessert!

Dessert!

Unfortunately, I didn’t get to take many photos of the pavlova, as when I was assembling it, the Christmas Day weather began to turn bad. Thus there was no good light to shoot in. The shots I got were taken at a doorway to the balcony, door open to get as much natural light in as possible, rain coming down just beyond where the pavlova sat! 

Here is the recipe for my pavlova. I used up some of the remaining egg yolks to make the frangipane fruit tarts (substitute one whole egg for two yolks), otherwise you could make some gingerbread or maybe some custard. The quantities for the fruit to decorate are just guides, as you can put as little or as much as you would like, there are no rules! Lots of different fruits are great for pavlova, however I would stick to things that complement rosewater for this recipe. 

I made the pavlova layers on Christmas Eve and left them to cool in the oven overnight, and assembled just before serving on Christmas Day. 

Raspberry & Rose Pavlova

Ingredients for the Pavlova: 

8 egg whites 

500 g caster sugar

2 tsp raspberry vinegar 

1 tsp rosewater 

40g cornflour


To Decorate: 

450 ml cream 

1 tbsp rosewater 

1-2 punnet raspberries

1 punnet blueberries

seeds from 1-2 pomegranates

1 punnet red currants 


Method: 

Pre-heat oven to 200 degrees Celsius. Line two large baking trays with baking paper, and trace a circle on each, approx. 26 cm in diameter (I used a dinner plate). 

In a clean dry bowl, beat the egg whites for 5-6 minutes, whilst gradually adding the sugar. Add the raspberry vinegar and rosewater and beat until the mixture is stiff and glossy. 

Sift cornflour over the mixture, and gently fold to combine. 

Place half the mixture on one tray, using the circle as a guide. Push the mixture around to form a circle, leaving a small border around the edges. Repeat with the remaining mixture on the other tray. 

Turn the oven down to 125 degrees Celsius, and cook undisturbed for 1.5 hours. 

After 1.5 hours, turn the oven off and leave the pavlova layers to cool completely in the oven. 

When ready to assemble the pavlova, whip the cream and rosewater together. Spread half over one of the pavlovas and sprinkle with half the pomegranate seeds, half the raspberries and half the blueberries. Place the remaining pavlova shell on top. Fill the top layer with the remaining cream, and berries, using the red currants to form a border around the fruit on the top layer. 


What did you make during the festive season? Let me know in the comments below!


For more recipes showcasing the best of rose, check out my eBook Baking with Rose by clicking the link below!

get your ebook!
In Other Desserts, Heirloom Recipes, Holidays Tags Christmas, Baking, Tart, Pavlova, Gingerbread Biscuits, Gingerbread House, 2014
2 Comments
  • The Blog
  • Older
  • Newer

recipes

  • Biscuits/Cookies 39
  • Breads Etc. 9
  • Breakfast 7
  • Cakes & Slices 68
  • Confectionary 5
  • Drinks 6
  • Events 14
  • Food Photography Tips 3
  • From The Mailing List 24
  • Heirloom Recipes 12
  • Holidays 44
  • Ice Cream 9
  • Jams Preserves & Spreads 9
  • Muffins 4
  • Off the Shelf 49
  • Other Desserts 25
  • Savoury Dishes/Meals 15
  • Scones 4
  • Tarts & Pastry 9
  • Travel 13

Sign up to Friday Food Chat with Kath, a weekly newsletter for more food, baking, cookbook chat and more!

Sign Up Here!
instagram-unauth pinterest facebook url

Website Accessibility: To enable text to speech function on the blog, click the sound button to the right of each blog post.

All images & content are the property of Kathryn Vincent, unless stated otherwise. Please do not use without permission.

Kulinary Adventures of Kath

Food Photography, Recipes & Baking

instagram-unauth pinterest facebook url