Kulinary Adventures of Kath

Food Photography, Recipes & Baking
  • home
  • About
  • Work with Kath
  • Shop
  • Blog
    • The Blog
    • Recipe Archive
  • Newsletter
  • Contact
  • home
  • About
  • Work with Kath
  • Shop
    • The Blog
    • Recipe Archive
  • Newsletter
  • Contact
Raspberry Pistachio Rose Cake (23 of 25).jpg

The Blog

Recipes and Food Photography by Kath Vincent.

  • The Blog
  • Recipe Archive
  • All
  • Biscuits/Cookies
  • Breads Etc.
  • Breakfast
  • Cakes & Slices
  • Confectionary
  • Drinks
  • Events
  • Food Photography Tips
  • From The Mailing List
  • Heirloom Recipes
  • Holidays
  • Ice Cream
  • Jams Preserves & Spreads
  • Muffins
  • Off the Shelf
  • Other Desserts
  • Savoury Dishes/Meals
  • Scones
  • Tarts & Pastry
  • Travel
Blood Orange Cupcakes

Blood Orange Cupcakes

Blood Orange Cupcakes

Kath October 12, 2016

Before blood orange season is officially over, I really wanted to share this simple cupcake recipe with you. The basic recipe is my staple cupcake/cake recipe I bake over and over again, and thus adapt over and over again. 

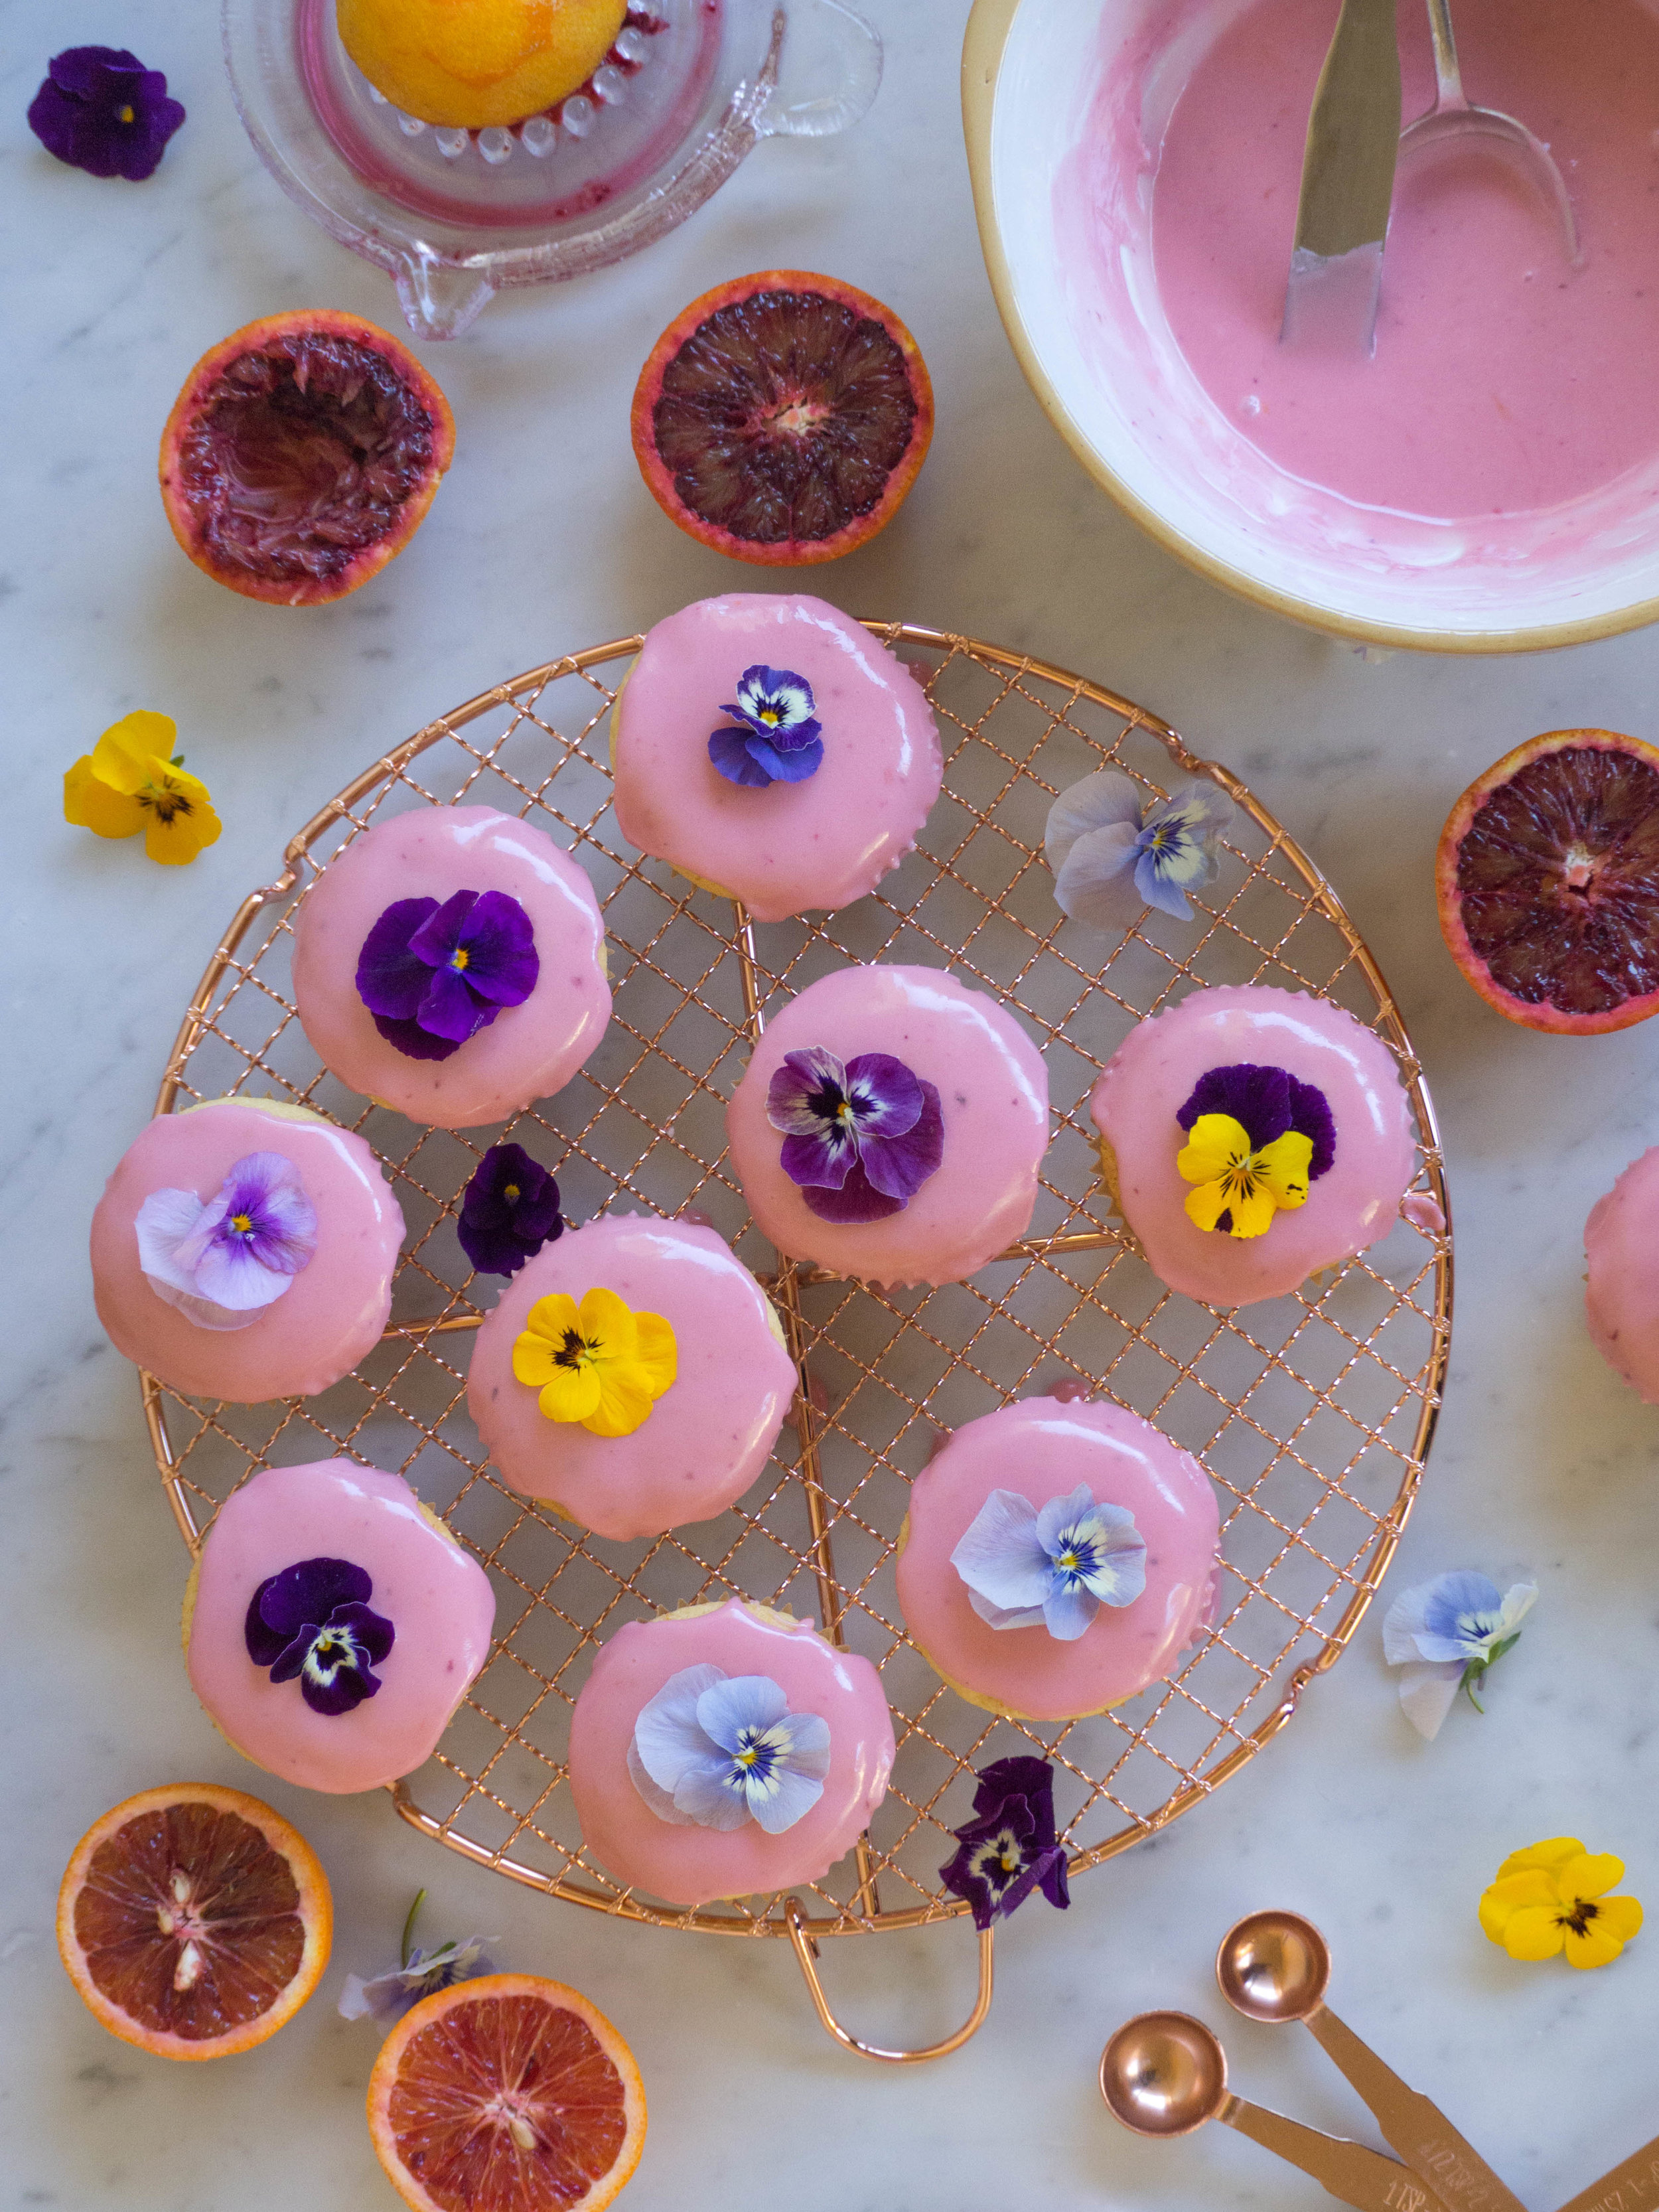
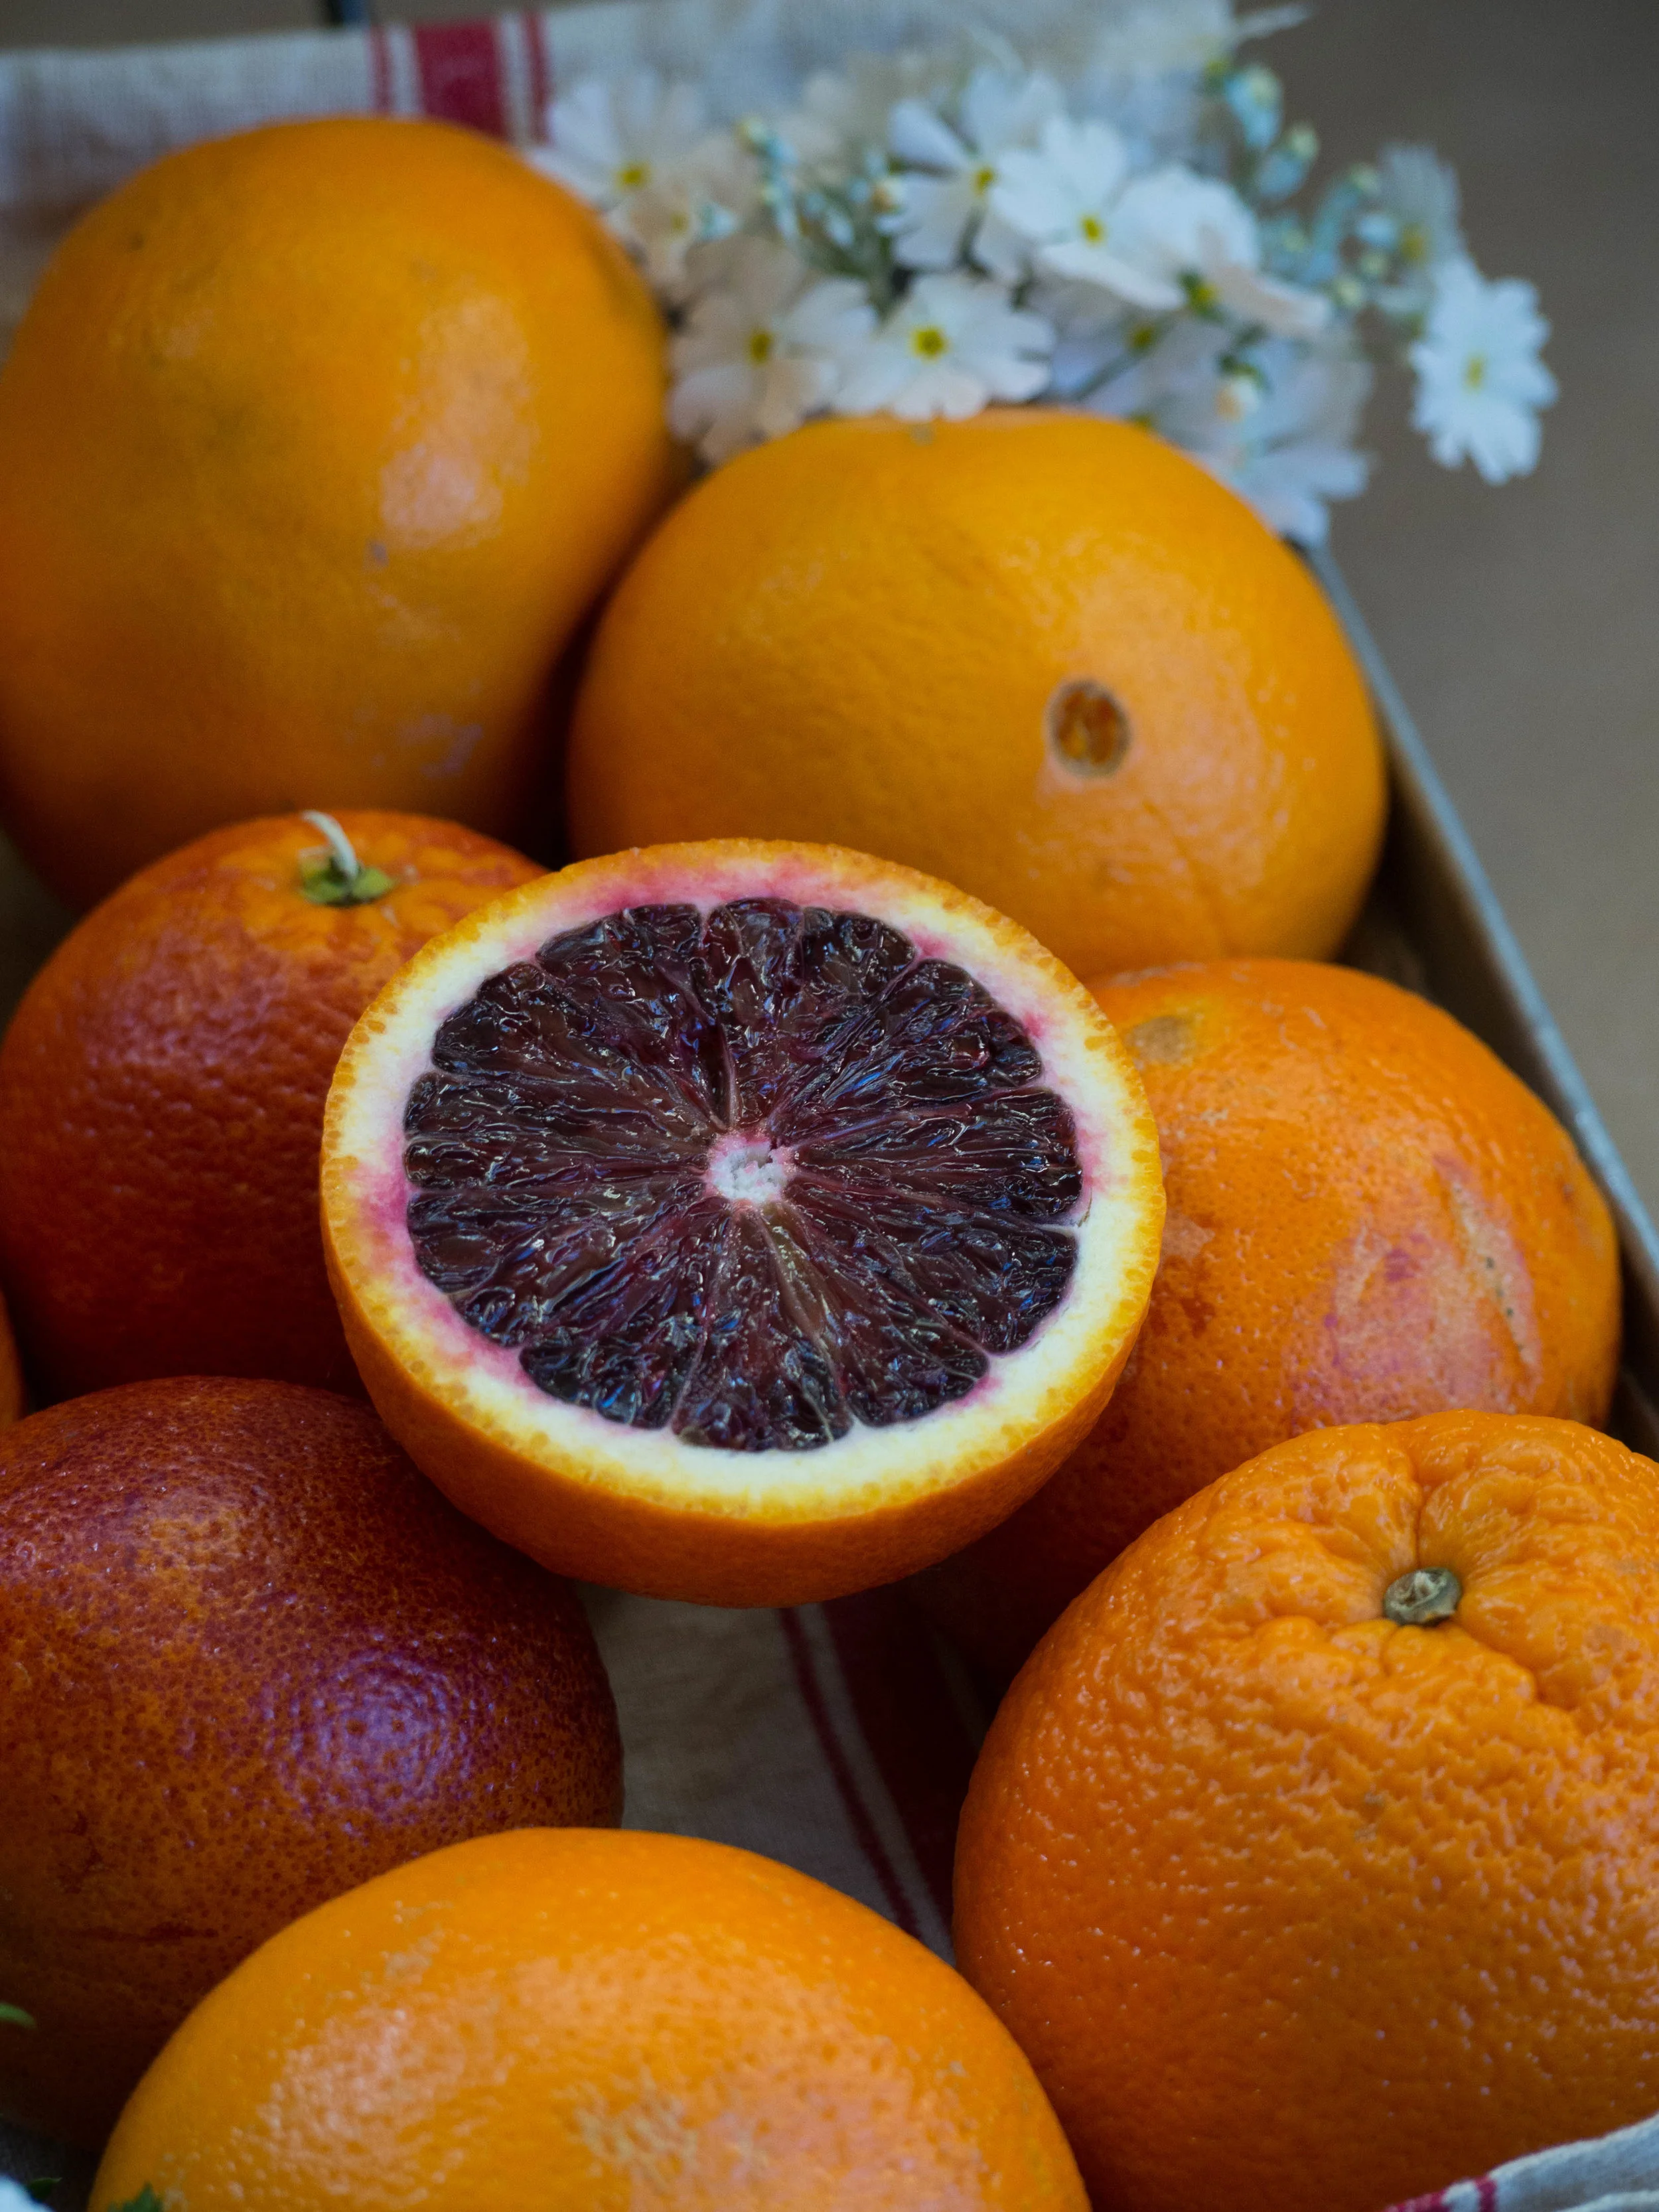
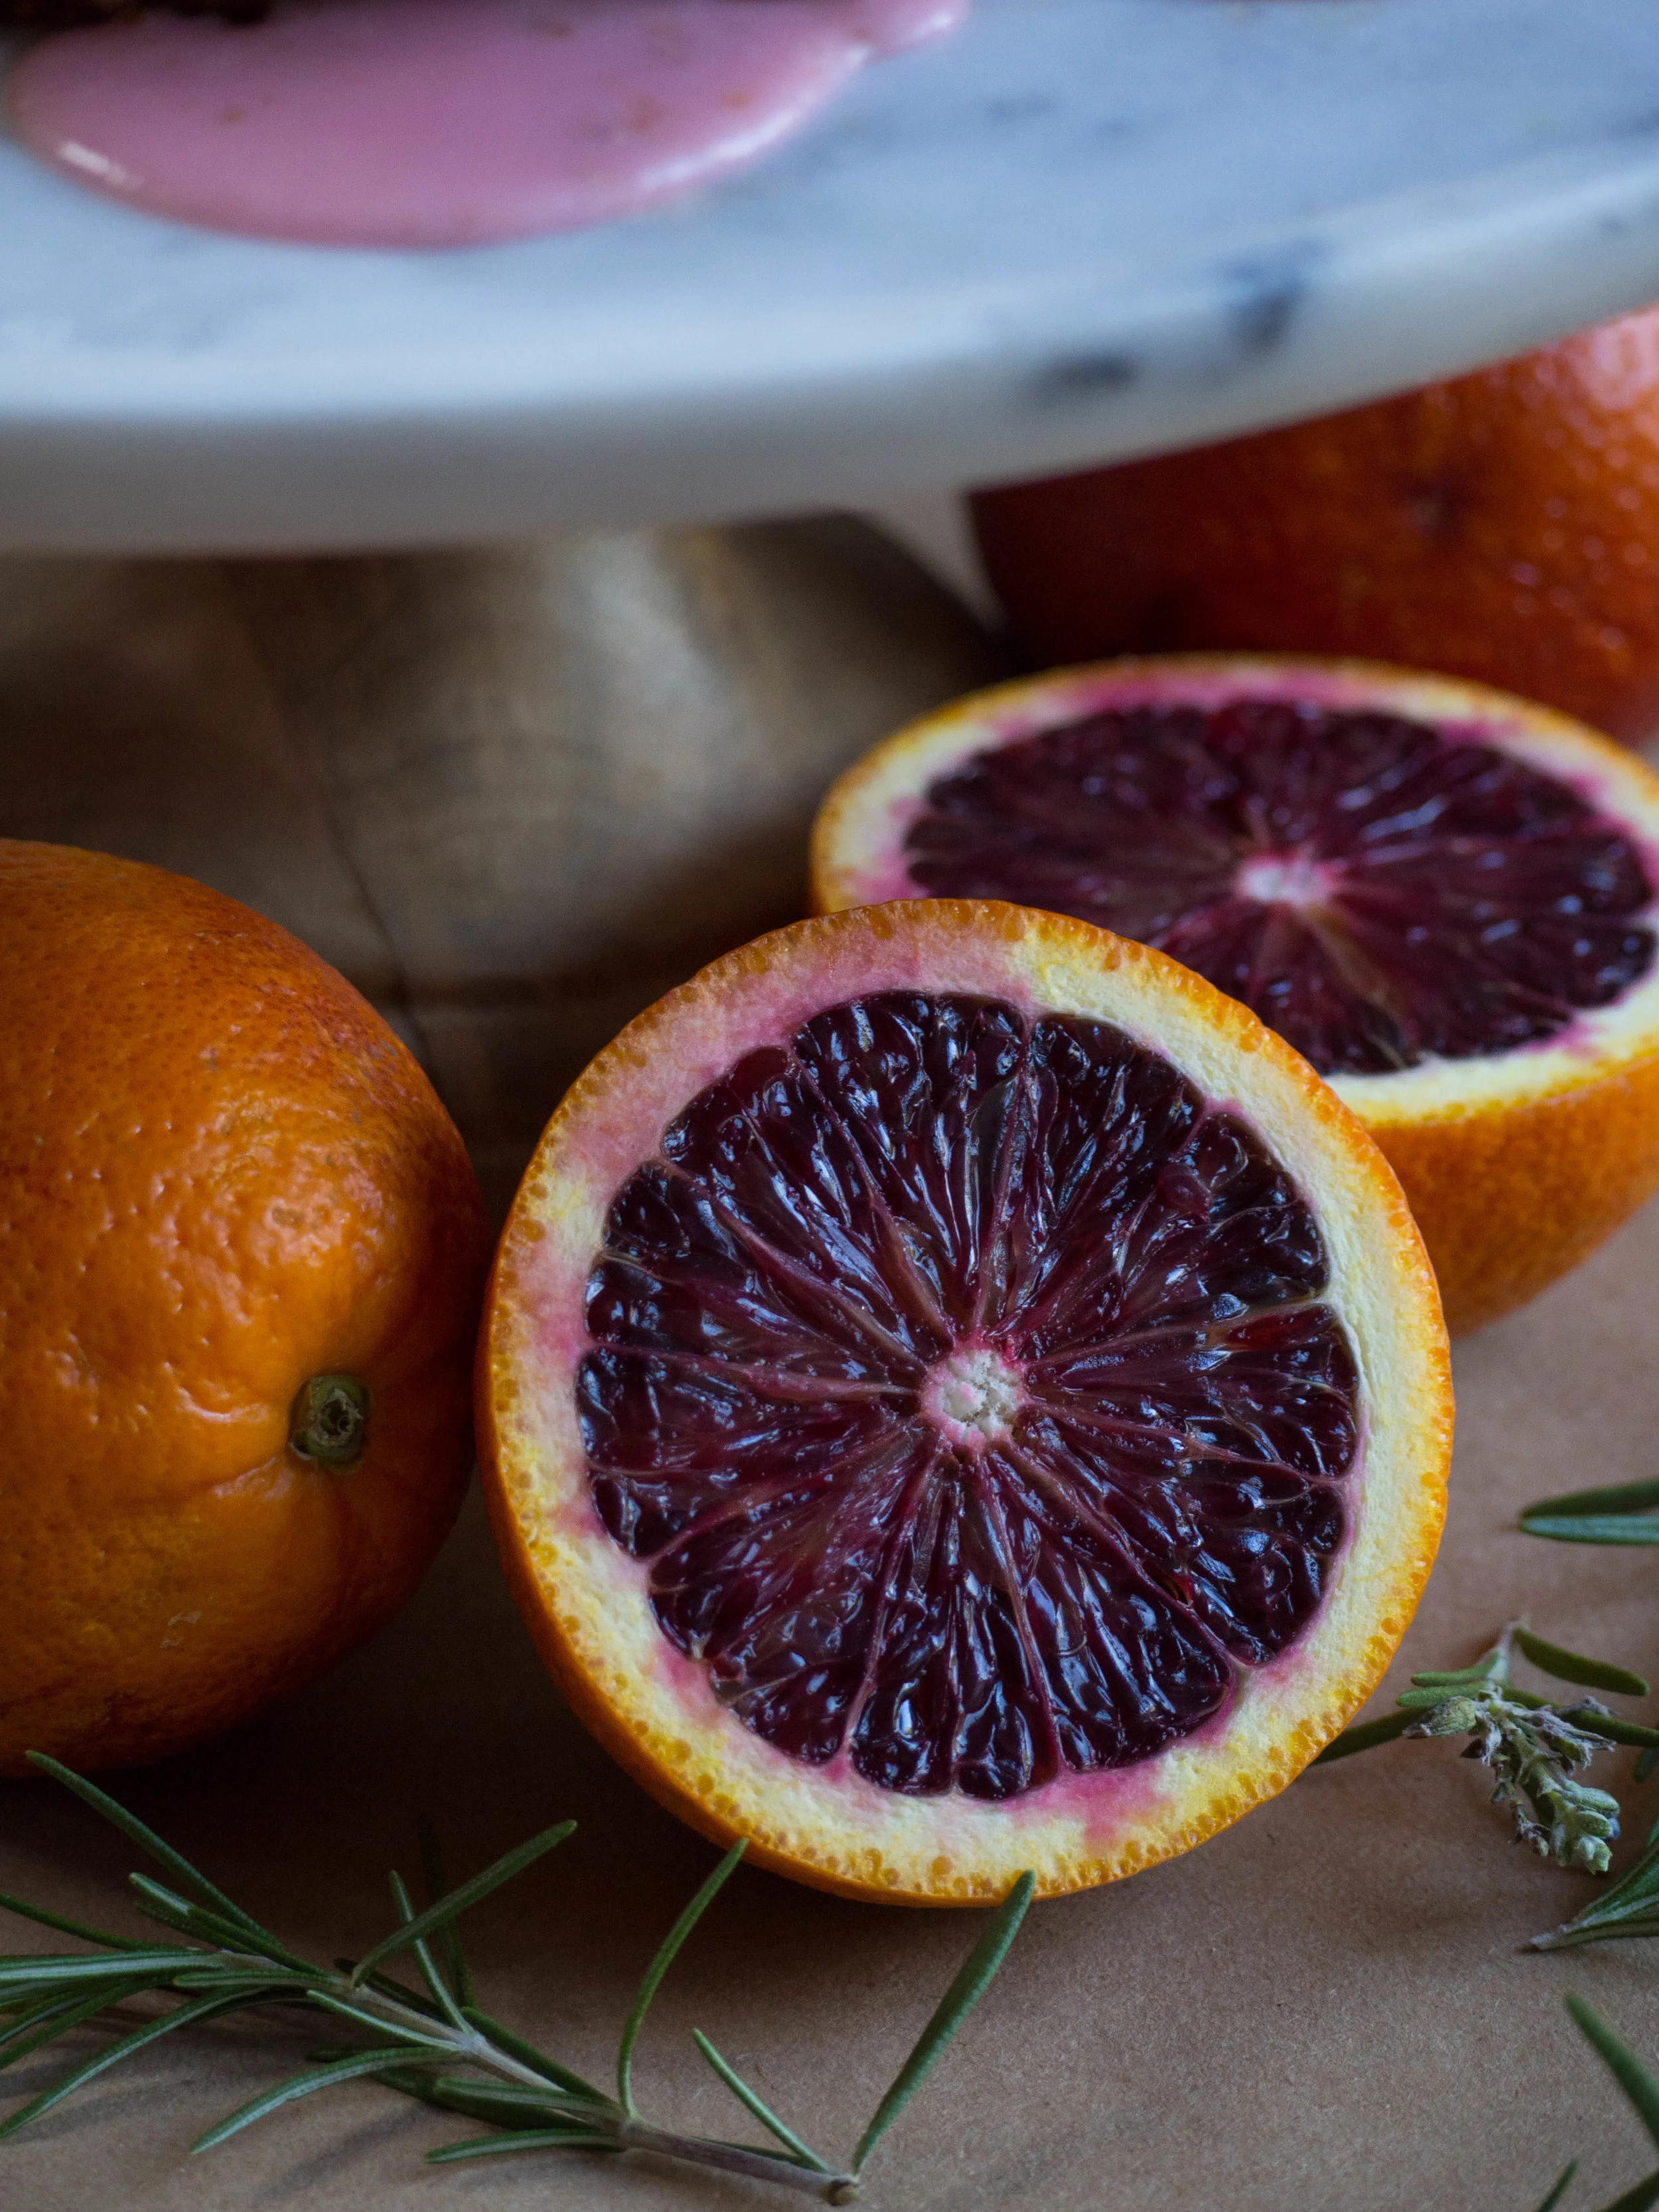
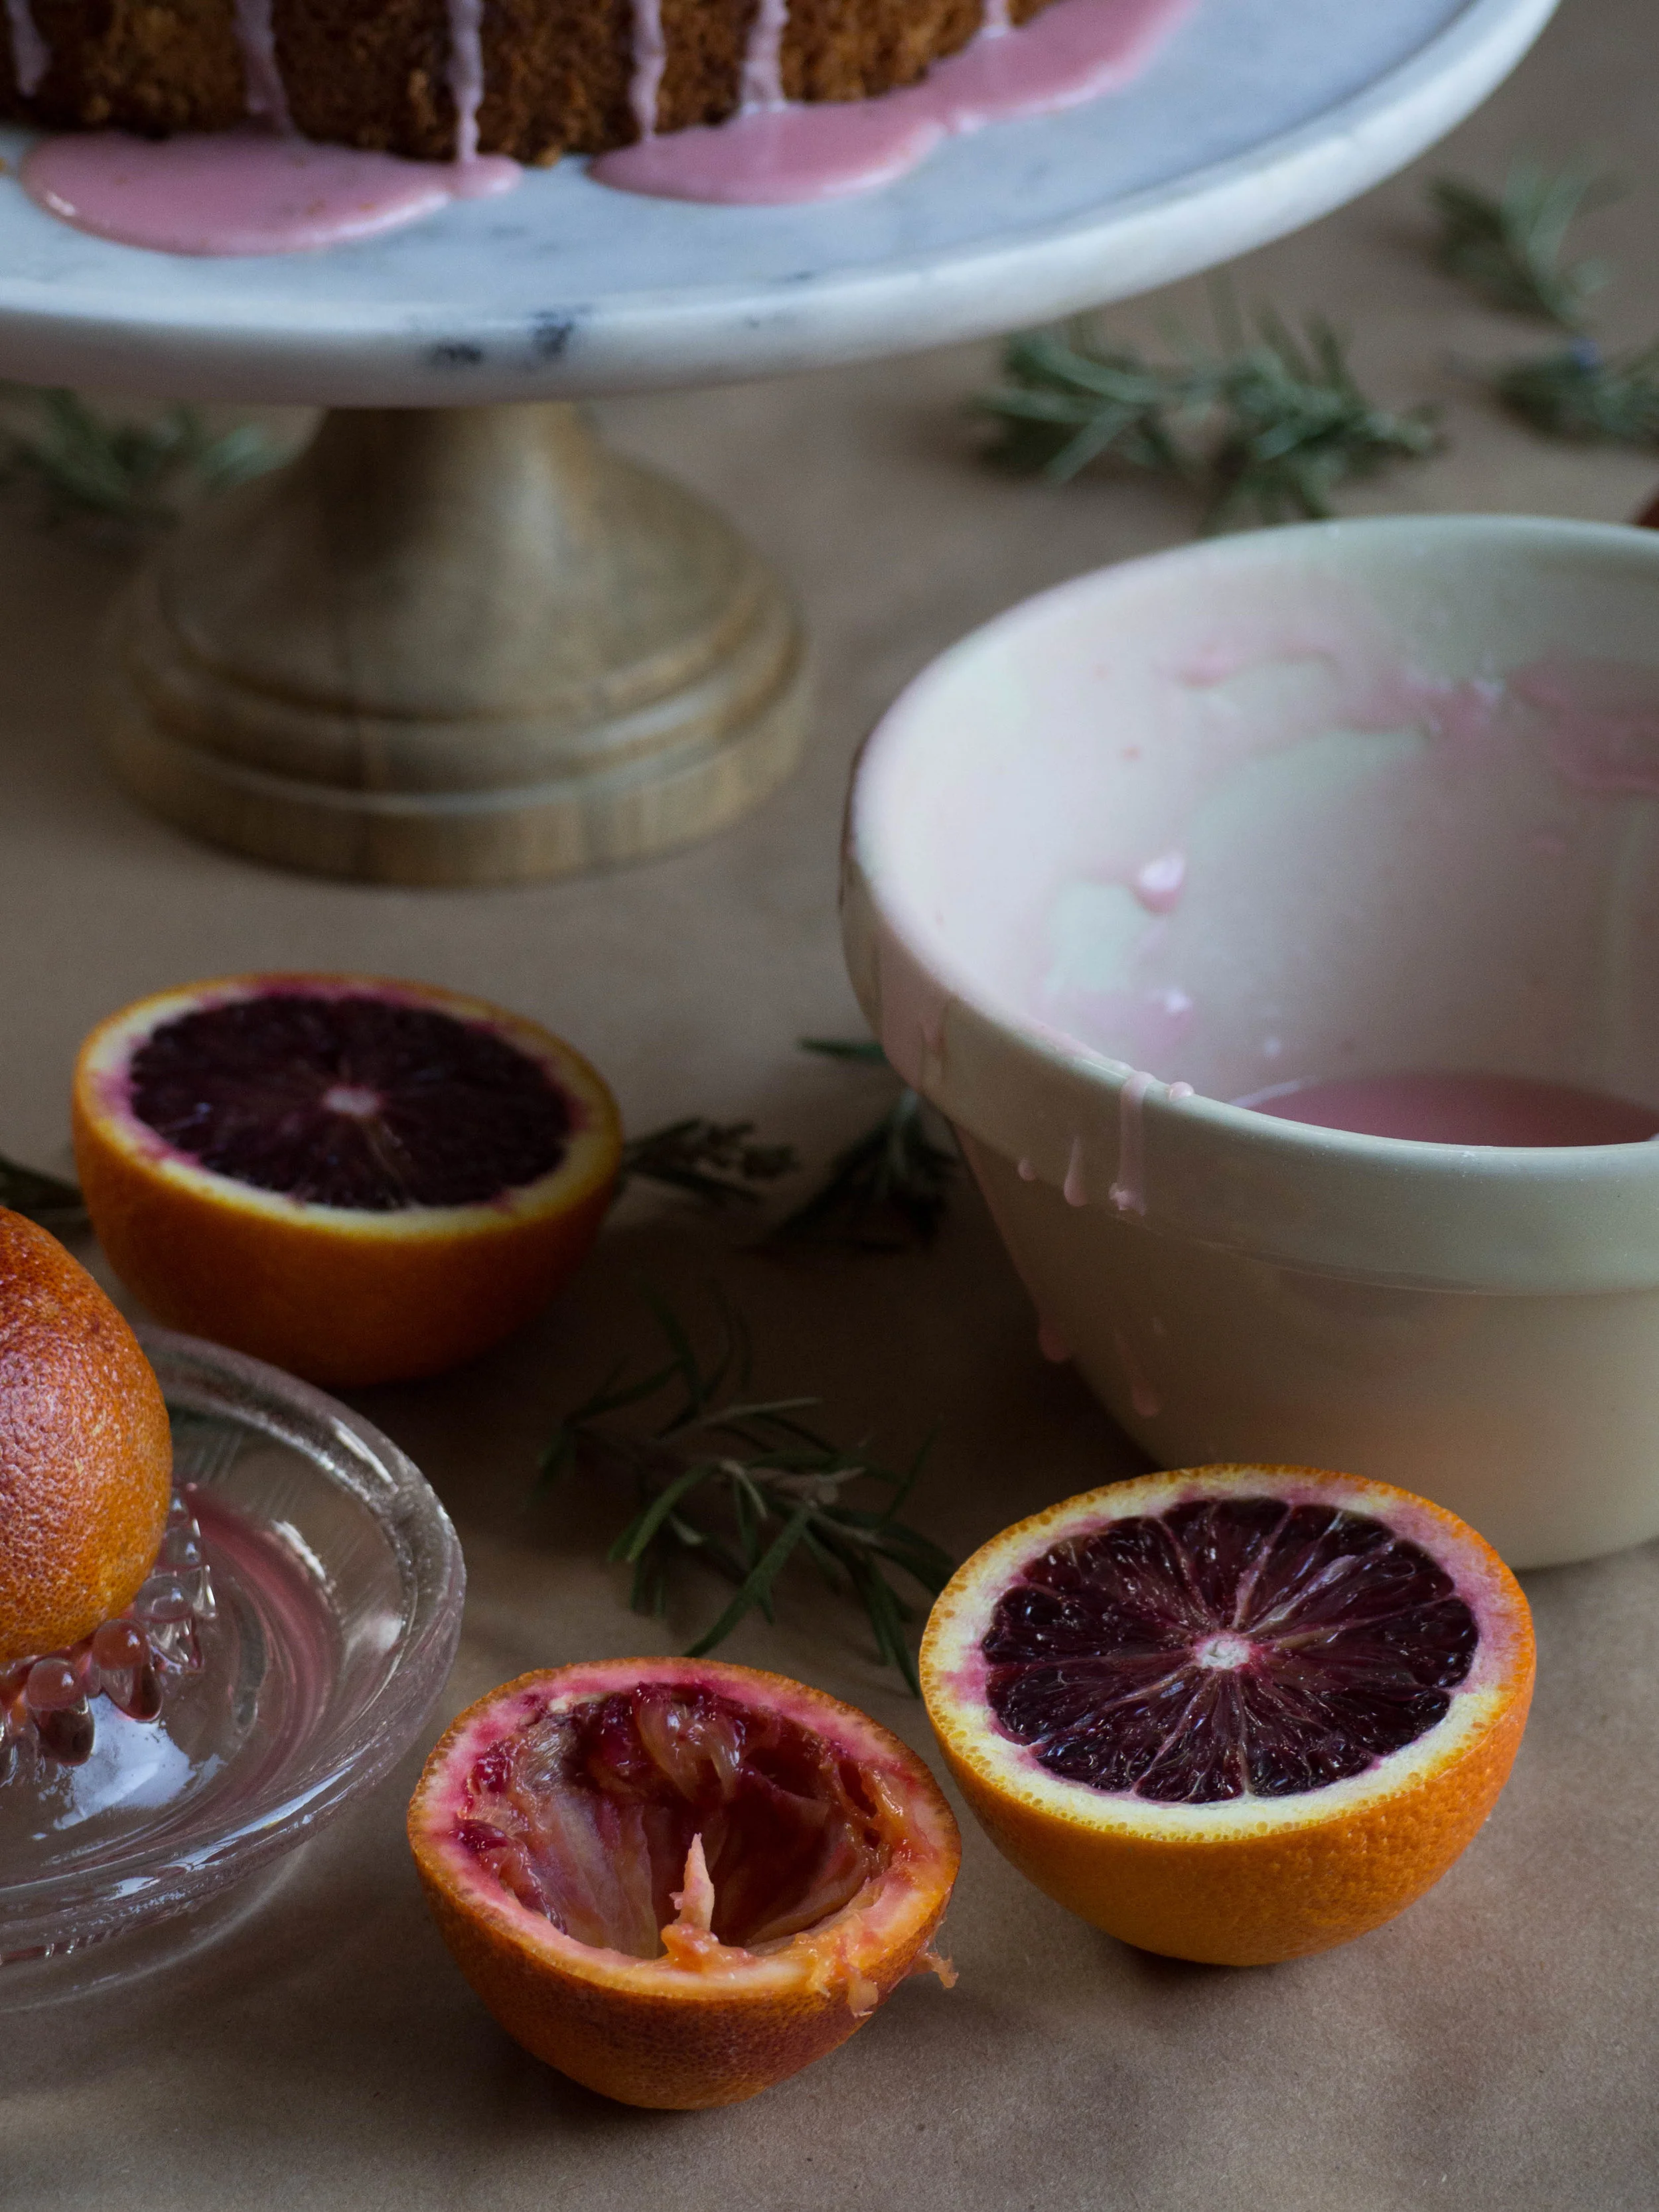
I have had a bit of a ‘thing’ for blood oranges this season. If you follow me on Instagram, you might have noticed! And luckily, this season seems to have been particularly plentiful. To me they are much nicer than a regular orange and I always feel some level of excitement when cutting one open - how red/purple will it be?! I have bought many whilst perusing the local green grocers on my lunch break, and carried them home on the train with either grand plans to bake something that weekend or just to juice them and freeze it for something later on. 

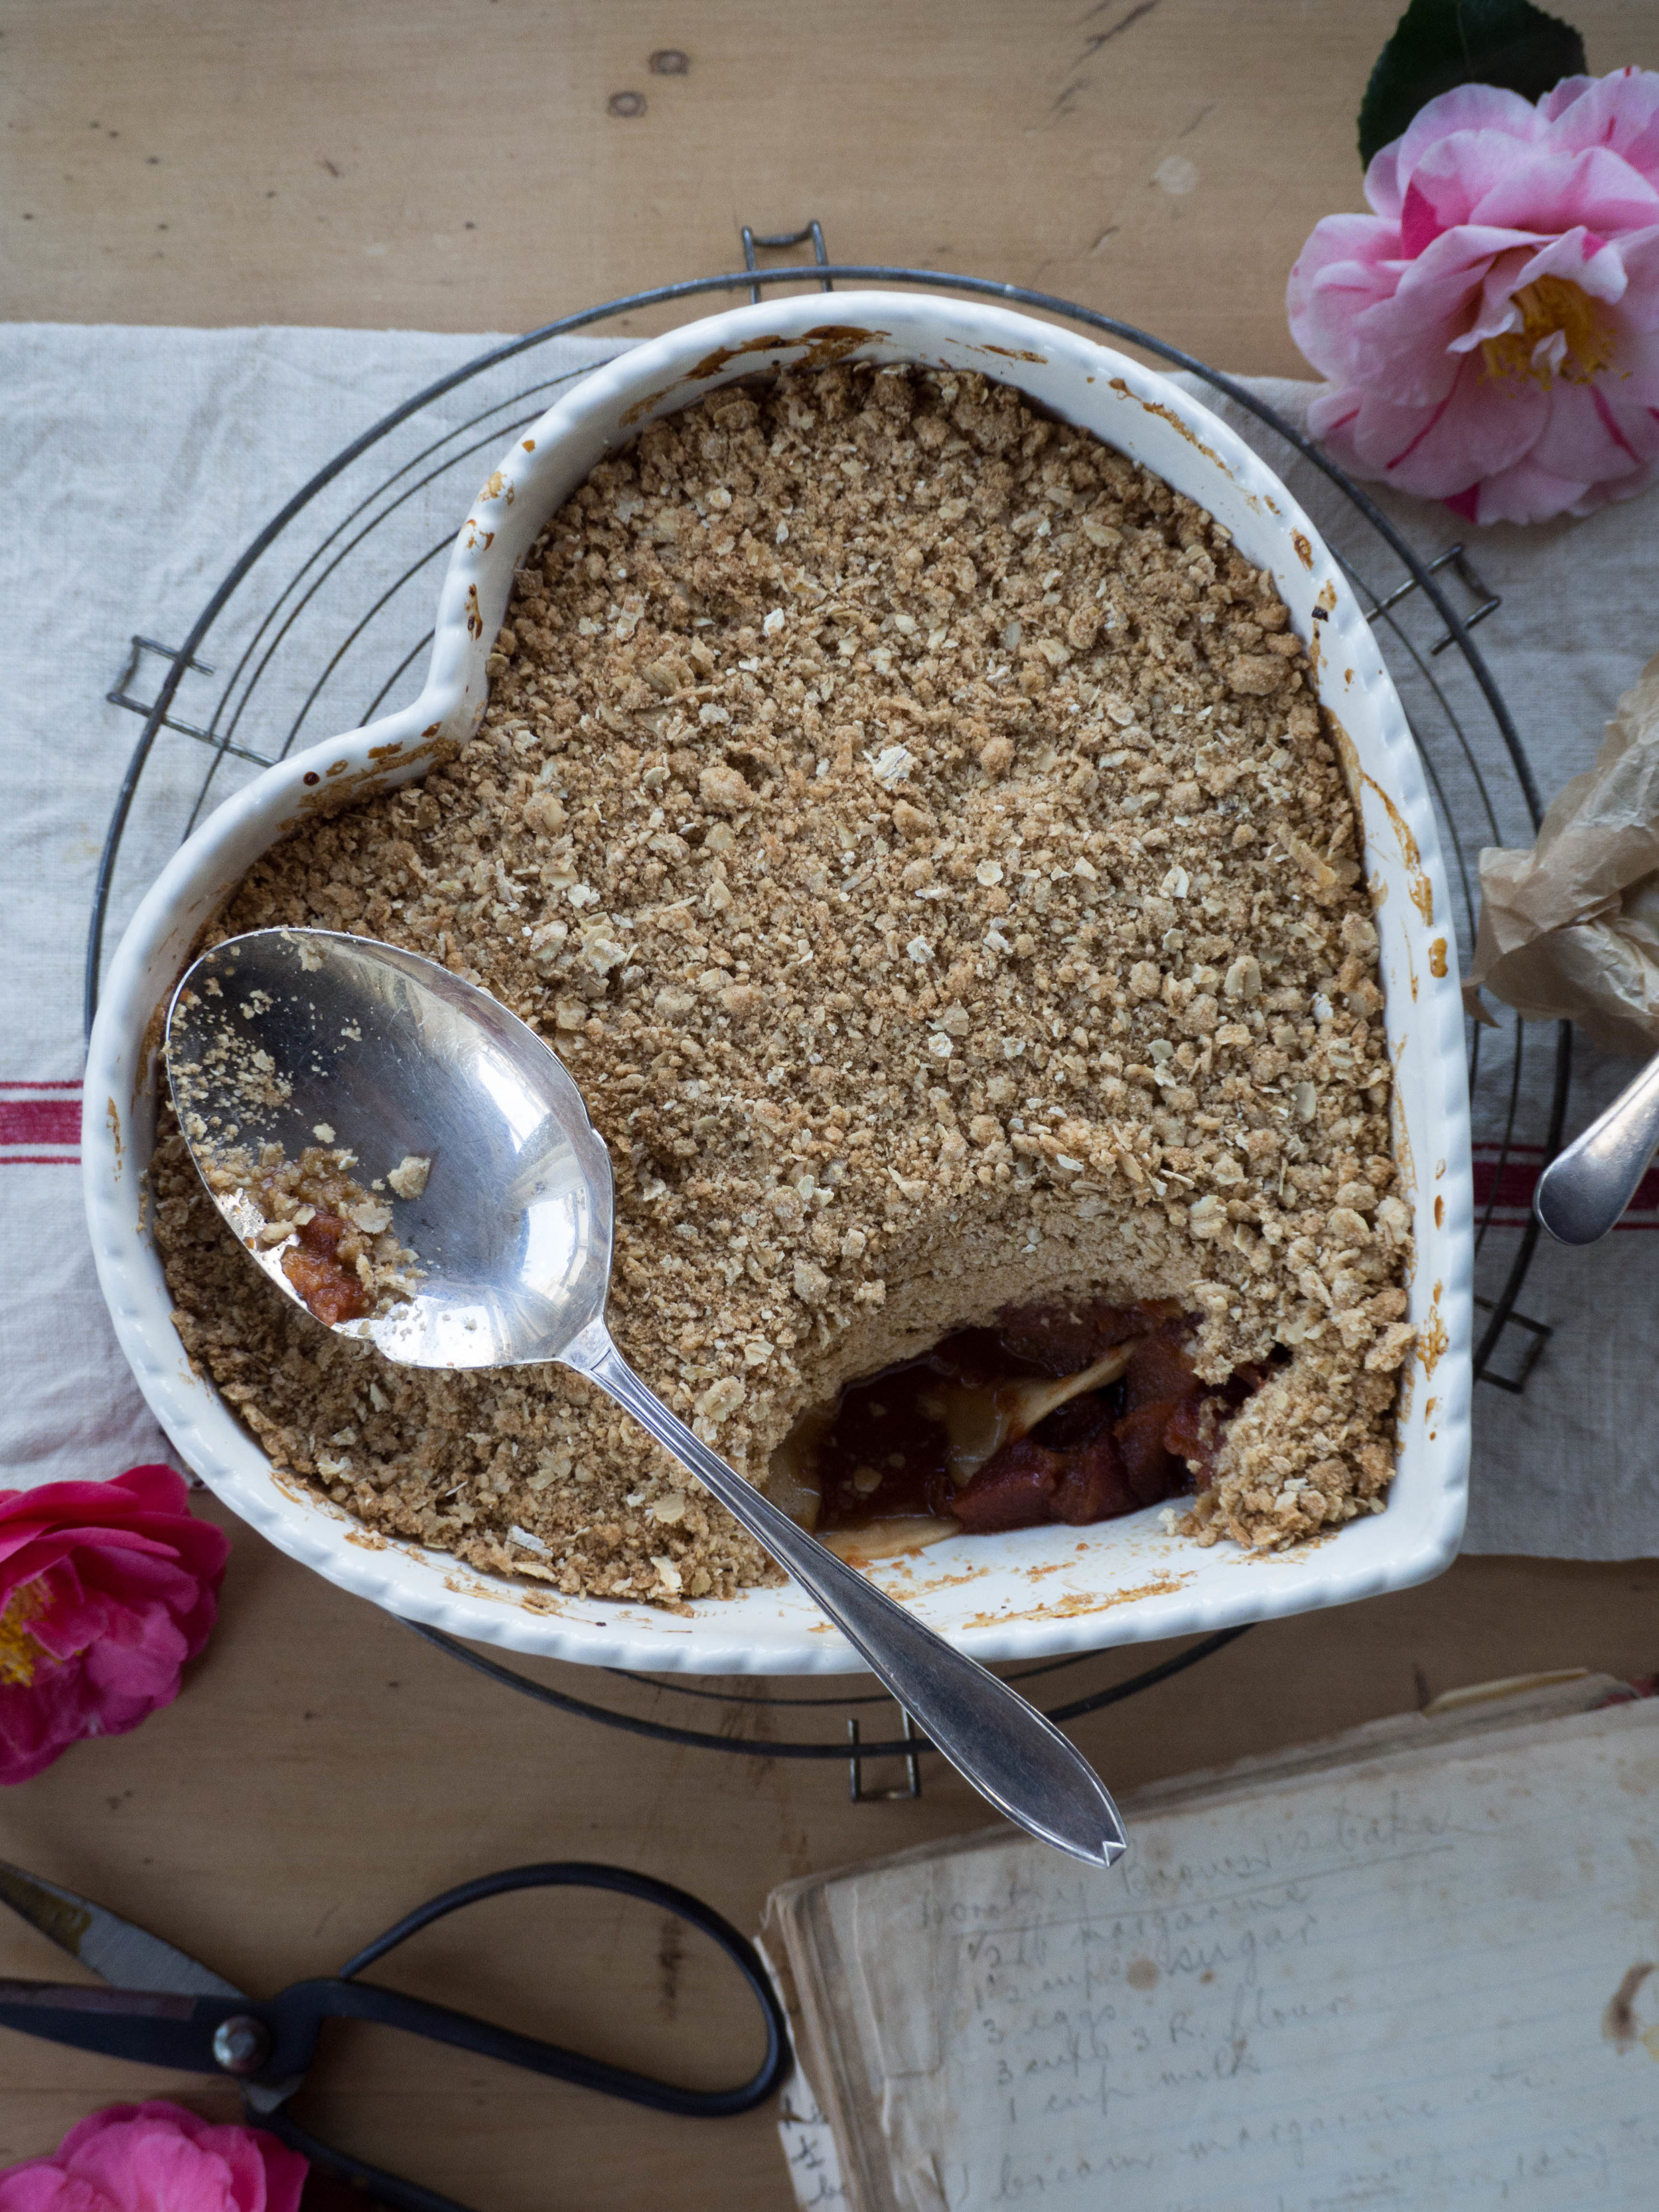
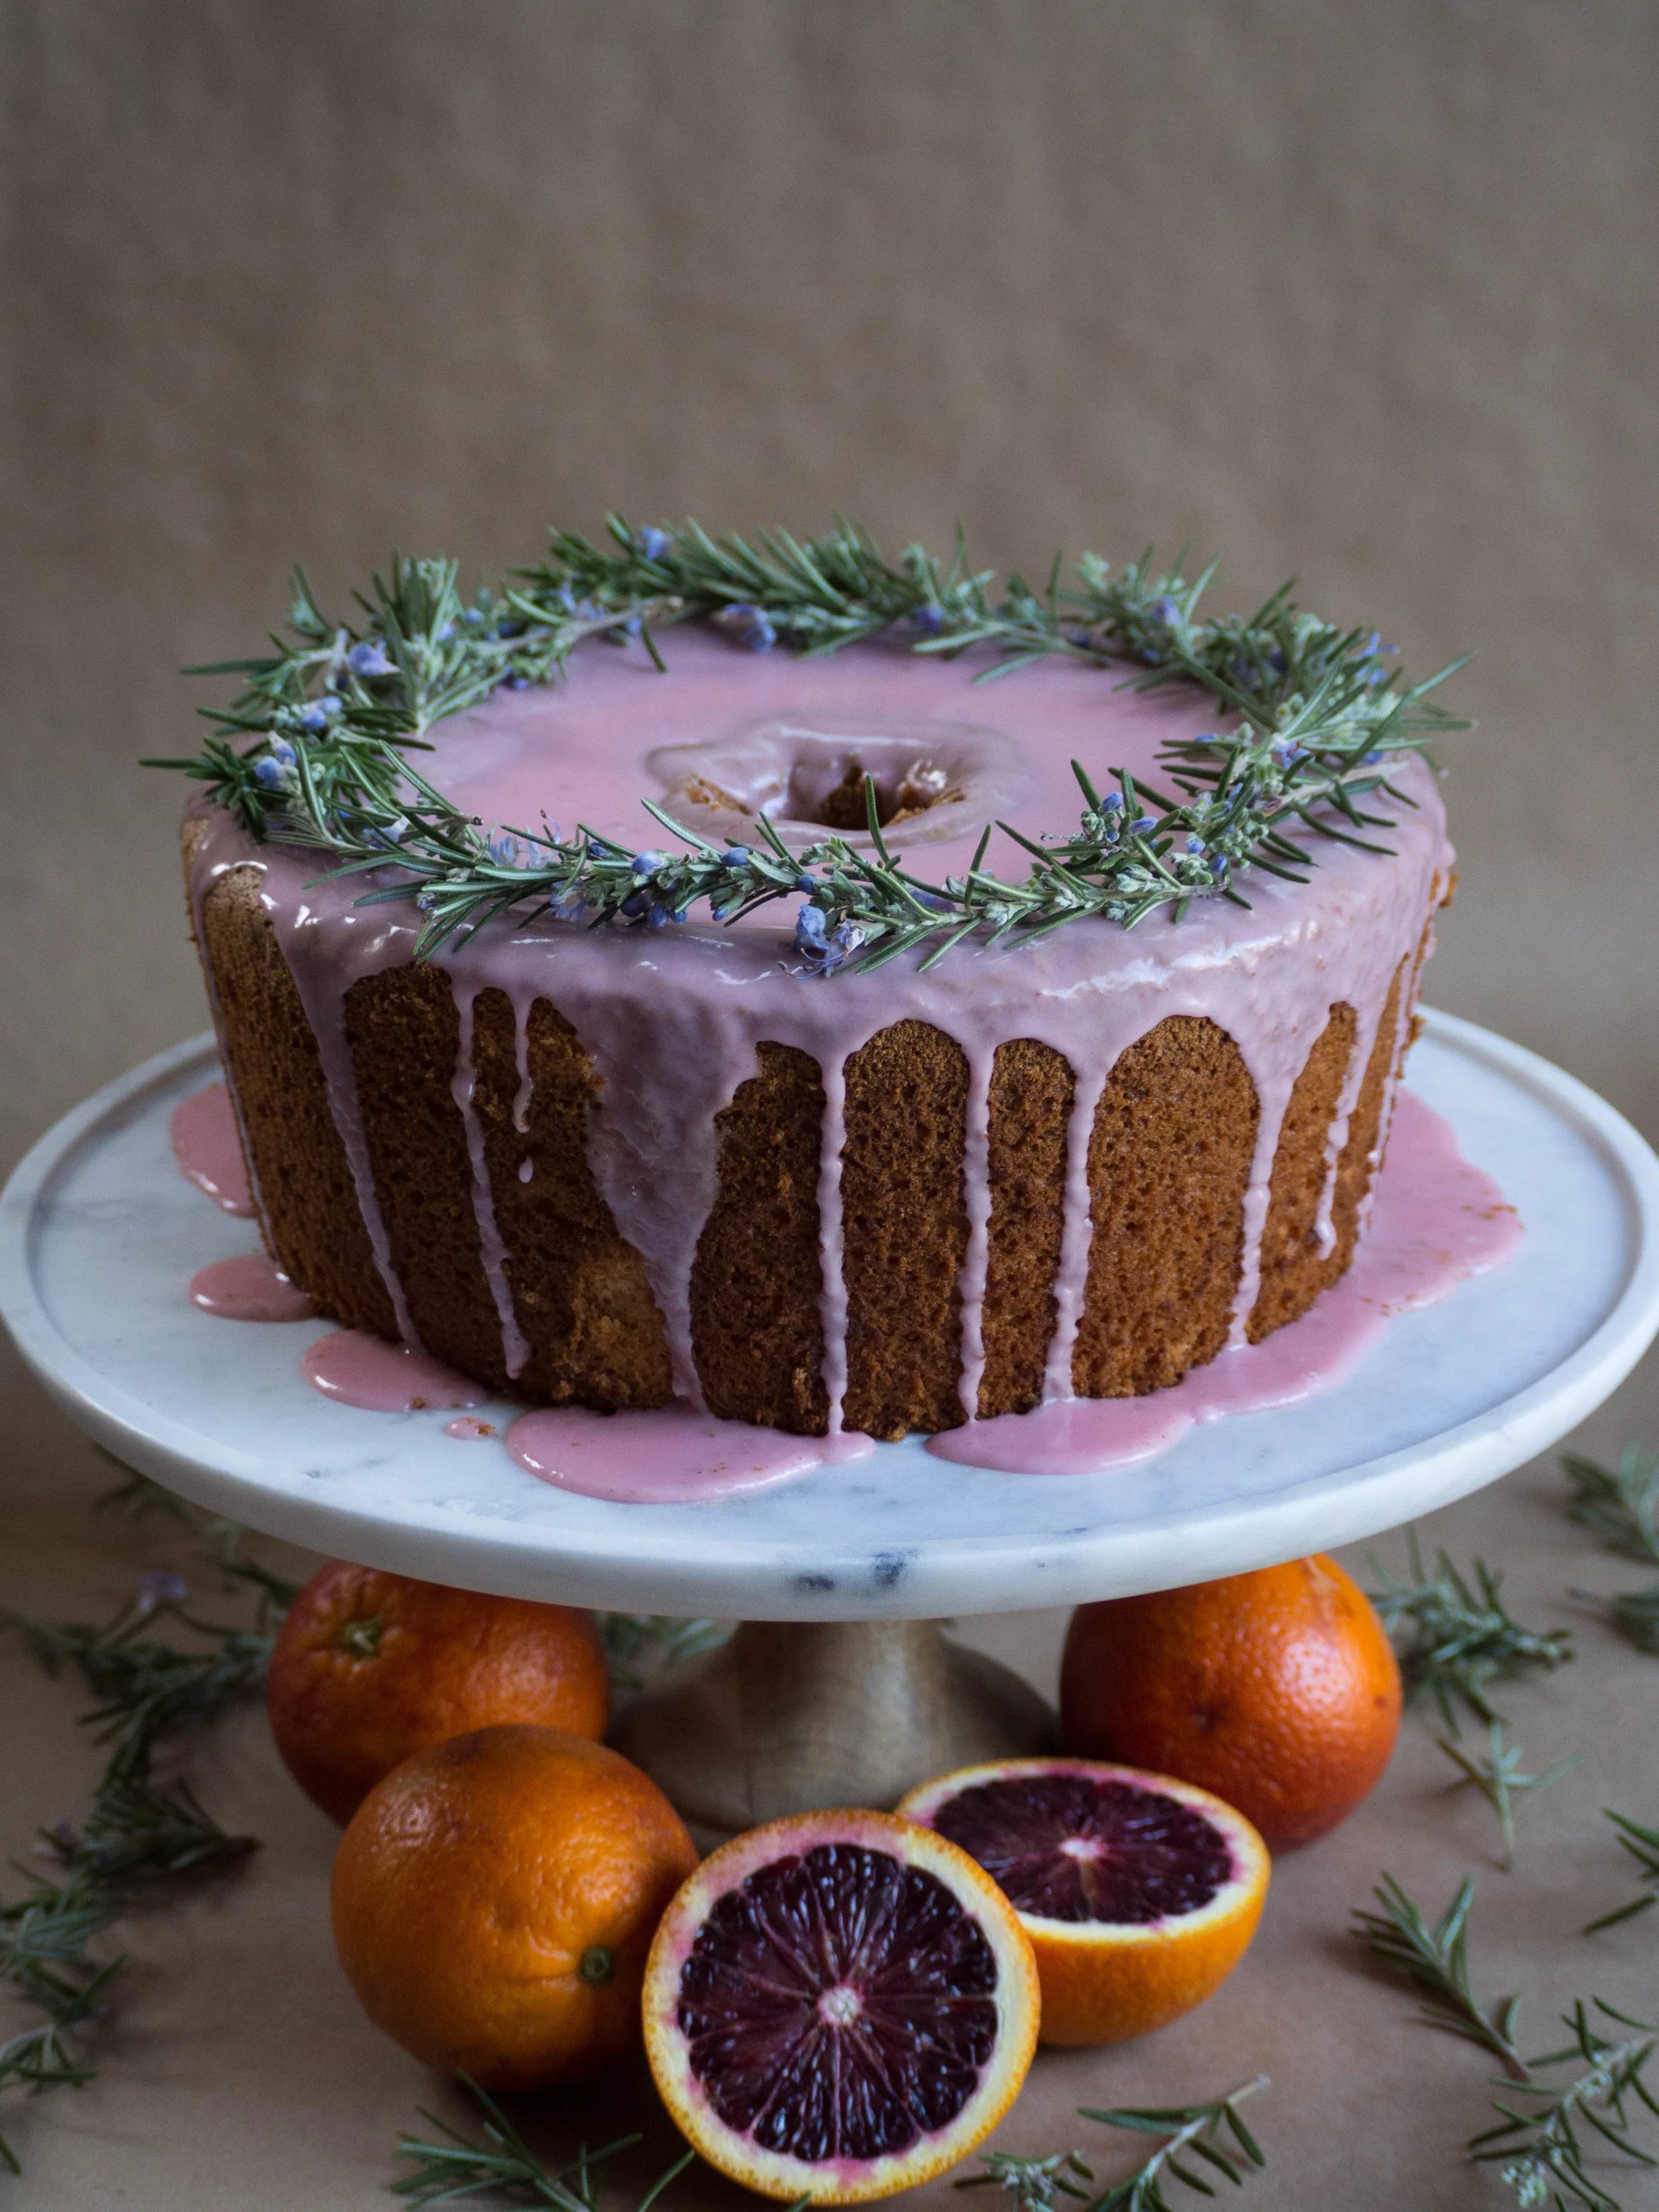
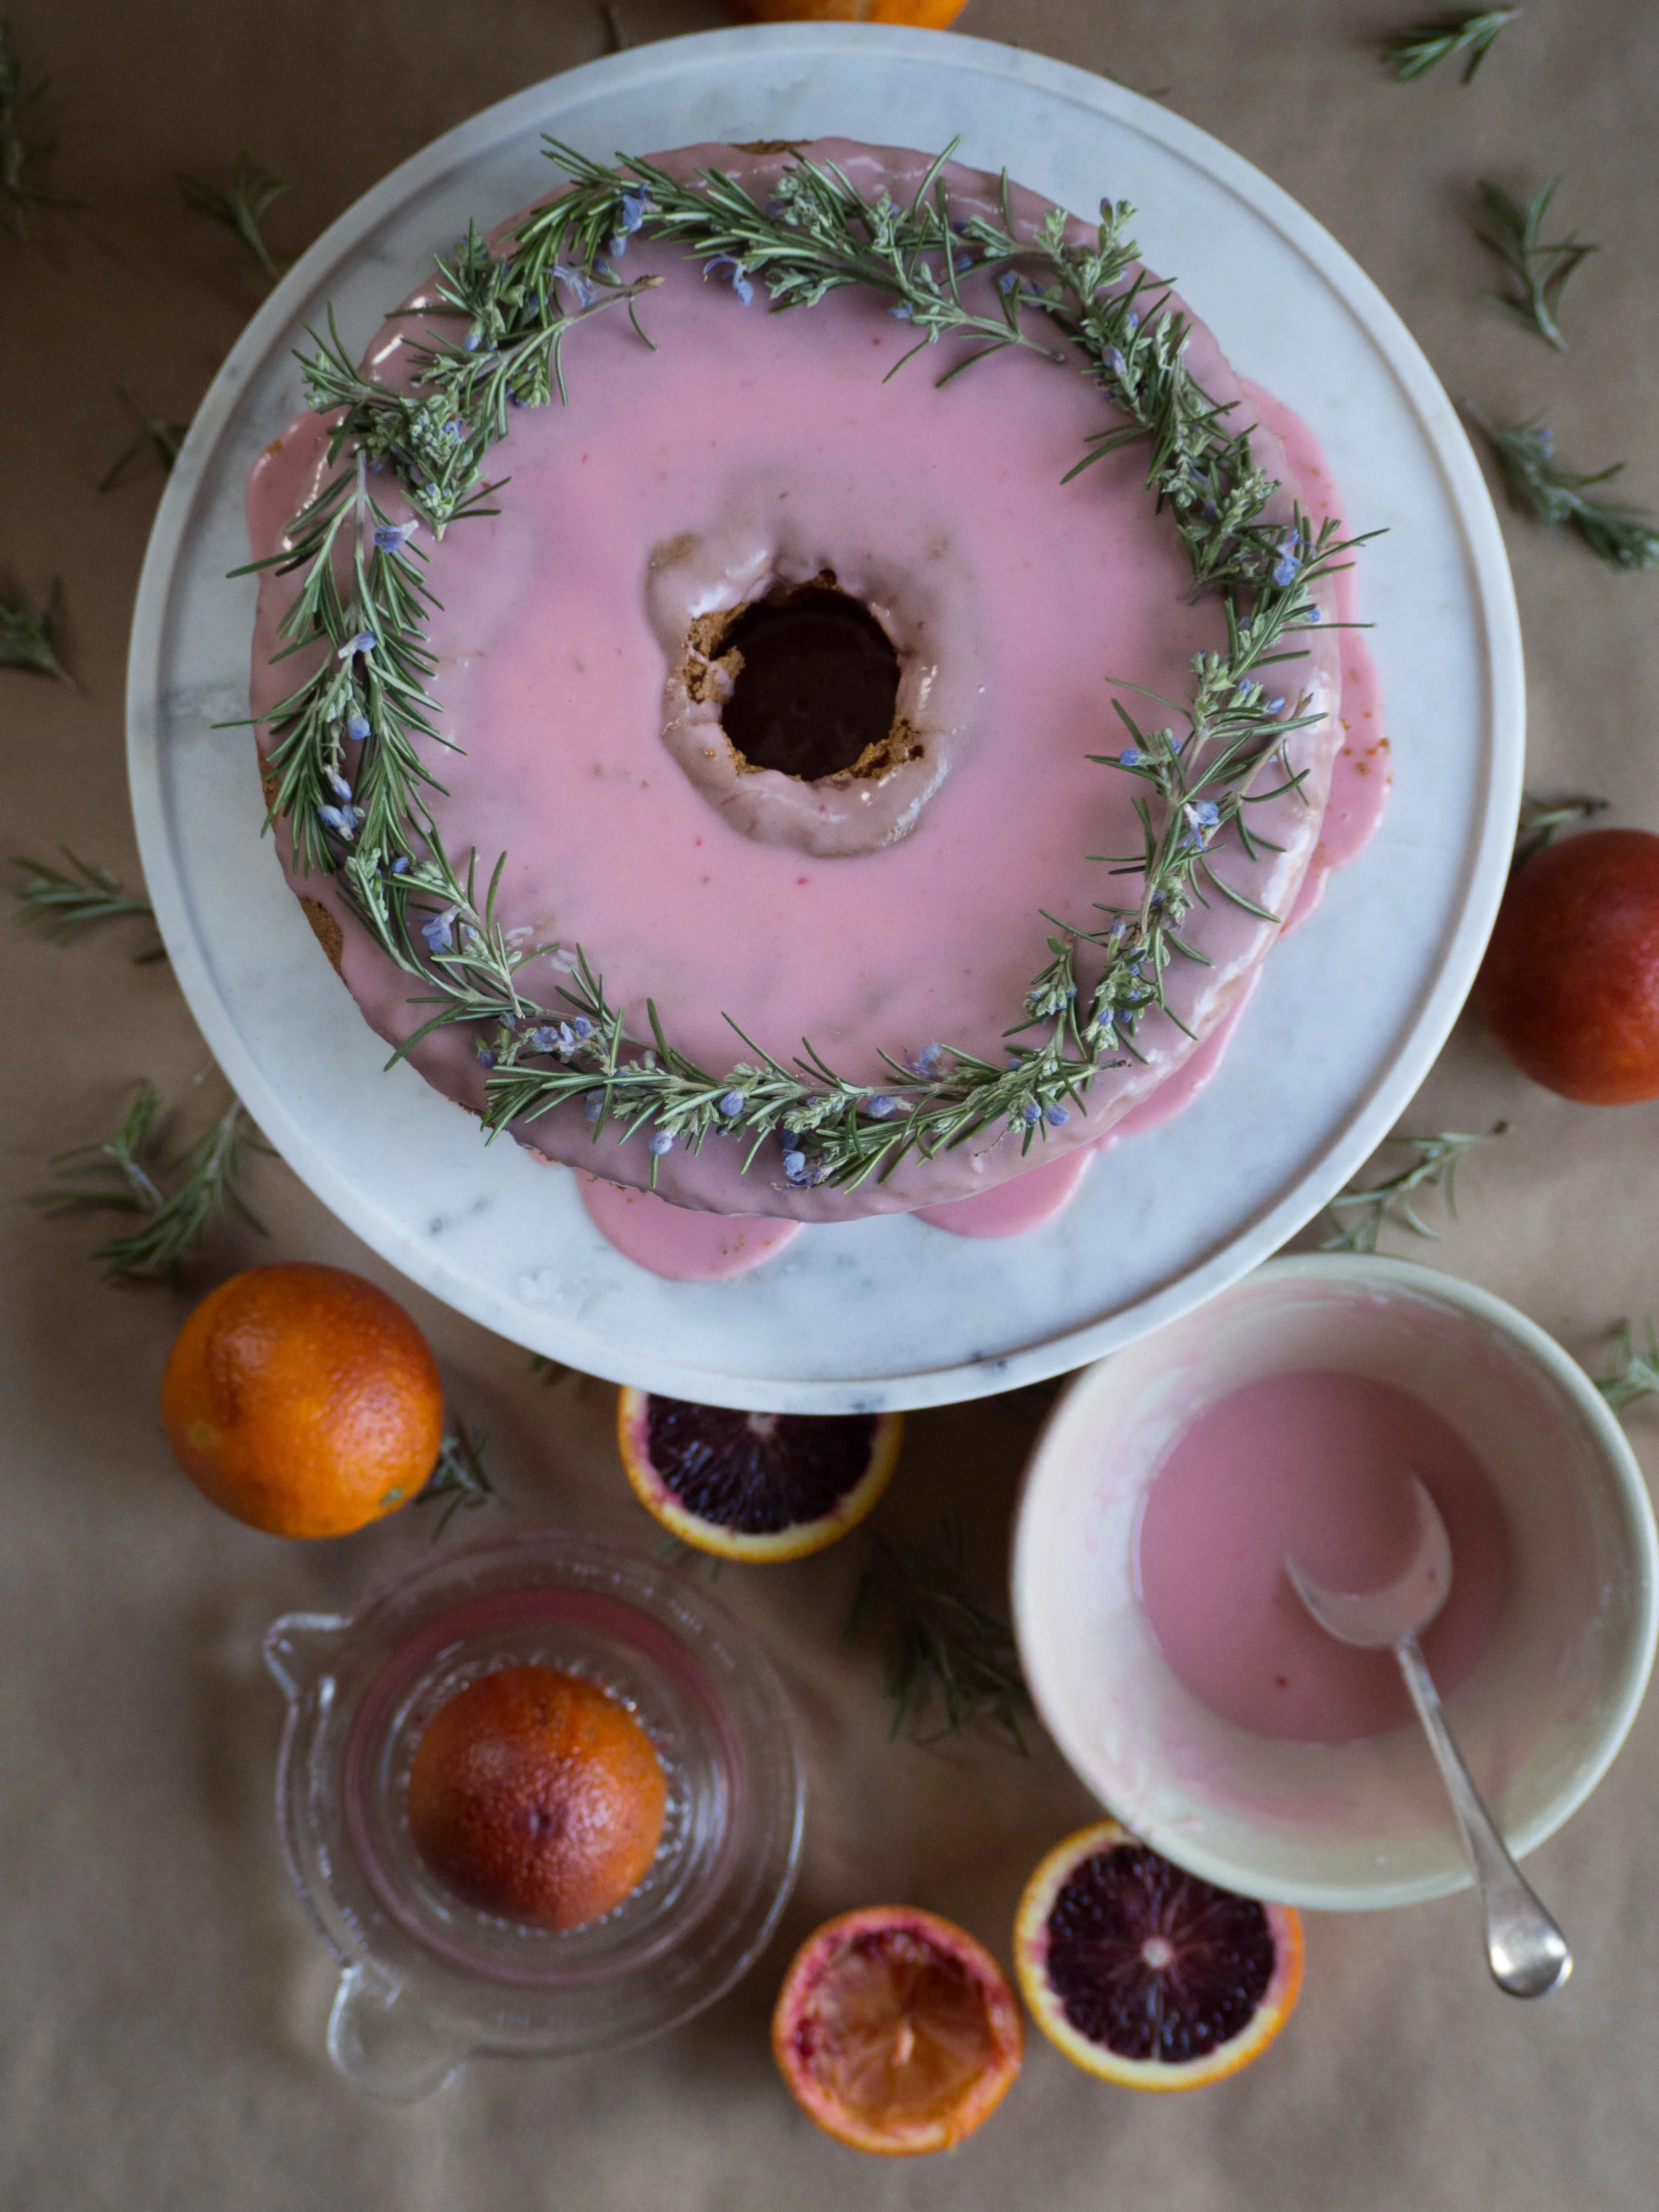
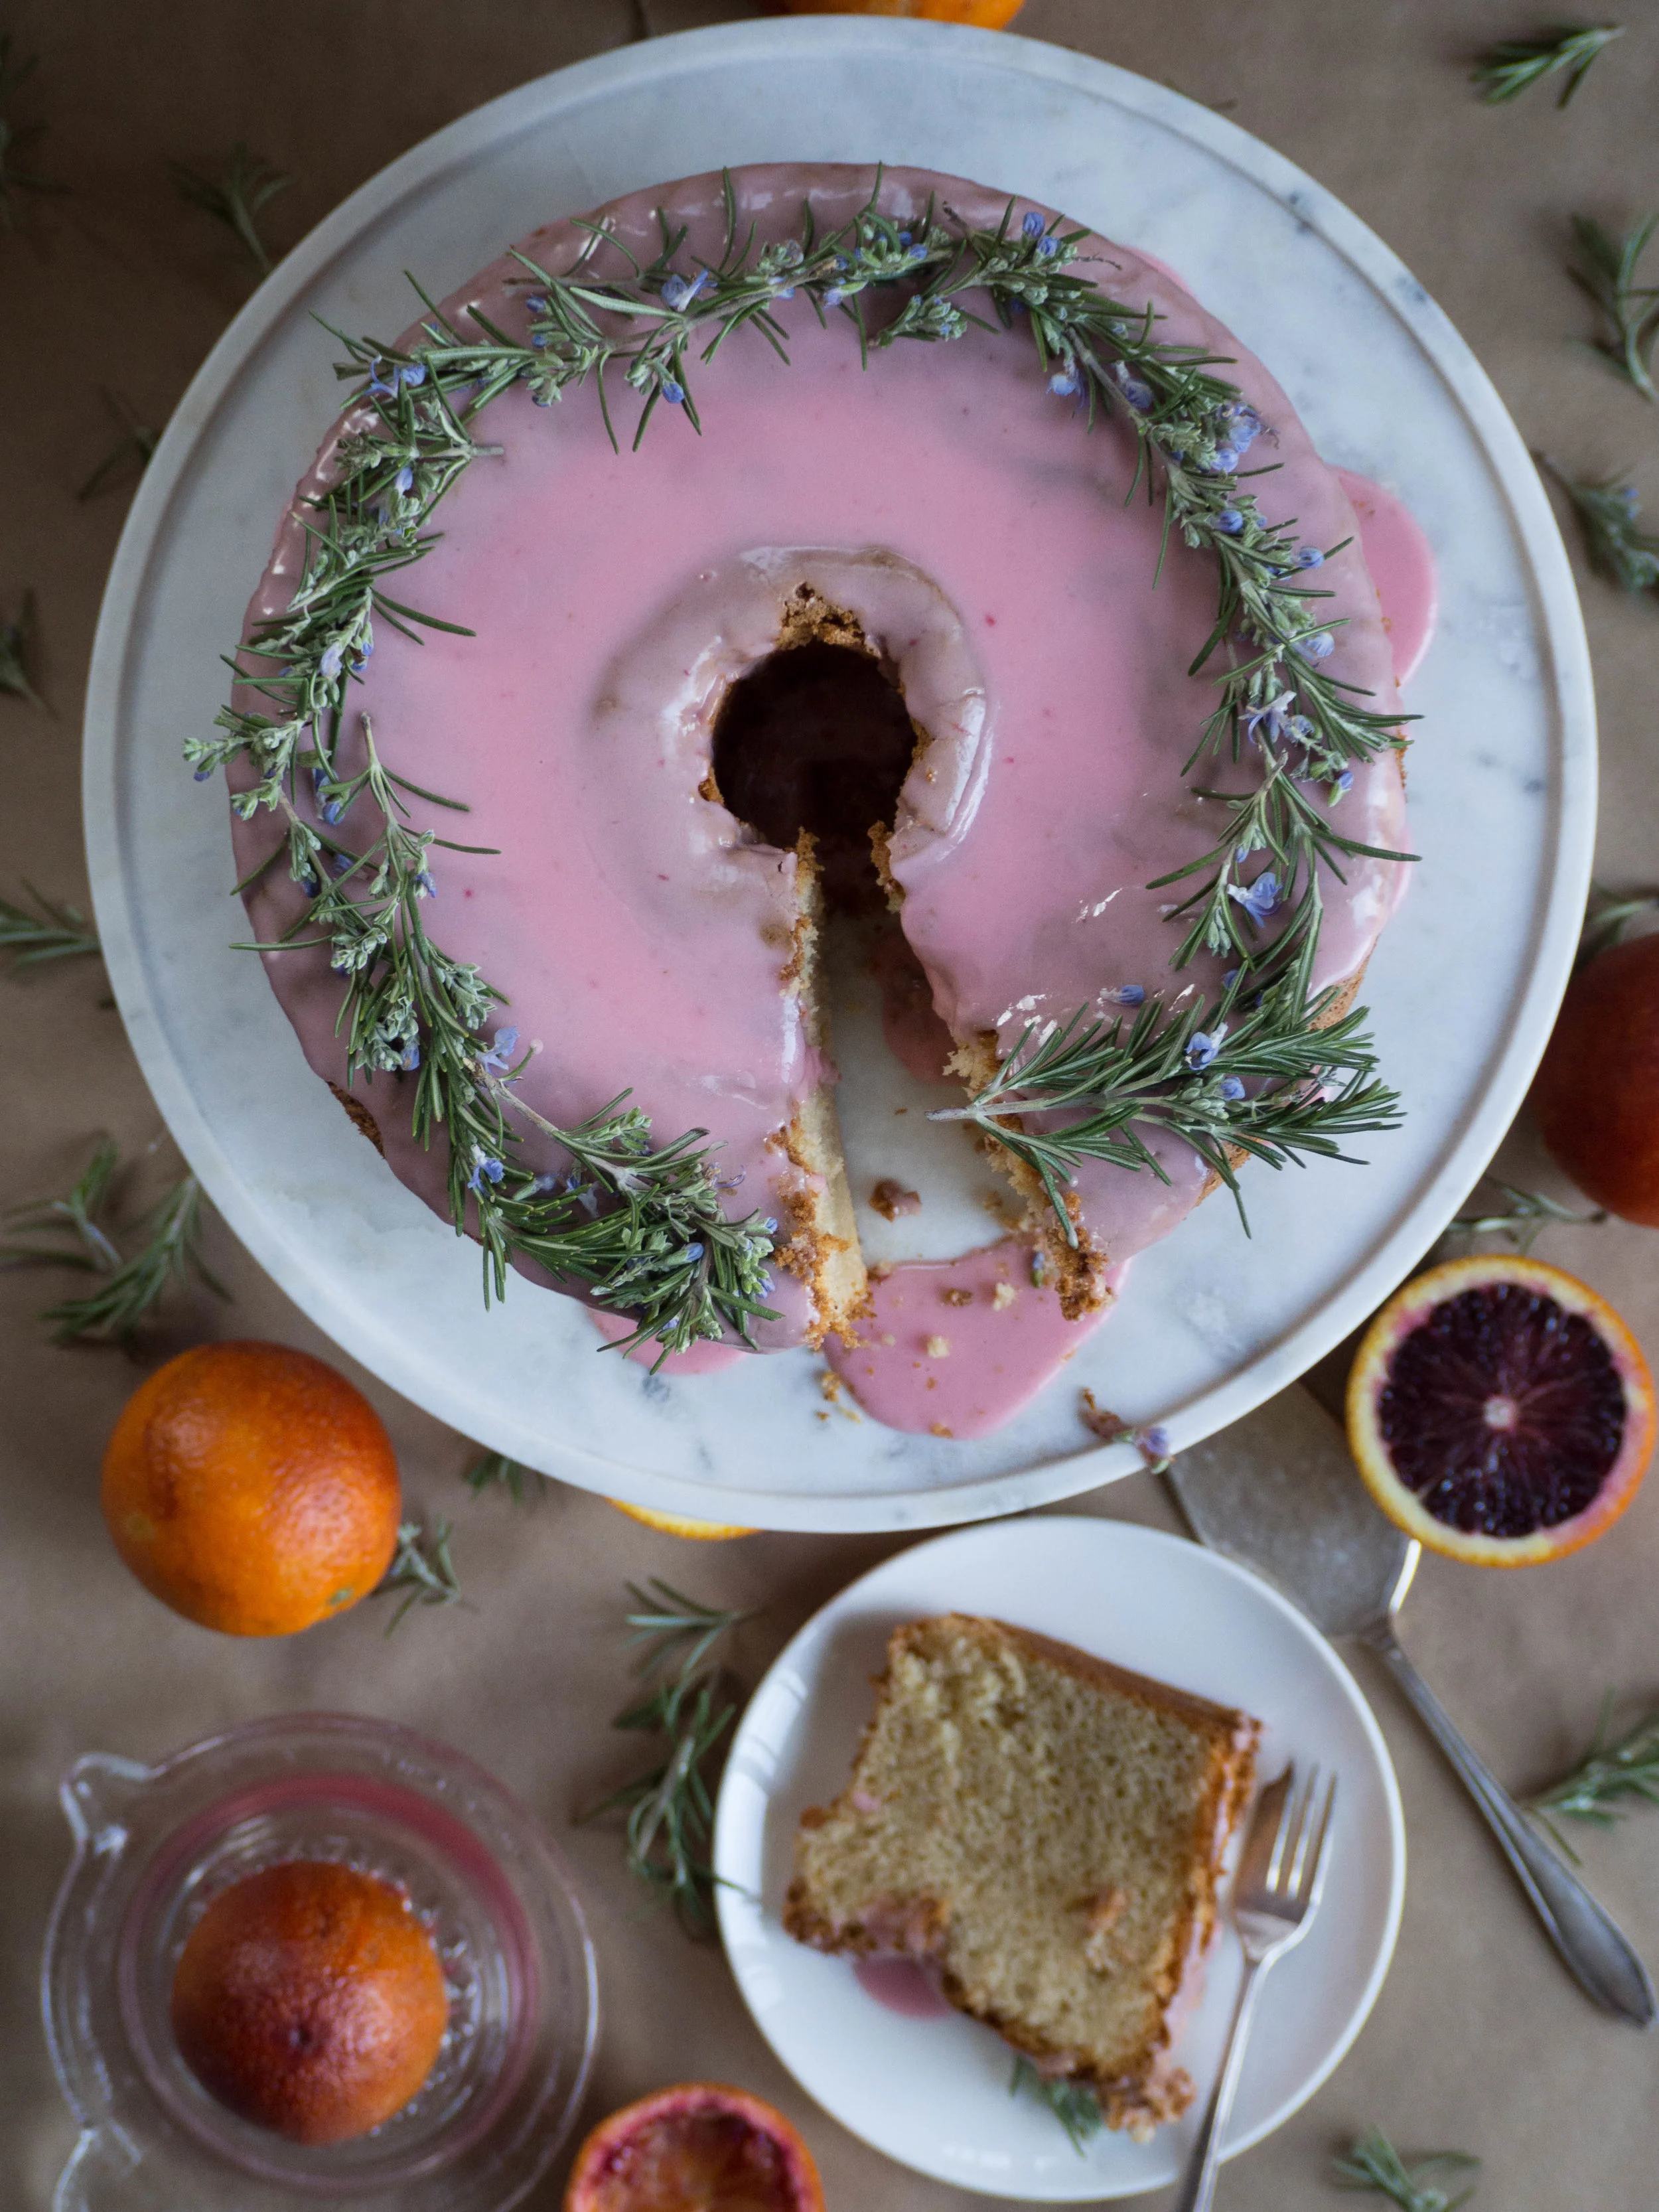
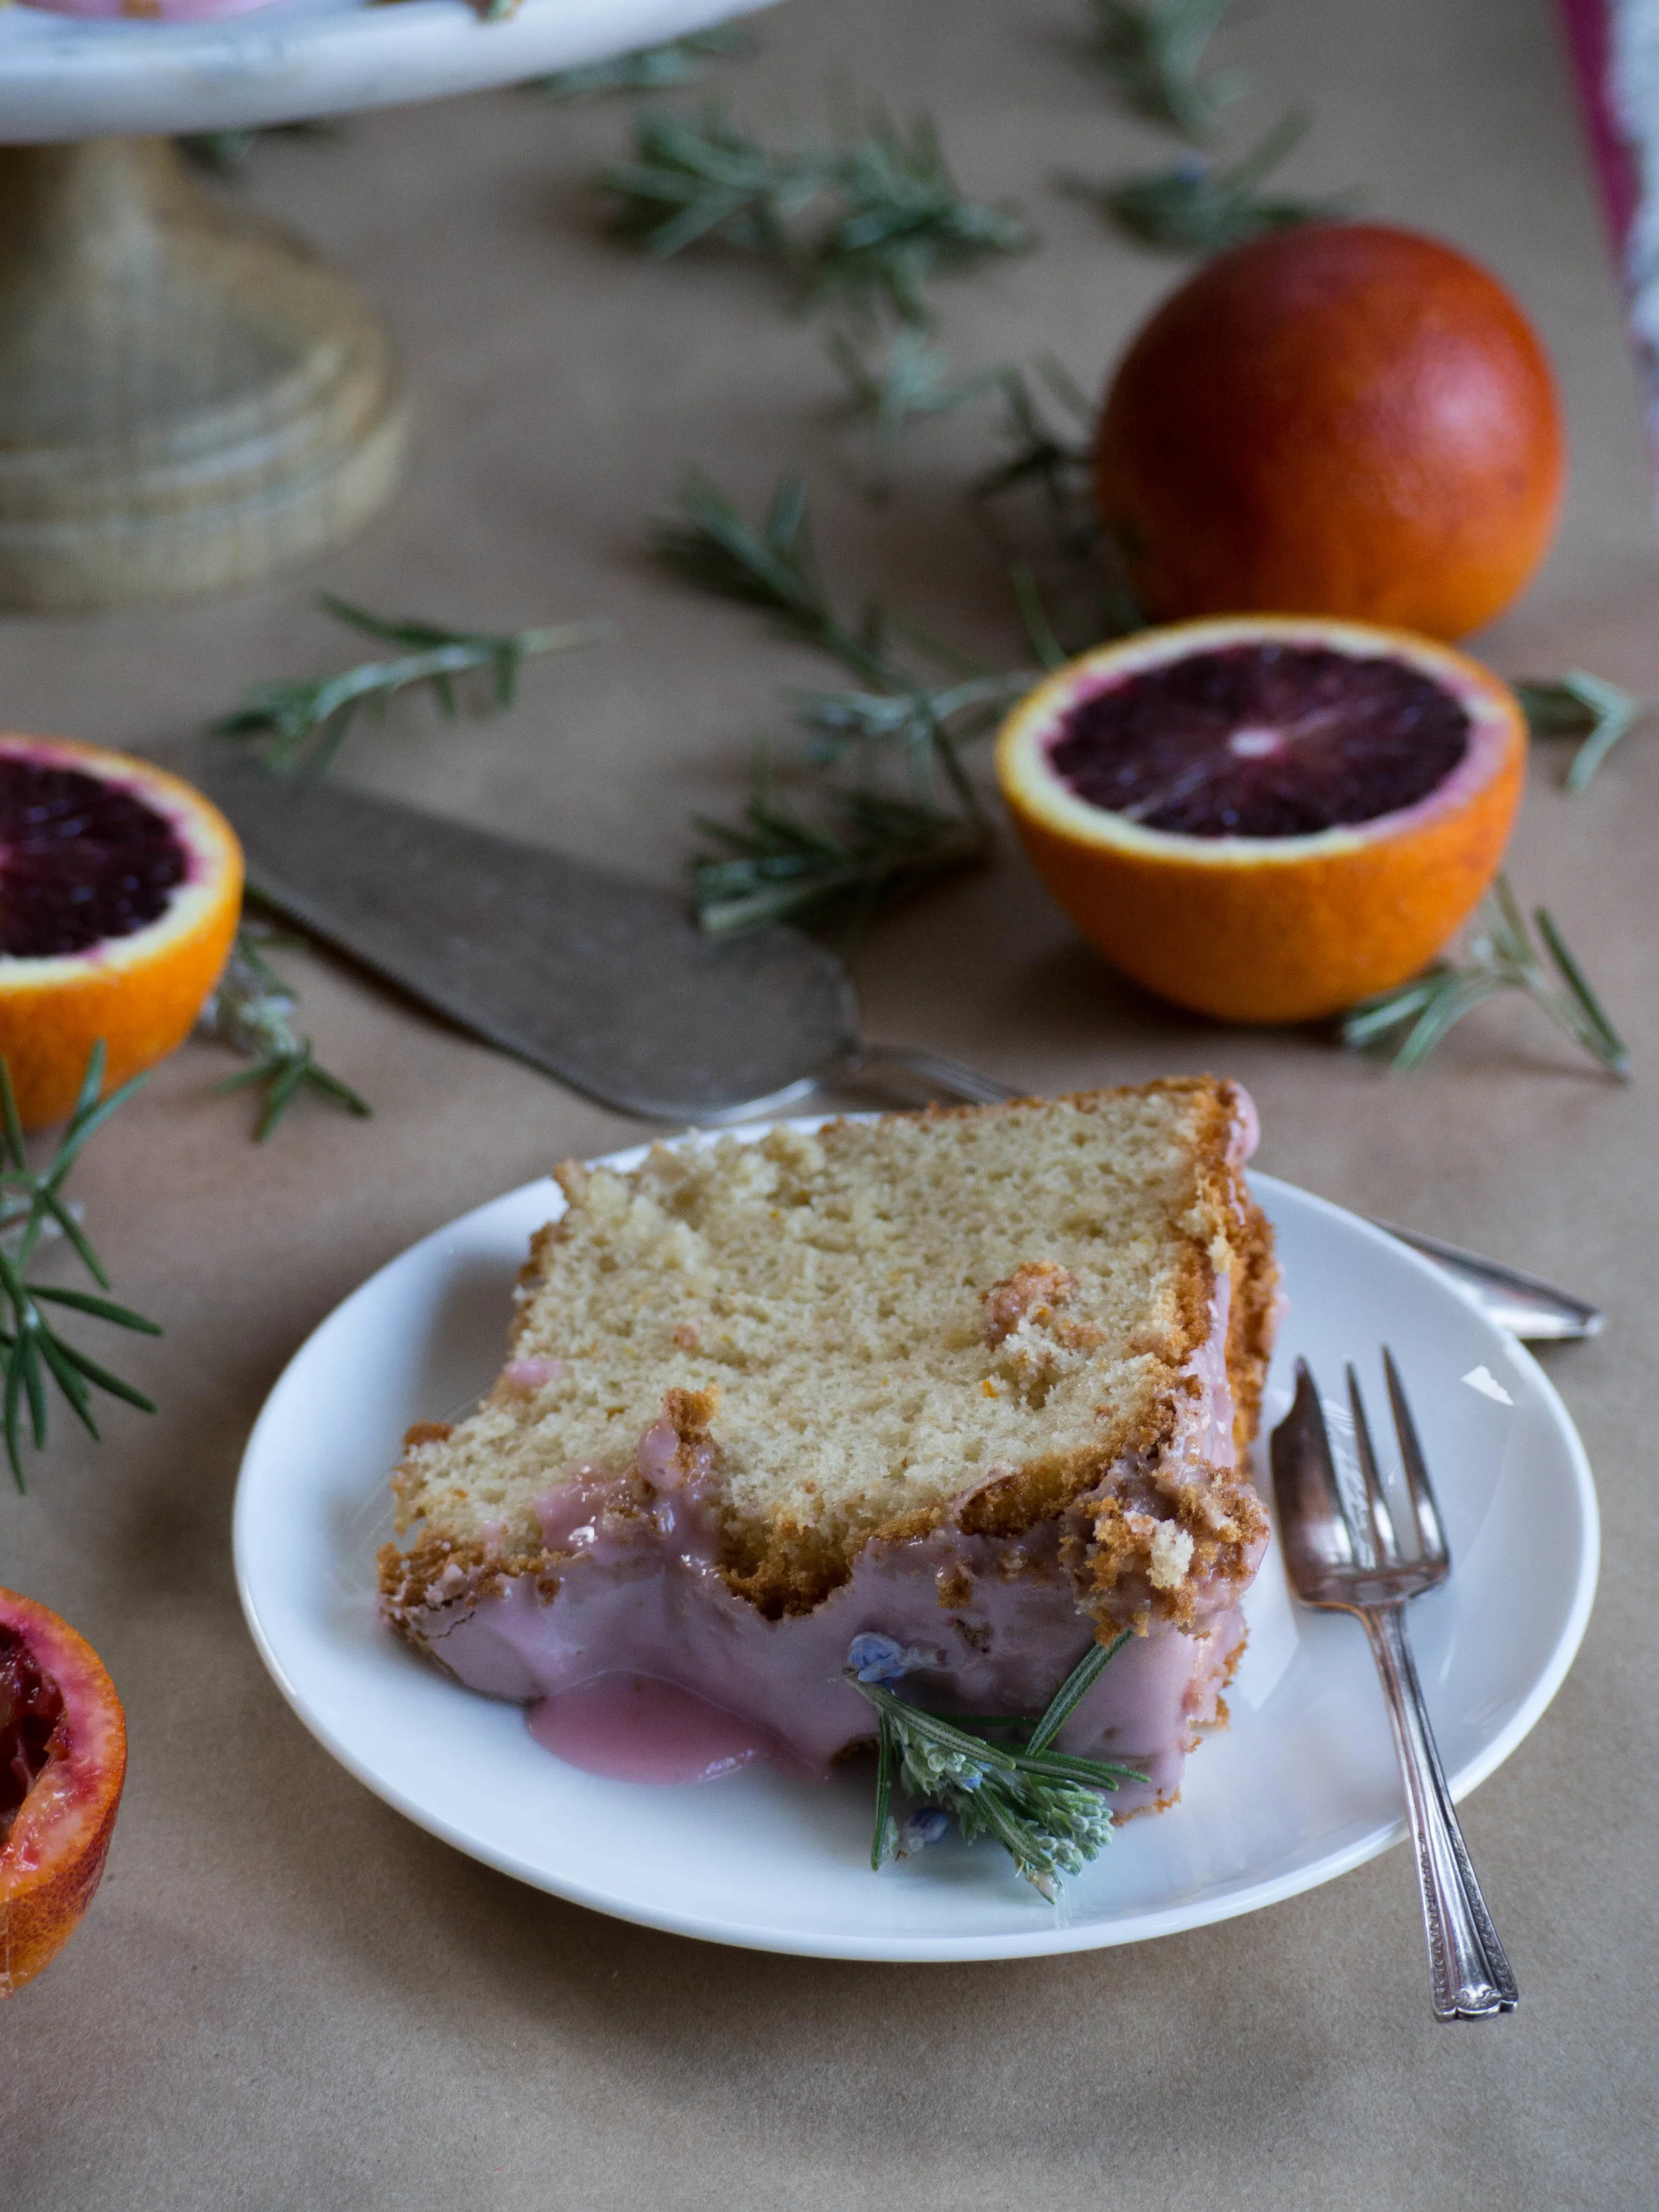
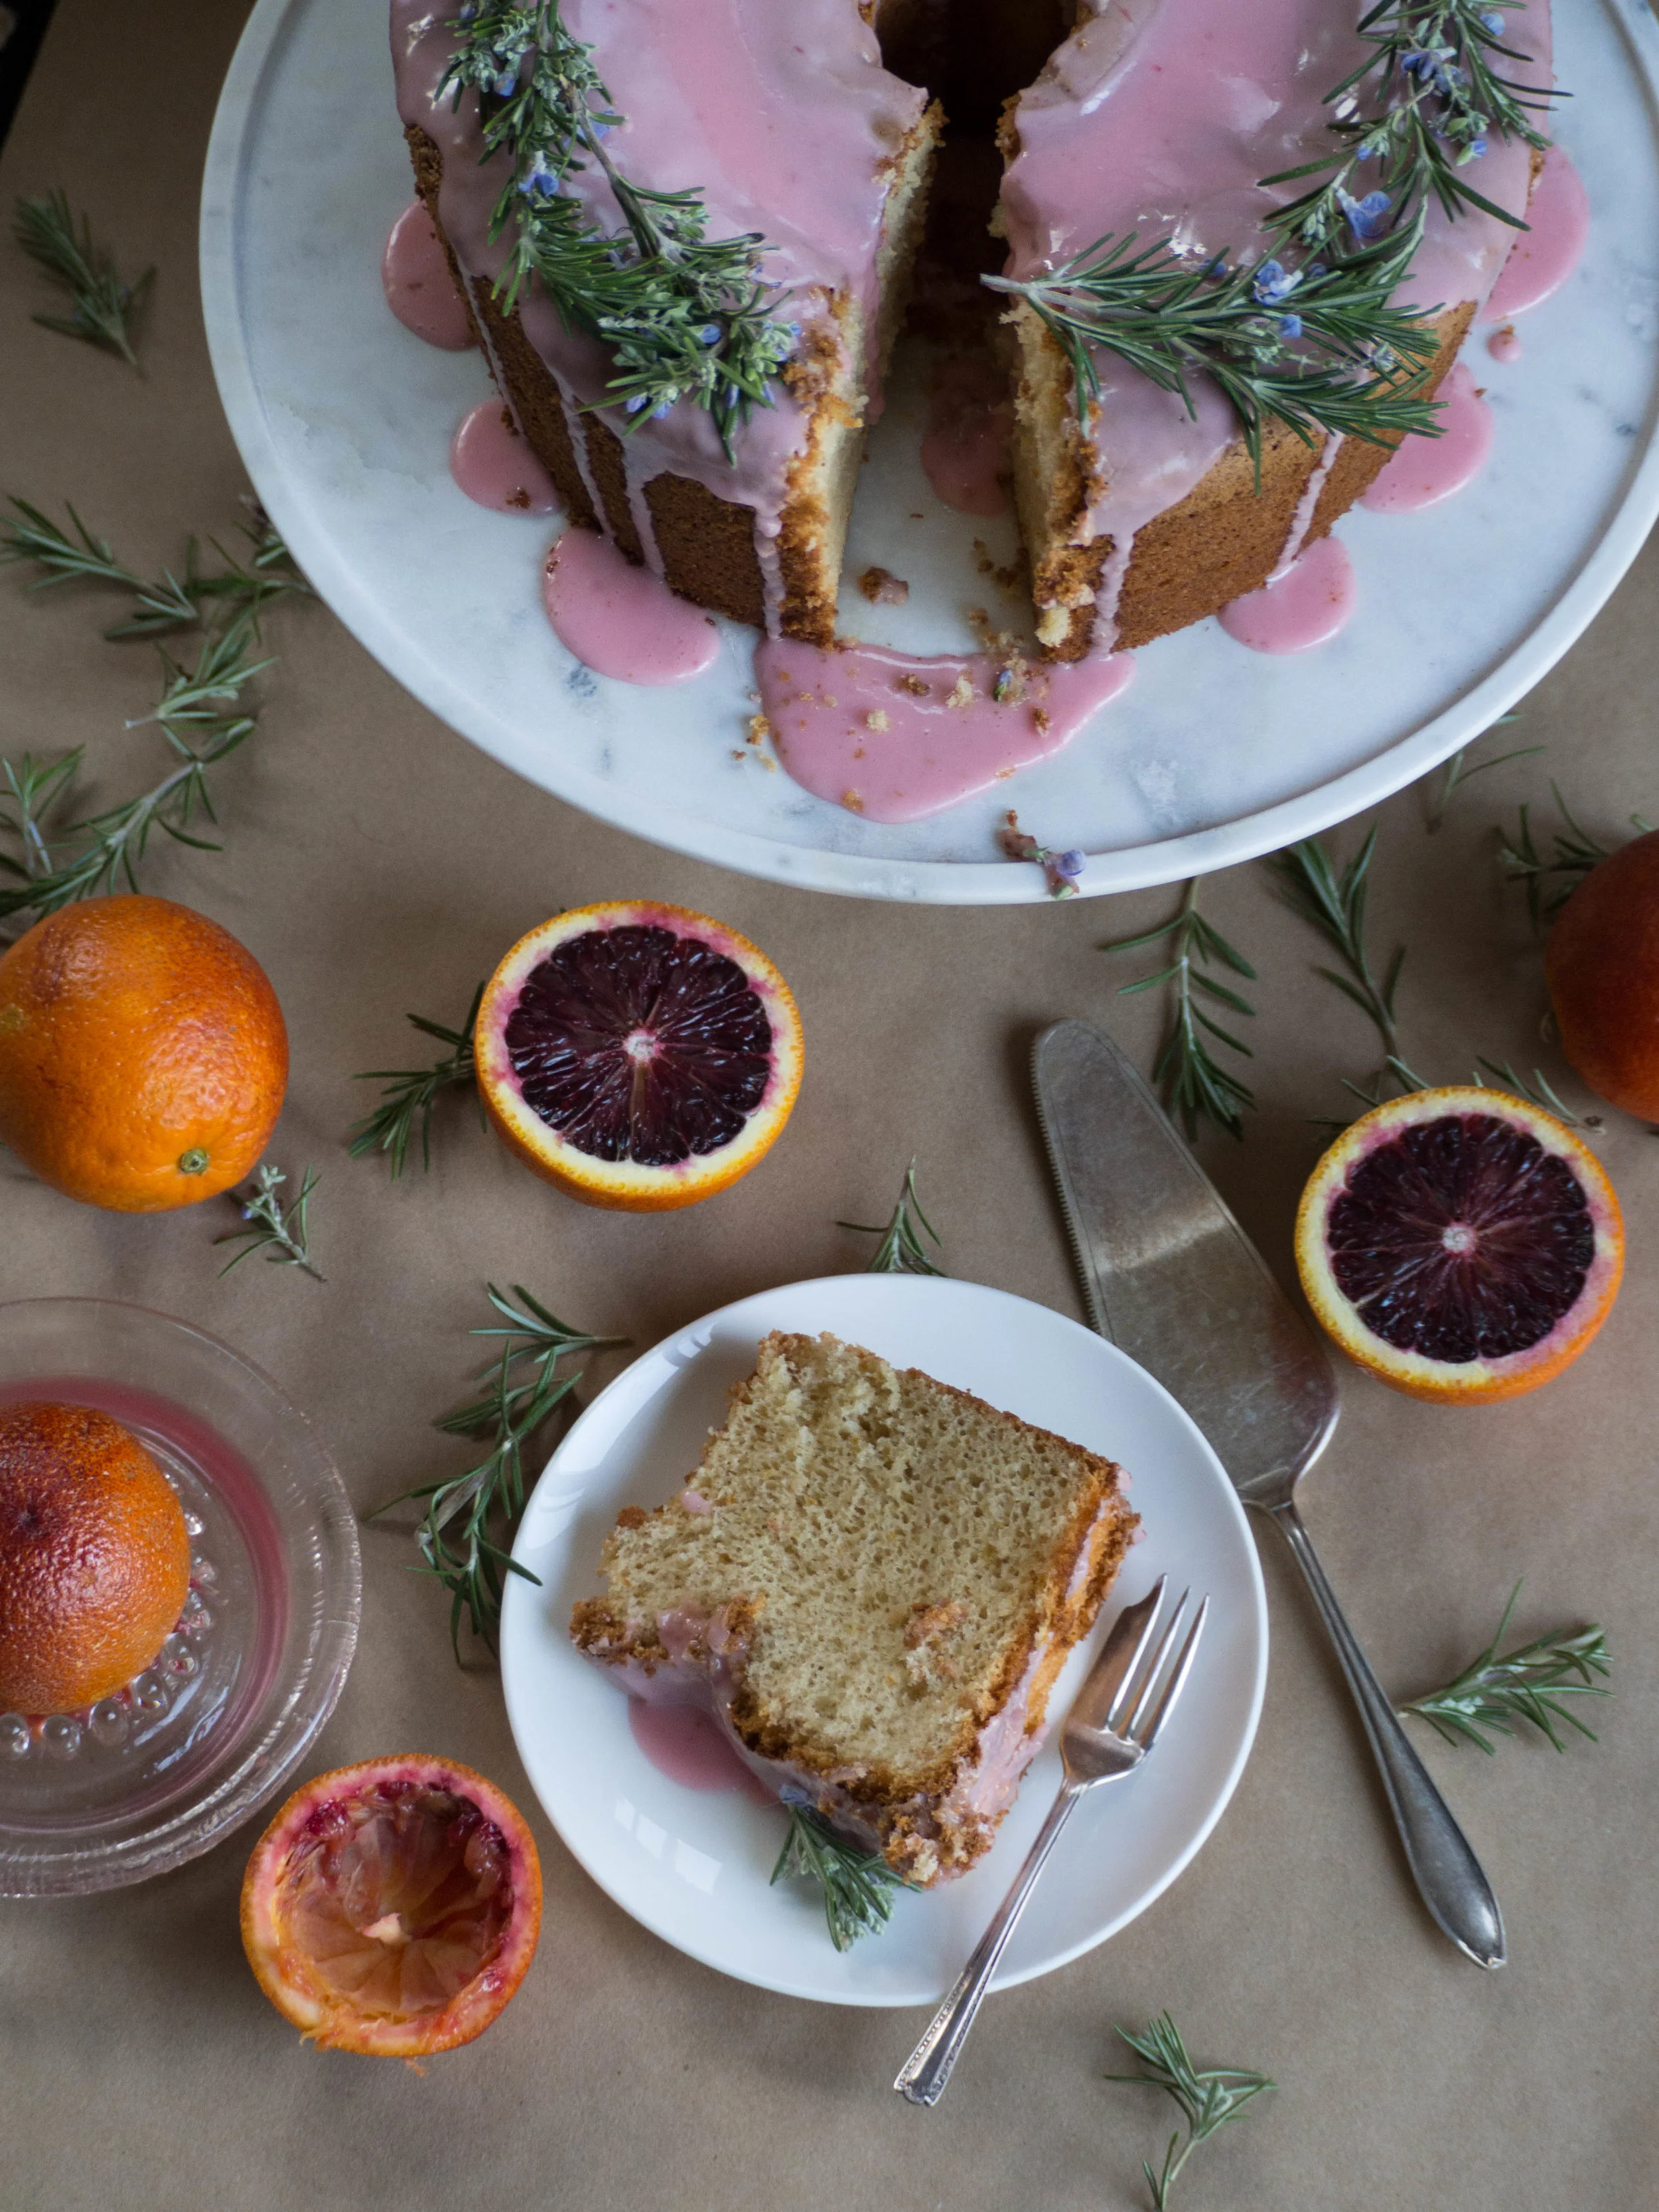
This recipe can suit either plan, use whilst the oranges are fresh, or defrost the juice later on and make when blood oranges have long gone from the markets. If making with fresh oranges, use the zest in the cake and the juice for the icing as the below recipe suggests. If you only have the juice, use that for the icing and add the zest of a regular orange to the cake batter, or substitute for one teaspoon of vanilla extract or paste. The recipe could of course be used for a whole cake rather than cupcakes, I particularly liked making it as a simple ring cake (picture below) - just remember the cooking time will be a little longer. 

Another option - Blood Orange Ring Cake 

Another option - Blood Orange Ring Cake 

Blood Orange Cupcakes

Ingredients: 

125g canola based margarine (or other flavourless margarine)

165g golden caster sugar (or caster sugar)

finely grated zest of one small/medium blood orange

2 eggs 

250g self-raising flour

105ml milk (preferably skimmed)


Ingredients for the Icing: 

1 1/2 cups icing sugar, plus extra

juice of 1/2 - 1 blood orange 

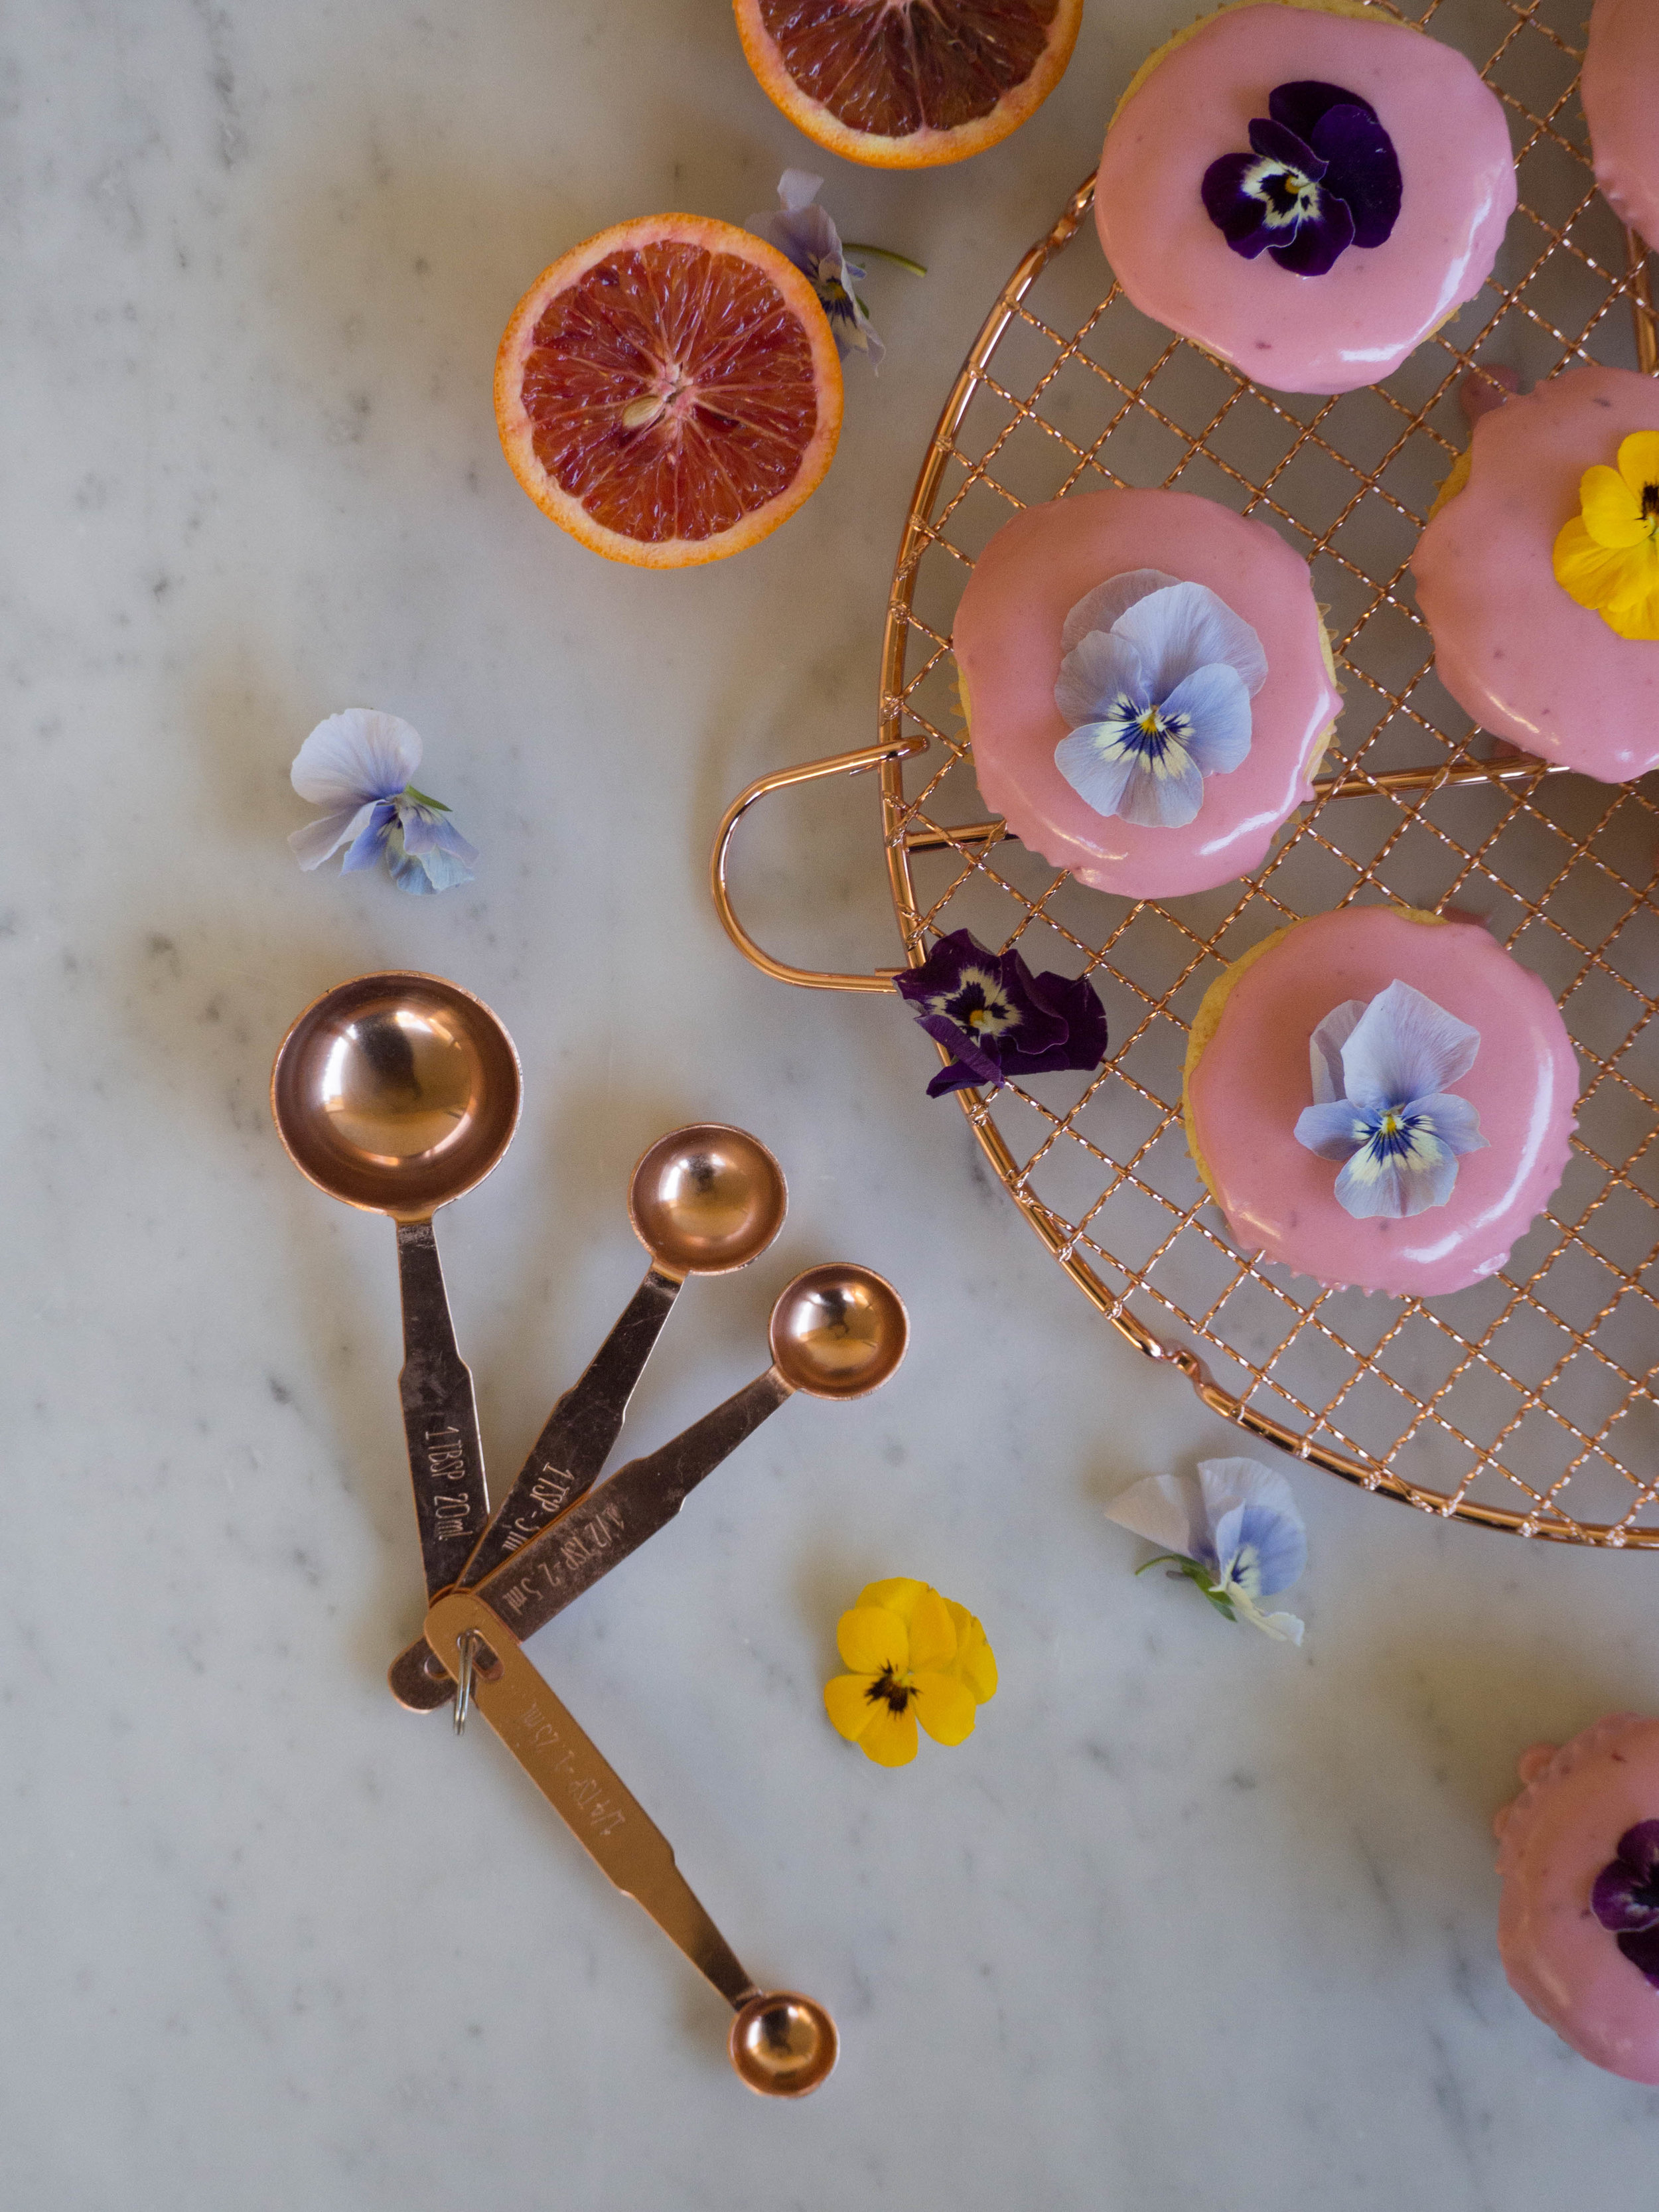
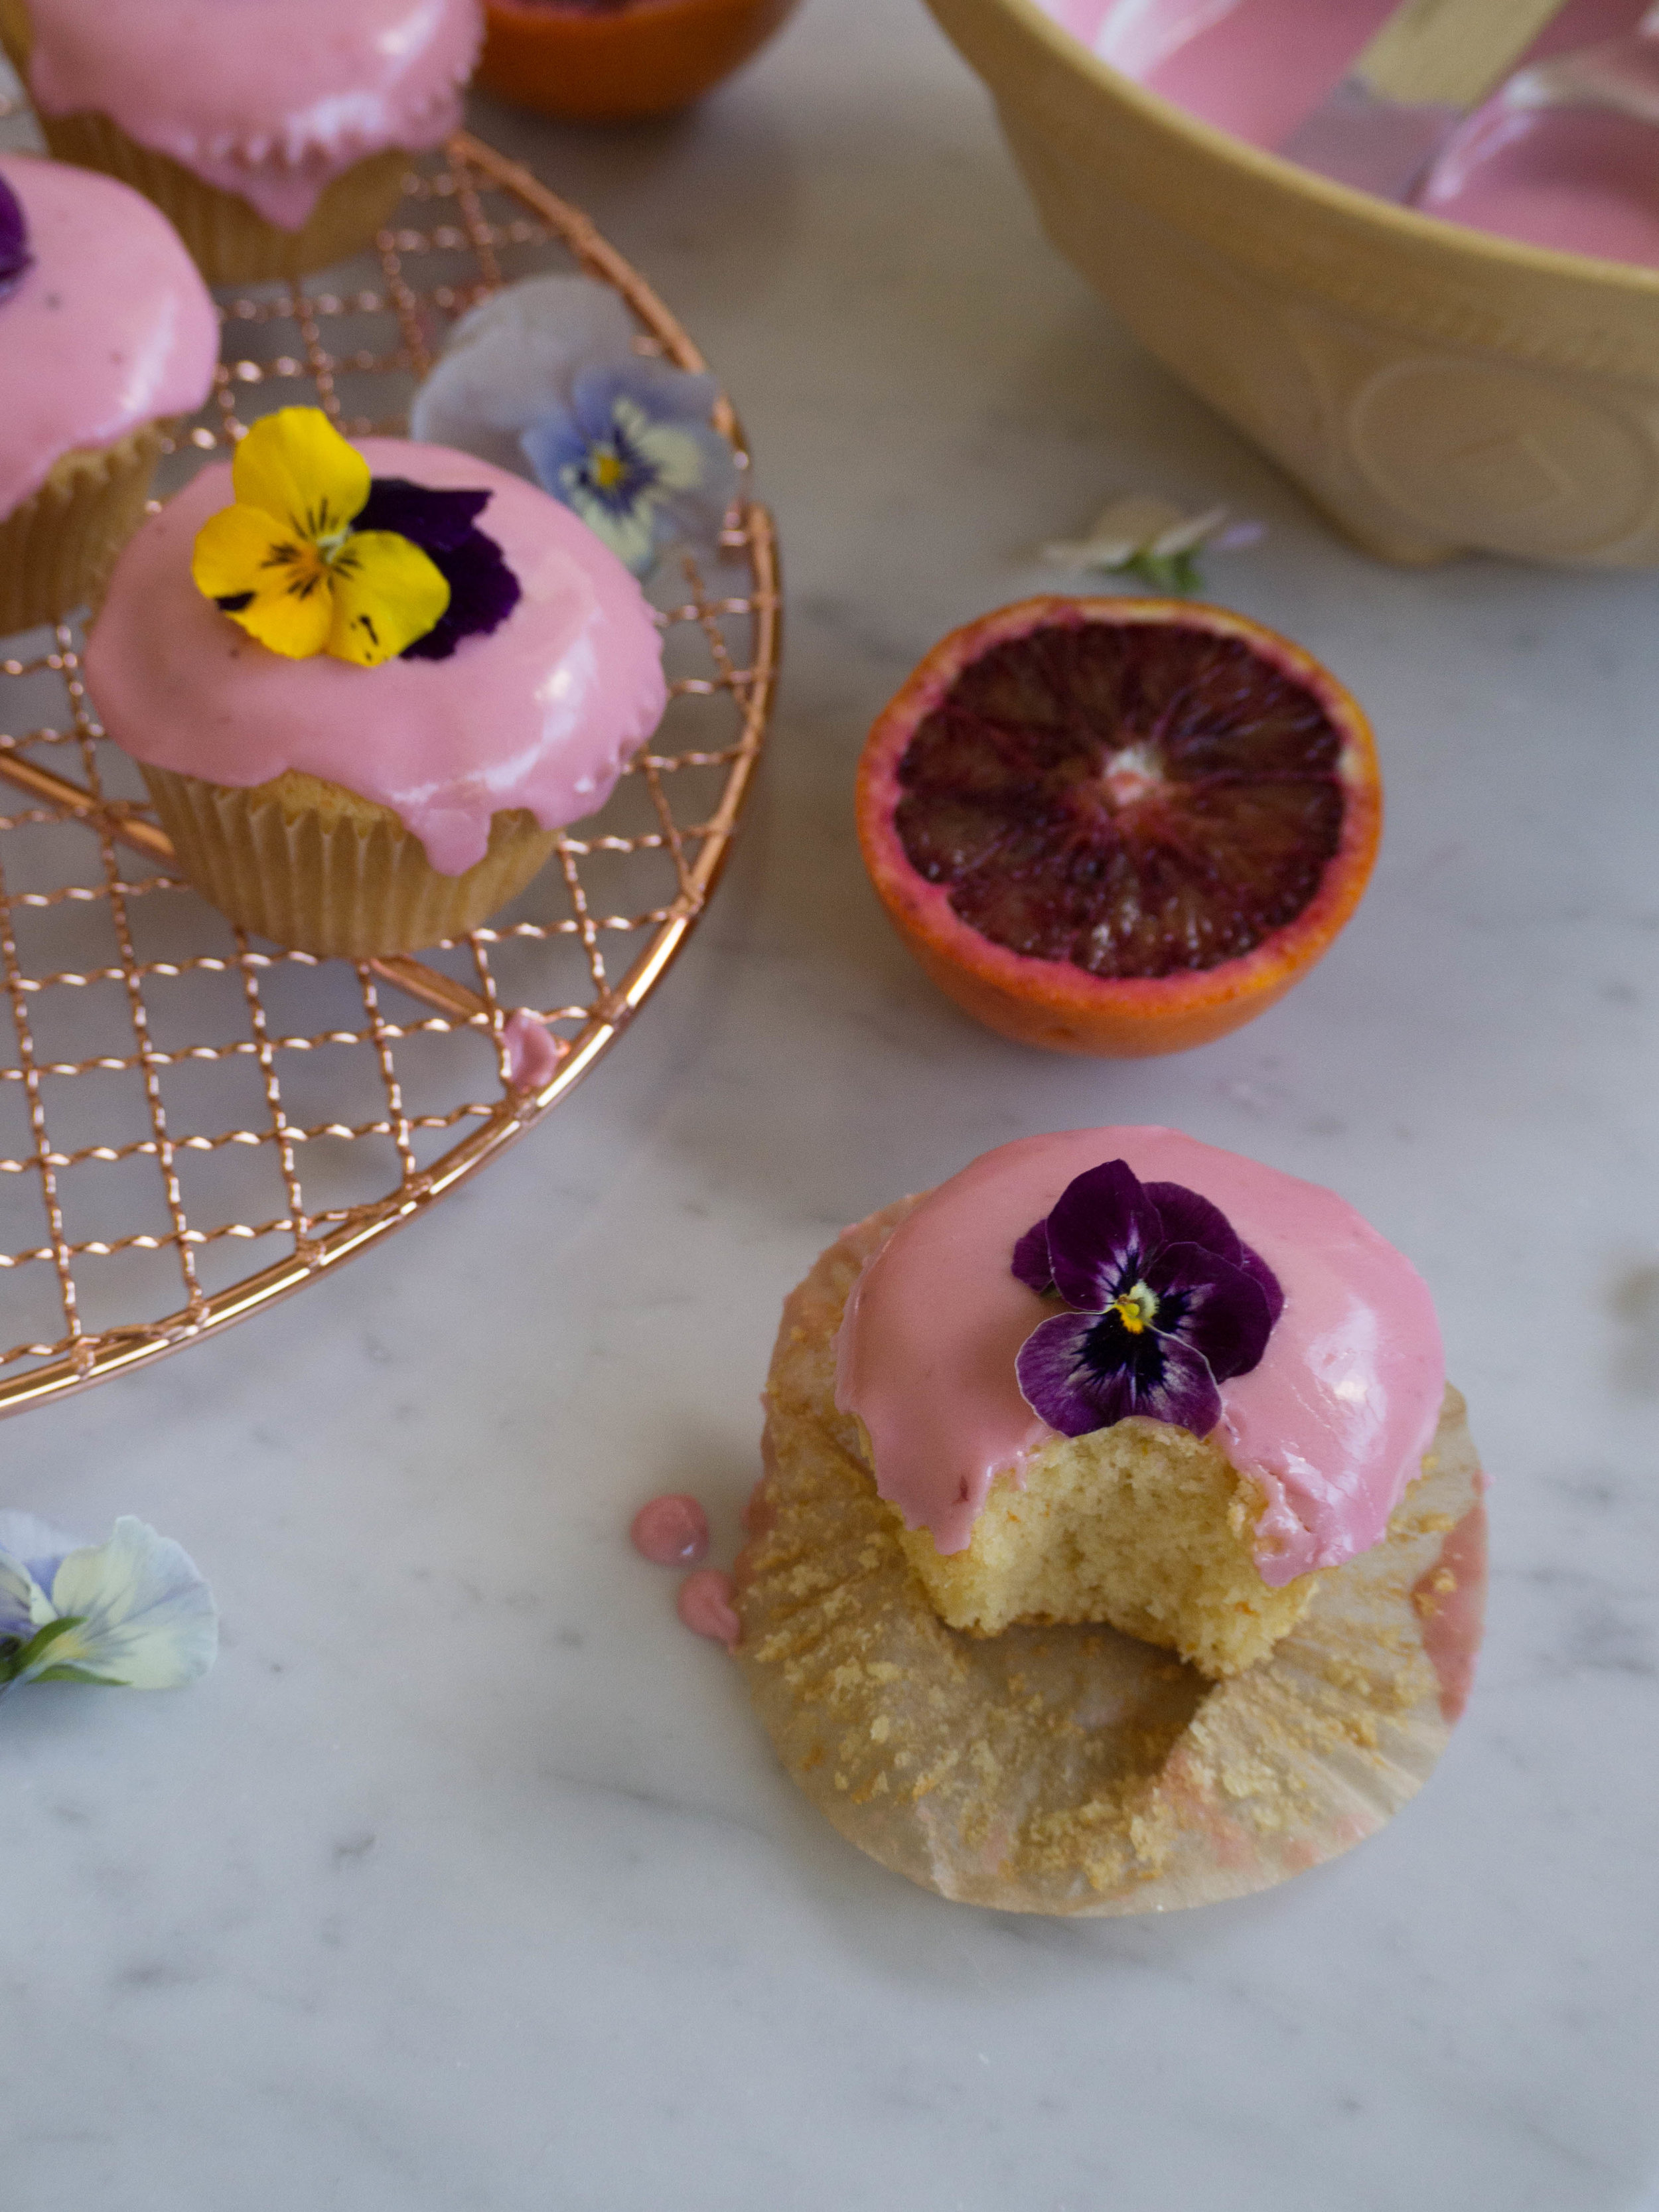
edible flowers for decoration, optional 


Method: 

Pre-heat oven to 160 degrees Celsius, and line a 12 hole cupcake tray with cupcake cases. 

In the bowl of an electric mixer, beat the margarine, sugar and blood orange zest until light and fluffy. 

Beat in the eggs one at a time, then add half the flour and half the milk and mix. Add the remaining flour and milk and mix on medium speed until combined.

Evenly divide the mixture amongst the cupcake cases, the mixture should fill each case so they are about 3/4 full. Bake for 20-25 minutes, or until the cakes spring back when touched lightly and a skewer comes out clean. The cakes will be lightly golden when they are done. 

Remove the cupcakes from the tray and cool on a wire rack. 

Once the cupcakes have cooled completely, sift the icing sugar into a bowl. Add one tablespoon of blood orange juice, and stir. Continue to add small amounts of the juice and stir well, until the icing is a nice smooth consistency. If you find the icing becomes too runny, add little bits of sifted icing sugar until you have created the right consistency (if the icing is too runny it will just run off the cupcakes and make a mess, it needs to have a slight spreadable consistency so you end up with most of the icing on top of the cakes, rather than all down the sides).  Spread icing over each cupcake, don’t worry if it runs downs the sides a little. Top with edible flowers immediately, if using. Allow the icing to set a little before serving. 

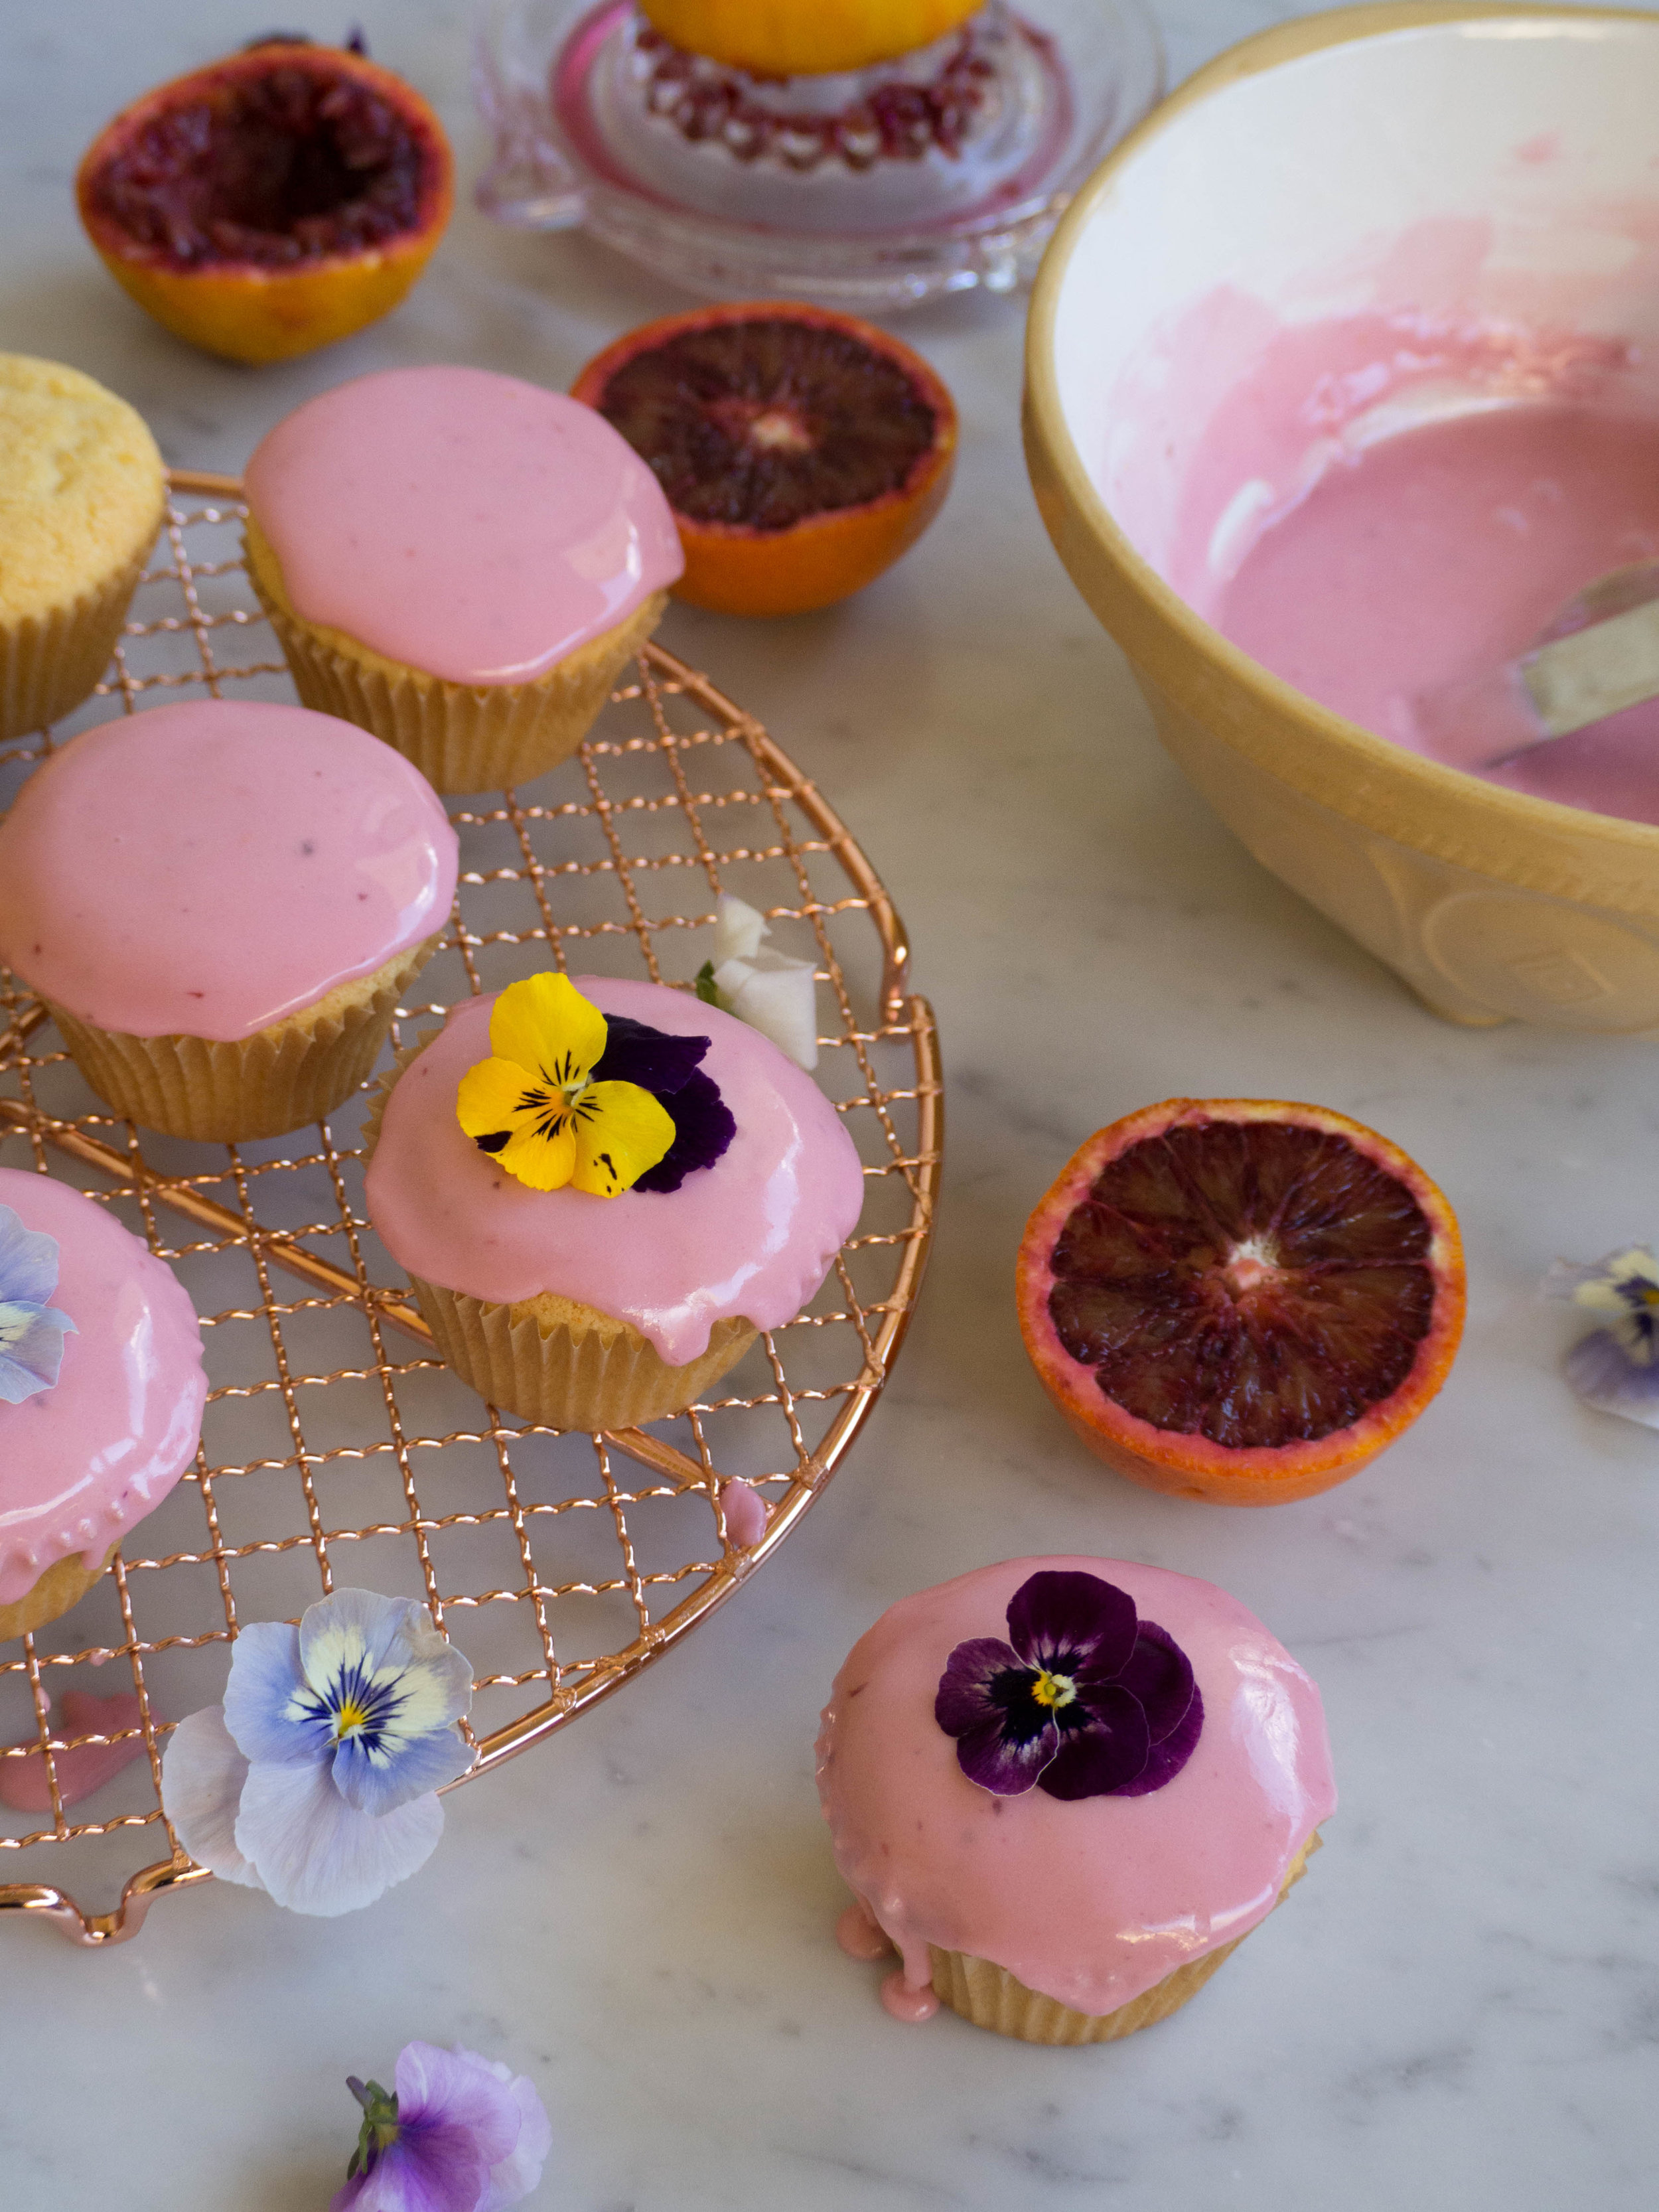
Cakes that have been decorated with edible flowers are best eaten the day of making. If there are any leftovers store in the fridge, as the decoration will not store well at room temperature. Otherwise, storing in an airtight container at room temperature for a few days will be fine.

In Cakes & Slices Tags Blood Orange, Cupcakes, Edible Flowers
Comment
Quince & Apple Crumble

Quince & Apple Crumble

Quince & Apple Crumble + How to Make Homemade Vanilla Ice Cream (Egg Free)

Kath September 25, 2016

This recipe is highly inspired by my Grandma’s cooking. Although I don’t think she ever poached quince or made her own ice cream, crumbles were definitely a staple dessert in her house. Rhubarb was the filling I remember most and as I have alluded to before, I would not try the Rhubarb Crumble’s my Grandma made. This was in protest of the fact that the dessert wasn’t Pavlova, which was, to me the only obvious choice for dessert at any time of year. 

My Grandma’s Pavlova was my absolute favourite (still evidenced by how many times it has appeared in some form on this blog!), and I remember feeling such bitter disappointment when I noticed it had not been my Grandma’s chosen dessert that evening. While the pink hue of the rhubarb should have drawn my interest as a child, I was firmly opposed to the idea of eating a vegetable in a dessert, even if it was served with ice cream. I would then moodily sit eating my plain vanilla ice cream, hoping our next visit would include my favourite Pavlova. 

Now being older and having made much more of an effort to try new foods, I have come around the to humble crumble. I could not however find amongst my Grandma’s hand written recipes, a recipe for any type of crumble. It is likely it was something she started making later in life, maybe seeing it made on one of the cooking shows on TV she liked watching, or amongst the recipes found in the newspaper. I did however stumble across a little section in her copy of ‘Delia Smith’s Complete Cookery Course’ on crumbles and I guess it is also possible the recipe she used or was inspired by came from there. The book is ‘a new edition for the 1990s’, which would fit in well with my thought that she made many more crumbles later in life. It also fits in rather perfectly with my childhood memory of boycotting her rhubarb crumble. 

My Grandma’s copy of Delia’s book, looks somewhat used, maybe just a little less so than her handwritten notebooks and recipe books from the 1950s. A few pages are marked with scraps of paper with handwritten recipes on them (including a lemon sponge and oatmeal cookies), and a couple of cut outs from the food section of a newspaper (one recipe and one reader cooking tip). There is also a bookmark from the Stroke Foundation holding the place between Spanish Pork with Olives and Ossobuco in the ‘Meat: Casseroles and Braised Dishes’ section. Such a find is slightly bittersweet considering how my Grandma’s life came to an end, but also a reminder of her understanding of her vulnerabilities and attention to preventing them.

Finding little notes, recipes and newspaper cut outs in my Grandma’s cookbooks give me little snapshots and reminders of her every time, and maybe one day in another book I’ll find a scrap of paper with a recipe for her crumble. 

For my crumble recipe I have used a combination of fruit which is slightly more Winter-y, however I thought equally as delicious and satisfying during any season. If you have some poached quinces definitely use them, they work so well with the crumble topping. If you wish to substitute the quinces for something else, I would suggest rhubarb (of course!), either sliced finely with a mandolin or lightly softened on the stove first - just keep the quantity of rhubarb about the same as the quinces or so it fits nicely into the dish you are using. If making, the ice cream should be made earlier in the day or the night before so it has ample time to freeze. It is quite a simple ice cream recipe, requiring no eggs just some sugar, milk, cream and vanilla. I would suggest doubling the ice cream recipe if you wish to feed more than 5 or so people. 

Homemade (Easy) Vanilla Ice Cream

Homemade (Easy) Vanilla Ice Cream

Homemade Vanilla Ice Cream (Egg Free)

Ingredients: 

165ml full cream milk 

6 tbsp white sugar

250ml pouring cream 

1 tsp vanilla extract 

2 tbsp vanilla bean paste 


Method: 

Whisk the milk and sugar together until the sugar has dissolved and the milk has become frothy. Then add the cream and both vanillas and whisk until combined. 

Transfer mixture into the bowl of an ice cream machine, and process according to machine instructions. I found the churning process took about 10-15 minutes. Once ready, transfer ice cream into a freezer safe container and freeze for at least 2 or 3 hours. 

Quince and Apple Crumble

Ingredients: 

6 poached quince, approx. 930g 

2 Pink Lady Apples, approx. 250g

2 very small pears, approx. 140g 

2 tbsp quince poaching liquid

2 tsp vanilla bean paste

75g unsalted butter, softened and cubed

110g plain flour 

110g oats (not instant) 

110g brown sugar 

1/2 tsp ground cinnamon 


Method: 

Pre-heat oven to 180 degrees Celsius. 

Remove the poached quinces from their poaching liquid, reserving the liquid. Roughly chop the quinces and place into a large mixing bowl. 

Very finely slice the apples and pears (I used a mandolin), discarding the cores. Place in the bowl with the quince and gently mix together. Add the vanilla bean paste and the quince poaching liquid and mix again. Then tip the mixture into a 2-2.5L capacity pie/gratin/baking dish. Spread the mixture out so it sits in the dish evenly. 

To make the crumble topping place the flour, oats and cinnamon into a mixing bowl then add the butter. Rub the butter into the flour and oats until the mixture starts to look crumbly. Add the sugar and mix well. 

Spoon the crumble mixture over the fruit ensuring it is evenly dispersed. The thickness of your crumble topping will depend on the size and depth of your dish. I used a fairly deep dish so I ended up with a nice thick crumble topping. 

Cook crumble for 30-40 minutes, or until the top has turned lightly golden brown. 

Serve warm with the vanilla ice cream. 

References: ‘Lomelino’s Ice Cream’ by Linda Lomelino (Roost Books, 2015), p.13: ‘Delia Smith’s Complete Cookery Course’ by Delia Smith (BBC Books, 1998), pp. 594-5.

In Other Desserts, Heirloom Recipes, Ice Cream Tags Crumble, Quince, Apple, Grandma, Ice Cream, Vanilla, Delia Smith, heirloom baking, Dessert
Comment
Blood Orange Chiffon Cake

Blood Orange Chiffon Cake

Blood Orange Chiffon Cake & A New Kitchen

Kath September 11, 2016

As soon as blood orange season arrived, I had recipe ideas swimming around in my head. I buy them about once a week, from the shops near where I work, only three or so at a time so they are easy to carry home after work. Then, come the weekend, I use some for baking things like this cake, then I juice the rest and freeze the it to use later on. My freezer is now quite full, along with the copious amounts of varying berries, homegrown mandarins and so much bread, the zip lock bags and small containers of blood orange juice are artfully placed in small gaps and spaces ready to be used once the weather gets warmer and ice blocks become necessary. 

The base recipe of this chiffon cake has been adapted from my favourite chiffon cake (of all time), the Custard Chiffon Cake which can be found in the Monday Morning Cooking Club’s first book. This chiffon cake was the first I ever tasted or made. Now it still remains my favourite, however adaptations such as this Blood Orange Chiffon are amazing and a great way to mix things up a bit and show off some lovely fresh produce. Not to mention I always love a cake with pink icing! Any excuse for pink icing!!

I have also added a few before and after photos of the kitchen to this post - just in case anyone was interested to see what I kept going on about for 4 months! As I mentioned in my last post, I am spending as much time as possible in the kitchen now, and am really enjoying being able to bake again. Making something like this Blood Orange Chiffon wasn’t at all possible for a while there, and I am so so happy it is all over and done with now! 

Click on the gallery below to check out the old kitchen vs the new kitchen!

Old Kitchen
Old Kitchen
New Kitchen
New Kitchen
Old Kitchen
Old Kitchen
New Kitchen
New Kitchen
Old Kitchen
Old Kitchen
New Kitchen
New Kitchen
Old Pantry/Food Storage
New Pantry
New Pantry
Old Kitchen New Kitchen Old Kitchen New Kitchen Old Kitchen New Kitchen Old Pantry/Food Storage New Pantry

Blood Orange Chiffon Cake

Ingredients: 

175 g self-raising flour

35 g plain flour

1 tsp cream of tartar

6 eggs (large), separated

345 g caster sugar

1/2 tsp vanilla extract

finely grated zest of one small/medium blood orange

170 ml blood orange juice, strained of pulp

80 ml vegetable oil 

3-4 springs of rosemary


Ingredients for Icing:

2 cups icing sugar, plus extra

juice of 1-2 blood oranges 

sprigs of rosemary (with flowers if possible), for decoration


Method:

Pre-heat oven to 180 degrees Celsius. Have an angel cake tin ready and nearby but do not grease it. The tin should not be a non-stick tin as the cake needs to cling to the sides of the tin as it cooks. 

Place rosemary into the oil, and leave to infuse. If you have time, leave it for as long as you can. Mix it about and squash into the oil to release some more flavour. 

In a small-medium bowl, sift the flours and cream of tartar three times. 

Using an electric mixer, beat the egg yolks with 1 cup of the sugar, until pale and creamy. If you have a free standing mixer with a paddle attachment, use this attachment for the egg yolks and save the whisk for later. Once pale and creamy, add the vanilla and blood orange zest. Remove the rosemary from the oil, and discard. Place the oil and blood orange juice in a jug and along with the sifted flour mixture, add to the yolk mixture while the mixer is beating on a low speed. Beat only until just combined. 

Using a separate bowl, whisk the egg whites using an electric mixer until soft peaks have formed. Add the remaining sugar, and whisk until the peaks are stiff (but not dry). 

Gently fold the egg yolk mixture into the egg whites with a metal spoon, a third at a time. Continue to gently fold until the mixtures are just combined. Do not over mix. 

Transfer the mixture to the cake tin and bake for 1 hour, or until a skewer inserted comes out clean. 

Immediately upon removing the cake from the oven you must invert the cake (stand it upside down). Using the hollow centre of the cake tin, place the cake upside down on the neck of a bottle and leave to cool. This process will stop the cake collapsing. This is also the reason for not greasing the tin, as you don’t want the cake to slide out at this stage.

Once the cake is completely cool, use a small serrated knife to cut the cake out of the tin. Start with the outer sides then lift the cake out using the bottom of the pan. Then carefully cut the cake off the base of the tin. 

Carefully place cake on serving plate or cake stand. In a medium bowl, sift in the icing sugar. Gradually add the juice of 1 blood orange. Stir until well mixed and add more icing sugar if the mixture is too wet, or more blood orange juice if it is too dry. The consistency shouldn’t be too thick, as it should be able to run down the sides of the cake, and not weight the top of the cake down. Gently drizzle/spread the icing over the cake and arrange the rosemary sprigs around the top of the cake. 

When serving, cut the cake with a serrated knife. 

Reference: ‘The Monday Morning Cooking Club’ by Merelyn Frank Chalmers, Natanya Eskin, Lauren Fink, Lisa Goldberg, Paula Horwitz and Jacqui Israel (2011), p 35.

In Cakes & Slices Tags Blood Orange, Chiffon, Cake, Rosemary, Kitchen renovation, Monday Morning Cooking Club, Dairy Free
Comment
Challah Doughnuts with Blood Orange Glaze - made by Molly Yeh

Challah Doughnuts with Blood Orange Glaze - made by Molly Yeh

Local is Lovely Workshop, July 2016 - A Photo Recap

Kath September 1, 2016

I feel like I'm always saying this, but it's been a while since I posted anything here. If you follow me on Instagram you will have seen what I've been up to in the past month or so, including attending another wonderful weekend away at a Local is Lovely Workshop. 

I was lucky enough to attend the first ever Local is Lovely Workshop back in November 2014 (posts here and here), and always knew I wanted to go back. When I saw Sophie (Local is Lovely) and Luisa would be teaming up with Molly Yeh (My Name is Yeh), I knew this was a best opportunity to go back to Kimbri Farm. Meeting Molly, and all the other workshop participants was just super lovely. I never tire of meeting new like minded people and listening to how food and photography intertwines their lives. I also never tire of Sophie's amazing food, and the wonderful opportunity of being in the country and having an amazing setting to relax in and shoot great photos (almost no styling needed!). 

I have included a few of my favourite photos from the weekend, and yes, those blood orange challah doughnuts were as good as they looked (Molly has the recipe on her blog just FYI!)!

I would also like to recommend a really great podcast called My Open Kitchen, put together by Sophie Hansen and Skye Manson, which has just released it's first episode. During the first episode Molly is interviewed (which was recorded during the time she was here for the workshop), and its a really great interview. The whole podcast is great to listen to and I for one loved listening to it on the train home from work - a much more enjoyable ride than normal!

Apart from spending time at amazing workshops, I have been working and trying to enjoy baking in our new kitchen as much as possible. I have been in the kitchen so much that I have hardly been on the computer (to edit photos and write blog posts!), in a few weeks! I do have recipes in the works and things ready to post here, I just can't stand spending the whole weekend on the computer and not in the kitchen! Especially as I have four months of not cooking to make up for!

Anyway, I have some delicious things coming to the blog soon (or my version of ‘soon’, I should say), including a blood orange cake which I am quite excited about. I made it a couple of weeks ago and I’m pretty sure I ate most of it myself, which when you see the cake you will understand the seriousness of that statement! 

For now I’ll leave you with my photo recap of the wonderful weekend that was the Local is Lovely Workshop. Don’t forget to check out my Instagram and Instagram Story for what I’m up to in the kitchen in between blog posts!

Rhubarb & Olive Oil Cakes - Made by Molly Yeh

Rhubarb & Olive Oil Cakes - Made by Molly Yeh

Molly icing her cake with tahini buttercream

Molly icing her cake with tahini buttercream

Molly decorating her cake - complete with a marzipan kangaroo!

Molly decorating her cake - complete with a marzipan kangaroo!

The beginnings of challah doughnuts - making the dough

The beginnings of challah doughnuts - making the dough

Challah dough

Challah dough

Molly with her freshly fried doughnuts

Molly with her freshly fried doughnuts

Blood orange glaze

Blood orange glaze

Challah doughnuts with Blood Orange glaze

Challah doughnuts with Blood Orange glaze

Making sourdough

Making sourdough

Finished sourdough 

Finished sourdough 

Beautiful fresh produce from Epicurean Harvest

Beautiful fresh produce from Epicurean Harvest

Molly making Shakshuka

Molly making Shakshuka

Shakshuka with homemade sourdough

Shakshuka with homemade sourdough

In Events Tags Local is Lovely, Local is Lovely Workshop, Sophie Hansen, Molly Yeh, My Name is Yeh, Luisa Brimble, Kimbri, Blue Mountains NSW, Photography, Styling, Blood Orange, shakshuka, challah, doughnuts, Epicurean Harvest, sourdough
Comment
Winter Pavlova with Poached Quinces

Winter Pavlova with Poached Quince

A Winter Pavlova + How to Poach Quince

Kath July 25, 2016

After 17 weeks, many frustrating meal times and far too many toasted sandwiches, our new kitchen is done! At the 17 week mark we were able to put most things back in the kitchen and use it (finally!), and after a few more weeks the last finishing touches and changes were done. Now all we need is another coat of paint and the longest kitchen renovation will be officially complete! I have been immensely enjoying being back in the kitchen. Not being able to bake for 4 months was almost like torture for me! Now I am trying to spend every spare moment in there, baking all the things I have been thinking about since late February, and making the most of seasonal produce I have been so desperately wanting to cook with. 

Such seasonal produce, includes quince. Since finding some good poaching recipes last year, my enthusiasm for cooking (and eating) homemade poached quince has only increased. When June arrived, and our kitchen was still in renovation mode, I did begin to panic that I may miss quince season all together and have to wait another whole year to enjoy them. Luckily the renovation finished just in time and I have poached three lots of quince (on a new gas stove none the less!). 

Grandma's Pavlova

Grandma's Pavlova

I have some stored in the fridge, with extra poaching liquid to use for whatever takes my fancy. Though served with ice cream and a drizzle of poaching syrup makes a nice simple dessert, and topping pancakes with them turn lazy weekend breakfasts into thoroughly gourmet affairs. 

After the publication of Country Style’s Heirloom Recipe Cookbook, in which my Grandma’s pavlova recipe was featured, I decided to go back to this favourite family recipe and give it a Winter twist. I also was keen to see how a familiar recipe fared in our new oven! Every oven seems to be different and it takes a little while to adjust. I am finding I’m needing to turn the recommended temperatures down at least 10 degrees in our new oven, and for this recipe I ended up baking the pavlova at 110 degrees Celsius (after the initial pre-heating). I have left the oven temperature in the recipe the same as my Grandma’s original recipe, however if you can smell the pavlova cooking too quickly (it will start to smell like the beginning stages of caramel/burning sugar), turn the temperature down accordingly. 

Country Style's Heirloom Recipes cookbook

Country Style's Heirloom Recipes cookbook

Note: Both the poached quince and the pavlova base can be made in advance. The pavlova can be cooked the night before and left in the oven overnight to cool. 

Poached Quinces

Poached Quince

Poached Quince

Ingredients: 

6 Quince 

900g white sugar

1.2L water

1 tsp vanilla bean paste

2 cinnamon quills 


Method: 

Peel the quince and cut into quarters, removing the cores. Wrap the peel and cores in muslin. In a large pot place the quince and the muslin containing the cores and peel. Add the sugar and water, and cook covered over low heat, allowing the water to simmer, for 1 hour. 

After one hour check the quince by pricking a couple with a fork to check how tender they have become. The quince should become quite tender and soft, however remain whole and not break up. If the quince are not tender enough keep them on the heat, checking again after twenty minutes or so. This process should take between 1-2 hours total. 

Once the quince have become tender, add the vanilla bean paste and cinnamon quills to the pot. Gently stir everything together, then turn off the heat and leave to cool with the lid on. 

Once the quince have begun to cool, sterilise a couple of medium/large jars, by washing them in hot soapy water then placing in the oven for 20 minutes on a low temperature. Transfer the quince into each jar, then cover with as much poaching liquid as will fit. You may want an additional jar to store any remaining poaching liquid. Store in the fridge for up to a month. 

Mascarpone Cream

Mascarpone Cream

Winter Pavlova

Ingredients: 

4 egg whites

125g caster sugar

125g golden caster sugar 

1 tsp white vinegar 

1 tsp vanilla bean paste 

20g cornflour 


To decorate: 

200g mascarpone (I used Pepe Saya) 

150ml thickened cream

1 tsp vanilla extract 

35g icing sugar

8 quarters of poached quince, approx. 

Poaching liquid, to serve


Method: 

Pre-heat oven to 200 degrees Celsius. Line a large baking tray with baking paper, and trace a circle approx. 26 cm in diameter (I used a dinner plate). 

In a clean dry bowl, beat the egg whites for 5-6 minutes, whilst gradually adding the sugar. Add the vinegar and vanilla and beat until the mixture is stiff and glossy. 

Sift cornflour over the mixture, and gently fold to combine. 

Place mixture onto the tray in the middle of the drawn circle. Push the mixture around to form a circle, leaving a small border around the edges. Try to keep the edges a little higher than the middle so any filling can sit comfortably in the middle later. 

Turn the oven down to 125 degrees Celsius, and cook undisturbed for 1.5 hours. 

After 1.5 hours, turn the oven off and leave the pavlova to cool completely in the oven (or overnight). 

Just before you are ready to serve the pavlova, place the mascarpone in a medium sized bowl and whip until it has thickened and soft peaks form. Gradually add the cream, vanilla and icing sugar until all ingredients have combined and stiff peaks form. 

Spread the mascarpone cream into the centre of the pavlova. Drain the quince of syrup and sit them on top of the cream. 

Serve with the quince poaching liquid. 

Winter Pavlova with Poached Quinces

Winter Pavlova with Poached Quince

Reference:  Jamie Magazine, Issue 63 November 2015 p.31. 

In Other Desserts, Heirloom Recipes Tags Quince, Poached Quinces, Pavlova, Country Style Magazine, Heirloom Recipes, Winter, Dessert, Kitchen renovation, Grandma
Comment
Berry Almond Slice with Homemade Triple Berry Jam

Berry Almond Slice with Homemade Triple Berry Jam

Berry Almond Slice + How to Make Homemade Triple Berry Jam

Kath June 6, 2016

This is the first time I have used homemade jam in this slice, and I am pleased to say it is well worth the effort. I have made this slice numerous times in the past, usually using a raspberry jam, mostly one by Bonne Maman. It was always nice, and always something that I was asked to make often. 

Once I decided I was going to make my own jam however, I knew I needed to try some with this slice recipe. I was quite amazed at how much better the flavours were and I don’t think I will be going to back to using bought jam anytime soon. 

If you are worried about making jam, I urge you to give this a go. Its not difficult you just need to be organised and have everything prepared and ready. Make sure you read through the recipe before you begin, and work out how you want to co-ordinate sterilising the jam jars and getting the jam started. I have also added a few extra jam making tips at the end of the recipe which should help. Fresh or frozen berries can be used for the jam, and you can alter the quantities or types of berries used. Just make sure the total quantity adds up to 1 kg. 

I used fresh berries that I had frozen myself for this recipe. When I see berries in season and at a good price, I always buy them and freeze them immediately. I use tupperware containers to store them in the freezer, and try to keep the most recent purchases at the bottom to ensure I use them after the ones I bought less recently. It is often a good idea to label and date these things, I just often forget or can’t be bothered. I bake with berries so often that they don’t tend to stay in the freezer very long. I find they cook much better than the bought frozen berries, as they hold their shape and don’t bleed so much (which is good when making cakes and muffins etc). 

I am very much looking forward to making this jam again. I found it so satisfying that my homemade jam tasted better than the bought stuff, and it was really nice to give as gifts as well. The slice recipe would lend itself to be paired with lots of different types of jams - I’m thinking cherry, or quince for next time. 

Homemade Triple Berry Jam

Homemade Triple Berry Jam

Berry Almond Slice with Homemade Triple Berry Jam
Almond Topping

Almond Topping

Berry Almond Slice with Homemade Triple Berry Jam

Homemade Triple Berry Jam

 If making the homemade jam for the almond slice, make the jam at least one day ahead. 

Ingredients: 

700 g raspberries

175 g blueberries

125 g blackberries

80 ml lemon juice, plus extra 

880 g white sugar 


Method: 

Begin by placing two or three small plates in the freezer. You will need these later to test if the jam is jelling and ready to bottle. 

Then, sterilise at least four 370g capacity jars (I used old Bonne Maman jam jars). There are a few different methods to sterilise jars for preserving, however I prefer to pre-heat the oven to 100-120 degrees Celsius, wash the jars and lids in hot soapy water, then place the jars upside down on an oven shelf. Allow the lids to air dry. Leave the jars in the oven for at least 20 minutes. 

Whilst the jam jars are being sterilised, start making the jam. Using a large heavy based saucepan (preferably enamel, stainless steel or aluminium), mix all the ingredients together and place on the stove over high heat without boiling, until the sugar dissolves, then bring to the boil. Reduce the heat and allow the jam mixture to simmer uncovered for 20 minutes without stirring. The jam mixture should have reduced by the 20 minute mark and will also appear to have thickened. If necessary stir the jam a little ensure it is cooking evenly. 

After 20 minutes test the jam to see if it has reached jelling point. To test the jelling point of the jam, use one of the chilled plates and drop a small amount of the jam onto it. Leave for a couple of minutes, then push your finger through the jam. If a skin has formed over the jam and you can now see it wrinkling, the jam is ready. If it is not ready, leave to cook for a few more minutes and/or add some extra lemon juice. Then use the remaining chilled plates to test if the jam has jelled.

Once the jam has reached jelling point, remove the sterilised jars from the oven and place onto a wooden board. Using a wide mouthed funnel or jam funnel, pour the hot jam into the hot sterilised jars. Fill right to the top and seal immediately. Leave to cool, and store in a cool dark place. This jam should last about 1 year stored correctly and unopened. Once opened keep in the fridge. 

Berry Almond Slice with Homemade Triple Berry Jam

Jam Tips

  • I often sterilise one extra jar just in case I need it, even if its a slightly smaller jar, just in case the recipe makes more jam than I expect.

  • Make sure the jars are filled right to the top with jam. If you do not they may not store as well and could develop mould. If you find you cannot fill a jar to the top, make sure you use that one first.

  • If mould does develop on the surface of the jam during storage, discard that whole jar. It will not be safe to eat any of the jam from that jar, even if the mould is removed from the surface.

  • In very humid conditions jam can be stored in the fridge even before opening.

  • If the jam will not reach jelling point, bring back to the boil and try again. You can also add more lemon juice (which acts as a natural jelling agent), or pectin/jam setter. Jams using apples generally set well as they naturally contain a lot of pectin.

  • Ensure all the utensils you are using, particularly the funnel, are well washed. Any contamination of the jam once it is cooling down could compromise its shelf life.

Berry Almond Slice with Homemade Triple Berry Jam

Berry Almond Slice

Ingredients for the Topping: 

60 g unsalted butter, softened

55 g caster sugar

1 tsp vanilla extract/paste

200 g flaked almonds

2 tbsp milk 


Ingredients for the Base: 

150 g unsalted butter, softened

110 g caster sugar 

1 tsp vanilla extract/paste

225 g plain flour

40 g cornflour

180-200g homemade triple berry jam  


Method: 

Preheat oven to 180 degrees Celsius, and line a 24 x 20 cm baking/lamington tin with baking paper. 

Make the almond topping first by combining all the ingredients in a small/medium saucepan. Place over low heat and stir until the butter has melted. Set aside to cool. 

To make the base of the slice, beat the butter, sugar and vanilla in the bowl of an electric mixer with the paddle attachment, until the mixture is pale and creamy. With the mixer on low speed, sift in the flour and cornflour in two or three batches. Mix until the ingredients are just combined. 

Press the dough mixture into the base of the lined tin, and bake for 12-15 minutes, or until it is light golden in colour. Then remove from the oven and leave to cool for at least 10 minutes. 

Spread the jam over the base, then top with the almond mixture. Cook for a further 25-30 minutes, or until the almond topping has turned golden brown. You may need to turn the slice half way through the cooking time to bake the top evenly. 

Allow to cool in the tin, and cut into slices once cooled. 

Berry Almond Slice with Homemade Triple Berry Jam

References: ‘Made from Scratch’ by the Australian Women’s Weekly (Bauer Media Books, 2015) pp 48-49, 57 & 270; ‘Holiday’ by Bill Granger (Murdoch Books, 2007) p.22. 

Berry Almond Slice with Homemade Triple Berry Jam
In Cakes & Slices, Jams Preserves & Spreads Tags Berry Jam, Berry Almond Slice, Homemade Jam, Bill Granger, Australian Women's Weekly, Almonds, Slices
2 Comments
  • The Blog
  • Older
  • Newer

recipes

  • Biscuits/Cookies 39
  • Breads Etc. 9
  • Breakfast 7
  • Cakes & Slices 68
  • Confectionary 5
  • Drinks 6
  • Events 14
  • Food Photography Tips 3
  • From The Mailing List 24
  • Heirloom Recipes 12
  • Holidays 44
  • Ice Cream 9
  • Jams Preserves & Spreads 9
  • Muffins 4
  • Off the Shelf 48
  • Other Desserts 25
  • Savoury Dishes/Meals 15
  • Scones 4
  • Tarts & Pastry 9
  • Travel 13

Sign up to Friday Food Chat with Kath, a weekly newsletter for more food, baking, cookbook chat and more!

Sign Up Here!
instagram-unauth pinterest facebook url

Website Accessibility: To enable text to speech function on the blog, click the sound button to the right of each blog post.

All images & content are the property of Kathryn Vincent, unless stated otherwise. Please do not use without permission.

Kulinary Adventures of Kath

Food Photography, Recipes & Baking

instagram-unauth pinterest facebook url