Kulinary Adventures of Kath

Food Photography, Recipes & Baking
  • home
  • About
  • Work with Kath
  • Shop
  • Blog
    • The Blog
    • Recipe Archive
  • Newsletter
  • Contact
  • home
  • About
  • Work with Kath
  • Shop
    • The Blog
    • Recipe Archive
  • Newsletter
  • Contact
Raspberry Pistachio Rose Cake (23 of 25).jpg

The Blog

Recipes and Food Photography by Kath Vincent.

  • The Blog
  • Recipe Archive
  • All
  • Biscuits/Cookies
  • Breads Etc.
  • Breakfast
  • Cakes & Slices
  • Confectionary
  • Drinks
  • Events
  • Food Photography Tips
  • From The Mailing List
  • Heirloom Recipes
  • Holidays
  • Ice Cream
  • Jams Preserves & Spreads
  • Muffins
  • Off the Shelf
  • Other Desserts
  • Savoury Dishes/Meals
  • Scones
  • Tarts & Pastry
  • Travel
Quince Cake

Cosy Bakes for Cooler Weather

Kath June 28, 2021

Here in Sydney, we’re well into Winter now - and a COVID related lockdown - so here are a few cosy things to bake to enjoy the cooler weather, and take advantage of being at home.

. . .

I for one am quite relieved the cooler weather has really begun, I hate the heat, but also find it much more comfortable to cook and bake in the cooler weather. There are many Autumn and Winter inspired things I want to bake, and below is a little list of the recipes I have been enjoying or hope too soon. 

This list is quite quince heavy, as to me, it isn’t Autumn without poaching a few quince! 

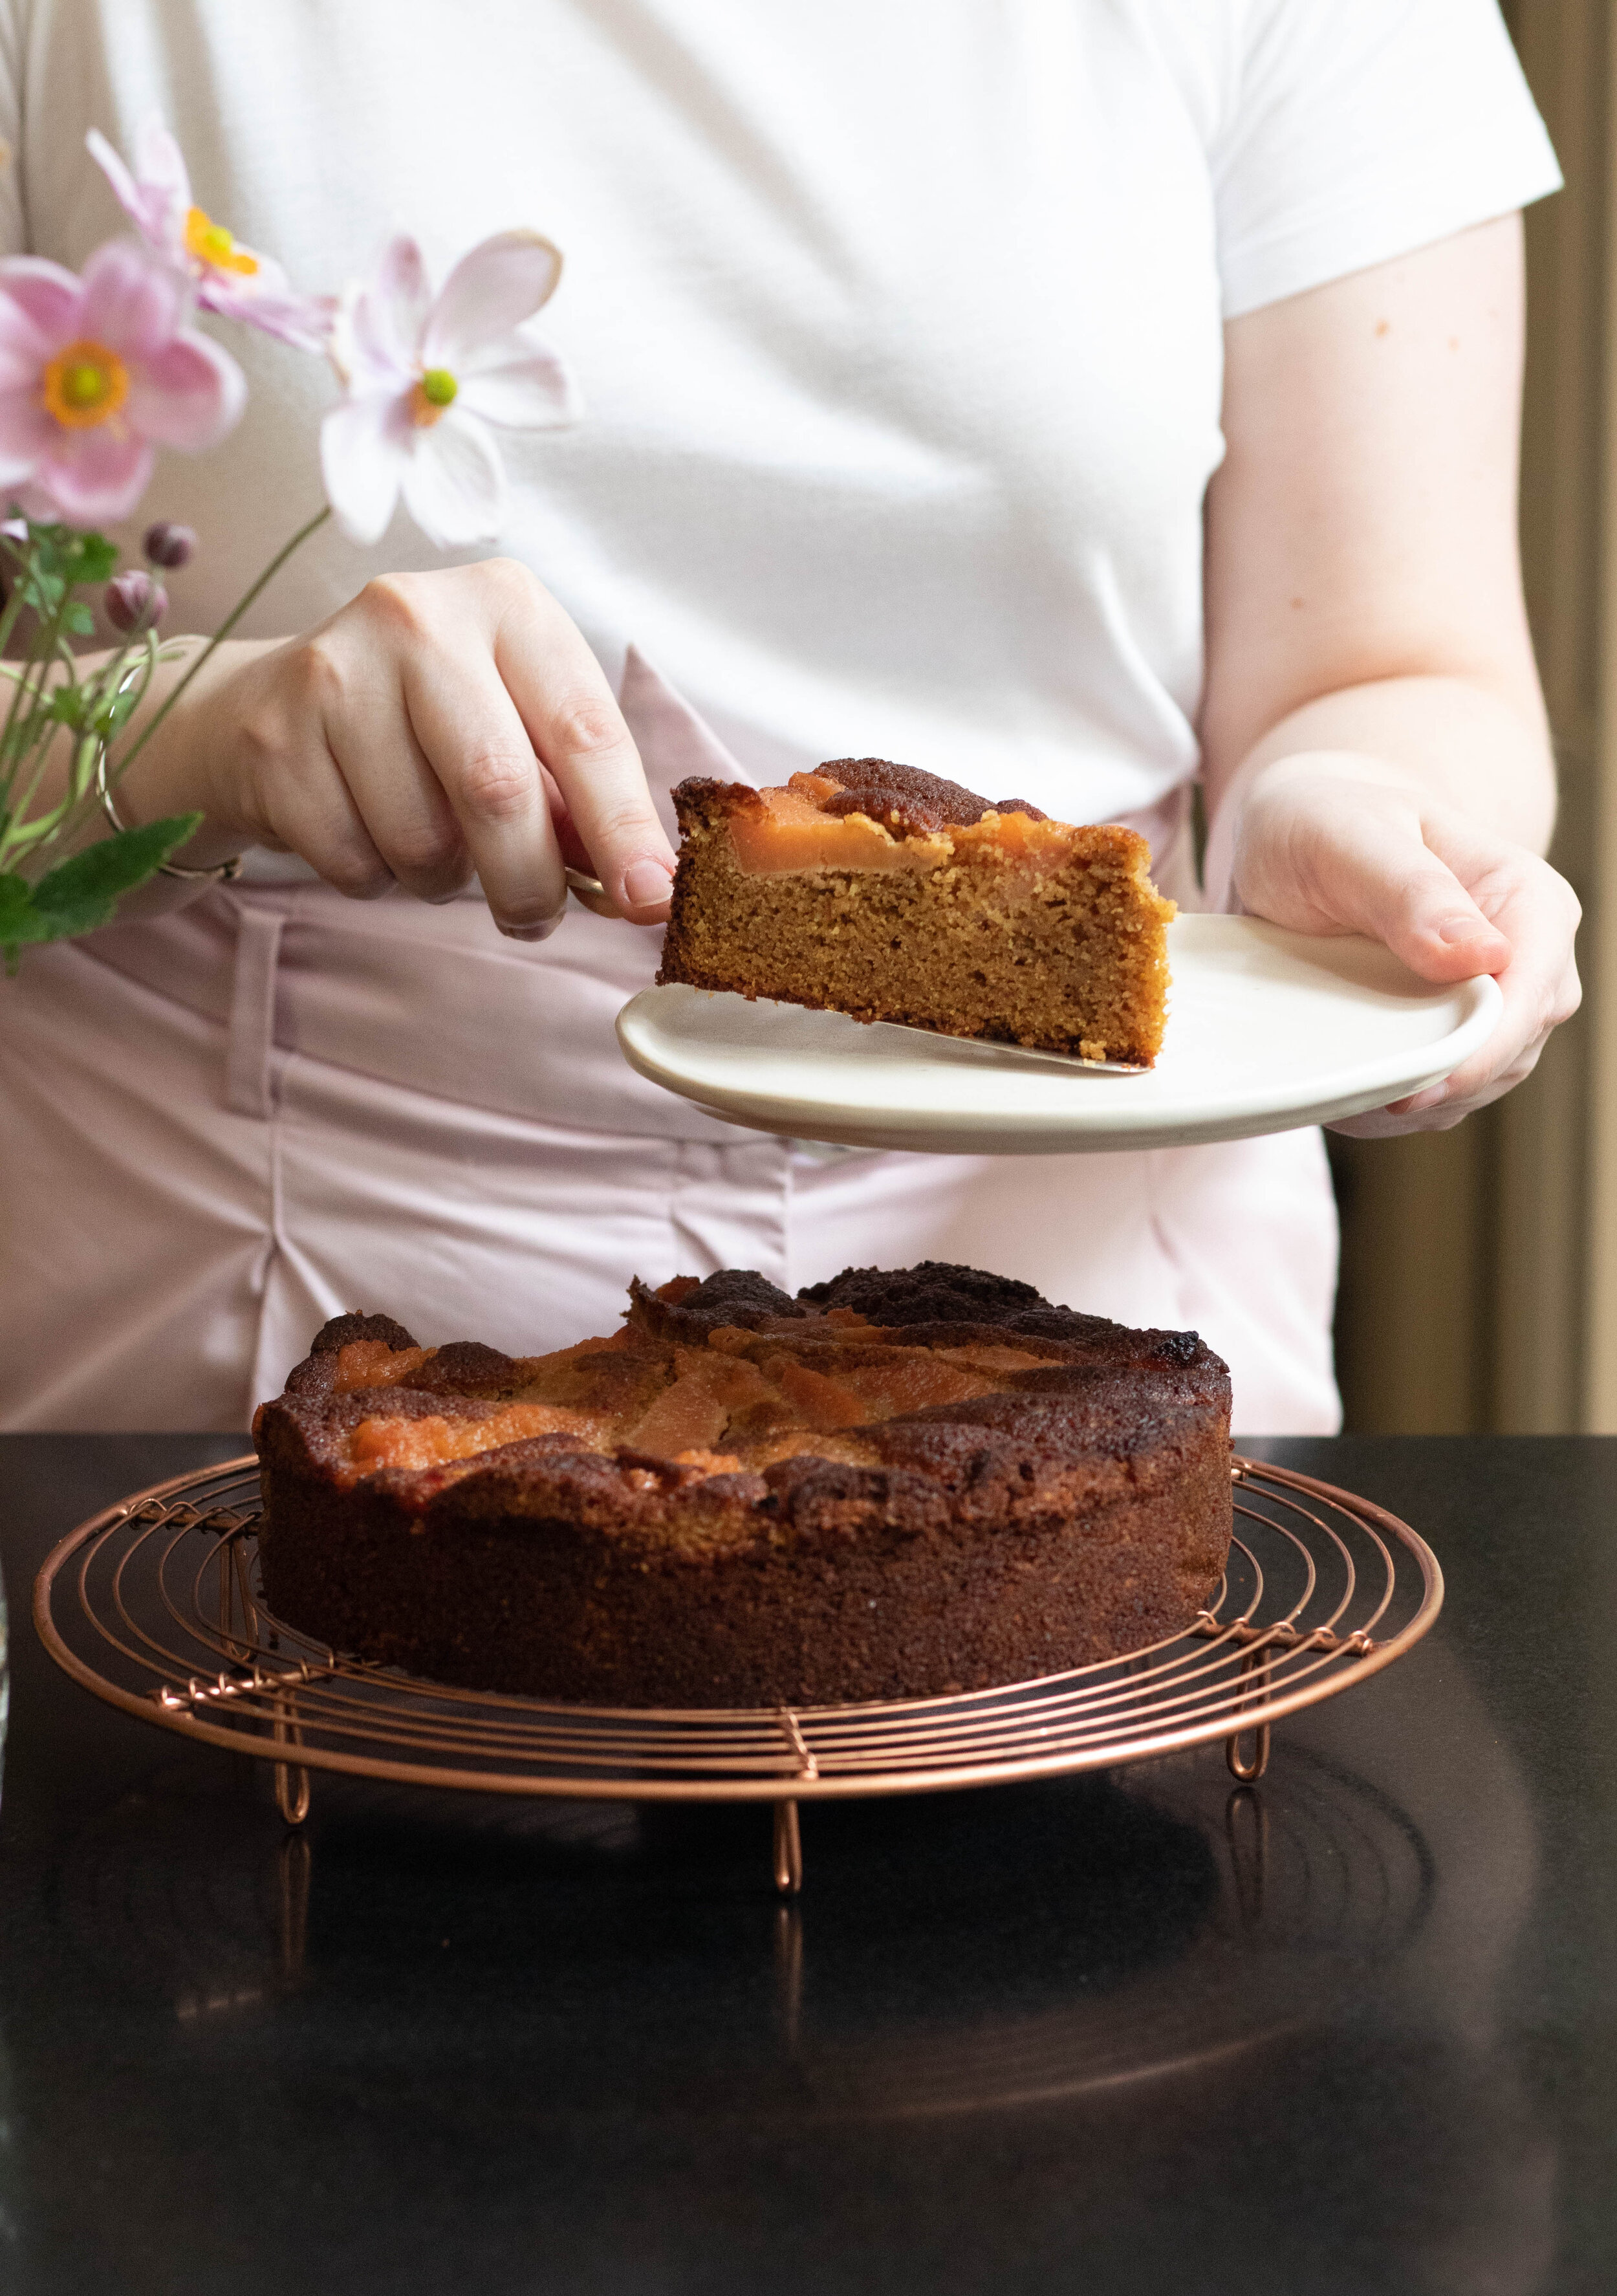
  1. On the long weekend I used this recipe to poach 2kg of quince, and am hoping to make the quince cake (pictured above) from my free eBook Seasonal Cakes and Bakes ASAP (get your free copy by signing up to my mailing list today!).

  2. I saw the talented Tilly of @tillys_table post the recipe for this Blackberry and Almond Afternoon Tea Cake on Instagram a week or so ago, as part her Plain-Cake Appreciation Society (a society I would definitely like a membership with!). I immediately saved Tilly’s post, and hope to make it soon. I also think you could use poached quince instead of blackberries, which I may do since I have so many now!

  3. On another quince related note, I made my annual double batch of Sophie Hansen’s Quince Chutney, which I am obsessed with and can’t ever seem to make enough of. The recipe is also in her book ‘A Basket by the Door’ and goes excellently with the pork sausage rolls on the page before hand (p.142). 

  4. Since there are still some lovely Australian plums in the shops at the moment, I made Leah Koenig’s Passover Cake which can be found in the Monday Morning Cooking Club’s book ‘Now for Something Sweet’. The recipe asks for pears and pecans, however I used plums and pistachios and it was delicious. And while I did use superfine matzo meal as the recipe says, you can substitute for plain flour and I am told it is an excellent cake made that way too. 

  5. For more cosy baking ideas check out my Cosy Winter Bakes eBook - I am going to be revisiting some of the recipes now the weather has cooled down!

In From The Mailing List, Cakes & Slices Tags Quince, Autumn Baking, Seasonal Cakes and Bakes, Cosy Winter Bakes, Sophie Hansen, Tilly's Table, Leah Koenig
Comment
Easy Choc Orange Sheet Cake

Simple Choc Orange Sheet Cake

Kath June 28, 2021

Do you ever bake, just to use a particular ingredient up? Like if the ingredient goes to waste, you’ve failed some kind of kitchen based test?

Sometimes much of my baking is inspired by a tub of yoghurt nearing the end of its life, eggs that need to be used as I over estimated how much I would actually be able to bake or an in season fruit I can’t stand to waste since it’s at its best right now and it would just be rude for it to end up in the bin. 

This chocolate orange cake came about for just that kind of reason. I got a big delivery of citrus later last month, and while I was more interested in the yuzu and bergamots, it also came with some oranges and mandarins. I don’t eat either of these citrus as they make me quite unwell so I had to come up with an idea to use some of them - as even though I don’t eat them, I still don’t want them to go to waste. 

Since I also have a very large supply of cocoa for someone who can’t eat chocolate, I decided to make the ultimate cake that I would never be able to eat - a chocolate and orange cake*! I am told it tastes like Jaffa (a choc orange lolly/candy common in Australia and New Zealand), which is exactly what I was going for. It’s based on the Chocolate Sheet Cake from my cookbook Everyday Bakes, and the recipe is below if you feel like a choc orange inspired bake!

*no cake was harmed during the development of this recipe - it was largely gifted to a good friend who I am glad to say hasn’t got sick of me offloading baked goods onto her and her family. They also took some of the citrus I couldn’t eat, and I now feel like the kitchen test of not wasting food has been passed for another week. Phew!

Simple Choc Orange Sheet Cake

Chocolate Orange Sheet Cake

Ingredients: 

125g unsalted butter, softened

165g caster sugar

1 tsp vanilla extract

finely grated zest of one orange

2 eggs 

230g self raising flour

2 tbsp cocoa powder

135g Greek style yoghurt 

Ingredients for the Icing: 

170g icing mixture

1-2 tbsp fresh orange juice

Method: 

Pre-heat oven to 160 degrees Celsius, and grease and line a 30x20cm rectangular slice or lamington tin with baking paper. 

In a medium bowl whisk together the flour and cocoa powder, then set aside.

In the bowl of an electric mixer, beat the butter, sugar, vanilla and orange zest until light and fluffy.

Beat in the eggs one at a time, then add the flour and the yoghurt and slowly mix until combined.

Tip the mixture into the prepared tray and smooth the top.

Bake for 20-25 minutes, or until the cake spring backs when touched lightly and a skewer comes out clean. The cake will be lightly golden when done. Allow the cake to cool on a wire rack.

To make the icing, mix 1 tbsp of the orange juice with the icing mixture in a medium bowl. Continue to add more orange juice, a little at a time until you have a smooth icing that you can spread over the cake - a slightly thinner consistency is good for this cake as there is more surface area to spread over, if the icing is too thick it might not cover the entire cake!

The big delivery of citrus I bought featuring blood limes, limes, bergamot, yuzu, lemons, mardarins, oranges, a buddhas hand and custard apple.

The big delivery of citrus I bought featuring blood limes, limes, bergamot, yuzu, lemons, mardarins, oranges, a buddhas hand and custard apple.

In Cakes & Slices, From The Mailing List Tags Chocolate, Citrus, oranges, Jaffa, cake, Mixer Free Recipes, Easy Baking
Comment
Rose Poached Peaches

Rosé Poached Peaches

Kath June 23, 2021

This recipe came about as Barossa Valley based Gomersal Wines kindly gifted me some of their products. They sent some Rosé, and since we often make poached pears in Moscato, I wondered if I could use this idea to poach another fruit in Rosé in the same manner. 

I can say with certainty that peaches (white or yellow) work very well poached in Rosé, and it is my new favourite Summer dessert.

You may be wondering why I am posting a distinctly Summer-y dessert during Winter, but I first made it during Summer with lovely in season white peaches. It was delicious, however there was no opportunity to take any photos. 

Gomersal kindly sent me another bottle so I could make it again, and I have been eagerly awaiting the out of season peaches from the USA so I could cook it again. 

Now finally the recipe is ready, and despite it being woefully out of season for those of us now in the depths of Winter I still wanted to share it.

If peaches aren’t in season where you are, instead of doing what I did and buying out of season peaches for $20/kg (!!!), you can use pears (ones that are just ripe, overripe pears won’t be too easy to peel!) instead and it will still be an equally delicious dessert. So really, this recipe will adapt to all times of year! 

Maybe I should have called the recipe Rosé Poached *Insert Your Seasonal Fruit Here*?!

Either way, it’s definitely a recipe worth giving a go. It’s certainly easy enough to make when you don’t have a lot of time, and since the peaches will last in the syrup for a few days you could definitely make this in advance. 

This recipe works best with slip stone peaches that are just ripe. Peaches that are beyond just ripe probably won’t peel or poach very neatly, and I can say from experience that cling peaches are quite difficult to eat even after poaching - unless you enjoy wrestling with a slippery peach in syrup trying to prize the flesh away from the stone!

Also, you will probably have some syrup left over after the peaches are finished. I would suggest if you want to save it, it would make a lovely addition to a Summer cocktail or drink. 

And while you can use vanilla bean paste if you don’t have any vanilla pods, if you do use a vanilla pod don’t throw it away after the peaches are done. Rinse it off and dry it, then add it to a jar of either pure vodka or rum to make your own vanilla extract. Each time you have used a vanilla pod add it to the jar, and in a few months you’ll have your own homemade vanilla extract!

Rose Poached Peaches

Rosé Poached Peaches

Ingredients: 

750ml bottle Rosé

4-6* peaches (yellow or white), just ripe or slightly under ripe slip stone if possible 

165g caster sugar 

1 vanilla pod

1 tsp vanilla extract

Ice cream to serve

Method: 

In a large saucepan, add the Rosé, sugar and vanilla extract. Slice the vanilla pod down the middle and scrape the seeds from each side and add to the pot, along with the vanilla pod pieces. 

Place over medium heat. Allow to come to a gentle boil.

Whilst the Rosé mixture is heating, carefully peel the peaches. Once the Rosé mixture has heated up and the sugar has dissolved, gently add in the peaches (a slotted spoon is good for this). 

If the peaches aren’t covered enough by the Rosé syrup, add in a little water - they don’t need to be completely submerged but you will want to move them around as they are poaching so they cook evenly. 

Lower the heat to low/medium so the Rosé syrup is simmering and leave the peaches to poach for about 20-30 minutes (the timing will depend on how ripe your peaches are and their size). Place a scrunched up piece of baking paper over the top of the peaches so ensure they don’t discolour during cooking. 

The peaches will be ready once a knife can gently pierce through the flesh and the flesh is soft but not mushy. 

Serve immediately with some of the Rosé syrup and ice cream. 

Will keep for a few days in the fridge. 

* quantity of peaches will depend on how many people you wish to serve, and how many you can fit in your saucepan.

Rose Poached Peaches

Thank you to Gomersal Wines for gifting me some of their wines so I could make this recipe.

Rose Poached Peaches (5 of 9).jpg
In Other Desserts Tags Rosé, Peaches, Gomersal Wines, Dessert
Comment
Giant ANZAC Biscuit

Giant ANZAC Biscuit

Kath April 21, 2021

The idea for this Giant ANZAC Biscuit started when I was watching Nadiya Hussain’s series ‘Time to Eat’ on Netflix a couple of months ago. 

Nadiya made a massive cookie in a pan on the stove, and it got me thinking about what other biscuit recipes could be cooked this way. I soon thought of the humble ANZAC biscuit as the butter already needs to be melted on the stove, and I couldn’t think of anything better than a giant ANZAC biscuit. 

I had some level of trepidation making this recipe. It reminded me a lot of those times in the past where I tried to make frittata on the stove and never understood how anyone got it to actually cook through without burning the bottom. My final attempt ended up with me putting the frustrating frittata in the oven, only to accidentally try pick it up out of the oven with the hand that didn’t have an oven glove on it. 

Needless to say I then sat at the sink with my burnt hand running under cold water (for a long time), picking at bits of the frittata and deciding that I would never attempt this again. I then developed a frittata recipe that only goes in the oven and my frittatas are no longer frustrating. 

I had a feeling that biscuits should really just go in the oven, but Nadiya made it look so easy. My attempts however, were not so easy, and quite frankly a waste of ingredients. 

I initially tried to cook it just on the stove, and once I could smell burning sugar I realised I was back in the land of the frustrating frittata. That attempt went in the bin, once it had cooled down and I had used both bicarb soda and lemon juice to clean the pan. And had the exhaust fan on long enough to get rid of the burnt sugar smell.

I decided one last attempt was in order, and started the biscuit on the stove then put it into the oven. What looked like a perfectly cooked giant biscuit was actually very raw inside. 

I decided now was as good a time as any to give up on my giant stove top ANZAC idea, particularly as I had not wasted so many baking ingredients in a long time. 

Luckily when I posted on my Instagram stories about my baking fail, someone kindly messaged me to say they often make giant ANZAC biscuits, and bake them in a tart tin. This excellent idea led me to think that a cake tin could also do the job, and just like a frittata, ANZAC biscuits, regular sized or giant, should be cooked in the oven (obviously…). 

So here is my third and final attempt at a Giant ANZAC Biscuit, baked in a springform cake tin. And cooked in the oven, as all biscuits/cookies should be. Nadiya’s perfect stovetop cookie will probably always allude me like a frittata cooked perfectly on the stove, but nevertheless I can now eat both frittata and giant biscuits without the fear of excessive burns (to the food and myself), so I’d call that a win.

Giant ANZAC Biscuit
Giant ANZAC Biscuit

Giant ANZAC Biscuit

Ingredients: 

80g rolled oats (not instant oats)

150g plain flour

215g caster sugar

65g coconut

1 tbsp golden syrup

110 g unsalted butter

1 tsp bi-carb soda

2 tbsp warm water 

Method:

Pre-heat the oven to 150 degrees Celsius and grease and line a 23-24cm springform cake tin.

Mix the oats, flour, sugar and coconut in a large bowl. Melt the golden syrup and butter on a medium-low heat, then mix the bi-carb soda and warm water together and add to the butter. The butter mixture should froth a little. 

Take the butter mixture off the heat and add to the dry ingredients and mix together. 

Tip the mixture into the prepared cake tin and smooth out so it reaches the edges and sits evenly. 

Bake for 30 minutes, or until the top is nicely golden. 

Undo the springform tin, leaving the biscuit to cool on the cake tin base, on top of a wire rack. 

Once completely cooled, remove the biscuit from the cake tin base and cut into pieces to eat. 

Store in an airtight container.

Giant ANZAC Biscuit
In Biscuits/Cookies Tags ANZAC Biscuits, Nadiya Hussain, Baking Fails, Giant ANZAC Biscuit, Biscuits/Cookies
Comment
Carrot Cake with Biscoff Buttercream

Carrot Cake with Biscoff Buttercream for Easter

Kath April 2, 2021

Yes, I know. Again with the Biscoff Spread!

Since discovering this caramelised biscuit spread, I have had many ideas for what I could do with it, apart from just using it as a spread. Adding it to a buttercream was one of them, and I can confirm it is delicious!

Since I don’t eat chocolate, I always need to think of something a little different to enjoy at Easter. I thought a carrot cake was quite a fitting alternative, especially decorated with a few pastel Easter eggs.

I have used panela sugar in this recipe as I love the caramel flavour it gives, however you can use the same quantity of brown sugar. I have also used some date syrup to add a little deeper flavour and colour to the cake, but if you don’t have any it can be substituted for more honey.

I hope you have a lovely long weekend, and get to enjoy a slice of cake, Easter egg or hot cross bun - or even better get to spend some time in the kitchen and bake some for yourself!

Carrot Cake with Biscoff Buttercream
Easter Picnic

Carrot Cake with Biscoff Buttercream

Ingredients: 

110g panela sugar (or light/dark brown sugar) 

185ml canola/vegetable oil 

85ml date syrup

100ml honey

4 eggs 

1.5 tsp vanilla bean paste 

335g plain flour

3 tsp baking powder

1.5 tsp bicarb soda 

2 tsp Hot Cross Bun spice*

4 large carrots, grated

Ingredients for the Buttercream: 

150g unsalted butter, at room temp

190g icing mixture/sugar 

130g (approx. 1/2 cup) smooth Biscoff spread

pastel Easter eggs, optional

edible flowers, optional

Method: 

Preheat oven to 170 degrees Celsius and line two 20 cm round springform baking tins with baking paper. 

In a large bowl whisk together the sugar, oil, date syrup, honey, eggs and vanilla.

Then add the flour, baking powder and Hot Cross Bun Spice. Sift in the bicarb soda and whisk together until combined.

Then add the grated carrots to the cake mixture and mix to combine. 

Equally divide the batter between the two prepared tins and bake for about 35-40 minutes, or until each cake is springy to the touch and a skewer inserted in the centre comes out clean.

Leave the cakes the cool on a wire rack for about 30 minutes, then remove from the tin and leave to cool completely. 

To make the icing, beat the butter using a stand mixer and the whisk or paddle attachment for 1-2 minutes, or until it is pale and creamy (if your butter is still a bit cold, you will need to beat it a bit longer than this). Add in the icing sugar, and beat for another 1-2 minutes or until the icing is fluffy.

Add the Biscoff spread and beat until combined.

Place one of the cakes on a plate or cake stand, and spread half the buttercream over the top. Top with the second cake, and spread over the remaining buttercream. Decorate with pastel Easter eggs and edible flowers if you wish.

Serves about 8.

*I have used the Hot Cross Bun Spice from Gewurzhaus, as they kindly sent me some. This spice is a combination of cassia, coriander, ginger and clove. You can substitute with your own mixture of these spices or just add 1tsp cinnamon and 1tsp mixed spice.

Carrot Cake with Biscoff Buttercream
In Cakes & Slices, Holidays Tags carrot cake, carrot, biscoff spread, Easter, bicoff buttercream, Holiday Baking, cake
2 Comments
Jam Tarts

Quick Bakes for Snacking Emergencies

Kath March 17, 2021

I’m not sure if anyone else encounters snacking emergencies as much as I do, but I am always looking for quick ideas that mean I can bake, but also not wait ages to actually eat some of it. So much so I wrote a whole book on it, but I think you all know about that already*!

I always end up coming back to baking myself, as I love it and no matter how tired or unwell I am or how busy, homemade bakes are ALWAYS better than store bought. I am perpetually disappointed by the things I buy out (a few pastries and breads notwithstanding, thank you Flour Shop 🧡🙏🏻), and am often frustrated by how unsatisfied store bought baked goods can be. 

I mean we all know that eating that much sugar and butter isn’t exactly good for us, so if I am going to eat it, it’s GOT to be worth it and I want to enjoy it and not feel like I just wasted my time/money/sugar intake with that random cookie or piece of cake that looked nice but did not follow through with flavour.

So with all that said, here are a few suggestions for quick, simple and tasty bakes that you can make even when you are low on time/energy/motivation/the desire to actually stand up for too long.

Get some bought shortcrust pastry (buy as good as you possibly can or the pastry may end up falling into my ‘store bought bakes aren’t good’ thing, see above) and make jam tarts (pictured above), which are as simple as cutting out rounds of pastry to fit whatever size cupcake type tray you have, fill with jam and bake at 180 degrees Celsius until the pastry has cooked (10-15 mins). Little free form jam tarts like hamantaschen are a great option if you find yourself without any cupcake type trays to use - just make sure you chill them before baking and yours will look better than mine did!

Messy but Easy Cheats Hamantaschen

Messy but Easy Cheats Hamantaschen

Some homemade pastry is easy to make if you feel like spending a little more time in the kitchen, and can be easily frozen too. Some recipes like this sour cream one work for sweet and savoury bakes and would make a lovely free form tart. The anchovy twists are made using the sour cream pastry, the original recipe is in Now For Something Sweet by Monday Morning Cooking Club (video of them making them and this pastry here!).

Anchovy Twists using easy Sour Cream Pastry from Now for Something Sweet by Monday Morning Cooking Club

Anchovy Twists using easy Sour Cream Pastry from Now for Something Sweet by Monday Morning Cooking Club

Super easy oil based biscuits are a great time saver that yield delicious results. One time I saw my friend make my Caramilk Cookies while her baby was napping, it was a mega nap (thank you nap Gods), but still, these cookies were prepared, out of the oven and partially eaten by the time said baby woke from her slumber and it would have still been fine if she ended up sleeping for less time (for the cookies I mean, not for her parents (obviously)). If you have my cookbook Everyday Bakes the Choc Chip Cookies on page 58 are also a super easy oil based biscuit. 

Caramilk Cookies

Caramilk Cookies

Easy cakes notably those that are oil based also make for a fuss free bake. Oil based cakes mean no waiting for butter to soften, or realising you have no butter so now need to go to the shops and this wanting to bake thing just got a whole lot less quick and easy. If you take a look at this Rose Cake, this is the kind of cake I am talking about. The I Love Lemon Cake in my eBook Cosy Winter Bakes also falls into this category, as does the Blood Orange Cake in my free eBook Seasonal Cakes and Bakes.  

Yoghurt, buttermilk, sour cream or creme fraiche can be used in this kind of recipe, and the size of the tin you use will determine the length of the cook time. So if you have time, bake in a 20cm round tin for 50 mins. If that sounds like too long for you, bake in a tray to make a slab/sheet cake and you’ll shave about 20 mins off the cook time. Same goes for cupcakes which would take about 20-25 minutes to bake!

Blood Orange Yoghurt Cake from my free eBook Seasonal Cakes and Bakes

Blood Orange Yoghurt Cake from my free eBook Seasonal Cakes and Bakes

* if you are new here, firstly Hi! It’s so lovely to have you. Secondly I wrote and self published a cookbook last year called ‘Everyday Bakes’ that contains recipes for bakes and a few snacks that won’t take up all your time but taste really good. Some of the recipes are a bit more involved than my suggestions above, but definitely still come under the ‘easy’ banner. There are still a few copies left, you can find out more and get yourself a copy here.

In From The Mailing List Tags Quick Bakes, Easy Baking, Jam Tarts, Cheats Hamantaschen, Monday Morning Cooking Club, Oil Based Cookies, Oil Based Cakes, Mixer Free Recipes
2 Comments
  • The Blog
  • Older
  • Newer

recipes

  • Biscuits/Cookies 40
  • Breads Etc. 9
  • Breakfast 7
  • Cakes & Slices 68
  • Confectionary 5
  • Drinks 6
  • Events 14
  • Food Photography Tips 3
  • From The Mailing List 24
  • Heirloom Recipes 12
  • Holidays 45
  • Ice Cream 9
  • Jams Preserves & Spreads 9
  • Muffins 4
  • Off the Shelf 52
  • Other Desserts 25
  • Savoury Dishes/Meals 15
  • Scones 4
  • Tarts & Pastry 9
  • Travel 13

Sign up to Friday Food Chat with Kath, a weekly newsletter for more food, baking, cookbook chat and more!

Sign Up Here!
instagram-unauth pinterest facebook url

Website Accessibility: To enable text to speech function on the blog, click the sound button to the right of each blog post.

All images & content are the property of Kathryn Vincent, unless stated otherwise. Please do not use without permission.

Kulinary Adventures of Kath

Food Photography, Recipes & Baking

instagram-unauth pinterest facebook url