Kulinary Adventures of Kath

Food Photography, Recipes & Baking
  • home
  • About
  • Work with Kath
  • Shop
  • Blog
    • The Blog
    • Recipe Archive
  • Newsletter
  • Contact
  • home
  • About
  • Work with Kath
  • Shop
    • The Blog
    • Recipe Archive
  • Newsletter
  • Contact
Raspberry Pistachio Rose Cake (23 of 25).jpg

The Blog

Recipes and Food Photography by Kath Vincent.

  • The Blog
  • Recipe Archive
  • All
  • Biscuits/Cookies
  • Breads Etc.
  • Breakfast
  • Cakes & Slices
  • Confectionary
  • Drinks
  • Events
  • Food Photography Tips
  • From The Mailing List
  • Heirloom Recipes
  • Holidays
  • Ice Cream
  • Jams Preserves & Spreads
  • Muffins
  • Off the Shelf
  • Other Desserts
  • Savoury Dishes/Meals
  • Scones
  • Tarts & Pastry
  • Travel
Rose & Vanilla Bean Ice Cream

Rose & Vanilla Bean Ice Cream

Rose & Vanilla Bean Ice Creams (Egg Free)

Kath July 17, 2018

This is one of those super Summery recipes that I just can’t get enough of. Having said that, yes I know I am posting this while we are in the middle of Winter here in Australia, and feeling particularly cold if I do say so myself. 

I first made these late last year, when we were at the beginning of what felt like one of the hottest and longest Summers ever. I was inspired by a milkshake I used to order at one of my favourite city haunts, The Tea Salon. Rose and vanilla is a winning combination for me, and in the Summer months it was always nice to have a good alternative to a hot tea. I met up with friends there often, it really became our go to place. 

Located in the Sydney City Westfield it was easy to get to and ticked the boxes in terms of the menu, and the pretty pink decor didn’t hurt either! The Tea Salon closed down a few months ago, much to my friends and my dismay. It felt like the end of an era, and I’m not quite sure what will replace our regular city haunt yet. 

View fullsize Rose & Vanilla Bean Milkshake at The Tea Salon
View fullsize Scone at The Tea Salon

Until we find somewhere just as good, I will have to be content with this recipe being the legacy of our many catch ups over the years at The Tea Salon. And while now doesn’t feel like the opportune time to be posting a recipe for ice cream for most of us here in Australia, it is definitely the perfect time for everyone in the Northern Hemisphere who seem to be enjoying endless Summer days. 

Not being a warm weather person, I am certainly not jealous of the weather everyone up there is having. I am however loving all the beautiful Instagram posts with all the Summer blooms, beautiful fashions, and fun outdoor activities. Summer in the UK in particular, through the lens of Instagram, looks utterly delightful compared to the hot and humid, sometimes almost 40 degrees days we can have here in Sydney. 

I can definitely see myself enjoying some of this ice cream again later in the year when the weather warms up, and maybe reminisce over some of the good times this recipe was inspired by. But for now I’ll just leave this recipe here till then, and continue to enjoy my warming cups of tea, soups and multitudes of blankets. 

Rose & Vanilla Bean Ice Creams

Rose & Vanilla Bean Ice Creams

Rose & Vanilla Bean Ice Creams

Rose & Vanilla Bean Ice Creams

Rose & Vanilla Bean Ice Creams (Egg Free)

Ingredients: 

165ml milk 

6 tbsp white sugar

250ml pouring cream 

1 vanilla bean seeds scraped or 1 tsp vanilla bean paste

2 tbsp rosewater (or to taste) 

Dried rose petals chopped, optional


Method: 

Whisk the milk and sugar together until the sugar has dissolved and the milk has become frothy. Then add the cream, the vanilla, and rosewater. Whisk until combined and the mixture has thickened a little. 

Transfer mixture into the bowl of an ice cream machine, and process according to machine instructions. I find the churning process takes about 10 minutes (weather depending), and is ready once the ice cream has thickened, slightly frozen and is clinging to the paddle of the ice cream machine. 

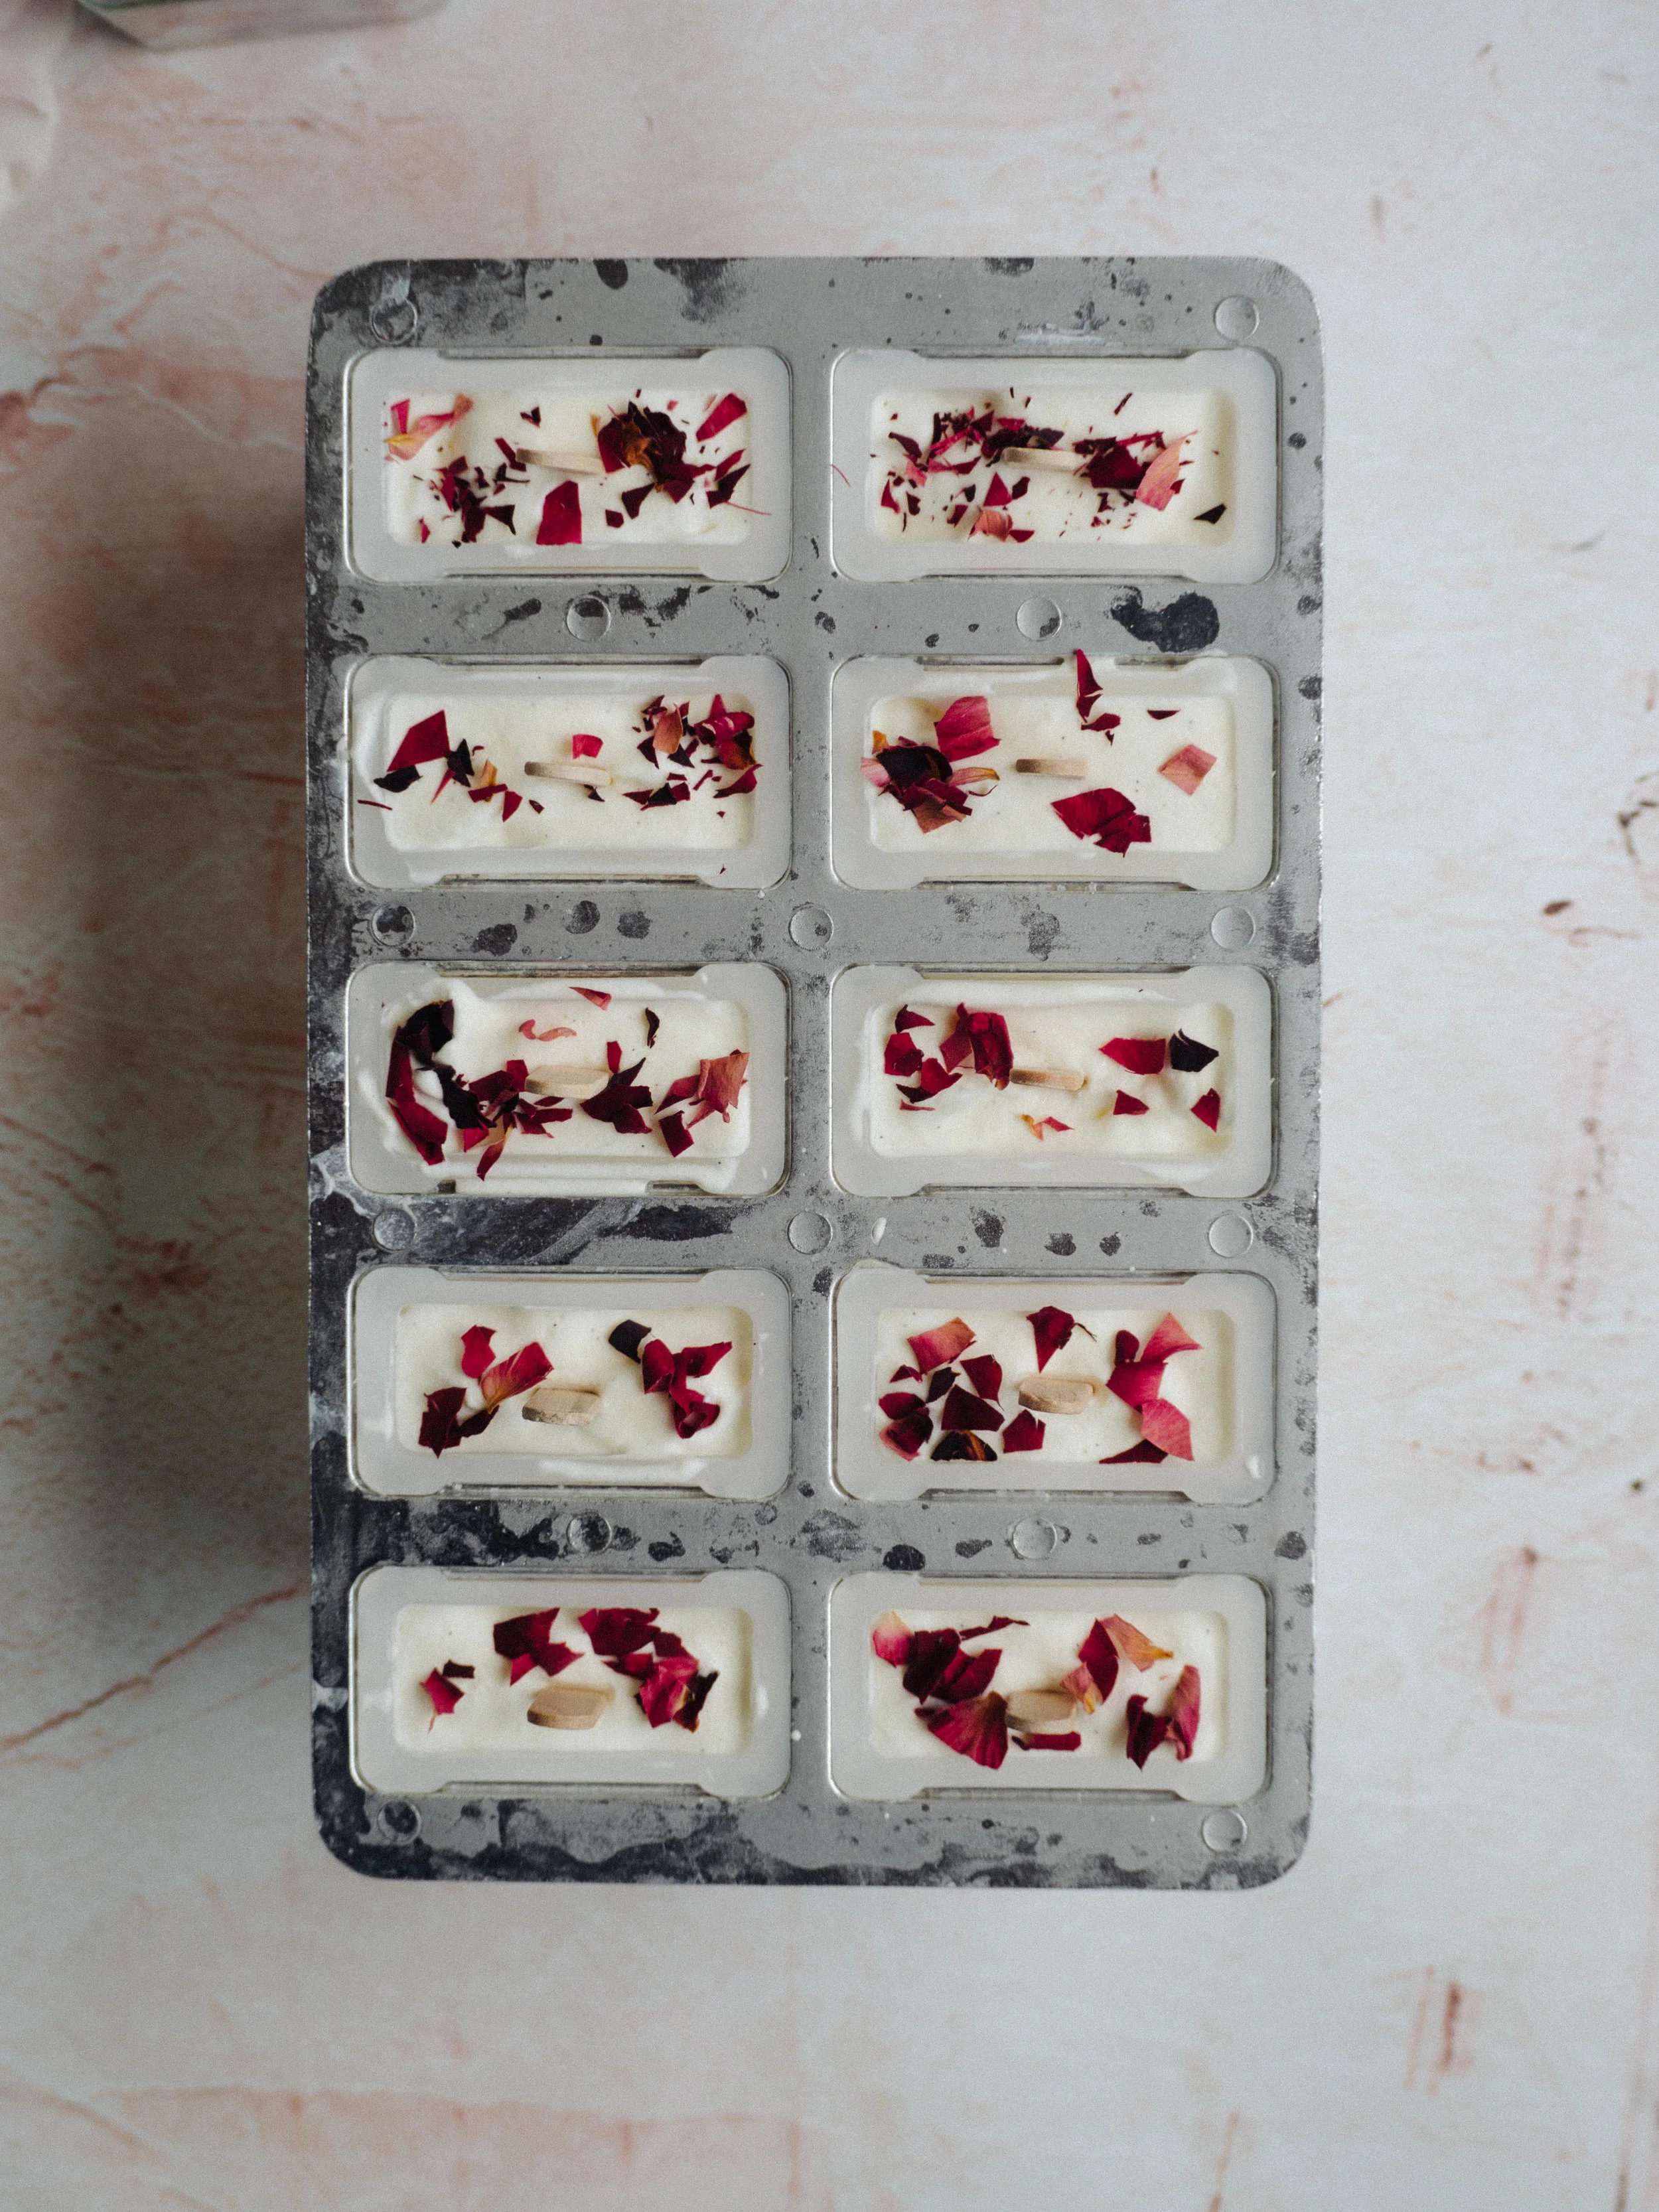
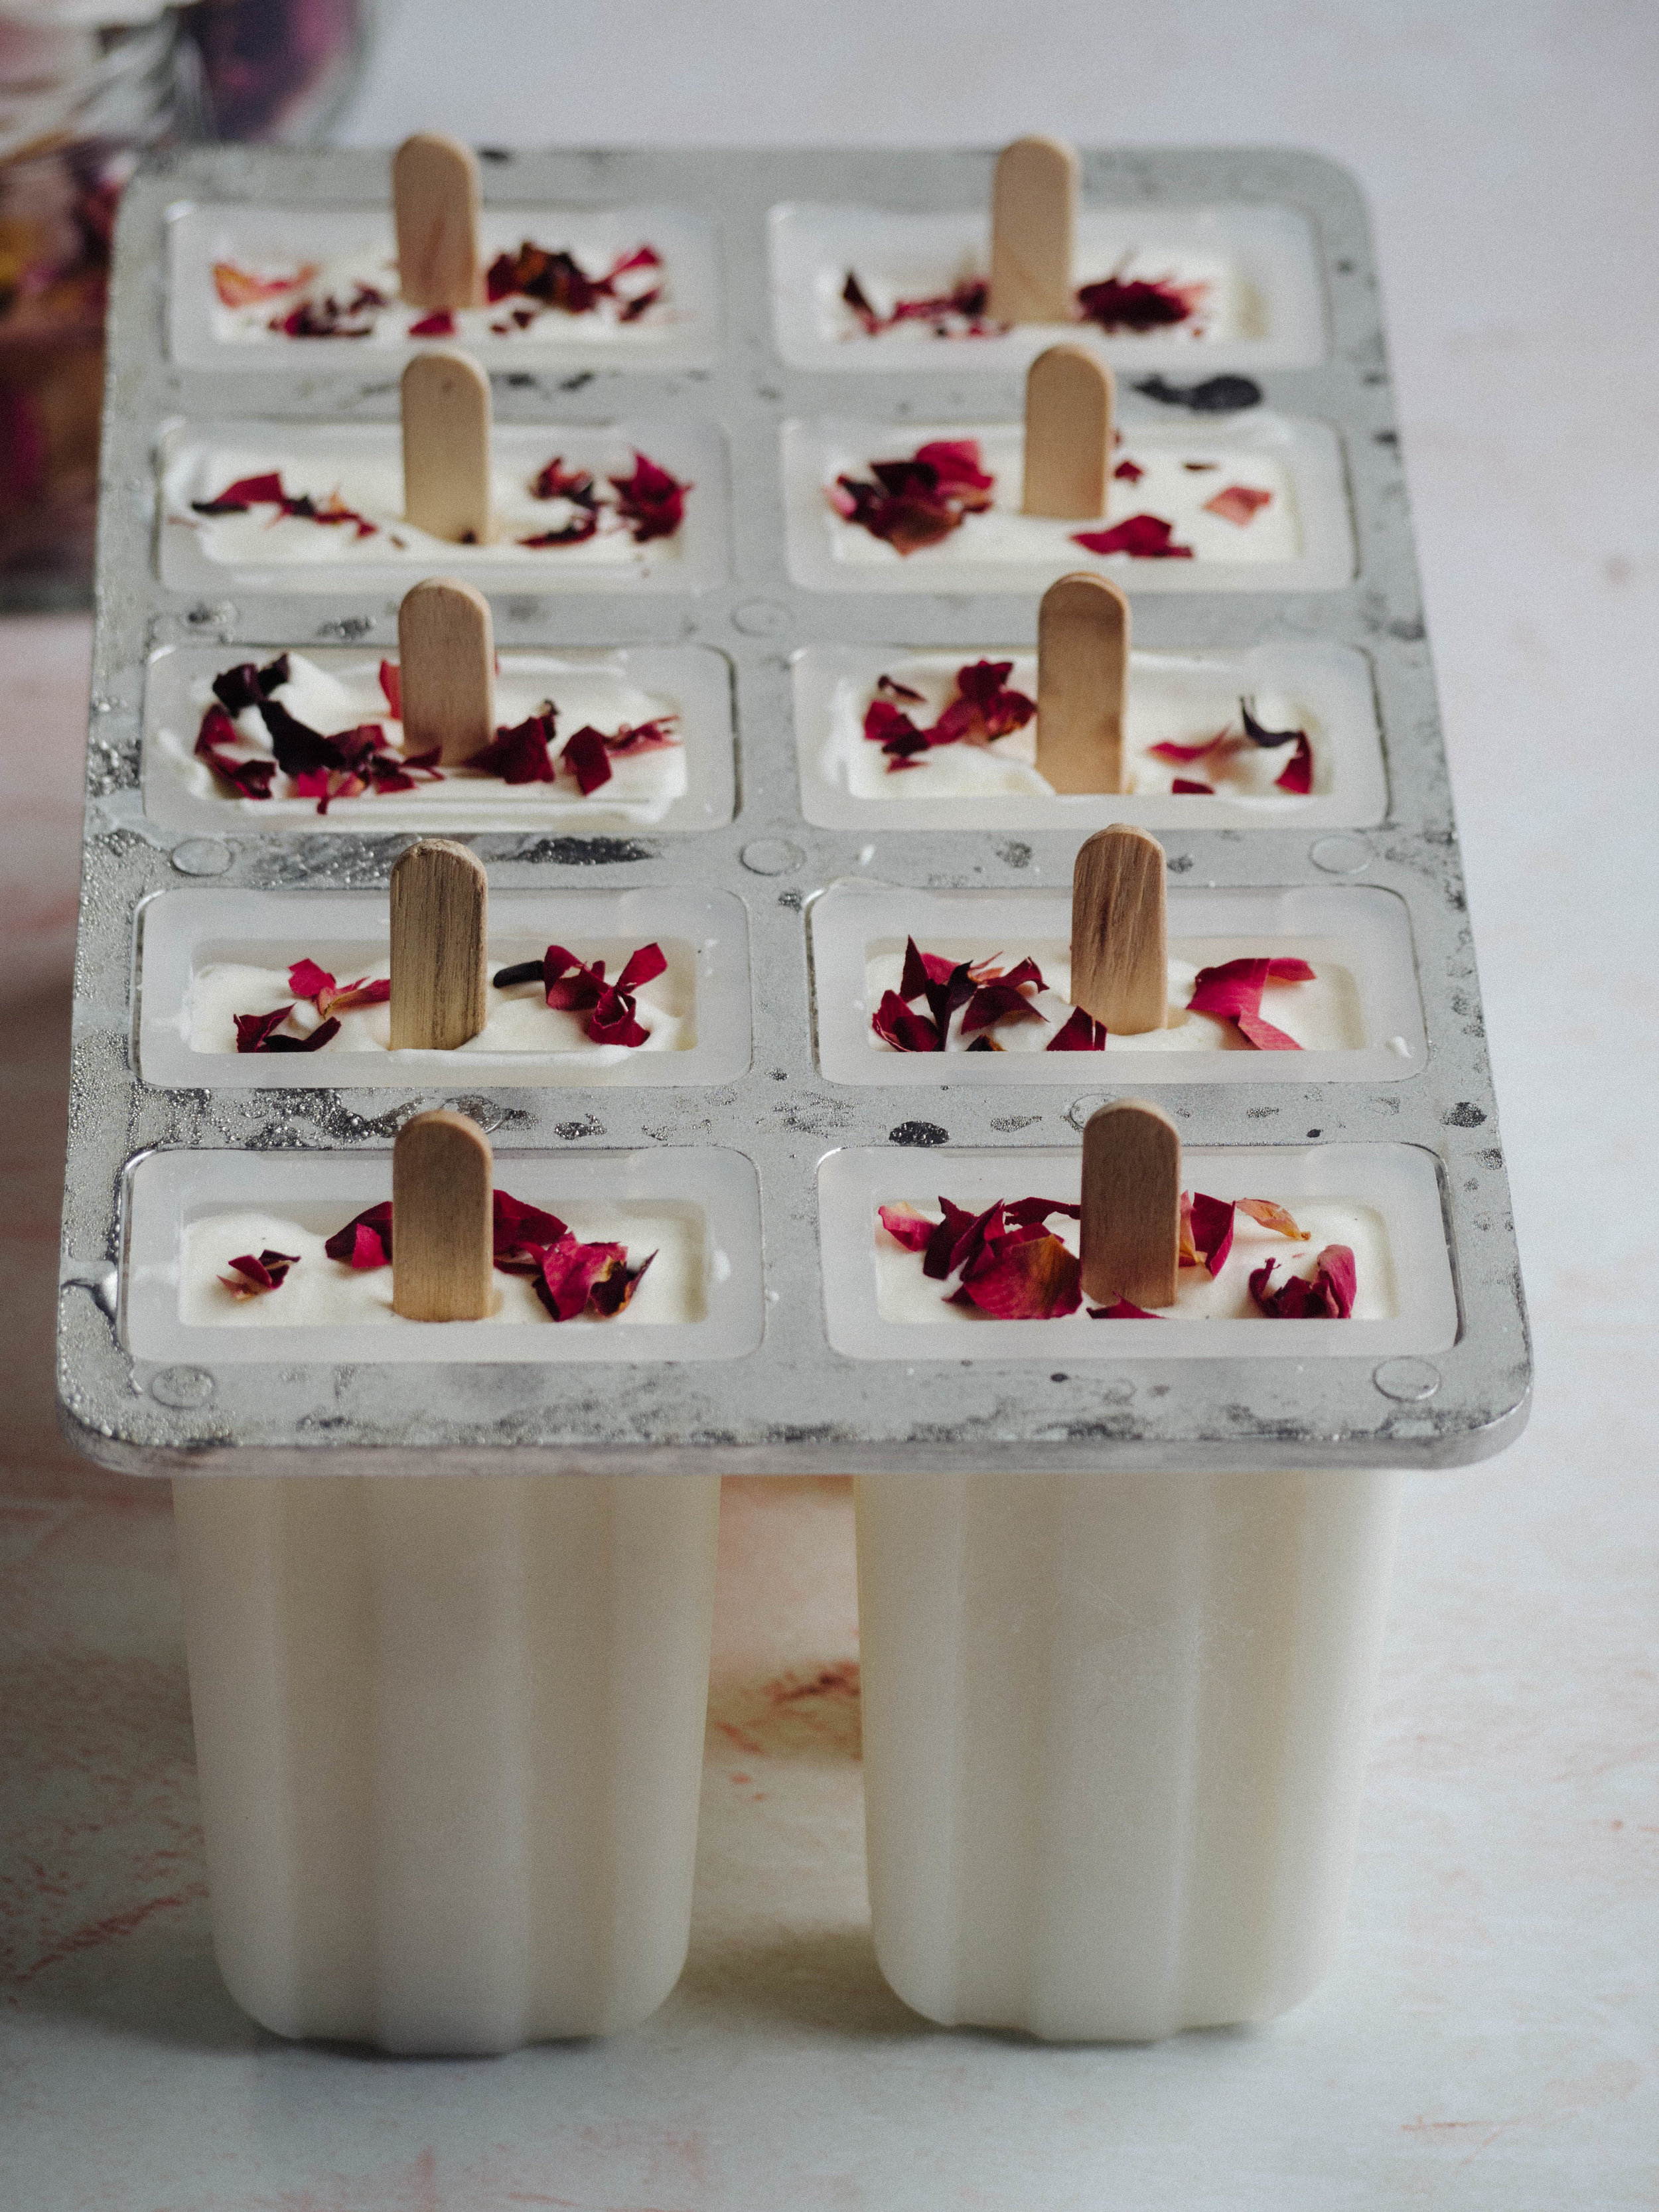
Once ready, transfer to a large piping bag and pipe into ice cream mould. Sprinkle some of the dried rose petals over the top, insert food safe wooden sticks into the centre of each one and place in the freezer. To keep the sticks in place I often cover the whole mould with a couple of layers of plastic wrap. Alternatively, transfer ice cream to a freezer safe container (at least 1L capacity) and freeze overnight. 

If making the individual ice creams, carefully remove them from the mould when ready to eat, the ice cream will melt quite quickly in the warmer Summer months! I found it easier to remove all of them from the mould once they were properly frozen and individually wrap them in plastic wrap to store in the freezer. 

Makes 10 individual ice creams or about 1L of ice cream. 

Rose & Vanilla Bean Ice Creams

Rose & Vanilla Bean Ice Creams

Reference: ‘Lomelino’s Ice Cream’ by Linda Lomelino (Roost Books, 2015), p.13

Rose & Vanilla Bean Ice Creams

Rose & Vanilla Bean Ice Creams

Dried Rose Petals

Dried Rose Petals

For more recipes showcasing the best of rose, check out my eBook Baking with Rose by clicking the link below!

get your ebook!
In Other Desserts, Ice Cream Tags Ice Cream, Rose, Rose Petals, Vanilla, The Tea Salon
Comment
Citrus Yoghurt Cake

Citrus Yoghurt Cake

Citrus Yoghurt Cake

Kath July 16, 2018

I call this a citrus yoghurt cake, rather than specifying any particular citrus, as I think almost any variety of citrus would be great in this cake. I have flitted between classic lemon and then bergamot, and both work really well. If you have read a little of my blog or follow me on Instagram, you won’t be surprised to hear the bergamot version is my favourite! Bergamot anything would be my favourite, but thats not to say the classic combination of lemon and yoghurt would be playing second best. Not at all. A mixture of lemon and lime would also be nice, and even going for a blood orange when they are in season would be great. 

I will be making this cake a few more times this Winter, as it is my favourite thing to bake with citrus and we have an over supply here at home. We got at least 30 or 40 lemonades from our tree, 4 very large bergamot and I also bought 10 bergamot online from Mountain Yuzu - as the name suggests their main crop is yuzu, however they are also the first people I have come across that grow and sell fresh bergamot in Australia (much to my delight!).

The reason I really like this cake, is that the combination of the oil and yoghurt gives the cake a moist crumb that really retains the juicy-ness of the fruit. Whichever citrus you choose to use will be the hero here, and nothing else but a cup of tea is necessary to enjoy a slice (or two!). 

View fullsize Homegrown Bergamots
View fullsize Homegrown Bergamot
Bergamots from Mountain Yuzu

Bergamots from Mountain Yuzu

Bergamots

Bergamots

Citrus Yoghurt Cake

Citrus Yoghurt Cake

Citrus Yoghurt Cake

Ingredients: 

210g plain flour (The Healthy Baker Low FODMAP Flour works well here too)

1/2 tsp baking powder

1/2 tsp baking soda

300g caster sugar

250g plain Greek style yoghurt

125ml vegetable oil 

2 eggs 

2 tbsp fresh lemon or bergamot juice

zest of two medium lemons or bergamots 


For the Icing: 

210g icing sugar (confectioners)

3 tbsp fresh lemon or bergamot juice 


Method: 

Pre-heat oven to 170 degrees Celsius, and grease and line the base of a 23cm round cake pan. 

In a medium bowl, whisk together the flour, baking powder and baking soda. 

In a large bowl, whisk together the caster sugar, yoghurt, oil, eggs, citrus juice and zest. Whisk until combined, then add the flour mixture a third at a time whisking until just incorporated after each addition. 

Pour the batter into the prepared cake tin and bake for 30 minutes or until golden in colour and a skewer inserted in the centre comes out clean. If not cooked after 30 minutes, continue to check the cake at 5 minute intervals until it is done. 

Allow the cake to cool in its tin for a few minutes, before transferring to a wire rack to cool completely. Don’t worry if the middle of the cake has dipped a little, it will still be perfectly cooked inside. 

To make the icing, whisk the icing sugar and 2 tbsp of the citrus juice together, adding more juice to get the right consistency if needed. You want the icing to be smooth, but not overly runny or it won’t cover the cake evenly. Spread the icing over the cake, allowing it to drip down the sides a little. 

Citrus Yoghurt Cake

Citrus Yoghurt Cake

Reference: https://www.davidlebovitz.com/lemon-yogurt-cake-recipe-apricot-cherry-compote/

Citrus Yoghurt Cake

Citrus Yoghurt Cake

In Cakes & Slices Tags Citrus, Bergamot, Lemon, Low FODMAP, Mountain Yuzu, Yoghurt
2 Comments
Six Strand Challah

Monday Morning Cooking Club @ Cornersmith + Challah with Egg and Onion

Kath June 25, 2018

Earlier this month I went to a cooking class at the Cornersmith Picklery with the Monday Morning Cooking Club (MMCC). The class was all about Jewish Comfort Food, and the day the class was held was so cold it was a perfect day to be cooking and eating warming comfort food. We all sat and watched three of the lovely MMCC ladies demonstrate each dish, then we got to sample them. 

First we ate egg & onion dip with challah, a staple at the Friday night table. I have been wanting to make challah myself for years now and just never got round to it, but with the amount of it I eat I really should have had a go! The egg dip was super simple, boiled eggs grated and mixed with onions cooked until they were soft and golden with little salt and pepper. The combination doesn’t sound much, and this is probably why I’ve never tried making it before, but it was heaven. I knew I would be making both these things, very very soon. 

View fullsize Braiding the challah using the 6 strand method
View fullsize Challah with egg and onion
View fullsize Serving the challah with egg and onion
View fullsize Matzo Ball Soup

We then had matzo ball soup, a traditional dish of Passover. I made some of my own over the Passover/Easter long weekend this year, and it was nice, but the MMCC’s one was so much better. I had used a recipe in Ottolenghi’s book Jerusalem, because it made a smaller quantity and used more herbs which I hoped would add more flavour to the soup. But I will definitely be using the MMCC’s recipe next time, as mine didn’t have nearly as much flavour as I had hoped. 

We then ate brisket with a salad. Now, I haven’t eaten red meat in at least 20 years - I have never been able to stand the taste and the texture. But I did try the brisket and I didn’t mind it. The sweetness of the honey and caramelised onions was really nice, and sliced really thinly I could imagine myself eating it on a really good reuben sandwich.  

Then came the Blintzes, a dish often served during the festival of Shavout. Consisting of individual crepes filled with a cream cheese filling and then baked with more cream, it was a decadent dessert and definitely worthy of the title comfort food. 

View fullsize Basting the Brisket
View fullsize Brisket served with salad
View fullsize Blintzes
View fullsize Blintzes served with sour cream and strawberries

As the MMCC ladies were making each dish, we heard tips and tricks they had for each recipe, sometimes learnt from the person whose recipe it had been originally or things they had worked out themselves after making it many times. The stories behind each dish were fascinating to me, as I love the history of food and the preservation of heirloom recipes. Which is of course in part why I love the MMCC so much. The stories contained in each of their books are just as interesting to me as discovering the recipes held within each book. Then the recipes themselves have opened up a whole new world of cooking and flavours for me and my family, that we now can’t live without. 

Homemade Challah
Egg & Onion

Egg & Onion

To that end, and after being inspired by this wonderful class at Cornersmith, I decided the following weekend that it was finally time to make my own challah and serve it with egg and onion. Since I was cooking only for me, I made a much smaller quantity of the egg and onion, and once the challah’s had cooled I sliced them up and placed each loaf in a zip lock bag and froze them. I found they defrosted really well, and of course toasted really well too. The egg and onion also keeps well in the fridge if stored correctly. 

Here are links for the MMCC’s Challah recipe and the egg and onion, but I have also included my paired down version of the egg and onion recipe here - something I have since gone on to make 3 times in about 2 weeks! For this recipe, the idea is to cater for one egg per person. 

Six Strand Challah

Six Strand Challah

Six Strand Challah

Six Strand Challah

Egg & Onion

Ingredients: 

x3 eggs, at room temperature

1/2 small/medium brown onion 

2 tbsp vegetable oil 

salt

ground pepper


Method: 

Peel and dice the onion, and heat the oil in a small fry pan. Add the onion and cook on a medium heat for about 10 minutes, or until the onion is nice and soft and golden in colour. 

Meanwhile, place the eggs in a medium saucepan and cover with cold tap water. Bring to the boil on a high heat, and continue to cook for a further 8 minutes once the water comes to a boil. The eggs should not be boiled for longer than 8 minutes. Once the eggs have cooked for 8 minutes transfer to a bowl of cold water. 

Once the onions have finished cooking, take them off the heat and set aside. 

When the eggs are cool enough to handle peel away the shells. Using a grater sitting in a wide but shallow bowl, grate the eggs into the bowl using the coarse side of the grater. Add the cooked onions to the eggs, allowing most of the oil to remain in the pan. Add a pinch of salt and ground pepper, and mix with a wooden spoon until combined and the salt has dissolved. 

The mixture should lightly hold together if you try to roll it into a ball with your fingers, so if it is too dry add a little more of the oil from cooking the onions. 

Serve at room temperature with slices of challah. 

If not serving immediately, cover the egg and onion with plastic wrap ensuring the wrap is touching the mixture and directly covering it, not just covering the bowl. 

Left overs can be kept covered in the same way in the fridge, and will last a few days. 

Challah with Egg and Onion

Challah with Egg and Onion

Challah with Egg and Onion

Challah with Egg and Onion

These recipes can also be found in ‘Monday Morning Cooking Club - The Food, The Stories, The Sisterhood’ by Merelyn Frank Chalmers, Natanya Eskin, Lauren Fink, Lisa Goldberg, Paula Horwitz and Jacqui Israel (HarperCollins, 2013), pp.78 & 263.

Challah with Egg and Onion

Challah with Egg and Onion

In Breads Etc., Events, Savoury Dishes/Meals Tags Monday Morning Cooking Club, Cornersmith Picklery, challah, Six Strand Challah, Egg and Onion, Jewish Comfort Food
Comment
Quince Scones

Quince Scones

My Open Kitchen Gathering 2018 + Quince Scones

Kath June 18, 2018

Last month I attended the first ever My Open Kitchen Gathering in Orange NSW which was hosted and organised by Sophie Hansen of the blog Local is Lovely. The My Open Kitchen project stemmed from Sophie’s Rural Woman of the Year win in 2016 and encompasses an e-course, podcast, workshops and now this Gathering. All are focused on the food and farming community and learning to bring social media into the fold to make better connections. 

The My Open Kitchen Gathering brought together ‘IRL’ all the things that are taught in the e-course and that are spoken of on the podcast, with a series of panel discussions from some super interesting women in the food/photography/social media space. The keynote speaker for the day was Sara Taster of the blog Me & Orla. Coming all the way from the UK to speak, having Sara there was like an amazing private live episode of her podcast Hashtag Authentic. Sara spoke eloquently on her Instagram and small business journey, and about how we all have a unique and unrepeatable opportunity in life as each of us are unique and unrepeatable. 

My Open Kitchen Gathering 2018, held at the Old Convent in Borenore NSW.

My Open Kitchen Gathering 2018, held at the Old Convent in Borenore NSW.

View fullsize The Old Convent
View fullsize Sara Tasker speaking at the My Open Kitchen Gathering 2018
View fullsize My Open Kitchen Gathering 2018
My Open Kitchen Gathering 2018 - The final panel discussion of the day

My Open Kitchen Gathering 2018 - The final panel discussion of the day

My Open Kitchen Gathering 2018

The day also brought together lots of ‘Insta-friends’ and My Open Kitchen e-course friends, and it was so great to finally meet these lovely ladies in person and catch up with those I’ve met at previous workshops. As My Open Kitchen has a heavy focus on farmers and producers, there was a little marketplace where attendees could sell some of their produce/wares during the lunch break on the day. I was particularly interested in the dried quinces sold by Sue of Singing Magpie Produce. After being in the same e-course group as Sue late last year, I had heard a little about her products and was very intrigued by the quinces. I managed to sample a little of the quince - which was absolutely amazing, but missed out on buying a packet. A week or so after the Gathering I ordered some online and eagerly awaited their arrival. 

When my package from Singing Magpie Produce arrived it made my week. I was having a particularly bad week having been bed ridden after complications from a procedure in hospital I had the week after the Gathering. The quinces are a deep burgundy colour and have a slightly sticky texture, not all shrivelled up and bone dry like dried fruits from the supermarket shelf. I kept them in my room for a few days as an emergency snack until I was feeling better and was allowed to move about again. I then began thinking about how I could bake with them. The below recipe for quince scones is what I came up with. I figured if dried dates and sultanas can go in scones, then why not these?

Quince Scones

Quince Scones

Quince Scones

Quince Scones

Ingredients: 

450g self-raising flour

2 tsp baking powder

3 tbsp icing sugar

1/2 tsp cinnamon

200ml cream

125ml sparkling water

2 tbsp lemon juice

80g dried quince, chopped into small pieces

1 egg, lightly beaten  

unsalted butter, to serve


Method: 

Preheat oven to 200 degrees Celsius. Line a large baking tray with baking paper, and dust a little flour over the top. 

Place the flour, icing sugar and cinnamon in a large bowl, and sift over the baking powder. Using a whisk mix the dry ingredients together.

In a jug, quickly and briefly whisk the cream, water and lemon juice together, then add to the dry ingredients. Add the chopped dried quince and mix together with a flat bladed knife, then turn out on to a lightly floured bench. Lightly knead the dough to bring it together, then press to dough out until it is 2-3cm thick. 

Using a 4.5/5cm cutter cut out rounds from the dough, dusting the cutter with flour if the dough sticks too much. Place the rounds on the prepared tray, leaving no gaps in between each round. Bring the dough back together and continue cutting until it is all used up. 

Brush the tops of the cut scones with the beaten egg ensuring only the tops are covered and it doesn’t drip down the sides. Bake for 15-20 minutes, until golden and puffed. Turn the tray around in the oven about halfway through so they cook and colour more evenly. 

Serve warm with the butter. 

Makes 18-20. 

Quince Scones

Reference: ‘Bill’s Basics’ by Bill Granger (HarperCollins Publishers, 2010), p.50.

Quince Scones
In Events, Scones Tags Quince, Dried Quince, My Open Kitchen, My Open Kitchen Gathering 2018, Singing Magpie Produce, Scones, Orange NSW
Comment
Low FODMAP Easter Spiced Brioche Scrolls

Low FODMAP Easter Spiced Brioche Scrolls

Easter Spiced Brioche Scrolls (Low FODMAP)

Kath March 30, 2018

Happy Easter! 

I hope everyone is enjoying celebrating Easter/Passover/the long weekend! It’s about 30 degrees Celsius here in Sydney, so it kinda seems odd that it’s Easter and technically meant to be Autumn. I am very much looking forward to the weather cooling down and really getting back into the kitchen again. Summer was hot here this year, and it definitely kept me away from the kitchen after the necessities of cooking for Christmas were over. Slowly I am finding moments in the kitchen, mostly to prepare for the work week, but also gradually getting back into the habit of baking and cooking purely for the joy if it. 

This long weekend I plan to make my annual lot of hot cross buns and have my first foray into making matzo ball soup. I’m thinking these are the best dishes of the two religious holidays celebrated this weekend so it is only fitting to give it them both a go. I have tried Matzo ball soup only once before, so I have been looking through my cookbooks and comparing the recipes from the likes of Yotam Ottolenghi and the Monday Morning Cooking Club to get all the tips and advice possible! Here’s hoping it goes well!

But now on to the scrolls! 

Low FODMAP Easter Spiced Hot Cross Buns

Low FODMAP Easter Spiced Hot Cross Buns

A couple of weeks ago I was generously sent some of The Healthy Baker’s Low FODMAP Plain Flour, so I decided that I would use that in my Easter baking and see how it goes. 

Since receiving this flour I have done a little research on the low FODMAP diet, and suffice to say the diet cuts out quite a few things across all food groups. 

The low FODMAP diet was developed by Monash University and aims to provide relief for those suffering IBS. Luckily the diet isn’t intended as a long term thing, rather a 6 or so week program to determine what high FODMAP foods someone may be reacting to. They  can then reintroduce other high FODMAP foods to their diet and continue to minimise those that still act as triggers. 

For these scrolls I have used a tried and tested brioche recipe so I could compare how they turned out using this new flour. And honestly, there is no comparison. The texture of the brioche is exactly the same as using regular plain flour. Which is great as it means everyone can enjoy all sorts of homemade baked goods without compromising on the quality of their bakes and not having to feel unwell after. I have tried to make these as hot cross bun inspired as possible by adding the same types of spices as I would to my hot cross buns. You can however use whatever combination you like, or in keeping with these being low FODMAP and for Easter, use dark chocolate instead. 

To make these scrolls Low FODMAP not only can you use The Healthy Baker’s flour but also substitute dairy milk for almond. I was also going to add dried fruit to the dough to make the scrolls even more like hot cross buns, but as dried fruit are high FODMAP I have left them out this time - so I guess these brioche scrolls can be like a better version of a fruitless hot cross bun for Easter! 

To get an idea about what other foods are low or high FODMAP check out the Monash University website which as some really good resources. 

Easter Spiced Brioche Scrolls using The Healthy Baker's Low FODMAP Plain Flour

Easter Spiced Brioche Scrolls using The Healthy Baker's Low FODMAP Plain Flour

Ingredients for the Dough: 

250ml milk (use lactose free for Low FODMAP)

10g dried yeast

75g caster sugar

2 eggs, beaten

485g Healthy Baker Low FODMAP Plain Flour, plus extra for dusting

75g unsalted butter, cubed and softened, plus extra for greasing


Ingredients for the Filling: 

85g unsalted butter, softened

120g panela sugar

1tsp ground cinnamon

1tsp mixed spice

1/2tsp ground ginger 

1/4tsp ground cardamom 

Pearl sugar*, optional 


Method: 

In a small saucepan warm the milk over low heat until lukewarm. Add the yeast, sugar and eggs and stir to combine. 

In the bowl of a stand mixer fitted with a dough hook, add the flour then the milk mixture and mix on a low speed until the ingredients are starting to combine and a dough is beginning to form. Increase the speed to medium-high for 5 minutes. Add the butter and mix on medium speed until it has been incorporated into the dough, and the dough is smooth and elastic. 

Use some butter to lightly grease a large bowl then place the dough inside. Cover with plastic wrap and leave to rise in a warm place for about 40 minutes until the dough has doubled in size. 

While the dough is rising prepare the spiced sugar for the filling by combining the panela sugar, cinnamon, mixed spice, ginger and cardamom in a small bowl. 

Once the dough has doubled in size, lightly flour your work surface and place the dough on top. Gently roll the dough into a rectangle (approx. 25 x 48 cm) allowing it to remain about 1 cm thick. 

Spread the softened butter over the dough then sprinkle over the spiced sugar mix. Roll the dough from the long edge to form a log, then cut into about 12 pieces. Line a large baking sheet with baking paper and place the cut scrolls on the sheet in rows leaving room in between each so they can rise. Loosely cover with plastic wrap and leave to rise again for about 30 minutes until the scrolls have doubled in size. 

While the scrolls are rising, pre-heat oven to 180 degrees Celsius. 

Once the scrolls have doubled in size, sprinkle with pearl sugar if you wish, and bake for 15-20 minutes or until they are golden brown and sound hollow when tapped. 

Serve warm and if there are any leftovers freeze them in zip lock bags to enjoy later. 


*Pearl sugar (or nib sugar) does not melt at high temperatures and can be used to decorate baked goods. It can be found at specialty food shops. 

Easter Spiced Brioche Scrolls

Easter Spiced Brioche Scrolls

Reference: The Cook and Baker by Cherie Bevan and Tass Tauroa (Murdoch Books, 2015), p.124. 

Low FODMAP Baking

Thank you to The Healthy Baker for providing me with some of their fantastic Low FODMAP Plain Flour!

In Breads Etc., Holidays Tags Brioche, Low FODMAP, The Healthy Baker, Sponsored Posts, Easter, Passover, Bread Making
Comment
Homemade Chunky Tomato Sauce

Homemade Chunky Tomato Sauce

Homemade Chunky Tomato Sauce + 6 Tips for Work Week Meal Prep

Kath December 1, 2017

For me, the most exciting part of work days, can be food. If I have something for lunch that I’m not looking forward to, it can make a bad day seem so much worse. I really like to be prepared and make things for work week lunches that I will enjoy eating and not make me cave and go buy something I shouldn’t. 

This chunky tomato sauce is staple for work week lunch prep for me. I have been making it consistently for the past year, and I am still not sick of it. I love tomatoes, and I have found so many uses for this sauce I never tire of it. For a work week lunch I will pair it with pasta or quinoa, add some extra basil, parmesan cheese and maybe some prosciutto and I have a meal I really look forward to eating. I can prepare a few portions of this in advance, and have it ready in the fridge to take to work in the mornings. 

I have also found this sauce is great for:

  • Pizza bases, just spread a thin layer over the base and then add any toppings you fancy
  • Adding to scrambled eggs
  • Using as a dip
  • Adding to open toasted sandwiches and bruschetta
  • As a substitute for a relish with things like frittatas
  • And of course, using it as the best homemade pasta sauce you’ve ever had is really number one on the list. 

This recipe is a quicker adaptation to this one I posted quite a while ago. I needed it to be quicker as even though I like cooking, I don’t want to spend all my time preparing for the work week. I tend to use whatever tomatoes are cheapest to buy, like the ‘imperfect picks’ or the ones that are quite ripe and ready for a quick sale. Once the sauce is cooked I store it in large glass jars in the fridge (like the ones pictured in this post). 

Homemade Chunky Tomato Sauce

Homemade Chunky Tomato Sauce

And as I have had many questions over the year about bringing food to work and how to go about it, below are some of my tips. I have also included a list of other recipes (all of which can be found in the recipe archive) I utilise most weeks to ensure I am super prepared with lots of good food to enjoy. 

Tips for Work Week Meal Prep

6 Tips for Work Week Meal Prep

1. Be Prepared

Spend some time working out what meals you want to make and what you need for each. Write a shopping list and work out which shops you need to go to. Prepare what you can in advance (i.e. things that can be frozen).

2. Utilise Your Freezer

Lots of meals either partially prepared or fully cooked can be frozen into portions and defrosted as you need them. Find some freezer safe containers and label them with the contents and date prepared. 

3. Have Some Good Storage Jars & Containers

Along with some good freezer safe containers, get some good reusable containers or large jars to store pantry staples, and other condiments and sauces you could make from scratch. Also get a couple of small/medium containers to take your lunch to work in.

4. Cook What You Like to Eat

Start with recipes and meal ideas you actually want to eat. If not buying lunch everyday is a new thing for you, don’t bother planning and prepping meals that you think you ‘should’ eat but probably won’t when it comes down to it. Prepare food that will satisfy you, and that you will maybe even look forward to eating.

5. Make It Fun

Hate food shopping? Make it more interesting by going to a market and getting some fresh produce there. This can also double as an enjoyable morning out on the weekend. You are also then buying fresh and local produce, and getting in touch with the seasonality of food and who produces it. Alternatively you could be super organised and buy your food online and save time. 

6. Always Cater For Leftovers

This is especially important on the weekends when you might have time to cook a little more. Cater for 1-2 more people than you are actually serving, especially if it’s something that will freeze or keep well and you would like to eat again. Cooked meats can be used in sandwiches and salads, and left over roast vegetables can make great additions to frittatas.

Tips for Work Week Meal Prep
Homemade Chunky Tomato Sauce

Homemade Chunky Tomato Sauce

Homemade Chunky Tomato Sauce


1.5-2kg tomatoes

4 cloves garlic, crushed

50g baby capers

45g anchovies in oil*

olive oil

1 tbsp tomato paste

1 bunch basil, leaves only, roughly chopped


Method: 

Pre-heat oven to 190 degrees Celsius. Have two deep baking dishes ready, I use two enamel ones that are approx. 28 x 20cm. 

Slice up the tomatoes into 1cm slices and divide between the two pans. If using small or cherry tomatoes, cut some in half and pierce really small ones with a knife. 

Divide the garlic and capers between the two pans. Drain the anchovies over the pans, allowing the oil to drizzle over the tomatoes. Roughly chop the anchovies and add some to each pan. Drizzle more oil over each pan, about 1/2 tbsp for each. 

Toss the contents of each pan to combine, then place in the oven. Cook for about 1 hour, checking and moving the tomatoes around in the pan every 20 minutes. Cook time for cherry tomatoes will be less, so keep an eye on them if using. 

The sauce will be ready when the tomatoes have cooked down, softened and there is some liquid from the tomatoes still in the pan. 

Remove from the oven and transfer all the tomatoes into one of the pans. Stir in the tomato paste and basil. Use immediately or allow to cool in the pans and transfer to large glass jars to store in the fridge until needed. 

Keeps in the fridge for about 10 days. 

* Yes I know, you don't like anchovies! Leave them out if you wish, however cutting them finely will help them dissolve away into the sauce and give the sauce a gentle touch of saltiness. 

Homemade Chunky Tomato Sauce

Homemade Chunky Tomato Sauce

Homemade Chunky Tomato Sauce

Homemade Chunky Tomato Sauce

In Savoury Dishes/Meals Tags Tomato Sauce, Tomato, Work Week Meal Prep, Meal Prep, Homemade
Comment
  • The Blog
  • Older
  • Newer

recipes

  • Biscuits/Cookies 39
  • Breads Etc. 9
  • Breakfast 7
  • Cakes & Slices 67
  • Confectionary 5
  • Drinks 6
  • Events 14
  • Food Photography Tips 3
  • From The Mailing List 24
  • Heirloom Recipes 12
  • Holidays 44
  • Ice Cream 9
  • Jams Preserves & Spreads 9
  • Muffins 4
  • Off the Shelf 47
  • Other Desserts 25
  • Savoury Dishes/Meals 15
  • Scones 4
  • Tarts & Pastry 9
  • Travel 13

Sign up to Friday Food Chat with Kath, a weekly newsletter for more food, baking, cookbook chat and more!

Sign Up Here!
instagram-unauth pinterest facebook url

Website Accessibility: To enable text to speech function on the blog, click the sound button to the right of each blog post.

All images & content are the property of Kathryn Vincent, unless stated otherwise. Please do not use without permission.

Kulinary Adventures of Kath

Food Photography, Recipes & Baking

instagram-unauth pinterest facebook url