Kulinary Adventures of Kath

Food Photography, Recipes & Baking
  • home
  • About
  • Work with Kath
  • Shop
  • Blog
    • The Blog
    • Recipe Archive
  • Newsletter
  • Contact
  • home
  • About
  • Work with Kath
  • Shop
    • The Blog
    • Recipe Archive
  • Newsletter
  • Contact
Raspberry Pistachio Rose Cake (23 of 25).jpg

The Blog

Recipes and Food Photography by Kath Vincent.

  • The Blog
  • Recipe Archive
  • All
  • Biscuits/Cookies
  • Breads Etc.
  • Breakfast
  • Cakes & Slices
  • Confectionary
  • Drinks
  • Events
  • Food Photography Tips
  • From The Mailing List
  • Heirloom Recipes
  • Holidays
  • Ice Cream
  • Jams Preserves & Spreads
  • Muffins
  • Off the Shelf
  • Other Desserts
  • Savoury Dishes/Meals
  • Scones
  • Tarts & Pastry
  • Travel
Rose Petal and Pistachio Cake

Rose Petal and Pistachio Cake

Rose Petal and Pistachio Cake

Kath September 10, 2020

The idea for this cake came about as my lovely Instagram friend Lauren (@foldgently)had an idea for a week of floral inspired cakes to mark the beginning of Spring - check out #fgfloralweek on Instagram for more gorgeous floral cakes.

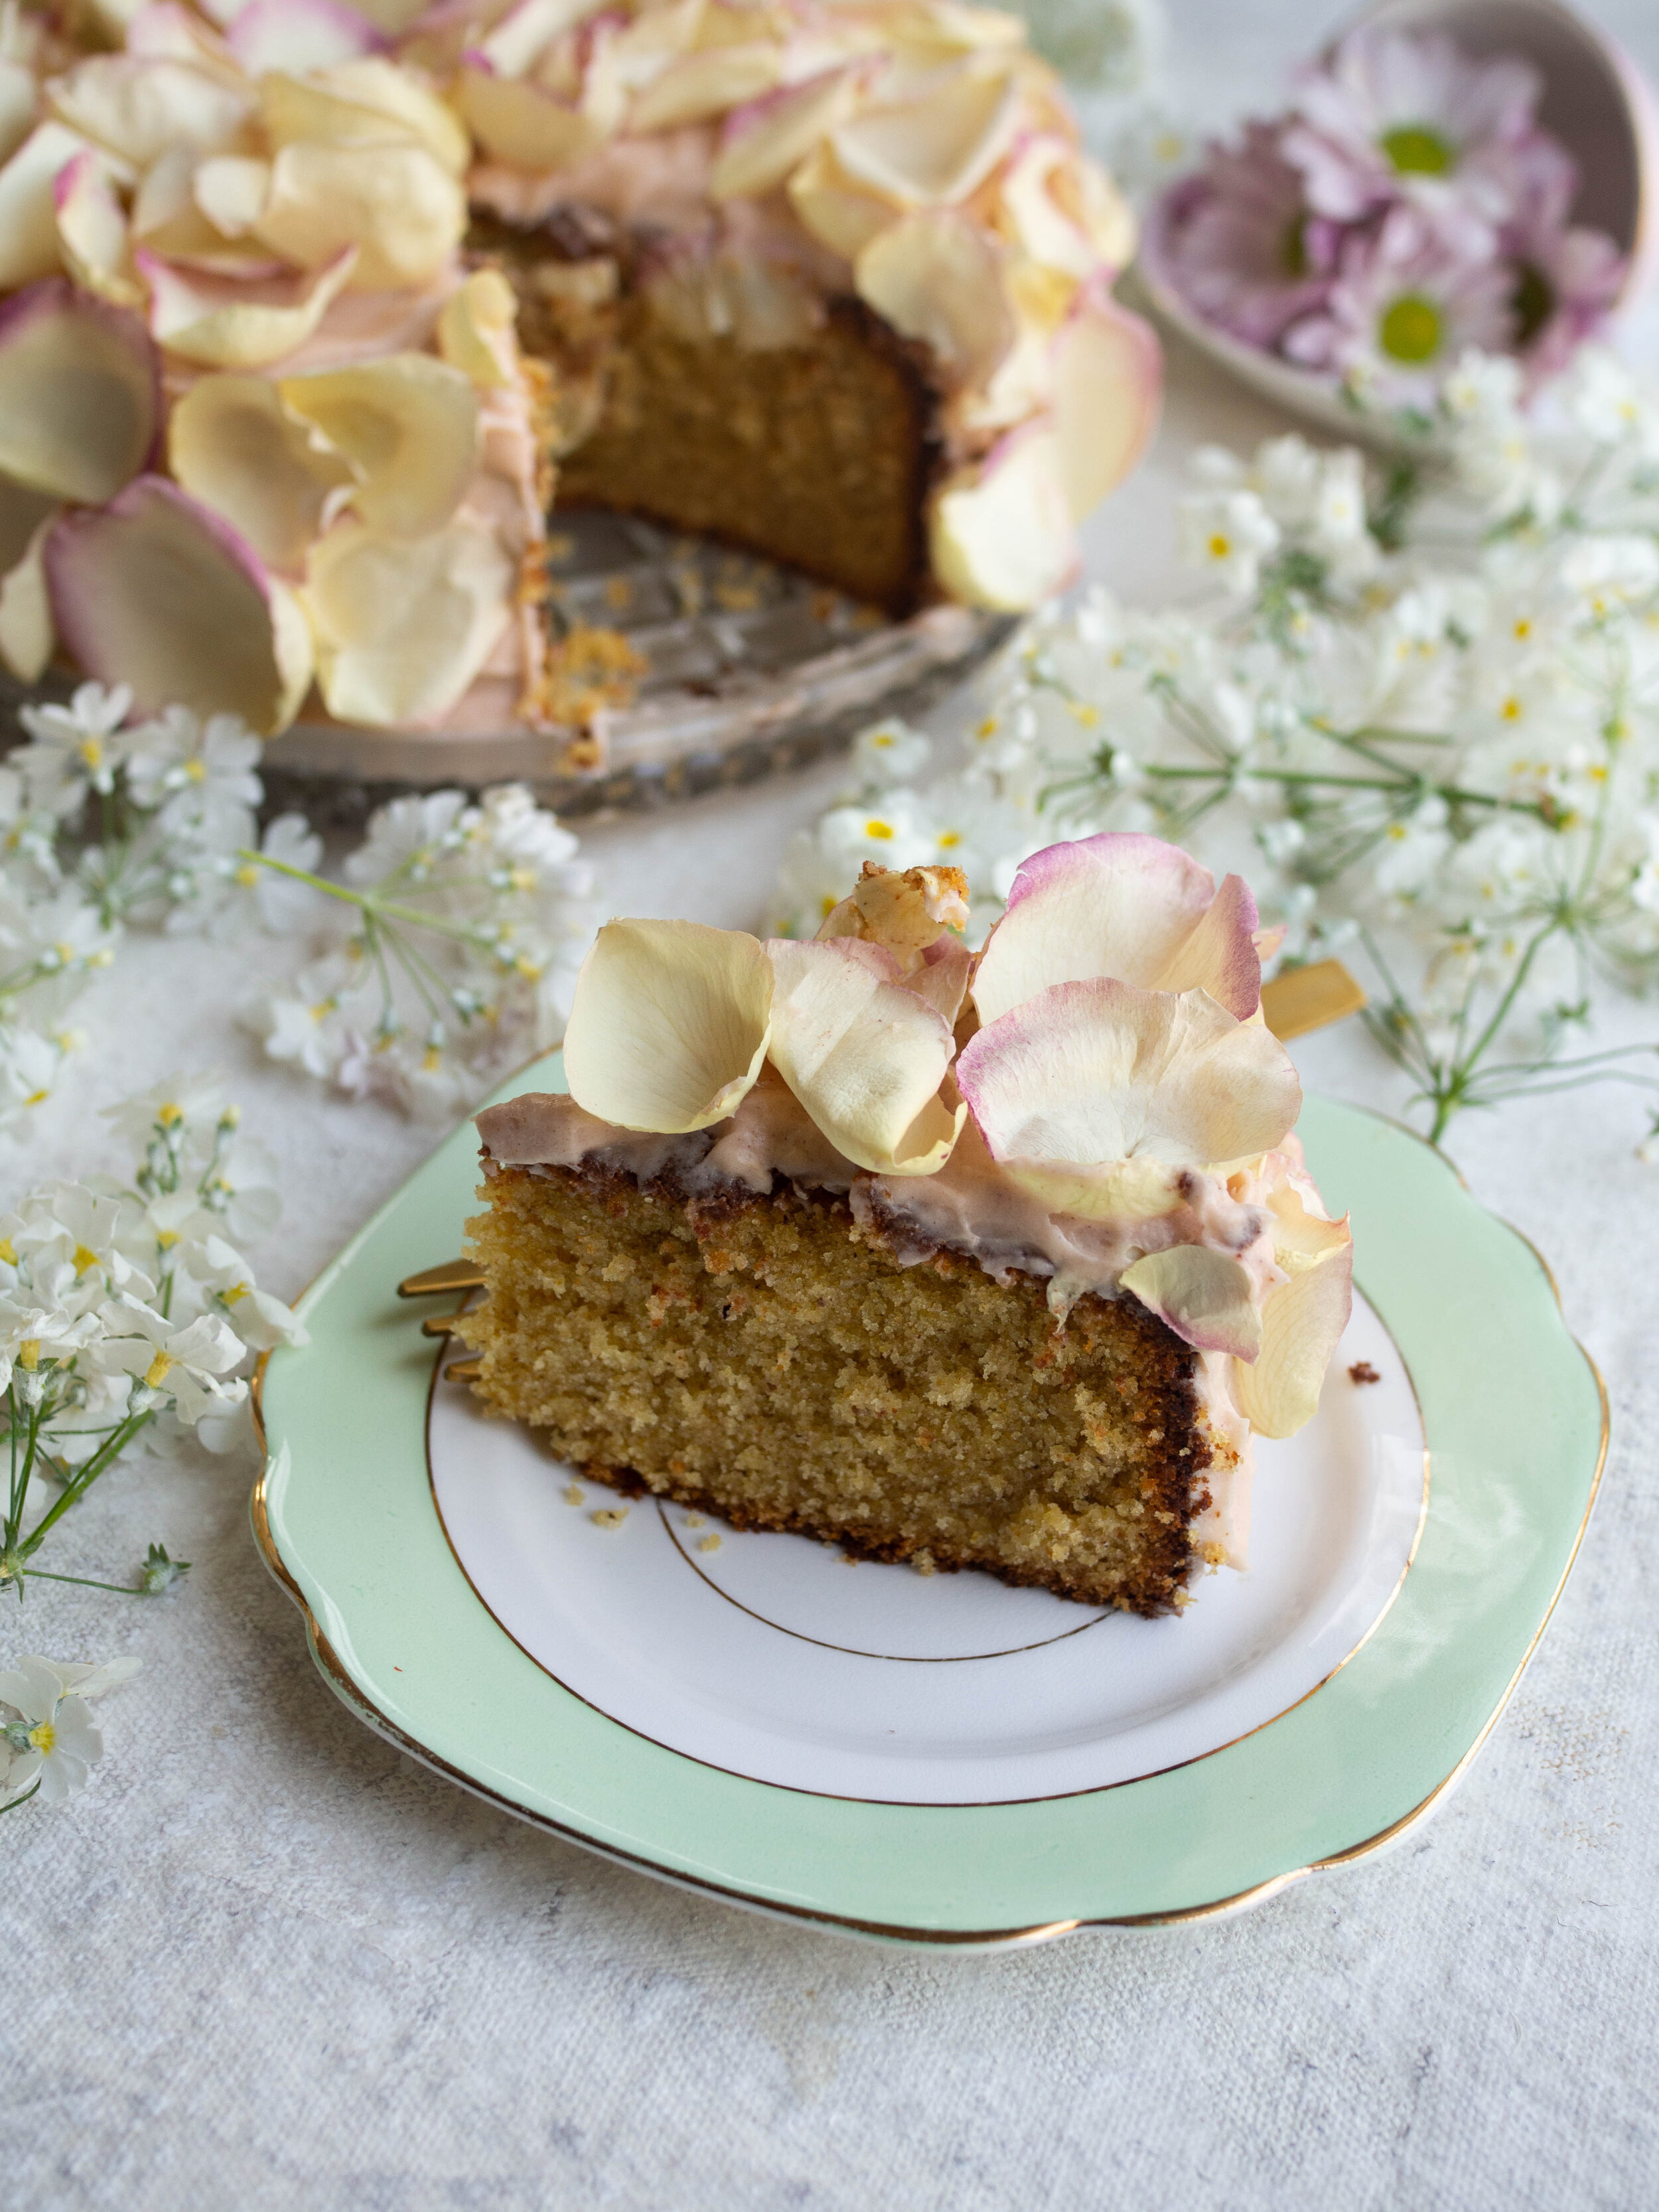
As I’m sure is quite obvious, I jumped at the chance to create a floral inspired cake - it doesn't take much (or any) persuading for me to add rose to just about everything! I had an idea to use a pistachio cake recipe I’ve been using a lot over the past year or so, then ice it in rose icing then completely cover the cake in edible rose petals (I used some from Simply Rose Petals).

I think this could be the ultimate celebration cake, though while I am celebrating absolutely nothing (except maybe finishing a new series on Netflix), it was still a joyous cake to eat. I don’t think there are any small problems or bad moods that can’t be helped with a slice of cake like this one (and a cup of tea).

I have added links to some of the ingredients I have used in case you have trouble finding them. You can also make your own pistachio butter by lighting roasting 120g raw unsalted or blanched pistachios then blitzing them in a food processor until it becomes a nice nut butter consistency.

A light pink food colouring can also be used instead of the rose powder to add some colour to the icing.

Rose Petal and Pistachio Cake

Rose Petal and Pistachio Cake

Ingredients: 

200g unsalted butter, softened

200g caster sugar

1 tsp rose water (I use this one)

120g pistachio butter (I use this one)

60g white chocolate, melted

3 eggs

120ml buttermilk or 120g plain Greek style yoghurt

200g self raising flour

Ingredients for the Icing: 

200g icing sugar (confectioners)

125g unsalted butter, at room temp

120g cream cheese, at room temp

2 tsp rose powder (I use this one)

1 tsp rose water 

Fresh, dried or freeze dried rose petals for decoration

Method: 

Preheat oven to 170 degrees Celsius and line a 20cm round cake tin. 

In the bowl of a stand mixer beat the butter, sugar and rose water until pale and creamy. Mix together the pistachio butter and melted white chocolate, then add to the butter mixture and mix until combined. 

Add in the eggs one at a time, then add the buttermilk/yoghurt and mix until well combined. Add the flour and mix on low speed until combined and the batter is smooth.

Transfer the batter to the prepared cake tin and bake for 50 minutes. Then cover the cake with foil and bake for a further 20-25 minutes, or until the cake is cooked through. 

Allow the cake to cool in its tin for a few minutes, then turn out on a wire rack to cool further. I like to keep the bottom side of the cake at the top as it is nice and flat to put the icing on a little later. 

Once the cake has cooled completely, make the icing by mixing together all the ingredients (except the rose petals) in a stand mixer or with a hand held mixer, until the icing is smooth. 

Spread over the top and sides of the cake, and decorate with the rose petals if using.

Serves about 8, store in fridge if using the cream cheese icing.

Rose Petal and Pistachio Cake

Reference: ‘A Table for Friends’ by Skye McAlpine (Bloomsbury Publishing, 2020) p.232.

Rose Petal and Pistachio Cake
In Cakes & Slices Tags Rose Cake, Rose, Pistachio Cake, Pistachio, Pistachio Butter, cake
Comment
Caramilk Cookies

Caramilk Cookies

Caramilk Cookies

Kath September 2, 2020

My blog feels very cookie heavy right now, but honestly that’s a pretty fair indication of what I have been baking in the last few months. Apart from revisiting old favourites from my recipe eBooks and testing recipes for my new eBook (and a little bit of recipe development for clients too), versions of this particular recipe have been what I am making when I just want something nice to eat - that doesn’t take much time to make. 

Like the Chai Cookies in the post before this one, these cookies are based on the recipe for Gingernut Cookies from my Grandma. It is a simple cookie recipe, that lends itself to multitudes of adaptations. You can change up some of the ingredients (just keep the quantities the same). A different oil or melted butter can be used instead of canola oil, treacle instead of golden syrup, white sugar instead of caster for a crunchier cookie (just don’t use brown sugar, when I made them like this the oiliness of the oil in the cookie was very noticeable and not as satisfying to eat). And of course a mixture of plain flour and baking powder can be used to make your own self raising flour (see here for a good explanation on how to make it).

Caramilk (a caramelised white chocolate) is my chocolate of choice for these, but you can use whatever you prefer (up to 200g).  And if you would like the recipe to be dairy free, make them using an oil (not butter) and pair with a dairy free or super dark chocolate. Or use something else completely instead of chocolate like some chopped dried fruit or nuts. 

I know a lot of people are using the time we have this year to embark on more involved baking projects, but I am finding that recipes like this one, that are endlessly adaptable and very quick and effortless to make, provide just the kind of instant gratification I am looking for - a little bit of time in the kitchen, and something very tasty to eat not long after. 

Caramilk Cookie Recipe

Caramilk Cookies

Ingredients:

120ml canola oil

225g caster sugar 

2 tbsp golden syrup

1 tsp vanilla extract

1 egg, beaten

290g self raising flour

180g block Cadbury Caramilk, roughly chopped

Method:

Preheat oven to 170 degrees Celsius and line three large baking trays with baking paper.

In a large bowl whisk together the oil, sugar, golden syrup, vanilla and egg.

Then add the flour and the chopped Caramilk and mix to combine with a wooden spoon.

Roll heaped teaspoonfuls of the dough into balls and place on the trays. The cookies will spread as they bake so leave enough room in between. 

Bake for 12-15 minutes or until golden brown. Rotate the trays in the oven about halfway through to ensure the cookies cook evenly.  

Allow to cool on their trays, then store in an airtight container (they will last 5-7 days). 

Makes about 30 cookies.

Caramilk Cookie Recipe
In Biscuits/Cookies Tags Caramilk, Caramelised White Chocolate, Cookies, Dairy Free, Biscuits/Cookies, Easy Baking, Mixer Free Recipes
2 Comments
Chai Cookies

Chai Cookies

Chai Cookies

Kath July 23, 2020

I was inspired to make these cookies when Gewürzhaus* kindly sent me some of their products last week. I got their Feel Good Hot Chocolate, but since I can’t eat chocolate they generously sent me a couple of their chai products too. Both the Chai Masala and Sugar are caffeine free, if you are making a chai from the powder you add your own tea to the pot. 

I decided to adapt my Grandma’s Gingernut Cookies and make them Chai Cookies using these delicious products. This recipe is quickly turning into a very adaptable favourite, and I can highly recommend making these crunchy chai spiced cookies. I used date syrup/molasses as it goes well with the chai spices, but treacle or golden syrup will work well if you don’t have any. These cookies do taste like chai, but also remind me of gingerbread too. Which is somewhat comforting, especially with a cup of tea (or chai or hot chocolate!). 

Gewürzhaus Masala Chai Sugar, Raj’s Magestic Chai Masala and Feel Good Hot Chocolate

Gewürzhaus Masala Chai Sugar, Raj’s Magestic Chai Masala and Feel Good Hot Chocolate

Chai Cookies

Ingredients:

115g unsalted butter 

225g caster sugar

2 tbsp date syrup/molasses

1 tsp vanilla extract

1 egg, beaten

290g self raising flour

2 tsp Gewürzhaus Raj’s Magestic Chai Masala (ground)

Gewürzhaus Masada Chai Sugar (coarse), for dipping

Method:

Preheat oven to 170 degrees Celsius and line three large baking trays with baking paper.

In a small saucepan melt the butter over low-medium heat. Once the butter has melted remove from the heat and mix in the sugar, date syrup, vanilla and the egg. 

In a large bowl whisk together the flour and spice mix. 

Add the butter mixture to the flour and mix with a wooden spoon until combined.

Tip some of the chai sugar into a shallow bowl.

Roll heaped teaspoonfuls of the dough into balls and dip one side into the chai sugar and place on to the prepared trays chai sugar side up. The cookies will spread as they bake so leave enough room in between. 

Bake for 12-15 minutes or until golden brown. Rotate the trays in the oven about halfway through to ensure the cookies cook evenly.  

Allow to cool on their trays, then store in an airtight container. 

Makes about 30 cookies.

Chai Cookies

*Products Kindly Gifted by Gewürzhaus. 

Chai Cookies
In Biscuits/Cookies Tags Cookies, Biscuits, Chai, Gewurzhaus, Biscuits/Cookies, Easy Baking, Mixer Free Recipes
2 Comments
The Jewish Cookbook by Leah Koenig

The Jewish Cookbook by Leah Koenig

Off The Shelf - 'The Jewish Cookbook' by Leah Koenig

Kath May 20, 2020

Bought at: it was gifted to me for Christmas. 

Recipes Made: Jewelled Rice p.174, Chicken and Quince Tagine p.269, Babka p.324, Yeasted Hamantaschen p.342, Candied Quince p.404, Charoset pp.406-409 and Lekvar p.410.

I made the Jewelled Rice on the same night I made the Chicken and Quince Tagine, and wow did I use a lot of pots of pans that night! This is no simple rice dish, but it is very tasty and beautiful. For a more simple version in the future, I would probably make the baked rice with salsa from ‘Simple’ by Ottolenghi as I definitely found it hard to co-ordinate all the pots and pans on the stove and the cooking times to have everything ready along with the Chicken and Quince Tagine. 

Chicken and Quince Tagine + Jewelled Rice

Chicken and Quince Tagine + Jewelled Rice

The Chicken and Quince Tagine was a big hit, and after the quince are candied it’s not a difficult dish to make you just need a little time. I’d never had quince with chicken and of course it was a great pairing. I did use the recipe for Candied Quince from the book as the recipe says, but I think if you already had some poached quince you could definitely use that. I am hoping to make this again whilst quince are still about, I liked it so much! 

Babka

Babka

When I was making Babka a few months ago, I consulted a few recipes one of which was the Babka recipe in this book. Comparing recipes was really helpful, and the recipe I ended up with can be found here. The recipe in this book was for a Cinnamon-Golden Raisin Babka which I definitely need to go back and try without making any of my own adaptations!

Yeasted Hamantaschen

Yeasted Hamantaschen

I had been wanting to try Yeasted Hamantaschen for a while, only ever having made the more shortcrust biscuit like version before. I was delighted when I saw Leah had a recipe for Yeasted Hamantaschen in her book, and I made my own version with Quince Lekvar. I altered the quantities of flour a little from the original recipe, check out my blog post on this recipe for more if you want to try making them (and for more information on what hamantaschen are and when they are traditionally made see this post!).

Making Candied Quince

Making Candied Quince

I was intrigued by the Candied Quince in this book, and I wasn’t sure what the end result would be. I was sort of imagining candied fruit like you would candy orange slices etc, but this actually ended up being more a quicker version of poaching quince. I didn’t find my quince turned a deep ruby red (I’m not sure if this was to do with the variety of quince I used), but once added to the Chicken and Quince Tagine the colour really didn’t matter as the taste was so good!

My version of Charoset

My version of Charoset

In the lead up to the Jewish holiday of Passover I decided I wanted to play around and create my own version of Charoset. Charoset is traditionally eaten as part of the Passover Seder, and comprises fruit (dried and often fresh apple too) and sweet wine. Leah has six different Charoset recipes in this book, all from different parts of the Jewish diaspora. They all have some things in common but also differ slightly in other ways too. I took the parts of each I really liked - rolling Charoset into balls like the Kurdish version and using a combination of dates, figs and a variety of spices like the Yemenite version - to create my own. 

Quince Lekvar

Quince Lekvar

Lekvar was something I had never heard of before. It is a fruit paste used in Central and Eastern European sweets made using dried friut and fruit juice. Prune and apricot are popular versions, but this got me thinking about other dried fruits I could use. I love dried quince, and decided to give making Lekvar a go with it, and it worked so well. I used my Lekvar to fill the Yeasted Hamantaschen I made and used the remainder to fill some untraditional rugelach made with cream cheese dough from the book ‘Beatrix Bakes’ (which were delicious!).

Beatrix Bakes Rugelach with Quince Lekvar

Beatrix Bakes Rugelach with Quince Lekvar

Favourite Things About the Book: My favourite thing about this book is how comprehensive it is. This really could be the one cookbook you own on Jewish food and you would have enough recipes to keep you going forever. And it covers the foods of the wider Jewish diaspora, not just the more common recipes from Eastern Europe (as good as those are!). There are recipes from Jews native to Italy, India, Georgia, Iraq and South Africa. There are even a few recipes which are relics from Jewish life in pre-Inquisition Spain and Spanish occupied Italy.

This book feels so well researched and collated, Leah has done such a great job of providing really interesting recipes and insights about their history, without the book tipping over into a reference book or making the reader feel overwhelmed with information. It remains firmly in the cookbook category, and even despite the lack of food photography (the book is 431 pages so images for each recipe isn’t possible), I find Leah’s writing and the information she is sharing through these recipes so engaging. Each time I pick this book up a different recipe stands out to me, and another post it note goes in to mark it’s importance. And as you can see in the photos of my copy, I have used a LOT of post it notes in this book - which is purely a testament to how many great recipes there are in this book. 

Leah really highlights and champions the diversity within Jewish cuisine, showing those of us who are still learning about the world’s Jewish communities and their food, how much more there is to discover outside of bagels and babka (though naturally recipes for both these carb filled delights that we all know and love are in the book too!). 

The Jewish Cookbook by Leah Koenig

Bookmarked Recipes (to make later!): Caponata alla Giudia p.116, Vegetarian Cholent p.144, Jewish-Style Braised Fennel p.158, Potato Laktes p.184, Eggplant and Tomato Stew p.249, Mandelbrot p.334, Almond Cardamom Cookies p.348.

The Jewish Cookbook by Leah Koenig
In Off the Shelf Tags The Jewish Cookbook, Leah Koenig, Jewish Baking, Jewish Cooking, Cookbooks, Off the Shelf, Cookbook Review
Comment
Homemade Rocky Road Easter Eggs

Rose Rocky Road Easter Eggs

Kath April 8, 2020

The idea for this recipe came to me quite late in the piece. With only two weeks to go until Easter at the time I knew I would be lucky to get everything I needed in time. But with my ability to buy Easter treats severely limited this year, I felt I really needed to make something. And preferably something I would enjoy eating (which means no milk or dark chocolate!). 

I really liked the rocky road I made last year, and felt making it into a more Easter themed shape would be just perfect. I finally found some half Easter egg moulds online, they took ages to arrive hence why this post is only ready two days before Easter! 

I also decided to buy marshmallows rather than make my own. I thought making marshmallows right now just felt a little wasteful in terms of ingredients and since one batch makes so many, and I couldn’t really share them as I usually would, I thought buying some would be best. My favourite bought marshmallows are from Grounded Pleasures, so I bought their massive 700g box which will also hopefully get us through a few Wintery isolation hot chocolates too! 

Grounded Pleasures Marshmallows

Grounded Pleasures Marshmallows

This recipe is mostly an assembly job, and an even easier version of my Rose Rocky Road I posted last year. You can of course use other types of chocolate, and other moulds or cake tins to shape your rocky road. I made a Rocky Road Wreath for Grounded Pleasures at Christmas last year, so there is another idea for how to shape your rocky road.  

I prefer to use good quality chocolate, which is why the recipe is long as it needs to be properly tempered. You can use baking chocolate, just follow the instructions on the packet to melt and you shouldn’t need to temper as below. 

Tempering chocolate can be tricky, and I would definitely recommend a chocolate thermometer if using good quality chocolate. Don’t worry if it doesn’t turn out perfectly, if your chocolate blooms (if using milk or dark chocolate) it will still taste great and if it has trouble setting just store it in the fridge. I am definitely no expert when it comes to properly tempering chocolate, but it always tastes good regardless! Plus there are plenty of resources available online if you want to know more.

I hope everyone has a clam and quiet Easter/long weekend. Let me know in the comments if you have a go at making some rocky road or what other baking adventures you have been up too. 

Rocky Road Ingredients
Rocky Road Easter Basket

Rose Rocky Road Easter Eggs

Ingredients: 

500g good quality white chocolate

pink colouring (suitable for use with chocolate)

rose flavouring (suitable for use with chocolate)

30g slivered almonds, roasted

160-170g marshmallows

dried edible flowers, for decoration (optional)

1 tsp freeze dried raspberry, for decoration (optional)

cooking spray

Method: 

Very lightly spray 6 medium half Easter eggs moulds (approx. 120ml capacity) with the cooking spray. Arrange the moulds on a tray with sides so the moulds aren’t about to move about too much. 

Have all the rocky road elements ready to go next to your prepared moulds.  

Place a small pot with a little water on the stove and allow to very gently simmer. Using another pot or bowl that will comfortably sit over the top of the water pot, measure out 300g of the white chocolate. 

Place this pot over the gently simmering water (ensuring the water does not touch the base of the pot above) and melt the chocolate. Ensure the chocolate is constantly stirred. Once the chocolate reaches 45 degrees Celsius on chocolate thermometer, remove from the heat and continue stirring while gradually adding the remaining 200g of white chocolate. Add a little at a time and allow to melt before adding more. 

Continue to check the temperature of the chocolate, once it has fallen to 34 degrees Celsius, the remaining chocolate should have all been added. Continue stirring to allow the chocolate to cool further to 32 degrees Celsius. Sometimes I find not all my chocolate has melted at this point, it can depend on the room temperature and the temperature of the chocolate to start with. I place my chocolate back over the warm water in the pot I used previously, and turn the heat on to very low. I keep stirring the chocolate and check that the temperature doesn’t rise about 34 degrees Celsius again. Once the chocolate has almost completely melted, remove from the heat again and continue to stir and allow the chocolate to return to 32 degrees Celsius. 

Add a little pink colouring at this point, and a few drops of the rose flavouring. Start small with both and add more if you think it’s necessary. 

Once the chocolate has reached 32 degrees Celsius, it is ready to use. 

Spoon in about a tablespoon of the melted chocolate into each mould. and spread it around so the inside of each mould. Place a few marshmallows into each mould (I found I could fit four marshmallows into each mould), and cover with more chocolate (try to distribute the chocolate evenly amongst each mould). I didn’t fill each mould to the brim, leave a gap at the top as this will help you remove the chocolate later. Tap each mould onto the bench gently to encourage the chocolate to evenly distribute and remove any air bubbles. 

Sprinkle some almonds over the top of each, and follow with the dried petals and freeze dried raspberries if using. 

Leave to set at room temperature if you are in a cool environment, otherwise place in the fridge for about 30 minutes to set. 

Once set remove from the moulds and store in an airtight container.

I prefer to keep the rocky road in the fridge. Keeps for about 2-3 weeks. 

Makes 6 medium half Easter eggs. 

Homemade Rocky Road Easter Eggs

Reference: ‘Bourke Street Bakery All Things Sweet’ by Paul Allam and David McGuinness (Murdoch Books, 2017), pp.104-105 + 119.

Rose Flavoured Chocolate Rocky Road
In Confectionary, Holidays Tags Rose, Rocky Road, Grounded Pleasures, Easter, Chocolate, Rose Chocolate, Holiday Baking
Comment
Gingernut Cookies

Gingernut Cookies

Kath April 5, 2020

Similar to the Oatmeal Cookies I posted the other day, these Gingernuts are a recipe from my Grandma, and they use self-raising flour which is a massive win at the moment! 

I don’t recall Grandma ever making these, but as soon as I gave one of these biscuits to my Mum, she said ‘Oh yes I remember these, this is Grandma’s recipe isn’t it?’. I found the recipe in a folder of loose handwritten and typed up recipes I collected from my grandparent’s place after Grandma died. There was a drawer in the kitchen that housed all her old cookbooks, notebooks and loose recipes and I carefully went through and filed them in a folder for safekeeping. 

Some of the recipes in the folder are things I will probably never make (like the recipe for Curried Seafood Salad!), but having them and seeing her handwriting is always comforting. Then there are gems like this recipe that I think I will be making many times over, not only at the moment whilst we are in self isolation and need to be reasonable about our plain flour use, but after this madness is over too. 

This recipe is really simple, and there is no need for a stand or hand held mixer. I also found that the dough was really easy to roll into balls, and the cookies baked into very consistent looking circles which was very satisfying. 

My Grandma’s original recipe (as shown below) was mostly in cup measurements, but I have converted it into grams as I find it is easiest to bake that way. I also found I did not get the 48 biscuits as per the original recipe, I got more like 30 biscuits in total. I may have made them a little bigger than Grandma did, but I guess I will never know! 

Gingernuts
My Grandma’s Gingernut Biscuit Recipe

My Grandma’s Gingernut Biscuit Recipe

Gingernut Cookies

Ingredients:

115g unsalted butter

225g caster sugar

2 tbsp golden syrup

1 egg, beaten

290g self raising flour

3 tsp ground ginger

pinch salt

Method:

Preheat oven to 170 degrees Celsius and line three large baking trays with baking paper.

In a small saucepan, melt the butter over low to medium heat. Once melted remove from the heat and add the sugar, golden syrup and the egg and mix well.

In a large bowl whisk together the flour, ground ginger and salt. Add the butter mixture to the flour and mix until combined. If the mixture is warm from the melted butter, allow it to cool a little, otherwise continue on.

Roll teaspoonfuls of the dough into balls and place on the trays. The biscuits will spread as they bake so leave enough room in between each. 

Bake for 12-15 minutes or until golden brown. I like the rotate the trays in the oven about halfway through to ensure the biscuits cook evenly. 

Allow to cool on their trays, then store in an airtight container. 

Makes about 30 biscuits/cookies.

Gingernut Cookies
In Biscuits/Cookies, Heirloom Recipes Tags Gingernuts, Social Isolation, Isolation Baking, Cookies, Biscuits, Grandma, Coronavirus, COVID-19, 2020, Easy Baking, Mixer Free Recipes, Biscuits/Cookies
4 Comments
  • The Blog
  • Older
  • Newer

recipes

  • Biscuits/Cookies 39
  • Breads Etc. 9
  • Breakfast 7
  • Cakes & Slices 67
  • Confectionary 5
  • Drinks 6
  • Events 14
  • Food Photography Tips 3
  • From The Mailing List 24
  • Heirloom Recipes 12
  • Holidays 44
  • Ice Cream 9
  • Jams Preserves & Spreads 9
  • Muffins 4
  • Off the Shelf 48
  • Other Desserts 25
  • Savoury Dishes/Meals 15
  • Scones 4
  • Tarts & Pastry 9
  • Travel 13

Sign up to Friday Food Chat with Kath, a weekly newsletter for more food, baking, cookbook chat and more!

Sign Up Here!
instagram-unauth pinterest facebook url

Website Accessibility: To enable text to speech function on the blog, click the sound button to the right of each blog post.

All images & content are the property of Kathryn Vincent, unless stated otherwise. Please do not use without permission.

Kulinary Adventures of Kath

Food Photography, Recipes & Baking

instagram-unauth pinterest facebook url